Attention: Here be dragons
This is the latest
(unstable) version of this documentation, which may document features
not available in or compatible with released stable versions of Godot.
Checking the stable version of the documentation...
Usando a iluminação global Lightmap
Os mapas de luz pré-calculados são um fluxo de trabalho alternativo para adicionar iluminação indireta (ou totalmente baked) a uma cena. Ao contrário da abordagem VoxelGI e SDFGI, mapas de luz pré-calculados funcionam bem em PCs e dispositivos móveis de baixo desempenho já que quase não consomem recursos em tempo de execução. Além disso, ao contrário do GIProbe, mapas de luz pré-calculados podem opcionalmente ser usados para armazenar iluminação direta, o que fornece ainda mais ganhos de desempenho.
Unlike VoxelGI and SDFGI, baked lightmaps are completely static. Once baked, they can't be modified at all. They also don't provide the scene with reflections, so using Reflection probes together with it on interiors (or using a Sky on exteriors) is a requirement to get good quality.
As they are baked, they have fewer problems than VoxelGI and SDFGI regarding light bleeding, and indirect light will often look better. The downside is that baking lightmaps takes longer compared to baking VoxelGI. While baking VoxelGI can be done in a matter of seconds, baking lightmaps can take several minutes if not more. This can slow down iteration speed significantly, so it is recommended to bake lightmaps only when you actually need to see changes in lighting. Lightmaps are baked on the GPU, making light baking faster if you have a mid-range or high-end dedicated GPU.
Baking lightmaps will also reserve baked materials' UV2 slot, which means you can no longer use it for other purposes in materials (either in the built-in Material 3D Padrão e Material ORM 3D or in custom shaders).
Apesar de sua falta de flexibilidade, mapas de luz(lightmaps) pré-calculados normalmente oferecem tanto a melhor qualidade e desempenho ao mesmo tempo em (principalmente) cenas estáticas. Isso torna os mapas de luz ainda populares no desenvolvimento do jogo, apesar dos lightmaps serem a técnica mais antiga para a iluminação global em videogames.
Ver também
Não tem certeza se o LightmapGI é adequado às suas necessidades? Veja Which global illumination technique should I use? para uma comparação de técnicas GI disponíveis na Godot 4.
Comparação visual
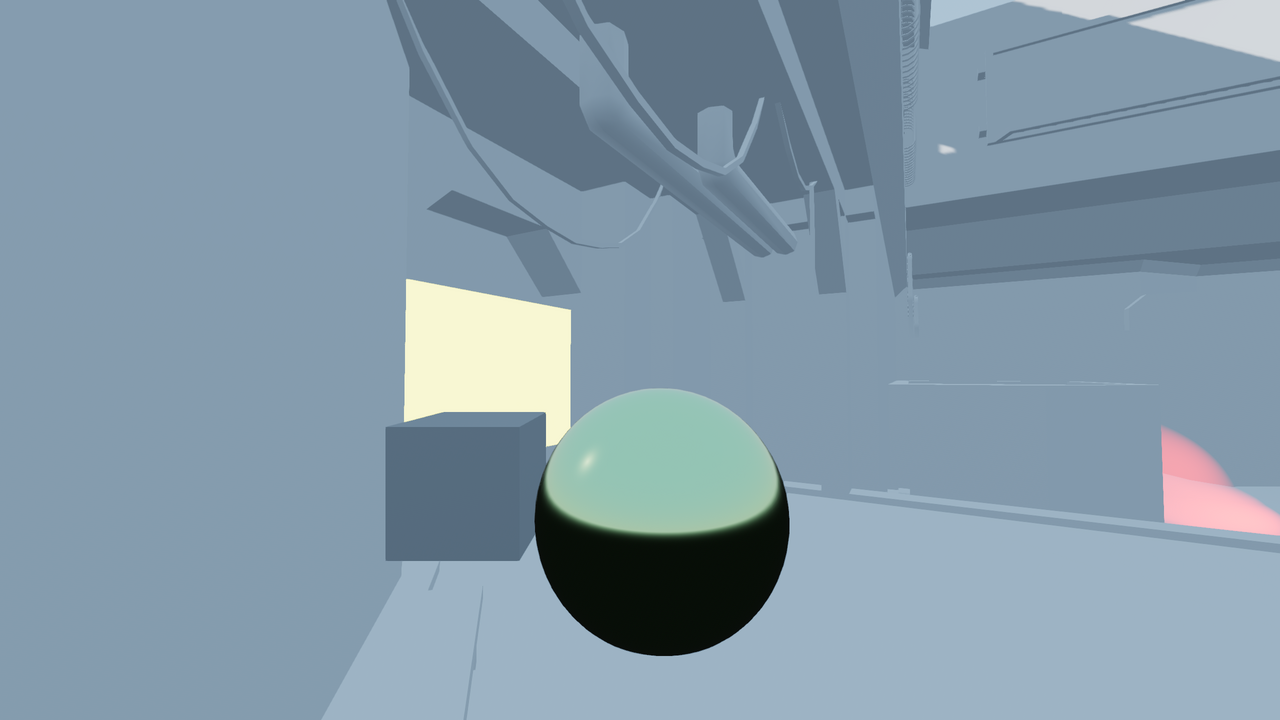
LightmapGI desabilitado.
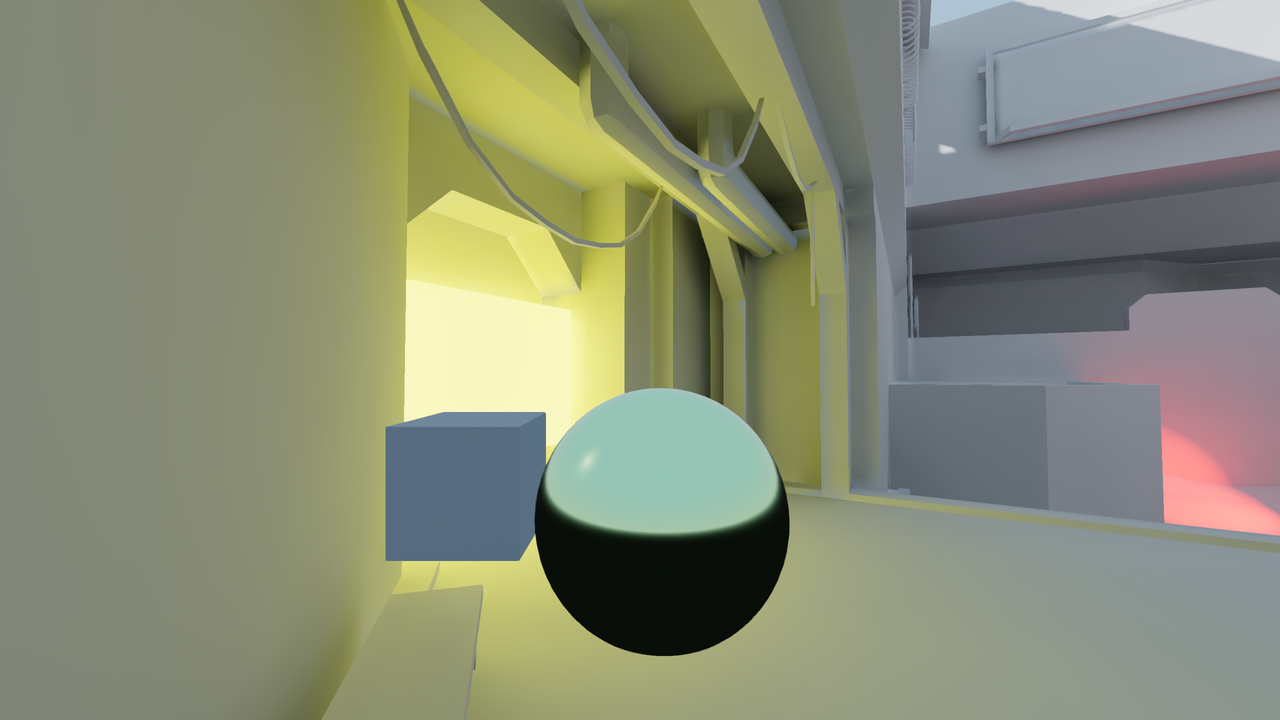
LightmapGI enabled (with indirect light baked only). Direct light is still real-time, allowing for subtle changes during gameplay.
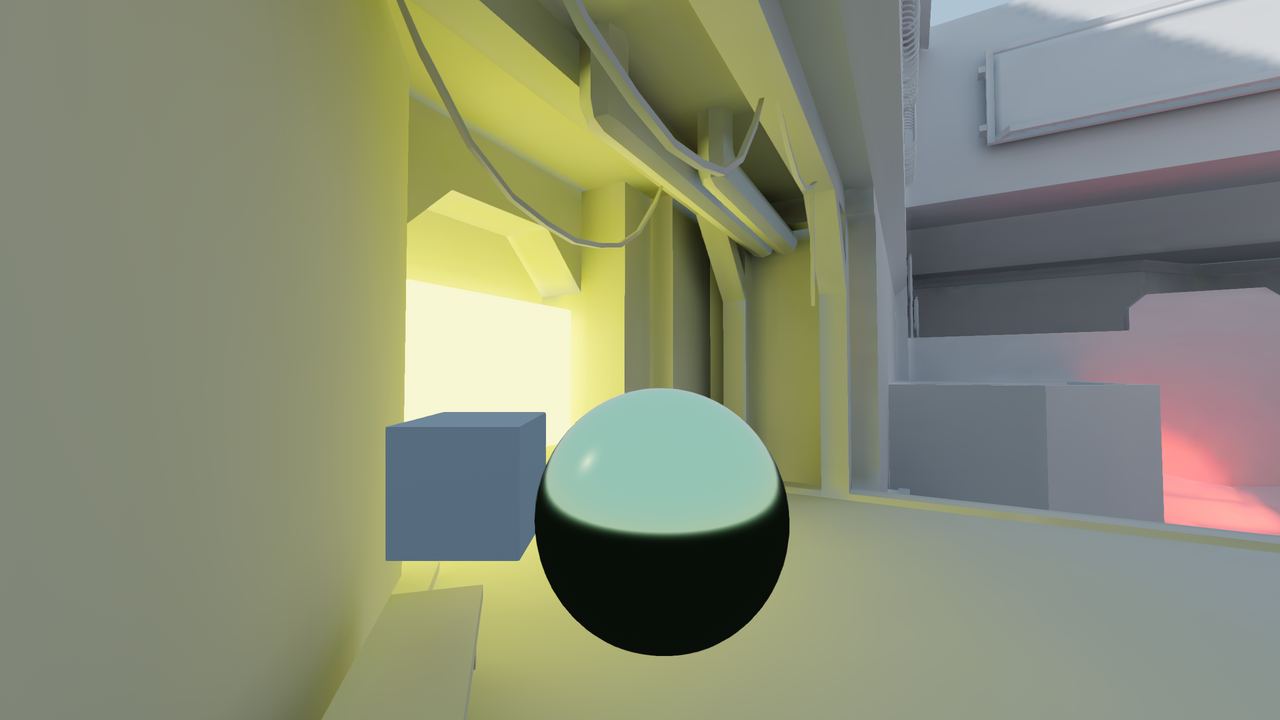
LightmapGI ativado (com luz direta e indireta pré-calculada). Melhor desempenho, mas menor qualidade visual. Repare na sombra do sol mais borrada no canto superior direito.
Here are some comparisons of how LightmapGI vs. VoxelGI look. Notice that lightmaps are more accurate, but also suffer from the fact that lighting is on an unwrapped texture, so transitions and resolution may not be that good. VoxelGI looks less accurate (as it's an approximation), but smoother overall.
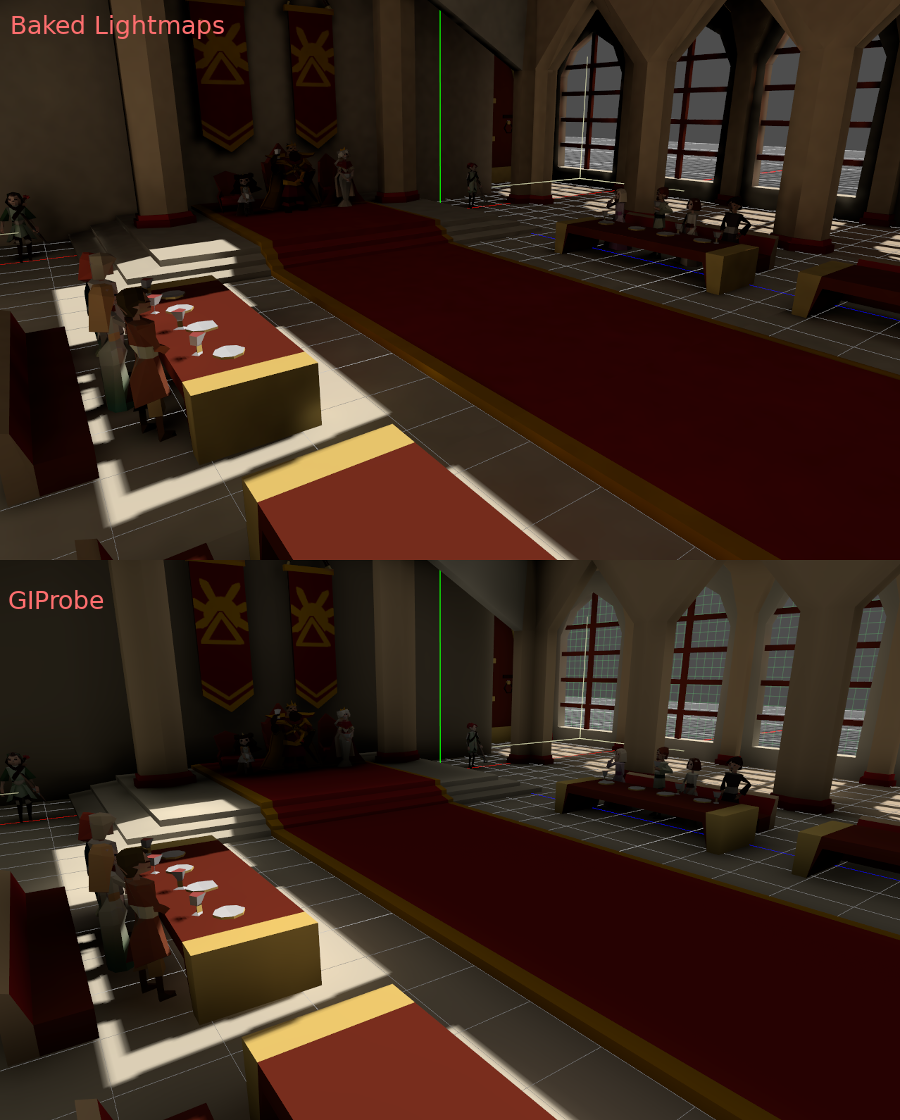
SDFGI também é menos preciso comparado ao LightmapGI. Porém, o SDFGI consegue suportar grandes mundos abertos sem necessidade de Pré-Cálculo.
Configurando
Aviso
Pré-calcular mapas de luz no editor web não é suportado devido à limitações de API gráfica. Na plataforma web, apenas a renderização de mapas de luz que foram pré-calculados em uma plataforma diferente são suportados.
Nota
The LightmapGI node only bakes nodes that are on the same level as the LightmapGI node (siblings), or nodes that are children of the LightmapGI node. This allows you to use several LightmapGI nodes to bake different parts of the scene, independently from each other.
First of all, before the lightmapper can do anything, the objects to be baked need a UV2 layer and a texture size. A UV2 layer is a set of secondary texture coordinates that ensures any face in the object has its own place in the UV map. Faces must not share pixels in the texture.
Há algumas maneiras de garantir que seu objeto tenha uma camada UV2 e um tamanho de textura únicos:
Unwrap on scene import (recommended)
In most scenarios, this is the best approach to use. The only downside is that, on large models, unwrapping can take a while on import. Nonetheless, Godot will cache the UV2 across reimports, so it will only be regenerated when needed.
Selecione a cena importada no painel de sistema de arquivos e vá para o painel Import. Lá, a seguinte opção pode ser modificada:
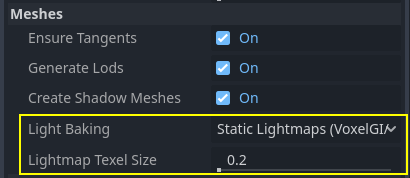
The Meshes > Light Baking option must be set to Static Lightmaps (VoxelGI/SDFGI/LightmapGI):
When unwrapping on import, you can adjust the texture size using the Meshes > Lightmap
Texel Size option. Lower values will result in more detailed lightmaps,
possibly resulting in higher visual quality at the cost of longer bake times and
larger lightmap file sizes. The default value of 0.2 is suited for
small/medium-sized scenes, but you may want to increase it to 0.5 or even
more for larger scenes. This is especially the case if you're baking indirect
lighting only, as indirect light is low-frequency data (which means it doesn't
need high-resolution textures to be accurately represented).
O efeito de definir esta opção é que todas as malhas dentro da cena terão seus mapas UV2 gerados corretamente.
Aviso
When reusing a mesh within a scene, keep in mind that UVs will be generated for the first instance found. If the mesh is re-used with different scales (and the scales are wildly different, more than half or twice), this will result in inefficient lightmaps. To avoid this, adjust the Lightmap Scale property in the GeometryInstance3D section of a MeshInstance3D node. This lets you increase the level of lightmap detail for specific MeshInstance3D nodes (but not decrease it).
Além disso, os arquivos *.unwrap_cache não devem ser ignorados no controle de versão, pois esses arquivos garantem que as reimportações UV2 sejam consistentes entre plataformas e versões de engine.
Desempacotar(Unwrap) de dentro Godot
Aviso
If this Mesh menu operation is used on an imported 3D scene, the generated UV2 will be lost when the scene is reloaded.
Godot has an option to unwrap meshes and visualize the UV channels. After selecting a MeshInstance3D node, it can be found in the Mesh menu at the top of the 3D editor viewport:

This will generate a second set of UV2 coordinates which can be used for baking. It will also set the texture size automatically.
Unwrap from your 3D modeling software
The last option is to do it from your favorite 3D app. This approach is generally not recommended, but it's explained so that you know it exists. The main advantage is that, on complex objects that you may want to re-import a lot, the texture generation process can be quite costly within Godot, so having it unwrapped before import can be faster.
Basta desempacotar(unwrap) a segunda camada UV2.

Em seguida, importe a cena 3D normalmente. Lembre-se de que você precisará definir o tamanho da textura na malha após a importação.

If you use external meshes on import, the size will be kept. Be wary that most unwrappers in 3D modeling software are not quality-oriented, as they are meant to work quickly. You will mostly need to use seams or other techniques to create better unwrapping.
Generating UV2 for primitive meshes
Nota
This option is only available for primitive meshes such as BoxMesh, CylinderMesh, PlaneMesh, etc.
Habilitar UV2 em malhas primitivas permite que você os faça receber e contribuir para a iluminação pré-calculada. Isso pode ser usado em certas configurações de iluminação. Por exemplo, você pode ocultar um torus que tem um material emissivo após pré-calcular lightmaps para criar uma luz de área que segue a forma de um torus.
By default, primitive meshes do not have UV2 generated to save resources (as these meshes may be created during gameplay). You can edit a primitive mesh in the inspector and enable Add UV2 to make the engine procedurally generate UV2 for a primitive mesh. The default UV2 Padding value is tuned to avoid most lightmap bleeding, without wasting too much space on the edges. If you notice lightmap bleeding on a specific primitive mesh only, you may have to increase UV2 Padding.
Lightmap Size Hint represents the size taken by a single mesh on the lightmap texture, which varies depending on the mesh's size properties and the UV2 Padding value. Lightmap Size Hint should not be manually changed, as any modifications will be lost when the scene is reloaded.
Generating UV2 for CSG nodes
Since Godot 4.4, you can convert a CSG node and its children to a MeshInstance3D. This can be used to bake lightmaps on a CSG node by following these steps:
Select the root CSG node and choose CSG > Bake Mesh Instance at the top of the 3D editor viewport.
Hide the root CSG node that was just baked (it is not hidden automatically).
Select the newly created MeshInstance3D node and choose Mesh > Unwrap UV2 for Lightmap/AO.
Lightmaps pré-calculados.
Dica
Remember to keep the original CSG node in the scene tree, so that you can perform changes to the geometry later if needed. To make changes to the geometry, remove the MeshInstance3D node and make the root CSG node visible again.
Verificando UV2
In the Mesh menu mentioned before, the UV2 texture coordinates can be visualized. If something is failing, double-check that the meshes have these UV2 coordinates:

Configurando a cena
Before anything is done, a LightmapGI node needs to be added to a scene. This will enable light baking on all nodes (and sub-nodes) in that scene, even on instanced scenes.

Uma subcena pode ser instanciada várias vezes, pois isso é suportado pelo pré-cálculo. Cada instância receberá seu próprio lightmap. Para evitar problemas com escala inconsistente de texels do lightmap, certifique-se de respeitar a regra sobre escala de malha mencionada anteriormente.
Configuração de malhas
For a MeshInstance3D node to take part in the baking process, it needs to have its bake mode set to Static. Meshes that have their bake mode set to Disabled or Dynamic will be ignored by the lightmapper.

Ao gerar automaticamente mapas de luz na importação de cena, isso é ativado automaticamente.
Configurando luzes
Lights are baked with indirect light only by default. This means that shadowmapping and lighting are still dynamic and affect moving objects, but light bounces from that light will be baked.
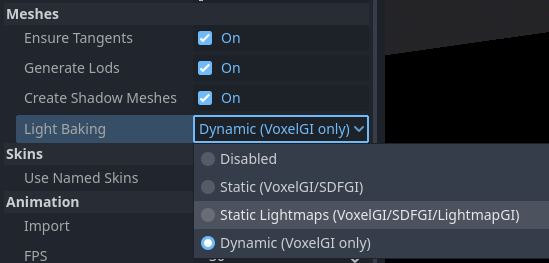
As luzes podem ser desativadas (sem bake) ou totalmente pré-calculada (diretamente e indiretamente). Isso pode ser controlado no menu Bake Mode nas luzes:

Os modos são:
Desativado
The light is ignored when baking lightmaps. This is the mode to use for dynamic lighting effects such as explosions and weapon effects.
Aviso
Hiding a light has no effect on the resulting lightmap bake. This means you must use the Disabled bake mode instead of hiding the Light node by disabling its Visible property.
Dinâmico(a)
This is the default mode, and is a compromise between performance and real-time friendliness. Only indirect lighting will be baked. Direct light and shadows are still real-time, as they would be without LightmapGI.
Este modo permite realizar alterações sutis na cor, energia e posição de uma luz enquanto ainda parece razoavelmente correta. Por exemplo, você pode usar isso para criar tochas estáticas cintilantes que têm sua luz indireta pré-calculada(baked).
Depending on the value of Shadowmask Mode, it is possible to still get distant baked shadows for DirectionalLight3D. This allows shadows up close to be real-time and show dynamic objects, while allowing static objects in the distance to still cast shadows.
Estático(a)
Both indirect and direct lighting will be baked. Since static surfaces can skip lighting and shadow computations entirely, this mode provides the best performance along with smooth shadows that never fade based on distance. The real-time light will not affect baked surfaces anymore, but it will still affect dynamic objects. When using the All bake mode on a light, dynamic objects will not cast real-time shadows onto baked surfaces, so you need to use a different approach such as blob shadows instead. Blob shadows can be implemented with a Decal node.
The light will not be adjustable at all during gameplay. Moving the light or changing its color (or energy) will not have any effect on static surfaces.
Since bake modes can be adjusted on a per-light basis, it is possible to create hybrid baked light setups. One popular option is to use a real-time DirectionalLight with its bake mode set to Dynamic, and use the Static bake mode for OmniLights and SpotLights. This provides good performance while still allowing dynamic objects to cast real-time shadows in outdoor areas.
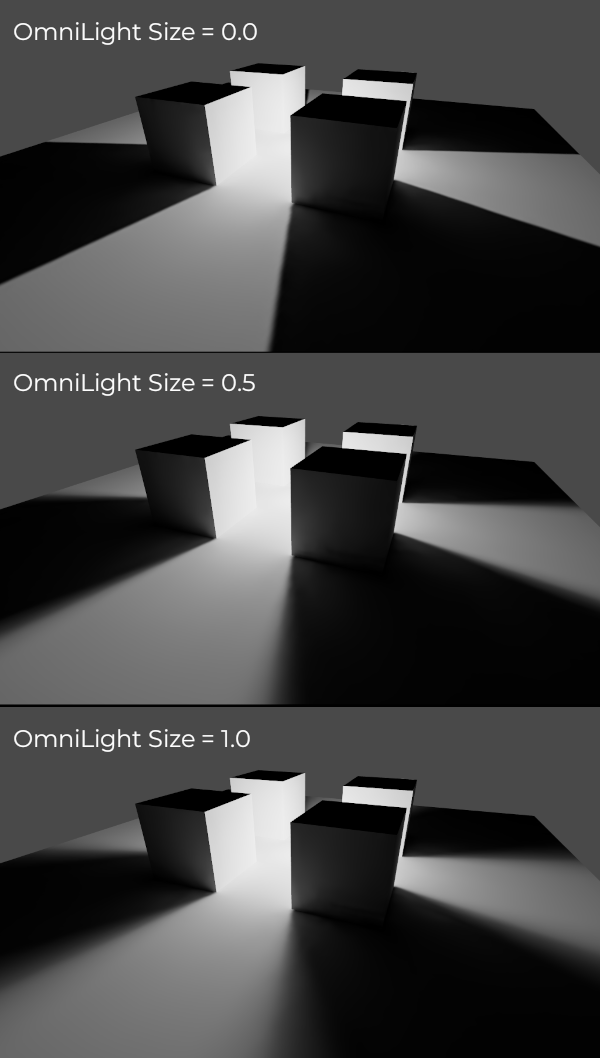
Fully baked lights can also make use of light nodes' Size (omni/spot) or Angular Distance (directional) properties. This allows for shadows with realistic penumbra that increases in size as the distance between the caster and the shadow increases. This also has a lower performance cost compared to real-time PCSS shadows, as only dynamic objects have real-time shadows rendered on them.
Pré-Calculo
To begin the bake process, click the Bake Lightmaps button at the top of the 3D editor viewport when selecting the LightmapGI node:

Isso pode levar de segundos a minutos (ou horas), dependendo do tamanho da cena, do método de pré-calculo e da qualidade selecionada.
Aviso
Baking lightmaps is a process that can require a lot of video memory, especially if the resulting texture is large. Due to internal limitations, the engine may also crash if the generated texture size is too large (even on systems with a lot of video memory).
To avoid crashes, make sure the lightmap texel size in the Import dock is set to a high enough value.
Ajustes
Quality: Four bake quality modes are provided: Low, Medium, High, and Ultra. Higher quality takes more time, but result in a better-looking lightmap with less noise. The difference is especially noticeable with emissive materials or areas that get little to no direct lighting. Each bake quality mode can be further adjusted in the Project Settings.
Supersampling: This creates the lightmap at a higher resolution and then downsamples it. This reduces noise and light leaking, and produces better shadows with small scale details. However, using it will increase bake times and memory usage during lightmap baking. The Supersampling Factor changes the size the lightmap is rendered at before downsampling.
Bounces: The number of bounces to use for indirect lighting. The default value (
3) is a good compromise between bake times and quality. Higher values will make light bounce around more times before it stops, which makes indirect lighting look smoother (but also possibly brighter depending on materials and geometry).Energia Indireta de Quicada: O multiplicador global a ser usado ao assar a energia indireta das luzes. Isso multiplica o valor Energia Indireta próprio de cada luz. Valores diferentes de
1.0não são fisicamente precisos, mas podem ser usados para um efeito artístico.Direcional: Se ativado, armazena informações direcionais para lightmaps. Isso melhora a aparência de materiais com normal map em superfícies pré-calculadas (baked), especialmente com luzes totalmente pré-calculadas (já que elas também têm luz direta incluída no pré-cálculo). A desvantagem é que lightmaps direcionais são um pouco mais caros de renderizar. Eles também exigem mais tempo para gerar o pré-cálculo e resultam em tamanhos de arquivo maiores.
Modo Shadowmask: Se definido para um modo diferente de None (Nenhum), a primeira DirectionalLight3D (Luz Direcional 3D) na cena com o modo de iluminação global Dynamic (Dinâmico) terá suas sombras estáticas pré-calculadas em uma textura separada chamada shadowmask (máscara de sombra). Isso pode ser usado para permitir que objetos estáticos distantes projetem sombras em outros objetos estáticos independentemente da distância da câmera. Veja a seção sobre shadowmasking para mais detalhes.
Interior: If enabled, environment lighting will not be sourced. Use this for purely indoor scenes to avoid light leaks.
Usar Textura para Reflexões: Se ativado, uma textura com as informações de iluminação será gerada para acelerar a geração da iluminação indireta ao custo de alguma precisão. A geometria pode apresentar artefatos extras de vazamento de luz ao usar lightmaps (mapas de luzes) de baixa resolução ou UVs que esticam significativamente o lightmap (mapa de luz) pelas superfícies. Deixe isso ativado se não tiver certeza.
Use Denoiser: If enabled, uses a denoising algorithm to make the lightmap significantly less noisy. This increases bake times and can occasionally introduce artifacts, but the result is often worth it. See Denoising for more information.
Força do Denoiser (Remoção de Ruídos): A intensidade da etapa de remoção de ruídos aplicada aos lightmaps gerados. Valores mais altos são mais eficazes na remoção de ruídos, mas podem reduzir o detalhe das sombras estáticas. Só tem efeito se a remoção de ruídos estiver ativada e o método de remoção for JNLM (OIDN não possui uma configuração de força de denoiser).
Bias: The offset value to use for shadows in 3D units. You generally don't need to change this value, except if you run into issues with light bleeding or dark spots in your lightmap after baking. This setting does not affect real-time shadows casted on baked surfaces (for lights with Dynamic bake mode).
Tamanho Máximo da Textura: O tamanho máximo da textura gerada para o atlas de texturas. Valores mais altos resultarão em menos fatias sendo geradas, mas podem não funcionar em todo hardware devido às limitações de tamanho de textura. Deixe isso no valor padrão de
16384se não tiver certeza.Ambiente > Modo: Controla como a iluminação do ambiente é fornecida ao gerar lightmaps pré-calculados. O valor padrão Scene é adequado para níveis com partes externas visíveis. Para cenas puramente internas, defina como Disabled para evitar vazamentos de luz e acelerar o pré-cálculo. Isso também pode ser definido como Custom Sky (Céu personalizado) ou Custom Color (Cor personalizada) para usar uma iluminação de ambiente diferente do céu do ambiente real da cena.
Gen Probes > Subdiv: See Objetos dinâmicos.
Data > Light Data: See Dados de Lighmap.
Usando máscaras de sombra, para sombras direcionais distantes
When using a DirectionalLight3D, the maximum distance at which it can draw real-time shadows is limited by its Shadow Max Distance property. This can be an issue in large scenes, as distant objects won't appear to have any shadows from the DirectionalLight3D. While this can be resolved by using the Static global illumination mode on the DirectionalLight3D, this has several downsides:
Since both direct and indirect light are baked, there is no way for dynamic objects to cast shadows onto static surfaces in a realistic manner. Godot skips shadow sampling entirely in this case to avoid "double lighting" artifacts.
Sombras estáticas vistas de perto carecem de detalhes, pois elas dependem apenas da textura do mapa de luz e não de cascatas de sombras em tempo real.
We can avoid these downsides while still benefiting from distant shadows by using shadowmasking. While dynamic objects won't receive shadows from the shadowmask, it still greatly improves visuals since most scenes are primarily comprised of static objects.
Since the lightmap texture alone doesn't contain shadow information, we can bake this shadow information to a separate texture called a shadowmask.
Shadowmasking only affects the first DirectionalLight3D in the scene (determined by tree order) that has the Dynamic global illumination mode. It is not possible to use shadowmasking with the Static global illumination mode, as this mode skips shadow sampling on static objects entirely. This is because the Static global illumination mode bakes both direct and indirect light.
Três modos de Mascara de Sombra estão disponíveis:
Nenhum(Padrão): Não gera uma textura de Máscara de sombra. Sombras direcionais não serão visíveis fora da área especificada pela propriedade Máxima distância de sombra da LuzDirecional3D.
Replace: Bakes a shadowmask texture, and uses it to draw directional shadows when outside the range specified by the DirectionalLight3D's Shadow Max Distance property. Shadows within this range remain fully real-time. This option generally makes the most sense for most scenes, as it can deal well with static objects that exhibit subtle motion (e.g. foliage shadows).
Overlay: Bakes a shadowmask texture, and uses it to draw directional shadows regardless of the distance from the camera. Shadows within the range of the DirectionalLight3D's Shadow Max Distance property will be overlaid with real-time shadows. This can make the transition between real-time and baked shadows less jarring, at the cost of a "smearing" effect present on static object shadows depending on lightmap texel density. Also, this mode can't deal as well with static objects that exhibit subtle motion (such as foliage), as the baked shadows can't be animated over time. Still, for scenes where the camera moves quickly, this may be a better choice than Replace.
Aqui temos uma comparação visual dos modos de máscaras de sombra em uma cena em que a Distância máxima de sombra foi definida para muito baixo, a propósitos de comparação. As caixas azuis são objetos dinâmicos, enquanto o restante da cena é um objeto estático. Há apenas uma LuzDirecional3D na cena com o modo de iluminação global Dinâmico:

Comparação entre os modos de mascara de sombra
Nota
É possível alternar entre os modos Substituir e Sobrepor máscaras de sombras sem a necessidade de gerar mapas de luz novamente.
Equilibrando tempos de pré-calculo (bake) com a qualidade
Since high-quality bakes can take very long (up to dozens of minutes for large complex scenes), it is recommended to use lower quality settings at first. Then, once you are confident with your scene's lighting setup, raise the quality settings and perform a "final" bake before exporting your project.
Reducing the lightmap resolution by increasing Lightmap Texel Size on the imported 3D scenes will also speed up baking significantly. However, this will require you to reimport all lightmapped 3D scenes before you can bake lightmaps again.
Denoising
Since baking lightmaps relies on raytracing, there will always be visible noise in the "raw" baked lightmap. Noise is especially visible in areas that are difficult to reach by bounced light, such as indoor areas with small openings where the sunlight can enter. Noise can be reduced by increasing bake quality, but doing so will increase bake times significantly.
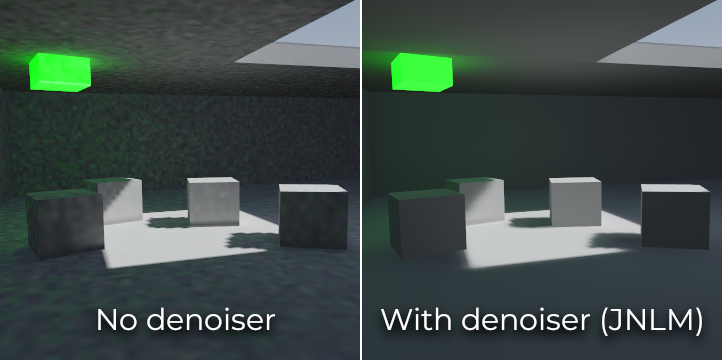
Comparison between denoising disabled and enabled (with the default JNLM denoiser).
Para combater o ruído sem aumentar muito o tempo do pré-cálculo, um denoiser pode ser usado. Um denoiser é um algoritmo executado no final pré-calculado do lightmap , ele detecta padrões de ruído e os suaviza enquanto está tentando o melhor para preservar os detalhes. E a Godot oferece dois algoritmos de remoção de ruído(denoising) :
JNLM (Meios Não Locais com Filtragem Conjunta, ou Non-Local Means with Joint Filtering)
JNLM é o método de eliminação de ruído mais comum e está incluído em Godot . Ele usa um algoritmo de eliminação de ruído simples, mas eficiente, conhecido como meios não locais. JNLM é executado na GPU usando uma computação de shaders , e é compatível com qualquer GPU que possa rodar os renderizadores RenderingDevice-based da Godot 4. Nenhuma configuração adicional é necessária.
A remoção de ruídos do JNLM pode ser ajustada usando a propriedade Denoiser Strength que fica visível quando Use Denoiser está ativado. Valores mais altos podem ser mais efetivos na remoção de ruídos, ao custo de suprimir os detalhes de sombras para sombras estáticas.
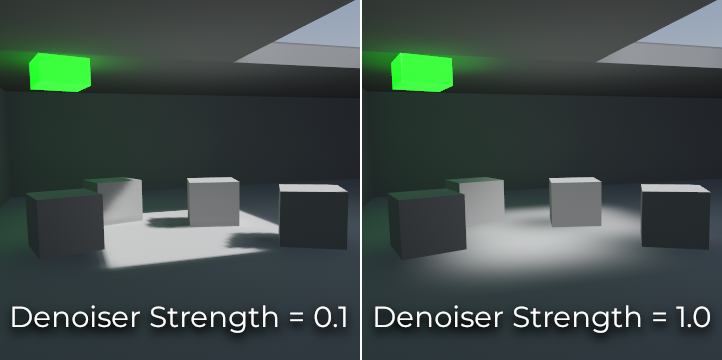
Comparação entre os valores de resistência do denoiser JNLM. Valores mais altos podem reduzir os detalhes.
OIDN (Abrir Imagem de Denoise ou, Open Image Denoise)
Ao contrário do JNLM, o OIDN utiliza uma abordagem de aprendizado de máquina para desabilitar os lightmaps. Ele apresenta um modelo treinado especificamente para remover ruído dos lightmaps, preservando mais detalhes de sombras na maioria das cenas em comparação com o JNLM.
O OIDN pode ser executado na GPU se a aceleração de hardware estiver configurada. Com uma GPU moderna de ponta, isso pode proporcionar uma aceleração de mais de 50 vezes em relação à remoção de ruídos baseada na CPU:
Nas GPUs da AMD, o HIP deve ser instalado e configurado.
On NVIDIA GPUs, CUDA must be installed and configured. This may automatically be done by the NVIDIA installer, but on Linux, CUDA libraries may not be installed by default. Double-check that the CUDA packages from your Linux distribution are installed.
On Intel GPUs, SYCL must be installed and configured.
If hardware acceleration is not available, OIDN will fall back to multithreaded
CPU-based denoising. To confirm whether GPU-based denoising is working, use a
GPU utilization monitor while baking lightmaps and look at the GPU utilization
percentage and VRAM utilization while the denoising step is shown in the Godot
editor. The nvidia-smi command line tool can be useful for this.
OIDN is not included with Godot due to its relatively large download size. You
can download precompiled OIDN binary packages from its
website.
Extract the package to a location on your PC, then specify the path to the
oidnDenoise executable in the Editor Settings (FileSystem > Tools > OIDN >
OIDN Denoise Path). This executable is located within the bin folder of
the binary package you extracted.
After specifying the path to the OIDN denoising executable, change the denoising method in the project settings by setting Rendering > Lightmapping > Denoiser to OIDN. This will affect all lightmap bakes on this project after the setting is changed.
Nota
The denoising method is configured in the project settings instead of the editor settings. This is done so that different team members working on the same project are assured to be using the same denoising method for consistent results.
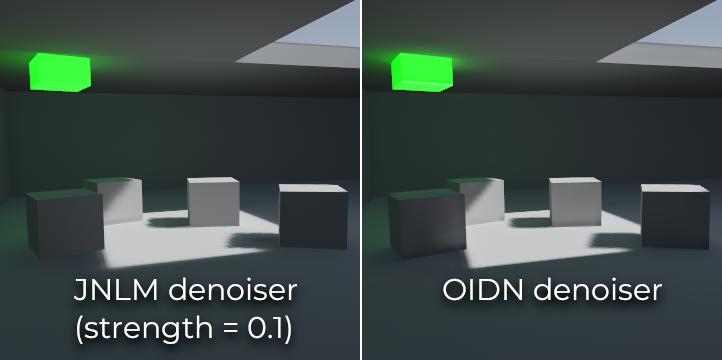
Comparação entre denoisers JNLM e OIDN. Observe como o OIDN preserva melhor os detalhes e reduz as costuras em diferentes objetos.
Objetos dinâmicos
Unlike VoxelGI and SDFGI, dynamic objects receive indirect lighting differently compared to static objects. This is because lightmapping is only performed on static objects.
To display indirect lighting on dynamic objects, a 3D probe system is used, with light probes being spread throughout the scene. When baking lightmaps, the lightmapper will calculate the amount of indirect light received by the probe. Direct light is not stored within light probes, even for lights that have their bake mode set to Static (as dynamic objects continue to be lit in real-time).
There are 2 ways to add light probes to a scene:
Automatic: Set Gen Probes > Subdiv to a value other than Disabled, then bake lightmaps. The default is
8, but you can choose a greater value to improve precision at the cost of longer bake times and larger output file size.Manual: In addition or as an alternative to generating probes automatically, you can add light probes manually by adding LightmapProbe nodes to the scene. This can be used to improve lighting detail in areas frequently travelled by dynamic objects. After placing LightmapProbe nodes in the scene, you must bake lightmaps again for them to be effective.
Nota
After baking lightmaps, you will notice white spheres in the 3D scene that represent how baked lighting will affect dynamic objects. These spheres do not appear in the running project.
If you want to hide these spheres in the editor, toggle View > Gizmos > LightmapGI at the top of the 3D editor (a "closed eye" icon indicates the gizmo is hidden).
Dados de Lighmap
The Data > Light Data property in the LightmapGI node contains the lightmap
data after baking. Textures are saved to disk, but this also contains the
capture data for dynamic objects, which can be heavy. If you are using a scene
in .tscn format, you should save this resource to an external binary
.lmbake file to avoid bloating the .tscn scene with binary data encoded
in Base64.
Dica
O arquivo EXR gerado pode ser visto ou mesmo editado usando um editor de imagens para realizar pós-processamento se necessário. Porém, lembre-se de que mudanças no arquivo EXR serão perdidas quando gerar os lightmaps novamente.
Reduzindo os artefatos de LightmapGI
If you notice LightmapGI nodes popping in and out of existence as the camera moves, this is most likely because the engine is rendering too many LightmapGI instances at once. Godot is limited to rendering 8 LightmapGI nodes at once, which means up to 8 instances can be in the camera view before some of them will start flickering.