Attention: Here be dragons
This is the latest
(unstable) version of this documentation, which may document features
not available in or compatible with released stable versions of Godot.
Checking the stable version of the documentation...
Reproduzindo videos
Godot supports video playback with the VideoStreamPlayer node.
Formatos de reprodução suportados
The only supported format in core is Ogg Theora (not to be confused with Ogg Vorbis audio) with optional Ogg Vorbis audio tracks. It's possible for extensions to bring support for additional formats.
H.264 e H.265 não podem ser suportados no núcleo do Godot, pois ambos estão protegidos por patentes de software. O AV1 é isento de royalties, mas permanece lento para decodificar na CPU e o suporte de decodificação de hardware ainda não está disponível em todas as GPUs em uso.
WebM was supported in core in Godot 3.x, but support for it was removed in 4.0 as it was too buggy and difficult to maintain.
Nota
You may find videos with a .ogg or .ogx extensions, which are generic
extensions for data within an Ogg container.
Renomear essas extensões de arquivo para .ogv talvez possa permitir que os vídeos sejam importados no Godot. No entanto, nem todos os arquivos com extensões .ogg ou .ogx são vídeos - alguns deles podem conter apenas áudio.
Setting up VideoStreamPlayer
Create a VideoStreamPlayer node using the Create New Node dialog.
Select the VideoStreamPlayer node in the scene tree dock, go to the inspector and load a
.ogvfile in the Stream property.Se você ainda não tem seu vídeo no formato Ogg Theora, vá para Configurações recomendadas de codificação Theora.
If you want the video to play as soon as the scene is loaded, check Autoplay in the inspector. If not, leave Autoplay disabled and call
play()on the VideoStreamPlayer node in a script to start playback when desired.
Lidando com redimensionamento e diferentes proporções
By default, the VideoStreamPlayer will automatically be resized to match the video's resolution. You can make it follow usual Control sizing by enabling Expand on the VideoStreamPlayer node.
To adjust how the VideoStreamPlayer node resizes depending on window size, adjust the anchors using the Layout menu at the top of the 2D editor viewport. However, this setup may not be powerful enough to handle all use cases, such as playing fullscreen videos without distorting the video (but with empty space on the edges instead). For more control, you can use an AspectRatioContainer node, which is designed to handle this kind of use case:
Adicione um nó AspectRatioContainer. Certifique-se de que não seja filho de nenhum outro nó de contêiner. Selecione o nó AspectRatioContainer e defina seu Layout na parte superior do editor 2D como Full Rect. Defina Ratio no nó AspectRatioContainer para corresponder à proporção do seu vídeo. Você pode usar fórmulas matemáticas no inspetor para se ajudar. Lembre-se de transformar um dos operandos em float. Caso contrário, o resultado da divisão será sempre um número inteiro.
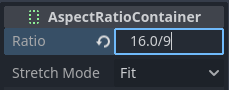
Isso avaliará para (aproximadamente) 1,777778
Once you've configured the AspectRatioContainer, reparent your VideoStreamPlayer node to be a child of the AspectRatioContainer node. Make sure Expand is enabled on the VideoStreamPlayer. Your video should now scale automatically to fit the whole screen while avoiding distortion.
Ver também
See Resoluções múltiplas for more tips on supporting multiple aspect ratios in your project.
Exibindo um vídeo em uma superfície 3D
Using a VideoStreamPlayer node as a child of a SubViewport node, it's possible to display any 2D node on a 3D surface. For example, this can be used to display animated billboards when frame-by-frame animation would require too much memory.
Isto pode ser feito com as seguintes etapas:
Create a SubViewport node. Set its size to match your video's size in pixels.
Create a VideoStreamPlayer node as a child of the SubViewport node and specify a video path in it. Make sure Expand is disabled, and enable Autoplay if needed.
Create a MeshInstance3D node with a PlaneMesh or QuadMesh resource in its Mesh property. Resize the mesh to match the video's aspect ratio (otherwise, it will appear distorted).
Create a new StandardMaterial3D resource in the Material Override property in the GeometryInstance3D section.
Enable Local To Scene in the StandardMaterial3D's Resource section (at the bottom). This is required before you can use a ViewportTexture in its Albedo Texture property.
In the StandardMaterial3D, set the Albedo > Texture property to New ViewportTexture. Edit the new resource by clicking it, then specify the path to the SubViewport node in the Viewport Path property.
Enable Albedo Texture Force sRGB in the StandardMaterial3D to prevent colors from being washed out.
If the billboard is supposed to emit its own light, set Shading Mode to Unshaded to improve rendering performance.
Veja Usando Viewports e o GUI em demonstração 3D para mais informações sobre a configuração desta instalação.
Looping a video
For looping a video, the Loop property can be enabled. This will seamlessly restart the video when it reaches its end.
Note that setting the project setting Video Delay Compensation to a non-zero value might cause your loop to not be seamless, because the synchronization of audio and video takes place at the start of each loop causing occasional missed frames. Set Video Delay Compensation in your project settings to 0 to avoid frame drop issues.
Condições de decodificação de vídeo e resoluções recomendadas
A decodificação de vídeo é realizada na CPU, pois as GPUs não possuem aceleração de hardware para decodificar os vídeos do Theora. CPUs de desktop modernas podem decodificar vídeos Ogg Theora em 1440p @ 60 FPS ou mais, mas CPUs móveis de baixo custo provavelmente terão dificuldades com vídeos de alta resolução.
Para garantir que seus vídeos sejam decodificados sem problemas em diversos hardwares:
Ao desenvolver jogos para plataformas de desktop, é recomendável codificar no máximo em 1080p (de preferência a 30 FPS). A maioria das pessoas ainda está usando monitores de resolução 1080p ou inferior, portanto, a codificação de vídeos de resolução mais alta pode não valer o aumento do tamanho do arquivo e dos requisitos de CPU.
Ao desenvolver jogos para plataformas móveis ou web, recomenda-se codificar em 720p no máximo (de preferência a 30 FPS ou até menos). A diferença visual entre vídeos 720p e 1080p em um dispositivo móvel geralmente não é tão perceptível.
Limitações de reprodução
There are some limitations with the current implementation of video playback in Godot:
A transmissão de um vídeo de um URL não é suportada.
Only mono and stereo audio output is supported. Videos with 4, 5.1 and 7.1 audio channels are supported but down-mixed to stereo.
Configurações recomendadas de codificação Theora
Um conselho é evitar depender de exportadores Ogg Theora integrados (na maioria das vezes). Existem 2 razões pelas quais você pode querer usar um programa externo para codificar seu vídeo:
Alguns programas como o Blender podem renderizar para Ogg Theora. No entanto, as predefinições de qualidade padrão geralmente são muito baixas para os padrões atuais. Você pode aumentar as opções de qualidade no software que está usando, mas pode achar que a qualidade de saída permanece abaixo do ideal (dado o tamanho maior do arquivo). Isso geralmente significa que o software suporta apenas codificação para taxa de bits constante (CBR), em vez de taxa de bits variável (VBR). A codificação VBR deve ser preferida na maioria dos cenários, pois fornece uma melhor relação entre qualidade e tamanho do arquivo.
Alguns outros programas não podem renderizar para Ogg Theora.
Nesse caso, você pode renderizar o vídeo para um formato intermediário de alta qualidade (como um vídeo H.264 de alta taxa de bits) e recodificá-lo para Ogg Theora. Idealmente, você deve usar um formato sem perdas ou descompactado como um formato intermediário para maximizar a qualidade do vídeo Ogg Theora de saída, mas isso pode exigir muito espaço em disco.
FFmpeg (CLI) is a popular open source tool for this purpose. FFmpeg has a steep learning curve, but it's a powerful tool.
Here are example FFmpeg commands to convert an MP4 video to Ogg Theora. Since FFmpeg supports a lot of input formats, you should be able to use the commands below with almost any input video format (AVI, MOV, WebM, …).
Nota
Certifique-se de que sua cópia do FFmpeg seja compilada com suporte a libtheora e libvorbis. Você pode verificar isso executando ffmpeg sem nenhum argumento e, em seguida, observando a linha configuration: na saída do comando.
Aviso
Current official FFmpeg releases have some bugs in their Ogg/Theora multiplexer. It's highly recommended to use one of the latest static daily builds, or build from their master branch to get the latest fixes.
On Windows, make sure to use 32-bit builds of FFmpeg. Windows 64-bit builds have known issues with Theora encoding, which result in artifacts in the output file.
Equilibrando qualidade e tamanho do arquivo
O nível de qualidade de vídeo (-q:v) deve estar entre 1 e 10. Qualidade 6 é um bom compromisso entre qualidade e tamanho do arquivo. Se estiver codificando em alta resolução (como 1440p ou 4K), você provavelmente desejará diminuir -q:v para 5 para manter os tamanhos de arquivo razoáveis. Como a densidade de pixels é maior em um vídeo de 1440p ou 4K, as predefinições de qualidade inferior em resoluções mais altas parecerão tão boas ou melhores em comparação com vídeos de baixa resolução.
The audio quality level (-q:a) must be between -1 and 10. Quality
6 provides a good compromise between quality and file size. In contrast to
video quality, increasing audio quality doesn't increase the output file size
nearly as much. Therefore, if you want the cleanest audio possible, you can
increase this to 9 to get perceptually lossless audio. This is especially
valuable if your input file already uses lossy audio compression. Higher quality
audio does increase the CPU usage of the decoder, so it might lead to audio
dropouts in case of high system load. See
this page
for a table listing Ogg Vorbis audio quality presets and their respective
variable bitrates.
The GOP (Group of Pictures) size (-g:v) is the max interval between
keyframes. Increasing this value can improve compression with almost no impact
on quality. The default size (12) is too low for most types of content,
it's therefore recommended using higher GOP values before reducing video
quality. Compression benefits will fade away as the GOP size increases though.
Values between 64 and 512 usually give the best compression.
Nota
Higher GOP sizes will increase max seek times with a sudden increase when
going beyond powers of two starting at 64. Max seek times with GOP size
65 can be almost twice as long as with GOP size 64, depending on
decoding speed.
FFmpeg: Converter preservando a resolução de vídeo original
O comando a seguir converte o vídeo mantendo sua resolução original. A taxa de bits do vídeo e do áudio será variável para maximizar a qualidade enquanto economiza espaço em partes do vídeo/áudio que não requerem uma taxa de bits alta (como cenas estáticas).
ffmpeg -i input.mp4 -q:v 6 -q:a 6 -g:v 64 output.ogv
FFmpeg: Redimensionar o vídeo e depois convertê-lo
O comando a seguir redimensiona um vídeo para 720 pixels de altura (720p), preservando sua proporção existente. Isso ajuda a diminuir significativamente o tamanho do arquivo se a fonte for gravada em uma resolução superior a 720p:
ffmpeg -i input.mp4 -vf "scale=-1:720" -q:v 6 -q:a 6 -g:v 64 output.ogv
Chroma Key Videos
Chroma key, commonly known as the "green screen" or "blue screen" effect, allows you to remove a specific color from an image or video and replace it with another background. This effect is widely used in video production to composite different elements together seamlessly.

We will achieve the chroma key effect by writing a custom shader in GDScript and using a VideoStreamPlayer node to display the video content.
Scene Setup
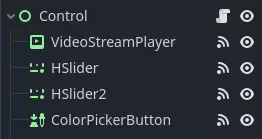
Ensure that the scene contains a VideoStreamPlayer node to play the video and a Control node to hold the UI elements for controlling the chroma key effect.
Writing the Custom Shader
To implement the chroma key effect, follow these steps:
Select the VideoStreamPlayer node in the scene and go to its properties. Under CanvasItem > Material, create a new shader named "ChromaKeyShader.gdshader."
In the "ChromaKeyShader.gdshader" file, write the custom shader code as shown below:
shader_type canvas_item;

// Uniform variables for chroma key effect
uniform vec3 chroma_key_color : source_color = vec3(0.0, 1.0, 0.0);
uniform float pickup_range : hint_range(0.0, 1.0) = 0.1;
uniform float fade_amount : hint_range(0.0, 1.0) = 0.1;

void fragment() {
    // Get the color from the texture at the given UV coordinates
    vec4 color = texture(TEXTURE, UV);

    // Calculate the distance between the current color and the chroma key color
    float distance = length(color.rgb - chroma_key_color);

    // If the distance is within the pickup range, discard the pixel
    // the lesser the distance more likely the colors are
    if (distance <= pickup_range) {
        discard;
    }

    // Calculate the fade factor based on the pickup range and fade amount
    float fade_factor = smoothstep(pickup_range, pickup_range + fade_amount, distance);

    // Set the output color with the original RGB values and the calculated fade factor
    COLOR = vec4(color.rgb, fade_factor);
}
The shader uses the distance calculation to identify pixels close to the chroma key color and discards them, effectively removing the selected color. Pixels that are slightly further away from the chroma key color are faded based on the fade_factor, blending them smoothly with the surrounding colors. This process creates the desired chroma key effect, making it appear as if the background has been replaced with another image or video.
The code above represents a simple demonstration of the Chroma Key shader, and users can customize it according to their specific requirements.
UI Controls
To allow users to manipulate the chroma key effect in real-time, we created sliders in the Control node. The Control node's script contains the following functions:
 extends Control

 func _on_color_picker_button_color_changed(color):
     # Update the "chroma_key_color" shader parameter of the VideoStreamPlayer's material.
     $VideoStreamPlayer.material.set("shader_parameter/chroma_key_color", color)

 func _on_h_slider_value_changed(value):
     # Update the "pickup_range" shader parameter of the VideoStreamPlayer's material.
     $VideoStreamPlayer.material.set("shader_parameter/pickup_range", value)

 func _on_h_slider_2_value_changed(value):
     # Update the "fade_amount" shader parameter of the VideoStreamPlayer's material.
     $VideoStreamPlayer.material.set("shader_parameter/fade_amount", value)

func _on_video_stream_player_finished():
     # Restart the video playback when it's finished.
     $VideoStreamPlayer.play()
using Godot;

public partial class MyControl : Control
{
    private VideoStreamPlayer _videoStreamPlayer;

    public override void _Ready()
    {
        _videoStreamPlayer = GetNode<VideoStreamPlayer>("VideoStreamPlayer");
    }

    private void OnColorPickerButtonColorChanged(Color color)
    {
        // Update the "chroma_key_color" shader parameter of the VideoStreamPlayer's material.
        _videoStreamPlayer.Material.Set("shader_parameter/chroma_key_color", color);
    }

    private void OnHSliderValueChanged(double value)
    {
        // Update the "pickup_range" shader parameter of the VideoStreamPlayer's material.
        _videoStreamPlayer.Material.Set("shader_parameter/pickup_range", value);
    }

    private void OnHSlider2ValueChanged(double value)
    {
        // Update the "fade_amount" shader parameter of the VideoStreamPlayer's material.
        _videoStreamPlayer.Material.Set("shader_parameter/fade_amount", value);
    }

    private void OnVideoStreamPlayerFinished()
    {
        // Restart the video playback when it's finished.
        _videoStreamPlayer.Play();
    }
}
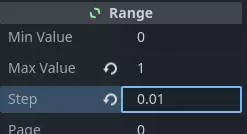
also make sure that the range of the sliders are appropriate, our settings are :
Signal Handling
Connect the appropriate signal from the UI elements to the Control node's script. you created in the Control node's script to control the chroma key effect. These signal handlers will update the shader's uniform variables in response to user input.
Save and run the scene to see the chroma key effect in action! With the provided UI controls, you can now adjust the chroma key color, pickup range, and fade amount in real-time, achieving the desired chroma key functionality for your video content.