Attention: Here be dragons
This is the latest
(unstable) version of this documentation, which may document features
not available in or compatible with released stable versions of Godot.
Checking the stable version of the documentation...
Criando plugins
Sobre plugins
Um plugin é uma ótima maneira de ampliar o editor com ferramentas úteis. Eles podem ser criados inteiramente usando GDScript e cenas, sem nem precisar recarregar o editor. Ao contrário dos módulos, você não precisa criar código C++ nem recompilar o editor. Embora isso torne os plug-ins menos poderosos, ainda há muitas coisas que você pode fazer com eles. Observe que um plugin é semelhante a qualquer cena que você já pode criar, exceto que é criado usando um script para adicionar funcionalidades ao editor.
Este tutorial vai lhe ensinar a criar dois plugins para que você entenda como eles funcionam, e possa desenvolvê-los por conta própria. O primeiro é um nó personalizado que você pode adicionar a qualquer cena no projeto, e o segundo é uma aba nova adicionada ao editor.
Criando um plugin
Antes de começar, crie um novo projeto vazio onde quiser. Ele servirá como base para desenvolver e testar os plugins.
Para o editor identificar um novo plugin, a primeira coisa a fazer é criar dois arquivos: um plugin.cfg para configuração, e um script de ferramenta com a funcionalidade. Plugins devem ser adicionados dentro de uma pasta chamada "addons", assim: addons/nome_do_plugin. O Godot oferece uma caixa de diálogo para gerar esses arquivos e colocá-los no lugar certo.
Na barra de ferramentas principal, clique no menu Projeto. Em seguida, clique em Configurações do Projeto.... Vá para a aba Plugins e clique no botão no canto superior direito.
Vai aparecer uma caixa de diálogo assim:

O texto placeholder em cada campo descreve como ele afeta a criação dos arquivos do plugin e os valores do arquivo de configuração.
Para continuar com o exemplo, use os seguintes valores:
Plugin Name: My Custom Node
Subfolder: my_custom_node
Description: A custom node made to extend the Godot Engine.
Author: Your Name Here
Version: 1.0.0
Language: GDScript
Script Name: custom_node.gd
Plugin Name: My Custom Node
Subfolder: MyCustomNode
Description: A custom node made to extend the Godot Engine.
Author: Your Name Here
Version: 1.0.0
Language: C#
Script Name: CustomNode.cs
Aviso
No C#, o script EditorPlugin precisa ser compilado, o que requer a recompilação do projeto. Feito isso, o plugin pode ser ativado na aba Plugins das Configurações do Projeto.
A estrutura de pastas do seu projeto deve ficar assim:

plugin.cfg é um arquivo INI simples com metadados sobre seu plugin. O nome e a descrição ajudam as pessoas a entender o que ele faz. Seu nome ajuda você a receber os devidos créditos pelo seu trabalho. O número da versão ajuda outras pessoas a saber se possuem uma versão desatualizada; se você não tiver certeza de como decidir o número da versão, dê uma olhada no Versionamento Semântico. O arquivo de script principal dirá ao Godot o que o seu plugin faz no editor quando estiver ativo.
O arquivo de script
Após criar o plugin, a caixa de diálogo abrirá automaticamente o script EditorPlugin para você. O script tem dois requisitos que você não pode alterar: ele deve ser um script @tool, ou então não carregará corretamente no editor, e deve herdar de EditorPlugin.
Aviso
Além do script EditorPlugin, qualquer outro arquivo GDScript que seu plugin usa deve também ser uma ferramenta. Qualquer GDScript sem @tool usado pelo editor agirá como um arquivo vazio!
É importante tratar a inicialização e a limpeza dos recursos. Uma boa prática é usar a função virtual _enter_tree() para inicializar seu plugin e _exit_tree() para limpá-lo. Felizmente, a caixa de diálogo já gera essas funções para você. Seu script deve ficar mais ou menos assim:
@tool
extends EditorPlugin


func _enter_tree():
    # Initialization of the plugin goes here.
    pass


func _exit_tree():
    # Clean-up of the plugin goes here.
    pass
#if TOOLS
using Godot;

[Tool]
public partial class CustomNode : EditorPlugin
{
    public override void _EnterTree()
    {
        // Initialization of the plugin goes here.
    }

    public override void _ExitTree()
    {
        // Clean-up of the plugin goes here.
    }
}
#endif
Este é um bom modelo para usar ao criar novos plugins.
Um nó personalizado
Às vezes você quer um certo comportamento em muitos nós, como uma cena personalizada ou control que pode ser reutilizado. Instanciação é útil em muitos casos, mas às vezes pode ser complicado, especialmente se você estiver usando em muitos projetos. Uma boa solução para isso é fazer um plugin que adiciona um nó com um comportamento personalizado.
Neste tutorial, criaremos um botão simples que exibe uma mensagem no console quando clicado. Para isso, vamos precisar de um script que estende Button. Também pode estender BaseButton se você preferir:
# Optional, add to execute in the editor.
@tool

# Icons are optional.
# Alternatively, you may use the UID of the icon or the absolute path.
@icon("icon.svg")

# Automatically register the node in the Create New Node dialog
# and make it available for use with other scripts.
class_name MyButton
extends Button


func _enter_tree():
    pressed.connect(clicked)


func clicked():
    print("You clicked me!")
using Godot;

// Optional, add to execute in the editor.
[Tool]

// Icons are optional.
// Alternatively, you may use the UID of the icon or the absolute path.
[Icon("icon.svg")]

// Automatically register the node in the Create New Node dialog
// and make it available for use with other scripts.
[GlobalClass]
public partial class MyButton : Button
{
    public override void _EnterTree()
    {
        Pressed += Clicked;
    }

    public void Clicked()
    {
        GD.Print("You clicked me!");
    }
}
That's it for our basic button. You can save this as my_button.gd inside the
plugin folder. You may have a 16×16 icon to show in the scene tree. If you
don't have one, you can grab the default one from the engine and save it in your
addons/my_custom_node folder as icon.svg, or use the default Godot logo
(@icon("res://icon.svg")).
Dica
Imagens SVG que são usadas como ícones de nó personalizados devem ter as opções de importação Editor > Redimensionar com a Escala do Editor e Editor > Converter Cores com Tema do Editor habilitadas. Isso permite que os ícones sigam a escala do editor e as configurações de tema se os ícones foram feitos com a mesma paleta de cores que os próprios ícones do Godot.
Feito isso, o plugin já deve estar disponível na lista de plugins nas Configurações do Projeto, então é só ativá-lo conforme explicado na seção Verificando os resultados.
Teste o seu plugin adicionando o seu novo nó:
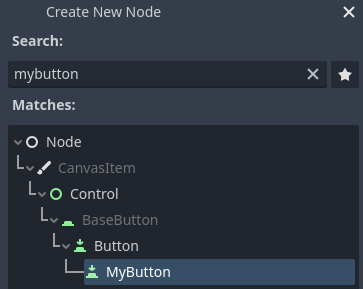
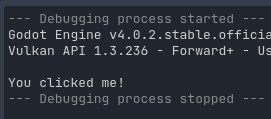
Ao adicionar o nó, você vai ver que ele já tem o script que você criou anexado a ele. Defina um texto para o botão, salve e execute a cena. Ao clicar no botão, você verá o texto aparecer no console:
Uma aba personalizada
Às vezes, você precisa adicionar ferramentas ao próprio editor. Um jeito fácil de fazer isso é adicionar uma nova aba com um plugin. Abas são apenas cenas baseadas em nós Control, então elas são criadas de uma forma parecida que cenas de GUI normais.
O início do processo de criação desse plugin é o mesmo que o anterior. Crie um novo arquivo plugin.cfg na pasta addons/my_custom_dock e adicione o seguinte conteúdo a ele:
[plugin]

name="My Custom Dock"
description="A custom dock made so I can learn how to make plugins."
author="Your Name Here"
version="1.0"
script="custom_dock.gd"
[plugin]

name="My Custom Dock"
description="A custom dock made so I can learn how to make plugins."
author="Your Name Here"
version="1.0"
script="CustomDock.cs"
Em seguida, crie o script custom_dock.gd na mesma pasta. Cole nele o template que vimos antes para começar bem.
Como estamos tentando adicionar uma nova aba personalizada, precisamos criar o conteúdo dela. Isso nada mais é do que uma cena normal do Godot: basta criar uma nova cena no editor e editá-la.
Para uma aba do editor, o nó raiz deve ser um Control ou uma de suas subclasses. Para este tutorial, você pode só criar um único botão. Não se esqueça de adicionar texto ao seu botão.

Salve esta cena como my_dock.tscn. Agora, precisamos pegar a cena que criamos e adicioná-la como uma aba no editor. Para isso, você pode contar com a função add_dock() da classe EditorPlugin.
Você precisa selecionar uma posição para a aba e definir o control a ser adicionado (que é a cena que você acabou de criar). Não se esqueça de remover a aba quando o plugin for desativado. O script pode ficar assim:
@tool
extends EditorPlugin


# A class member to hold the dock during the plugin life cycle.
var dock


func _enter_tree():
    # Initialization of the plugin goes here.
    # Load the dock scene and instantiate it.
    var dock_scene = preload("res://addons/my_custom_dock/my_dock.tscn").instantiate()

    # Create the dock and add the loaded scene to it.
    dock = EditorDock.new()
    dock.add_child(dock_scene)

    dock.title = "My Dock"

    # Note that LEFT_UL means the left of the editor, upper-left dock.
    dock.default_slot = DOCK_SLOT_LEFT_UL

    # Allow the dock to be on the left or right of the editor, and to be made floating.
    dock.available_layouts = EditorDock.DOCK_LAYOUT_VERTICAL | EditorDock.DOCK_LAYOUT_FLOATING

    add_dock(dock)


func _exit_tree():
    # Clean-up of the plugin goes here.
    # Remove the dock.
    remove_dock(dock)
    # Erase the control from the memory.
    dock.queue_free()
#if TOOLS
using Godot;

[Tool]
public partial class CustomDock : EditorPlugin
{
    private EditorDock _dock;

    public override void _EnterTree()
    {
        var _dock_scene = GD.Load<PackedScene>("res://addons/MyCustomDock/MyDock.tscn").Instantiate<Control>();

        // Create the dock and add the loaded scene to it.
        _dock = new EditorDock();
        _dock.AddChild(dock_scene);

        _dock.Title = "My Dock";

        // Note that LeftUl means the left of the editor, upper-left dock.
        _dock.DefaultSlot = DockSlot.LeftUl;

        // Allow the dock to be on the left or right of the editor, and to be made floating.
        _dock.AvailableLayouts = DockLayout.Horizontal | DockLayout.Floating;

        AddDock(_dock);
    }

    public override void _ExitTree()
    {
        // Clean-up of the plugin goes here.
        // Remove the dock.
        RemoveDock(_dock);
        // Erase the control from the memory.
        _dock.QueueFree();
    }
}
#endif
Observe que a aba aparecerá inicialmente na posição que você escolheu, mas o usuário pode alterar livremente sua posição e salvar o layout resultante.
Verificando os resultados
Agora é hora de verificar os resultados do seu trabalho. Abra as Configurações do Projeto e clique na aba Plugins. Seu plugin deve ser o único na lista.

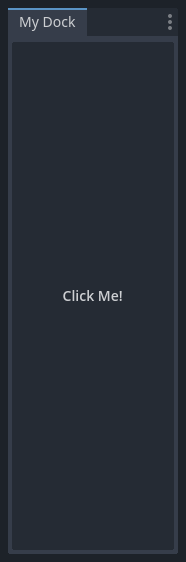
Como pode ver, o plugin não está habilitado. Clique na caixa de seleção que diz Ativo para ativar o plugin. A aba deve aparecer antes mesmo de fechar a janela de configurações. Agora você tem uma aba personalizada:
Registrando autoloads/singletons em plugins
Plugins do editor podem registrar autoloads automaticamente ao habilitar o plugin. Isso também inclui remover o autoload quando o plugin for desativado.
Isso torna a configuração de plugins mais rápida para os usuários, já que eles não precisam adicionar autoloads manualmente nas suas configurações de projeto se o seu plugin requer o uso de um autoload.
Use o código a seguir para registrar um singleton em um plugin do editor:
@tool
extends EditorPlugin

# Replace this value with a PascalCase autoload name, as per the GDScript style guide.
const AUTOLOAD_NAME = "SomeAutoload"


func _enable_plugin():
    # The autoload can be a scene or script file.
    add_autoload_singleton(AUTOLOAD_NAME, "res://addons/my_addon/some_autoload.tscn")


func _disable_plugin():
    remove_autoload_singleton(AUTOLOAD_NAME)
#if TOOLS
using Godot;

[Tool]
public partial class MyEditorPlugin : EditorPlugin
{
    // Replace this value with a PascalCase autoload name.
    private const string AutoloadName = "SomeAutoload";

    public override void _EnablePlugin()
    {
        // The autoload can be a scene or script file.
        AddAutoloadSingleton(AutoloadName, "res://addons/MyAddon/SomeAutoload.tscn");
    }

    public override void _DisablePlugin()
    {
        RemoveAutoloadSingleton(AutoloadName);
    }
}
#endif
Usando sub-plugins
Muitas vezes um plugin adiciona várias coisas, por exemplo um nó personalizado e um painel. Nesses casos, pode ser mais fácil ter um script de plugin separado para cada um desses recursos. Sub-plugins podem ser usados para isso.
Primeiro crie todos os plugins e sub-plugins como plugins normais:

Em seguida, mova os sub-plugins para a pasta do plugin principal:

O Godot vai esconder os sub-plugins da lista de plugins, para que o usuário não possa habilitar ou desabilitá-los. Em vez disso, o script principal do plugin deve ativar e desativar sub-plugins deste jeito:
@tool
extends EditorPlugin

# The main plugin is located at res://addons/my_plugin/
const PLUGIN_NAME = "my_plugin"

func _enable_plugin():
    EditorInterface.set_plugin_enabled(PLUGIN_NAME + "/node", true)
    EditorInterface.set_plugin_enabled(PLUGIN_NAME + "/panel", true)

func _disable_plugin():
    EditorInterface.set_plugin_enabled(PLUGIN_NAME + "/node", false)
    EditorInterface.set_plugin_enabled(PLUGIN_NAME + "/panel", false)
Indo além
Agora que aprendeu a fazer plugins básicos, você pode estender o editor de várias maneiras. Muitas funcionalidades podem ser adicionadas ao editor usando GDScript; é uma maneira poderosa de criar editores especializados sem ter que usar módulos de C++.
Você pode fazer seus próprios plugins para se ajudar e compartilhá-los no Biblioteca de Recursos para que outras pessoas possam se beneficiar de seu trabalho.