Attention: Here be dragons
This is the latest
(unstable) version of this documentation, which may document features
not available in or compatible with released stable versions of Godot.
Checking the stable version of the documentation...
Criando seu primeiro script
In this lesson, you will code your first script to make the Godot icon turn in circles. As we mentioned in the introduction, we assume you have programming foundations.
Este tutorial foi escrito em GDScript, e o código equivalente em C# está incluído em outra aba de cada bloco de código para conveniência.
Ver também
To learn more about GDScript, its keywords, and its syntax, head to the GDScript section. To learn more about C#, head to the C#/.NET section.
Configuração do projeto
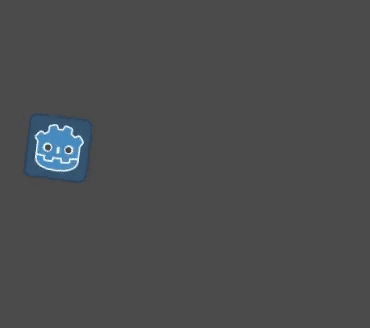
Please create a new project to start with a clean slate. Your project should contain one picture: the Godot icon, which we often use for prototyping in the community.
We need to create a Sprite2D node to display it in the game. In the Scene dock, click the button.
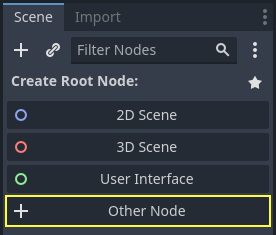
Type "Sprite2D" in the search bar to filter nodes and double-click on Sprite2D to create the node.
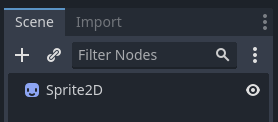
Your Scene tab should now only have a Sprite2D node.
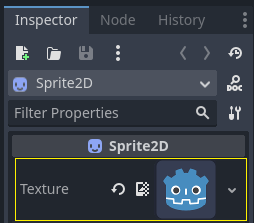
A Sprite2D node needs a texture to display. In the Inspector on the right, you
can see that the Texture property says <empty>. To display the
Godot icon, click and drag the file icon.svg from the FileSystem dock onto the
Texture slot.
Nota
You can create Sprite2D nodes automatically by dragging and dropping images on the viewport.
E então, clique e arraste o ícone no viewport para centralizá-lo na visualização do jogo.
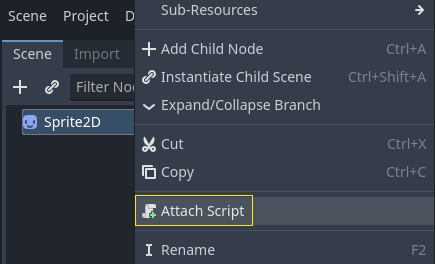
Criando um novo script
To create and attach a new script to our node, right-click on Sprite2D in the Scene dock and select .
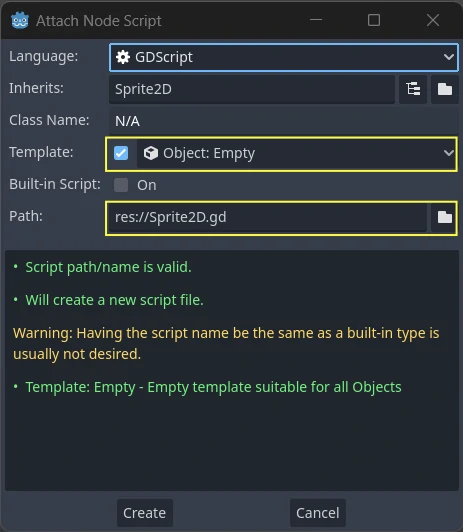
The Attach Node Script window appears. It allows you to select the script's language and file path, among other options.
Change the Template field from Node: Default to Object: Empty to
start with a clean file. Leave the other options set to their default values and
click the button to create the script.
Nota
Os nomes do scripts em C# devem ser iguais aos nomes de sua classe. Neste caso você deve nomear o arquivo `MySprite2D.cs.
The Script workspace should appear with your new sprite_2d.gd file open and
the following line of code:
extends Sprite2D
using Godot;
using System;

public partial class MySprite2D : Sprite2D
{
}
Every GDScript file is implicitly a class. The extends keyword defines the
class this script inherits or extends. In this case, it's Sprite2D, meaning
our script will get access to all the properties and functions of the Sprite2D
node, including classes it extends, like Node2D, CanvasItem, and
Node.
Nota
In GDScript, if you omit the line with the extends keyword, your
class will implicitly extend RefCounted, which
Godot uses to manage your application's memory.
Inherited properties include the ones you can see in the Inspector dock, like
our node's texture.
Nota
By default, the Inspector displays a node's properties in "Title Case", with capitalized words separated by a space. In GDScript code, these properties are in "snake_case", which is lowercase with each word separated by an underscore.
You can hover over any property's name in the Inspector to see a description and its identifier in code.
Olá, mundo!
Nosso script por enquanto não está fazendo nada. Vamos fazê-lo imprimir o texto "Olá, mundo!" no painel de Saída em baixo para começarmos.
Adicione o seguinte código no seu script:
func _init():
    print("Hello, world!")
public MySprite2D()
{
    GD.Print("Hello, world!");
}
Vamos decompô-lo. A palavra-chave func define uma nova função chamada _init. Este é um nome especial para o construtor da nossa classe. A engine chama o _init() em cada objeto ou nó ao criá-lo na memória, se você definir esta função.
Nota
GDScript é uma linguagem baseada em recuo. A aba no início da linha que diz print() é necessária para que o código funcione. Se você omitir ou não recuar uma linha corretamente, o editor a destacará em vermelho e exibirá a seguinte mensagem de erro: "Esperado recuo do bloco".
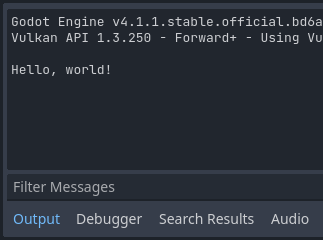
Save the scene as sprite_2d.tscn if you haven't already, then press F6 (Cmd + R on macOS)
to run it. Look at the Output bottom panel that expands.
It should display "Hello, world!".
Delete the _init() function, so you're only left with the line extends
Sprite2D.
Adicionando movimento
It's time to make our node move and rotate. To do so, we're going to add two
member variables to our script: the movement speed in pixels per second and the
angular speed in radians per second. Add the following after the extends Sprite2D line.
var speed = 400
var angular_speed = PI
private int _speed = 400;
private float _angularSpeed = Mathf.Pi;
As variáveis de definição ficam próximas ao topo do script, depois de qualquer linha "extends", mas antes das funções. Cada instância de nó com este script anexado a ela terá sua própria cópia das propriedades speed e angular_speed.
Nota
Os ângulos no Godot trabalham com radianos por padrão, mas há funções e propriedades embutidas disponíveis se você preferir calcular ângulos em graus ao invés de radianos.
To move our icon, we need to update its position and rotation every frame in the
game loop. We can use the _process() virtual function of the Node class.
If you define it in any class that extends the Node class, like Sprite2D, Godot
will call the function every frame and pass it an argument named delta, the
time elapsed since the last frame.
Nota
Os jogos funcionam renderizando muitas imagens por segundo, cada uma chamada de quadro, e fazem isso em um loop. Medimos a taxa na qual um jogo produz imagens em quadros por segundo (FPS). A maioria dos jogos aponta para 60 FPS, embora você possa encontrar números como 30 FPS em dispositivos móveis mais lentos ou 90 a 240 para jogos de realidade virtual.
A engine e os desenvolvedores de jogos fazem seu melhor para atualizar o mundo do jogo e renderizar imagens em um intervalo de tempo constante, mas sempre terá pequenas variações no tempo de renderização de frames. É por isso que a engine nos oferece o valor de tempo delta, fazendo com que o movimento ocorra independente da taxa de quadros.
No fim do script, defina a função:
func _process(delta):
rotation += angular_speed * delta
public override void _Process(double delta)
{
Rotation += _angularSpeed * (float)delta;
}
A palavra-chave func define uma nova função. Depois disso, devemos escrever o nome da função e os argumentos que ela recebe entre parênteses. Dois pontos terminam a definição e os blocos recuados que seguem são o conteúdo ou as instruções da função.
Nota
Observe como _process() e _init(), começam com um sublinhado à esquerda. Por convenção, as funções virtuais do Godot, ou seja, funções integradas que você pode substituir para se comunicar com a engine, começam com um sublinhado.
The line inside the function, rotation += angular_speed * delta, increments
our sprite's rotation every frame. Here, rotation is a property inherited
from the class Node2D, which Sprite2D extends. It controls the rotation
of our node and works with radians.
Dica
In the code editor, you can Ctrl + Click (Cmd + Click on
macOS) on any built-in property or function like position,
rotation, or _process to open the corresponding documentation
in a new tab.
Execute a cena para ver o ícone Godot girar.
Nota
Em C#, note como o argumento delta passado ao método `_Process() é do tipo `double. Nós, portanto, devemos converte-lo para o tipo float ao aplicarmos à rotação.
Adicionando movimento
Let's now make the node move. Add the following two lines inside of the _process()
function, ensuring the new lines are indented the same way as the rotation += angular_speed * delta line before
them.
var velocity = Vector2.UP.rotated(rotation) * speed
position += velocity * delta
var velocity = Vector2.Up.Rotated(Rotation) * _speed;
Position += velocity * (float)delta;
Como já vimos, a palavra-chave var define uma nova variável. Se você colocá-lo no início do script, ela define uma propriedade da classe. Dentro de uma função, define uma variável local: ela só existe dentro do escopo da função.
We define a local variable named velocity, a 2D vector representing both a
direction and a speed. To make the node move forward, we start from the Vector2
class's constant Vector2.UP, a vector pointing up, and rotate it by calling the
Vector2 method rotated(). This expression, Vector2.UP.rotated(rotation),
is a vector pointing forward relative to our icon. Multiplied by our speed
property, it gives us a velocity we can use to move the node forward.
Adicionamos velocity * delta à posição do nó para movê-lo. A própria posição é do tipo Vector2, um tipo embutido em Godot representando um vetor 2D.
Execute a cena para ver a cabeça do Godot se mover em círculos.
Nota
Mover um nó assim não leva em consideração a colisão com paredes ou o chão. Em Seu primeiro jogo 2D, você aprenderá outra abordagem para mover objetos enquanto detecta colisões.
Our node currently moves by itself. In the next part, Capturando os controles de entrada do jogador, we'll use player input to control it.
Script completo
Here is the complete sprite_2d.gd file for reference.
extends
Sprite2D
var speed = 400
var angular_speed = PI
func _process(delta):
rotation += angular_speed * delta
var velocity = Vector2.UP.rotated(rotation) * speed
position += velocity * delta
using Godot;
using System;
public partial class MySprite2D : Sprite2D
{
private int _speed = 400;
private float _angularSpeed = Mathf.Pi;
public override void _Process(double delta)
{
Rotation += _angularSpeed * (float)delta;
var velocity = Vector2.Up.Rotated(Rotation) * _speed;

Position += velocity * (float)delta;
}
}