Up to date
This page is up to date for Godot 4.2.
If you still find outdated information, please open an issue.
Vytvoření nepřítele
Nyní je čas, vytvořit nepřátele, kterým se náš hráč bude muset vyhnout. Jejich chování nebude příliš složité: náhodně se vynoří na okrajích obrazovky, vyberou náhodný směr a budou se dál pohybovat po přímce.
Vytvoříme scénu Mob, pomocí jejích instancí pak stvoříme ve hře libovolný počet nezávislých nepřátel.
Nastavení uzlu
Click Scene -> New Scene from the top menu and add the following nodes:
RigidBody2D (pojmenovaný
Mob)
Nezapomeňte nastavit podřízené uzly tak, aby nemohly být vybrány, jako jste to udělali na scéně Player.
Select the Mob node and set it's Gravity Scale
property in the RigidBody2D
section of the inspector to 0.
This will prevent the mob from falling downwards.
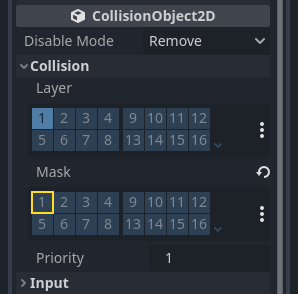
In addition, under the CollisionObject2D
section just beneath the RigidBody2D section,
expand the Collision group and
uncheck the 1 inside the Mask property.
This will ensure the mobs do not collide with each other.
Set up the AnimatedSprite2D like you did for the
player. This time, we have 3 animations: fly, swim, and walk. There
are two images for each animation in the art folder.
The Animation Speed property has to be set for each individual animation. Adjust it to 3 for all 3 animations.
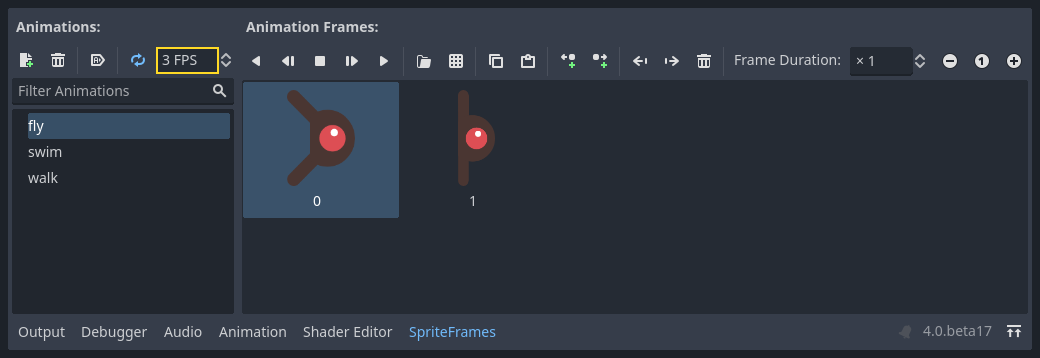
You can use the "Play Animation" buttons on the right of the Animation Speed input field to preview your animations.
Jednu z těchto animací vybereme náhodně, aby nepřátelé měly určitou rozmanitost.
Like the player images, these mob images need to be scaled down. Set the
AnimatedSprite2D's Scale property to (0.75, 0.75).
As in the Player scene, add a CapsuleShape2D for the collision. To align
the shape with the image, you'll need to set the Rotation property
to 90 (under "Transform" in the Inspector).
Ulož scénu.
Skript nepřítele
Ke scéně Mob přidej skript a vytvoř následující členské proměnné:
extends RigidBody2D
using Godot;

public partial class Mob : RigidBody2D
{
    // Don't forget to rebuild the project.
}
Nyní se podívejme na zbytek skriptu. V _ready() přehráváme animaci náhodně pro ní vybereme jeden ze tří typů animací:
func _ready():
    var mob_types = $AnimatedSprite2D.sprite_frames.get_animation_names()
    $AnimatedSprite2D.play(mob_types[randi() % mob_types.size()])
public override void _Ready()
{
    var animatedSprite2D = GetNode<AnimatedSprite2D>("AnimatedSprite2D");
    string[] mobTypes = animatedSprite2D.SpriteFrames.GetAnimationNames();
    animatedSprite2D.Play(mobTypes[GD.Randi() % mobTypes.Length]);
}
First, we get the list of animation names from the AnimatedSprite2D's sprite_frames
property. This returns an Array containing all three animation names: ["walk",
"swim", "fly"].
Potom musíme vybrat náhodné číslo mezi 0 a 2, abychom vybrali jedno z těchto jmen ze seznamu (indexy pole začínají 0). randi() % n vybere náhodné celé číslo mezi 0 a n-1.
The last piece is to make the mobs delete themselves when they leave the screen.
Connect the screen_exited() signal of the VisibleOnScreenNotifier2D node
to the Mob and add this code:
func _on_visible_on_screen_notifier_2d_screen_exited():
    queue_free()
private void OnVisibleOnScreenNotifier2DScreenExited()
{
    QueueFree();
}
Tím je dokončena scéna Mob.
With the player and enemies ready, in the next part, we'll bring them together in a new scene. We'll make enemies spawn randomly around the game board and move forward, turning our project into a playable game.