Up to date
This page is up to date for Godot 4.2.
If you still find outdated information, please open an issue.
Hlavní scéna hry
Nyní je čas všechno co jsme dosud udělali spojit do jedné hratelné scény.
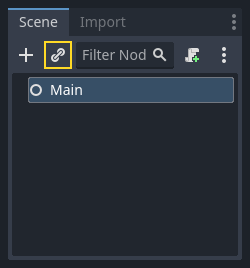
Vytvořte novou scénu a přidejte Node s názvem Main. (Důvod, proč používáme Node místo Node2D, je ten, že tento uzel bude kontejnerem pro zpracování herní logiky. Sám o sobě 2D funkcionalitu nevyžaduje.)
Click the Instance button (represented by a chain link icon) and select your saved
player.tscn.
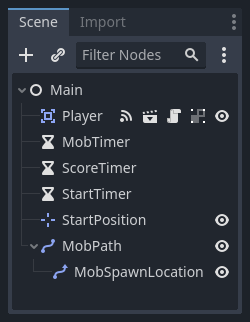
Nyní přidejte následující uzly jako potomky Main a pojmenujte je podle obrázku (hodnoty jsou v sekundách):
Timer (pojmenovaný
MobTimer) - pro ovládání času generování nepřátelTimer (pojmenovaný
ScoreTimer) - pro zvýšení skóre za každou sekundu bez srážkyTimer (pojmenovaný
StartTimer) - pro zpoždění před spuštěnímMarker2D (named
StartPosition) - to indicate the player's start position
Nastavte vlastnost Wait Time každého z uzlů Timer takto:
MobTimer:0.5ScoreTimer:1StartTimer:2
Dále nastavte vlastnost One Shot uzlu StartTimer na " On "a nastavte Position v uzlu StartPosition na (240, 450).
Zrození nepřátel
Main uzel bude vytvářet nové nepřátele a chceme, aby se objevili na náhodné místě při okraji obrazovky. Přidejte a Path2D uzel s názvem MobPath jako potomka Main. Když vyberete Path2D, uvidíte v horní části editoru některá nová tlačítka:

Select the middle one ("Add Point") and draw the path by clicking to add the points at the corners shown. To have the points snap to the grid, make sure "Use Grid Snap" and "Use Smart Snap" are both selected. These options can be found to the left of the "Lock" button, appearing as a magnet next to some dots and intersecting lines, respectively.

Důležité
Nakreslete cestu ve směru hodinových ručiček, jinak budou vaši nepřátelé natočení směrem ven místo dovnitř!
Po umístění bodu 4 do obrázku klikněte na tlačítko „Zavřít křivku“ a vaše cesta bude úplná.
Nyní, když je cesta definována, přidejte uzel PathFollow2D jako podřízený uzel MobPath a pojmenujte jej MobSpawnLocation. Tento uzel se bude automaticky otáčet a sledovat cestu, jak se pohybuje, takže ji můžeme použít k výběru náhodné polohy a směru podél cesty.
Vaše scéna by měla vypadat takto:
Hlavní skript
Add a script to Main. At the top of the script, we use
@export var mob_scene: PackedScene to allow us to choose the Mob scene we want
to instance.
extends Node

@export var mob_scene: PackedScene
var score
using Godot;

public partial class Main : Node
{
    // Don't forget to rebuild the project so the editor knows about the new export variable.

    [Export]
    public PackedScene MobScene { get; set; }

    private int _score;
}
Klikněte na uzel Main a uvidíte vlastnost MobScene v Inspektoru pod "Proměnné skriptu".
Hodnotu této vlastnosti můžete přiřadit dvěma způsoby:
Drag
mob.tscnfrom the "FileSystem" dock and drop it in the Mob Scene property.Click the down arrow next to "[empty]" and choose "Load". Select
mob.tscn.
Next, select the instance of the Player scene under Main node in the Scene dock,
and access the Node dock on the sidebar. Make sure to have the Signals tab selected
in the Node dock.
You should see a list of the signals for the Player node. Find and
double-click the hit signal in the list (or right-click it and select
"Connect..."). This will open the signal connection dialog. We want to make a
new function named game_over, which will handle what needs to happen when a
game ends. Type "game_over" in the "Receiver Method" box at the bottom of the
signal connection dialog and click "Connect". You are aiming to have the hit signal
emitted from Player and handled in the Main script. Add the following code
to the new function, as well as a new_game function that will set
everything up for a new game:
func game_over():
    $ScoreTimer.stop()
    $MobTimer.stop()

func new_game():
    score = 0
    $Player.start($StartPosition.position)
    $StartTimer.start()
public void GameOver()
{
    GetNode<Timer>("MobTimer").Stop();
    GetNode<Timer>("ScoreTimer").Stop();
}

public void NewGame()
{
    _score = 0;

    var player = GetNode<Player>("Player");
    var startPosition = GetNode<Marker2D>("StartPosition");
    player.Start(startPosition.Position);

    GetNode<Timer>("StartTimer").Start();
}
Now connect the timeout() signal of each of the Timer nodes (StartTimer,
ScoreTimer, and MobTimer) to the main script. StartTimer will start
the other two timers. ScoreTimer will increment the score by 1.
func _on_score_timer_timeout():
    score += 1

func _on_start_timer_timeout():
    $MobTimer.start()
    $ScoreTimer.start()
private void OnScoreTimerTimeout()
{
    _score++;
}

private void OnStartTimerTimeout()
{
    GetNode<Timer>("MobTimer").Start();
    GetNode<Timer>("ScoreTimer").Start();
}
In _on_mob_timer_timeout(), we will create a mob instance, pick a random
starting location along the Path2D, and set the mob in motion. The
PathFollow2D node will automatically rotate as it follows the path, so we
will use that to select the mob's direction as well as its position.
When we spawn a mob, we'll pick a random value between 150.0 and
250.0 for how fast each mob will move (it would be boring if they were
all moving at the same speed).
Všimněte si, že do scény musí být přidána nová instance pomocí add_child().
func _on_mob_timer_timeout():
    # Create a new instance of the Mob scene.
    var mob = mob_scene.instantiate()

    # Choose a random location on Path2D.
    var mob_spawn_location = get_node("MobPath/MobSpawnLocation")
    mob_spawn_location.progress_ratio = randf()

    # Set the mob's direction perpendicular to the path direction.
    var direction = mob_spawn_location.rotation + PI / 2

    # Set the mob's position to a random location.
    mob.position = mob_spawn_location.position

    # Add some randomness to the direction.
    direction += randf_range(-PI / 4, PI / 4)
    mob.rotation = direction

    # Choose the velocity for the mob.
    var velocity = Vector2(randf_range(150.0, 250.0), 0.0)
    mob.linear_velocity = velocity.rotated(direction)

    # Spawn the mob by adding it to the Main scene.
    add_child(mob)
private void OnMobTimerTimeout()
{
    // Note: Normally it is best to use explicit types rather than the `var`
    // keyword. However, var is acceptable to use here because the types are
    // obviously Mob and PathFollow2D, since they appear later on the line.

    // Create a new instance of the Mob scene.
    Mob mob = MobScene.Instantiate<Mob>();

    // Choose a random location on Path2D.
    var mobSpawnLocation = GetNode<PathFollow2D>("MobPath/MobSpawnLocation");
    mobSpawnLocation.ProgressRatio = GD.Randf();

    // Set the mob's direction perpendicular to the path direction.
    float direction = mobSpawnLocation.Rotation + Mathf.Pi / 2;

    // Set the mob's position to a random location.
    mob.Position = mobSpawnLocation.Position;

    // Add some randomness to the direction.
    direction += (float)GD.RandRange(-Mathf.Pi / 4, Mathf.Pi / 4);
    mob.Rotation = direction;

    // Choose the velocity.
    var velocity = new Vector2((float)GD.RandRange(150.0, 250.0), 0);
    mob.LinearVelocity = velocity.Rotated(direction);

    // Spawn the mob by adding it to the Main scene.
    AddChild(mob);
}
Důležité
Why PI? In functions requiring angles, Godot uses radians,
not degrees. Pi represents a half turn in radians, about
3.1415 (there is also TAU which is equal to 2 * PI).
If you're more comfortable working with degrees, you'll need to
use the deg_to_rad() and rad_to_deg() functions to
convert between the two.
Testování scény
Vyzkoušejte scénu, abychom se ujistili, že vše funguje. Přidejte volání new_game do _ready():
func _ready():
    new_game()
public override void _Ready()
{
    NewGame();
}
Let's also assign Main as our "Main Scene" - the one that runs automatically
when the game launches. Press the "Play" button and select main.tscn when
prompted.
Tip
If you had already set another scene as the "Main Scene", you can right
click main.tscn in the FileSystem dock and select "Set As Main Scene".
Měli byste být schopni pohybovat hráčem do všech směrů, vidět rozmnožování nepřátek a sledovat, jak hráč zmizí, když je zasažen nepřítelem.
Pokud jste si jisti, že vše funguje, odeberte volání new_game() z _ready().
What's our game lacking? Some user interface. In the next lesson, we'll add a title screen and display the player's score.