Work in progress
The content of this page was not yet updated for Godot
4.2
and may be outdated. If you know how to improve this page or you can confirm
that it's up to date, feel free to open a pull request.
Velikost a kotvy
Pokud by hra byla vždy spuštěna na stejném zařízení a se stejným rozlišením, rozmístění ovládacích prvků bylo jednoduchou záležitostí nastavení polohy a velikosti každého z nich. Bohužel je tomu tak zřídka.
Standardní rozlišení a poměr stran mají dnes pouze televizory. Vše od počítačových monitorů po tablety, přenosné konzole a mobilní telefony ma různá rozlišení a poměry stran.
Existuje několik způsobů, jak to zvládnout, ale prozatím si představme, že se změnilo rozlišení obrazovky a je třeba změnit umístění ovládacích prvků. Některé budou muset následovat spodní část obrazovky, jiní horní část obrazovky nebo možná pravý nebo levý okraj.
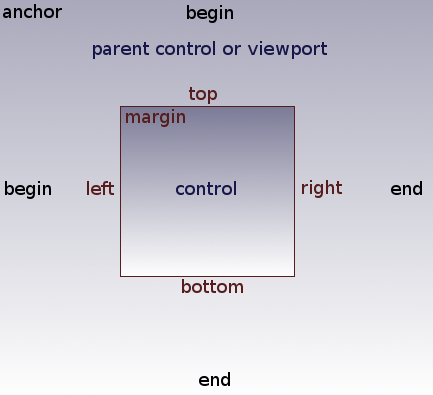
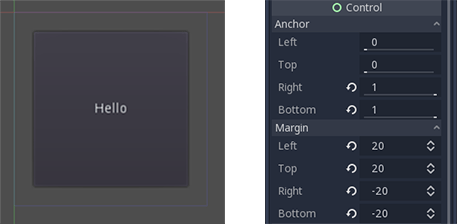
This is done by editing the margin properties of controls. Each control has four margins: left, right, bottom, and top, which correspond to the respective edges of the control. By default, all of them represent a distance in pixels relative to the top-left corner of the parent control or (in case there is no parent control) the viewport.
So to make the control wider you can make the right margin larger and/or make the left margin smaller. This lets you set the exact placement and shape of the control.
The anchor properties adjust where the margin distances are relative to. Each margin has an individual anchor that can be adjusted from the beginning to the end of the parent. So the vertical (top, bottom) anchors adjust from 0 (top of parent) to 1.0 (bottom of parent) with 0.5 being the center, and the control margins will be placed relative to that point. The horizontal (left, right) anchors similarly adjust from left to right of the parent.
Note that when you wish the edge of a control to be above or left of the anchor point, you must change the margin value to be negative.
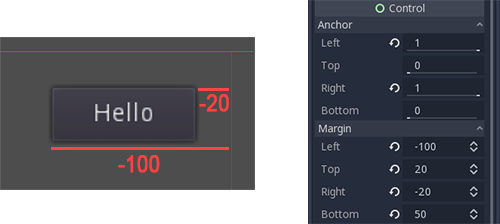
For example: when horizontal anchors are changed to 1, the margin values become relative to the top-right corner of the parent control or viewport.
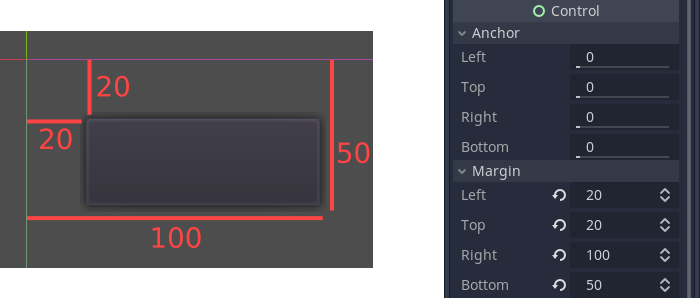
Adjusting the two horizontal or the two vertical anchors to different values will make the control change size when the parent control does. Here, the control is set to anchor its bottom-right corner to the parent's bottom-right, while the top-left control margins are still anchored to the top-left of the parent, so when re-sizing the parent, the control will always cover it, leaving a 20 pixel margin:
Centrování ovládacího prvku
Chcete-li vycentrovat ovládací prvek v nadřazeném uzlu, nastavte jeho kotvy na 0,5 a každý okraj na polovinu jeho příslušného rozměru. Například níže uvedený kód ukazuje, jak může být TextureRect vystředěn na ve svém rodičovském uzlu:
var rect = TextureRect.new()
rect.texture = load("res://icon.png")
rect.anchor_left = 0.5
rect.anchor_right = 0.5
rect.anchor_top = 0.5
rect.anchor_bottom = 0.5
var texture_size = rect.texture.get_size()
rect.offset_left = -texture_size.x / 2
rect.offset_right = texture_size.x / 2
rect.offset_top = -texture_size.y / 2
rect.offset_bottom = texture_size.y / 2
add_child(rect)
var rect = new TextureRect();

rect.Texture = ResourceLoader.Load<Texture>("res://icon.png");
rect.AnchorLeft = 0.5f;
rect.AnchorRight = 0.5f;
rect.AnchorTop = 0.5f;
rect.AnchorBottom = 0.5f;

var textureSize = rect.Texture.GetSize();

rect.OffsetLeft = -textureSize.X / 2;
rect.OffsetRight = textureSize.X / 2;
rect.OffsetTop = -textureSize.Y / 2;
rect.OffsetBottom = textureSize.Y / 2;
AddChild(rect);
Nastavení každé kotvy na 0,5 posune referenční bod pro okraje do středu jeho nadřazeného uzlu. Odtud jsme nastavili záporné okraje tak, aby ovládací prvek získal svoji přirozenou velikost.
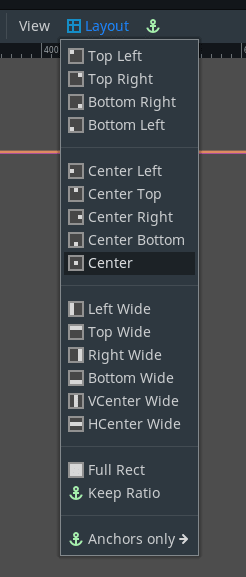
Předvolby rozvržení
Instead of manually adjusting the margin and anchor values, you can use the toolbar's Layout menu, above the viewport. Besides centering, it gives you many options to align and resize control nodes.