Up to date
This page is up to date for Godot 4.2.
If you still find outdated information, please open an issue.
Heads up display
Posledním kouskem, který naše hra potřebuje, je UI: rozhraní pro zobrazování věcí, jako je skóre, zpráva „konec hry“ a tlačítko restartu.
Create a new scene, click the "Other Node" button and add a CanvasLayer node named
HUD. "HUD" stands for "heads-up display", an informational display that
appears as an overlay on top of the game view.
Uzel CanvasLayer umožňuje nakreslit naše prvky uživatelského rozhraní do vrstvy nad zbytkem hry, takže informace, které zobrazuje, nejsou zakryty žádnými herními prvky, jako je hráč nebo nepřátelé.
HUD musí zobrazit následující informace:
Skóre, změněno uzlem
ScoreTimer.Zprávu, například „Game Over“ nebo „Připravte se!“
Tlačítko "Start" pro zahájení hry.
Základní uzel pro prvky uživatelského rozhraní je Control. K vytvoření našeho uživatelského rozhraní použijeme dva typy Control nodes: Label a Button.
Jako podřízené uzlu HUD vytvořte následující:
Label s názvem
ScoreLabel.Label pojmenovaný
Message.Button s názvem
StartButton.Timer s názvem
MessageTimer.
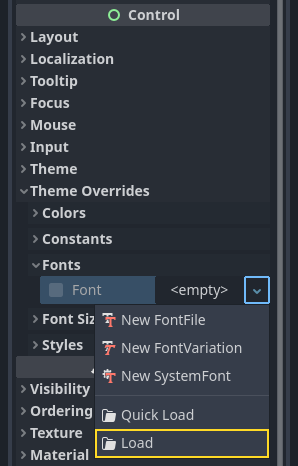
Klikněte na ScoreLabel a zadejte číslo do pole Text v Inspektoru. Výchozí písmo pro uzly Control je malé a neškáluje se dobře. Ve herníchzdrojích je obsažen soubor s názvem „Xolonium-Regular.ttf“. Chcete-li použít toto písmo, proveďte následující:
Under "Theme Overrides > Fonts", choose "Load" and select the "Xolonium-Regular.ttf" file.
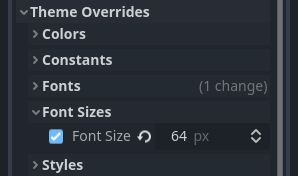
The font size is still too small, increase it to 64 under "Theme Overrides > Font Sizes".
Once you've done this with the ScoreLabel, repeat the changes for the Message and StartButton nodes.
Poznámka
Anchors: Control nodes have a position and size,
but they also have anchors. Anchors define the origin -
the reference point for the edges of the node.
Arrange the nodes as shown below. You can drag the nodes to place them manually, or for more precise placement, use "Anchor Presets".
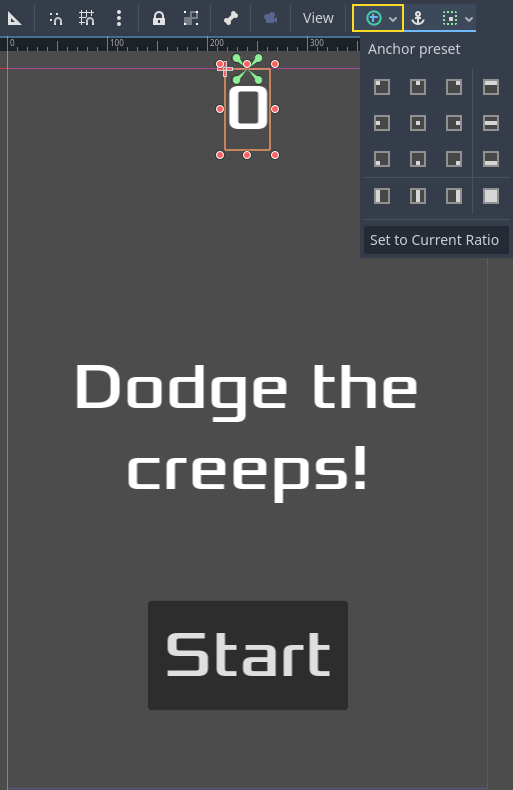
ScoreLabel
Add the text
0.Set the "Horizontal Alignment" and "Vertical Alignment" to
Center.Choose the "Anchor Preset"
Center Top.
Zpráva
Add the text
Dodge the Creeps!.Set the "Horizontal Alignment" and "Vertical Alignment" to
Center.Set the "Autowrap Mode" to
Word, otherwise the label will stay on one line.Under "Control - Layout/Transform" set "Size X" to
480to use the entire width of the screen.Choose the "Anchor Preset"
Center.
Připojení HUD k Main
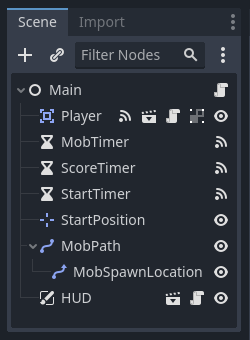
Nyní, když jsme dokončili scénu HUD, vraťte se ke scéně Main. Vytvořte instanci scény HUD ve Main, jak jste to udělali se scénou Player. Strom scény by měl vypadat takto, takže se ujistětě, že vám něco neuniklo:
Nyní musíme propojit funkcionalitu HUD se skriptem Main. To vyžaduje několik přídavků ke scéně Main:
In the Node tab, connect the HUD's start_game signal to the new_game()
function of the Main node by clicking the "Pick" button in the "Connect a Signal"
window and selecting the new_game() method or type "new_game" below "Receiver Method"
in the window. Verify that the green connection icon now appears next to
func new_game() in the script.
V new_game() aktualizujte zobrazení skóre a zobrazte zprávu „Připravte se“:
$HUD.update_score(score)
$HUD.show_message("Get Ready")
var hud = GetNode<HUD>("HUD");
hud.UpdateScore(_score);
hud.ShowMessage("Get Ready!");
V game_over() musíme zavolat odpovídající HUD` funkci:
$HUD.show_game_over()
GetNode<HUD>("HUD").ShowGameOver();
Finally, add this to _on_score_timer_timeout() to keep the display in sync
with the changing score:
$HUD.update_score(score)
GetNode<HUD>("HUD").UpdateScore(_score);
Varování
Remember to remove the call to new_game() from
_ready() if you haven't already, otherwise
your game will start automatically.
Now you're ready to play! Click the "Play the Project" button. You will be asked
to select a main scene, so choose main.tscn.
Odstranění starých nepřátel
Pokud budete hrát až do „Game Over“ a ihned poté zahájíte novou hru, můžou se na obrazovce stále zobrazovat nepřátelé z předchozí hry. Bylo by lepší, kdyby všichni zmizeli na začátku hry nové. Potřebujeme jen způsob, jak říct všem nepřátelům, aby zmizeli. Můžeme to udělat pomocí funkcionality „skupina“.
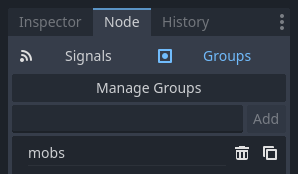
Ve scéně Mob vyberte kořenový uzel a klikněte na kartu "Uzel" vedle Inspektoru (na stejném místě, kde najdete signály uzlu). Vedle položky "Signály" klikněte na "Skupiny" a můžete zadat nový název skupiny a kliknout na tlačítko "Přidat".
Nyní budou všechny nepřátelé ve skupině „mobs“. K funkci game_over() v Main pak můžeme přidat následující řádek:
get_tree().call_group("mobs", "queue_free")
// Note that for calling Godot-provided methods with strings,
// we have to use the original Godot snake_case name.
GetTree().CallGroup("mobs", Node.MethodName.QueueFree);
Funkce call_group() volá pojmenovanou funkci na každém uzlu ve skupině - v tomto případě říkáme každému nepříteli, aby se sám odstranil.
The game's mostly done at this point. In the next and last part, we'll polish it a bit by adding a background, looping music, and some keyboard shortcuts.