Your first game
Overview
This tutorial will guide you through making your first Godot project. You will learn how the Godot editor works, how to structure a project, and how to build a 2D game.
Note
This project is an introduction to the Godot engine. It assumes that you have some programming experience already. If you're new to programming entirely, you should start here: Scripting. If you want to use C# in Godot, please also read C# basics before continuing.
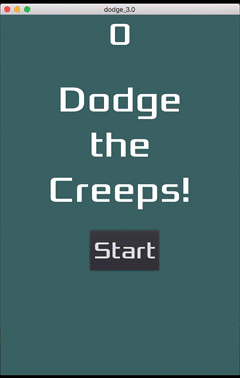
The game is called "Dodge the Creeps!". Your character must move and avoid the enemies for as long as possible. Here is a preview of the final result:
Why 2D? 3D games are much more complex than 2D ones. You should stick to 2D until you have a good understanding of the game development process and how to use Godot.
Project setup
Launch Godot and create a new project. Then, download
dodge_assets.zip. This contains the
images and sounds you'll be using to make the game. Unzip these files in your
project folder.
Note
For this tutorial, we will assume you are familiar with the Godot editor. If you haven't read Scenes and nodes, do so now for an explanation of setting up a project and using the editor.
This game is designed for portrait mode, so we need to adjust the size of the
game window. Click on Project -> Project Settings -> Display -> Window and
set "Width" to 480 and "Height" to 720.
Also in this section, under the "Stretch" options, set Mode to "2d" and
Aspect to "keep". This ensures that the game scales consistently on
different sized screens.
Organizing the project
In this project, we will make 3 independent scenes: Player,
Mob, and HUD, which we will combine into the game's Main
scene. In a larger project, it might be useful to create folders to hold
the various scenes and their scripts, but for this relatively small
game, you can save your scenes and scripts in the project's root folder,
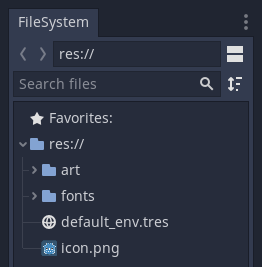
identified by res://. You can see your project folders in the FileSystem
Dock in the lower left corner:
Player scene
The first scene will define the Player object. One of the benefits
of creating a separate Player scene is that we can test it separately, even
before we've created other parts of the game.
Node structure
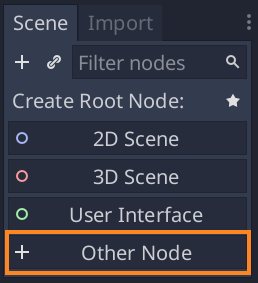
To begin, we need to choose a root node for the player object. As a general rule, a scene's root node should reflect the object's desired functionality - what the object is. Click the "Other Node" button and add an Area2D node to the scene.
Godot will display a warning icon next to the node in the scene tree. You can ignore it for now. We will address it later.
With Area2D we can detect objects that overlap or run into the player.
Change the node's name to Player by double-clicking on it. Now that we've
set the scene's root node, we can add additional nodes to give it more
functionality.
Before we add any children to the Player node, we want to make sure we don't
accidentally move or resize them by clicking on them. Select the node and
click the icon to the right of the lock; its tooltip says "Makes sure the object's children
are not selectable."

Save the scene. Click Scene -> Save, or press Ctrl + S on Windows/Linux or Cmd + S on macOS.
Note
For this project, we will be following the Godot naming conventions.
GDScript: Classes (nodes) use PascalCase, variables and functions use snake_case, and constants use ALL_CAPS (See GDScript style guide).
C#: Classes, export variables and methods use PascalCase, private fields use _camelCase, local variables and parameters use camelCase (See C# style guide). Be careful to type the method names precisely when connecting signals.
Sprite animation
Click on the Player node and add an AnimatedSprite node as a
child. The AnimatedSprite will handle the appearance and animations
for our player. Notice that there is a warning symbol next to the node.
An AnimatedSprite requires a SpriteFrames resource, which is a
list of the animations it can display. To create one, find the
Frames property in the Inspector and click "[empty]" ->
"New SpriteFrames". Click again to open the "SpriteFrames" panel:
On the left is a list of animations. Click the "default" one and rename
it to "walk". Then click the "New Animation" button to create a second animation
named "up". Find the player images in the "FileSystem" tab - they're in the
art folder you unzipped earlier. Drag the two images for each animation, named
playerGrey_up[1/2] and playerGrey_walk[1/2], into the "Animation Frames"
side of the panel for the corresponding animation:
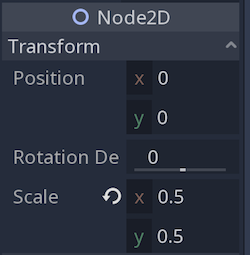
The player images are a bit too large for the game window, so we need to
scale them down. Click on the AnimatedSprite node and set the Scale
property to (0.5, 0.5). You can find it in the Inspector under the
Node2D heading.
Finally, add a CollisionShape2D as a child
of Player. This will determine the player's "hitbox", or the
bounds of its collision area. For this character, a CapsuleShape2D
node gives the best fit, so next to "Shape" in the Inspector, click
"[empty]"" -> "New CapsuleShape2D". Using the two size handles, resize the
shape to cover the sprite:
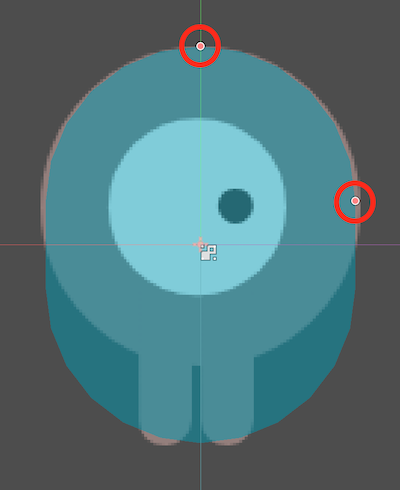
When you're finished, your Player scene should look like this:

Make sure to save the scene again after these changes.
Moving the player
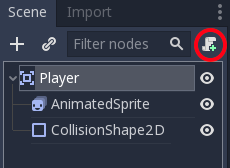
Now we need to add some functionality that we can't get from a built-in
node, so we'll add a script. Click the Player node and click the
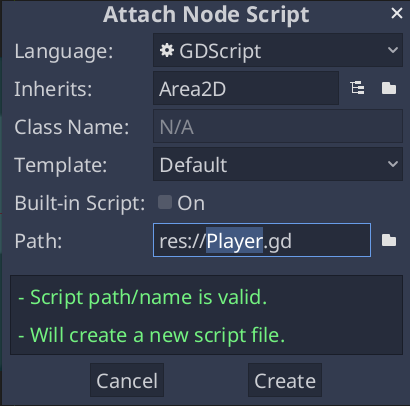
"Attach Script" button:
In the script settings window, you can leave the default settings alone. Just click "Create":
Note
If you're creating a C# script or other languages, select the language from the language drop down menu before hitting create.
Start by declaring the member variables this object will need:
extends Area2D

export var speed = 400  # How fast the player will move (pixels/sec).
var screen_size  # Size of the game window.
public class Player : Area2D
{
    [Export]
    public int Speed = 400; // How fast the player will move (pixels/sec).

    private Vector2 _screenSize; // Size of the game window.
}
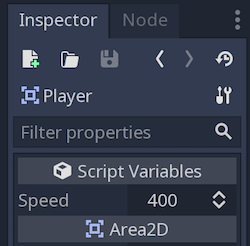
Using the export keyword on the first variable speed allows us to
set its value in the Inspector. This can be handy for values that you
want to be able to adjust just like a node's built-in properties. Click on
the Player node and you'll see the property now appears in the "Script
Variables" section of the Inspector. Remember, if you change the value here, it
will override the value written in the script.
Warning
If you're using C#, you need to (re)build the project assemblies whenever you want to see new export variables or signals. This build can be manually triggered by clicking the word "Mono" at the bottom of the editor window to reveal the Mono Panel, then clicking the "Build Project" button.
The _ready() function is called when a node enters the scene tree,
which is a good time to find the size of the game window:
func _ready():
    screen_size = get_viewport_rect().size
public override void _Ready()
{
    _screenSize = GetViewport().Size;
}
Now we can use the _process() function to define what the player will do.
_process() is called every frame, so we'll use it to update
elements of our game, which we expect will change often. For the player, we
need to do the following:
Check for input.
Move in the given direction.
Play the appropriate animation.
First, we need to check for input - is the player pressing a key? For this game, we have 4 direction inputs to check. Input actions are defined in the Project Settings under "Input Map". Here, you can define custom events and assign different keys, mouse events, or other inputs to them. For this demo, we will use the default events that are assigned to the arrow keys on the keyboard.
You can detect whether a key is pressed using
Input.is_action_pressed(), which returns true if it's pressed
or false if it isn't.
func _process(delta):
    var velocity = Vector2()  # The player's movement vector.
    if Input.is_action_pressed("ui_right"):
        velocity.x += 1
    if Input.is_action_pressed("ui_left"):
        velocity.x -= 1
    if Input.is_action_pressed("ui_down"):
        velocity.y += 1
    if Input.is_action_pressed("ui_up"):
        velocity.y -= 1
    if velocity.length() > 0:
        velocity = velocity.normalized() * speed
        $AnimatedSprite.play()
    else:
        $AnimatedSprite.stop()
public override void _Process(float delta)
{
    var velocity = new Vector2(); // The player's movement vector.

    if (Input.IsActionPressed("ui_right"))
    {
        velocity.x += 1;
    }

    if (Input.IsActionPressed("ui_left"))
    {
        velocity.x -= 1;
    }

    if (Input.IsActionPressed("ui_down"))
    {
        velocity.y += 1;
    }

    if (Input.IsActionPressed("ui_up"))
    {
        velocity.y -= 1;
    }

    var animatedSprite = GetNode<AnimatedSprite>("AnimatedSprite");

    if (velocity.Length() > 0)
    {
        velocity = velocity.Normalized() * Speed;
        animatedSprite.Play();
    }
    else
    {
        animatedSprite.Stop();
    }
}
We start by setting the velocity to (0, 0) - by default, the player
should not be moving. Then we check each input and add/subtract from the
velocity to obtain a total direction. For example, if you hold right
and down at the same time, the resulting velocity vector will be
(1, 1). In this case, since we're adding a horizontal and a vertical
movement, the player would move faster diagonally than if it just moved horizontally.
We can prevent that if we normalize the velocity, which means we set
its length to 1, then multiply by the desired speed. This means no
more fast diagonal movement.
Tip
If you've never used vector math before, or need a refresher, you can see an explanation of vector usage in Godot at Vector math. It's good to know but won't be necessary for the rest of this tutorial.
We also check whether the player is moving so we can call play() or stop()
on the AnimatedSprite.
$is shorthand forget_node(). So in the code above,$AnimatedSprite.play()is the same asget_node("AnimatedSprite").play().
Tip
In GDScript, $ returns the node at the relative path from the current node, or returns null if the node is not found.
Since AnimatedSprite is a child of the current node, we can use $AnimatedSprite.
Now that we have a movement direction, we can update the player's position. We
can also use clamp() to prevent it from leaving the screen. Clamping a value
means restricting it to a given range. Add the following to the bottom of
the _process function (make sure it's not indented under the else):
position += velocity * delta
position.x = clamp(position.x, 0, screen_size.x)
position.y = clamp(position.y, 0, screen_size.y)
Position += velocity * delta;
Position = new Vector2(
    x: Mathf.Clamp(Position.x, 0, _screenSize.x),
    y: Mathf.Clamp(Position.y, 0, _screenSize.y)
);
Tip
The delta parameter in the _process() function refers to the frame length - the amount of time that the previous frame took to complete. Using this value ensures that your movement will remain consistent even if the frame rate changes.
Click "Play Scene" (F6) and confirm you can move the player
around the screen in all directions.
Warning
If you get an error in the "Debugger" panel that says
Attempt to call function 'play' in base 'null instance' on a null instance
this likely means you spelled the name of the AnimatedSprite node wrong.
Node names are case-sensitive and $NodeName must match the name
you see in the scene tree.
Choosing animations
Now that the player can move, we need to change which animation the
AnimatedSprite is playing based on its direction. We have the "walk"
animation, which shows the player walking to the right. This animation should
be flipped horizontally using the flip_h property for left movement. We also
have the "up" animation, which should be flipped vertically with flip_v
for downward movement. Let's place this code at the end of the _process()
function:
if velocity.x != 0:
    $AnimatedSprite.animation = "walk"
    $AnimatedSprite.flip_v = false
    # See the note below about boolean assignment
    $AnimatedSprite.flip_h = velocity.x < 0
elif velocity.y != 0:
    $AnimatedSprite.animation = "up"
    $AnimatedSprite.flip_v = velocity.y > 0
if (velocity.x != 0)
{
    animatedSprite.Animation = "walk";
    animatedSprite.FlipV = false;
    // See the note below about boolean assignment
    animatedSprite.FlipH = velocity.x < 0;
}
else if (velocity.y != 0)
{
    animatedSprite.Animation = "up";
    animatedSprite.FlipV = velocity.y > 0;
}
Note
The boolean assignments in the code above are a common shorthand for programmers. Since we're doing a comparison test (boolean) and also assigning a boolean value, we can do both at the same time. Consider this code versus the one-line boolean assignment above:
if velocity.x < 0:
    $AnimatedSprite.flip_h = true
else:
    $AnimatedSprite.flip_h = false
if (velocity.x < 0)
{
    animatedSprite.FlipH = true;
}
else
{
    animatedSprite.FlipH = false;
}
Play the scene again and check that the animations are correct in each of the directions.
Tip
A common mistake here is to type the names of the animations wrong. The
animation names in the SpriteFrames panel must match what you type in the
code. If you named the animation "Walk", you must also use a capital
"W" in the code.
When you're sure the movement is working correctly, add this line to _ready(),
so the player will be hidden when the game starts:
hide()
Hide();
Preparing for collisions
We want Player to detect when it's hit by an enemy, but we haven't
made any enemies yet! That's OK, because we're going to use Godot's
signal functionality to make it work.
Add the following at the top of the script, after extends Area2D:
signal hit
// Don't forget to rebuild the project so the editor knows about the new signal.

[Signal]
public delegate void Hit();
This defines a custom signal called "hit" that we will have our player
emit (send out) when it collides with an enemy. We will use Area2D to
detect the collision. Select the Player node and click the "Node" tab
next to the Inspector tab to see the list of signals the player can emit:
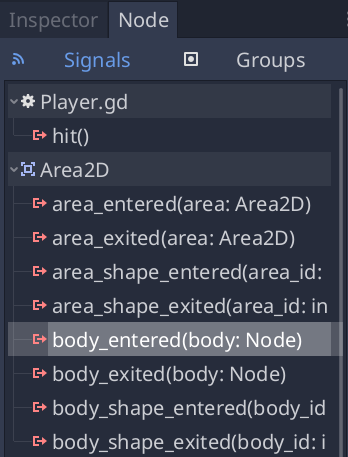
Notice our custom "hit" signal is there as well! Since our enemies are
going to be RigidBody2D nodes, we want the
body_entered(body: Node) signal. This signal will be emitted when a
body contacts the player. Click "Connect.." and the "Connect a Signal" window
appears. We don't need to change any of these settings so click "Connect" again.
Godot will automatically create a function in your player's script.

Note the green icon indicating that a signal is connected to this function. Add this code to the function:
func _on_Player_body_entered(body):
    hide()  # Player disappears after being hit.
    emit_signal("hit")
    $CollisionShape2D.set_deferred("disabled", true)
public void OnPlayerBodyEntered(PhysicsBody2D body)
{
    Hide(); // Player disappears after being hit.
    EmitSignal("Hit");
    GetNode<CollisionShape2D>("CollisionShape2D").SetDeferred("disabled", true);
}
Each time an enemy hits the player, the signal is going to be emitted. We need
to disable the player's collision so that we don't trigger the hit signal
more than once.
Note
Disabling the area's collision shape can cause an error if it happens
in the middle of the engine's collision processing. Using set_deferred()
tells Godot to wait to disable the shape until it's safe to do so.
The last piece is to add a function we can call to reset the player when starting a new game.
func start(pos):
    position = pos
    show()
    $CollisionShape2D.disabled = false
public void Start(Vector2 pos)
{
    Position = pos;
    Show();
    GetNode<CollisionShape2D>("CollisionShape2D").Disabled = false;
}
Enemy scene
Now it's time to make the enemies our player will have to dodge. Their behavior will not be very complex: mobs will spawn randomly at the edges of the screen, choose a random direction, and move in a straight line.
We'll create a Mob scene, which we can then instance to create any
number of independent mobs in the game.
Note
See Instancing to learn more about instancing.
Node setup
Click Scene -> New Scene and add the following nodes:
Don't forget to set the children so they can't be selected, like you did with the Player scene.
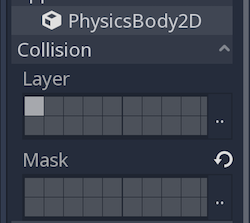
In the RigidBody2D properties, set Gravity Scale to 0, so
the mob will not fall downward. In addition, under the
PhysicsBody2D section, click the Mask property and
uncheck the first box. This will ensure the mobs do not collide with each other.
Set up the AnimatedSprite like you did for the player.
This time, we have 3 animations: fly, swim, and walk. There are two
images for each animation in the art folder.
Adjust the "Speed (FPS)" to 3 for all animations.
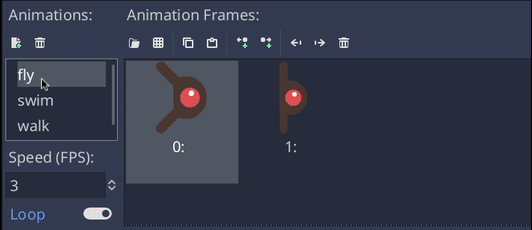
Set the Playing property in the Inspector to “On”.
We'll select one of these animations randomly so that the mobs will have some variety.
Like the player images, these mob images need to be scaled down. Set the
AnimatedSprite's Scale property to (0.75, 0.75).
As in the Player scene, add a CapsuleShape2D for the
collision. To align the shape with the image, you'll need to set the
Rotation Degrees property to 90 (under "Transform" in the Inspector).
Save the scene.
Enemy script
Add a script to the Mob and add the following member variables:
extends RigidBody2D

export var min_speed = 150  # Minimum speed range.
export var max_speed = 250  # Maximum speed range.
public class Mob : RigidBody2D
{
    // Don't forget to rebuild the project so the editor knows about the new export variables.

    [Export]
    public int MinSpeed = 150; // Minimum speed range.

    [Export]
    public int MaxSpeed = 250; // Maximum speed range.

}
When we spawn a mob, we'll pick a random value between min_speed and
max_speed for how fast each mob will move (it would be boring if they
were all moving at the same speed).
Now let's look at the rest of the script. In _ready() we randomly
choose one of the three animation types:
func _ready():
    var mob_types = $AnimatedSprite.frames.get_animation_names()
    $AnimatedSprite.animation = mob_types[randi() % mob_types.size()]
// C# doesn't implement GDScript's random methods, so we use 'System.Random' as an alternative.
static private Random _random = new Random();

public override void _Ready()
{
    var animSprite = GetNode<AnimatedSprite>("AnimatedSprite");
    var mobTypes = animSprite.Frames.GetAnimationNames();
    animSprite.Animation = mobTypes[_random.Next(0, mobTypes.Length)];
}
First, we get the list of animation names from the AnimatedSprite's frames
property. This returns an Array containing all three animation names:
["walk", "swim", "fly"].
We then need to pick a random number between 0 and 2 to select one of these
names from the list (array indices start at 0). randi() % n selects a
random integer between 0 and n-1.
Note
You must use randomize() if you want your sequence of "random"
numbers to be different every time you run the scene. We're going
to use randomize() in our Main scene, so we won't need it here.
The last piece is to make the mobs delete themselves when they leave the
screen. Connect the screen_exited() signal of the VisibilityNotifier2D
node and add this code:
func _on_VisibilityNotifier2D_screen_exited():
    queue_free()
public void OnVisibilityNotifier2DScreenExited()
{
    QueueFree();
}
This completes the Mob scene.
Main scene
Now it's time to bring it all together. Create a new scene and add a
Node named Main. Ensure you create a Node, not a
Node2D. Click the "Instance" button and select your
saved Player.tscn.
Now, add the following nodes as children of Main, and name them as
shown (values are in seconds):
Timer (named
MobTimer) - to control how often mobs spawnTimer (named
ScoreTimer) - to increment the score every secondTimer (named
StartTimer) - to give a delay before startingPosition2D (named
StartPosition) - to indicate the player's start position
Set the Wait Time property of each of the Timer nodes as
follows:
MobTimer:0.5ScoreTimer:1StartTimer:2
In addition, set the One Shot property of StartTimer to "On" and
set Position of the StartPosition node to (240, 450).
Spawning mobs
The Main node will be spawning new mobs, and we want them to appear at a
random location on the edge of the screen. Add a Path2D node named
MobPath as a child of Main. When you select Path2D,
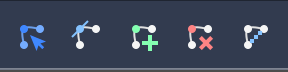
you will see some new buttons at the top of the editor:
Select the middle one ("Add Point") and draw the path by clicking to add the points at the corners shown. To have the points snap to the grid, make sure "Use Grid Snap" and "Use Snap" are both selected. These options can be found to the left of the "Lock" button, appearing as a magnet next to some dots and intersecting lines, respectively.

Important
Draw the path in clockwise order, or your mobs will spawn pointing outwards instead of inwards!
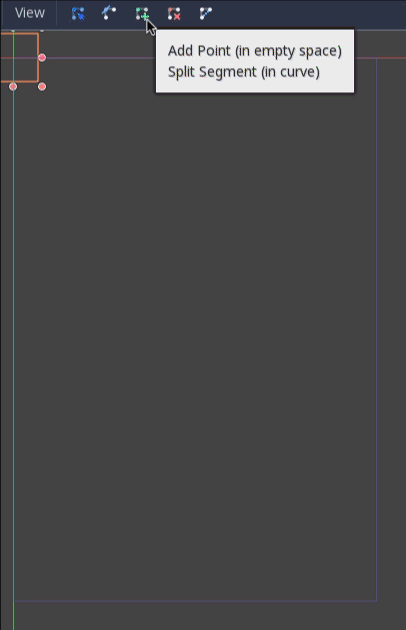
After placing point 4 in the image, click the "Close Curve" button and
your curve will be complete.
Now that the path is defined, add a PathFollow2D
node as a child of MobPath and name it MobSpawnLocation. This node will
automatically rotate and follow the path as it moves, so we can use it
to select a random position and direction along the path.
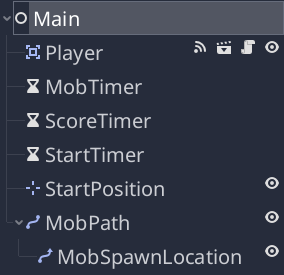
Your scene should look like this:
Main script
Add a script to Main. At the top of the script, we use
export (PackedScene) to allow us to choose the Mob scene we want to
instance.
extends Node

export (PackedScene) var Mob
var score

func _ready():
    randomize()
public class Main : Node
{
    // Don't forget to rebuild the project so the editor knows about the new export variable.

    [Export]
    public PackedScene Mob;

    private int _score;

    // We use 'System.Random' as an alternative to GDScript's random methods.
    private Random _random = new Random();

    public override void _Ready()
    {
    }

    // We'll use this later because C# doesn't support GDScript's randi().
    private float RandRange(float min, float max)
    {
        return (float)_random.NextDouble() * (max - min) + min;
    }
}
Click the Main node and you will see the Mob property in the Inspector
under "Script Variables".
You can assign this property's value in two ways:
Drag
Mob.tscnfrom the "FileSystem" panel and drop it in theMobproperty .Click the down arrow next to "[empty]" and choose "Load". Select
Mob.tscn.
Next, select the Player node in the Scene dock, and access the Node dock on
the sidebar. Make sure to have the Signals tab selected in the Node dock.
You should see a list of the signals for the Player node. Find and
double-click the hit signal in the list (or right-click it and select
"Connect..."). This will open the signal connection dialog. We want to make
a new function named game_over, which will handle what needs to happen when
a game ends.
Type "game_over" in the "Receiver Method" box at the bottom of the
signal connection dialog and click "Connect". Add the following code to the
new function, as well as a new_game function that will set everything up
for a new game:
func game_over():
    $ScoreTimer.stop()
    $MobTimer.stop()

func new_game():
    score = 0
    $Player.start($StartPosition.position)
    $StartTimer.start()
public void GameOver()
{
    GetNode<Timer>("MobTimer").Stop();
    GetNode<Timer>("ScoreTimer").Stop();
}

public void NewGame()
{
    _score = 0;

    var player = GetNode<Player>("Player");
    var startPosition = GetNode<Position2D>("StartPosition");
    player.Start(startPosition.Position);

    GetNode<Timer>("StartTimer").Start();
}
Now connect the timeout() signal of each of the Timer nodes (StartTimer,
ScoreTimer , and MobTimer) to the main script. StartTimer will start
the other two timers. ScoreTimer will increment the score by 1.
func _on_StartTimer_timeout():
    $MobTimer.start()
    $ScoreTimer.start()

func _on_ScoreTimer_timeout():
    score += 1
public void OnStartTimerTimeout()
{
    GetNode<Timer>("MobTimer").Start();
    GetNode<Timer>("ScoreTimer").Start();
}

public void OnScoreTimerTimeout()
{
    _score++;
}
In _on_MobTimer_timeout(), we will create a mob instance, pick a
random starting location along the Path2D, and set the mob in
motion. The PathFollow2D node will automatically rotate as it
follows the path, so we will use that to select the mob's direction as
well as its position.
Note that a new instance must be added to the scene using add_child().
func _on_MobTimer_timeout():
    # Choose a random location on Path2D.
    $MobPath/MobSpawnLocation.offset = randi()
    # Create a Mob instance and add it to the scene.
    var mob = Mob.instance()
    add_child(mob)
    # Set the mob's direction perpendicular to the path direction.
    var direction = $MobPath/MobSpawnLocation.rotation + PI / 2
    # Set the mob's position to a random location.
    mob.position = $MobPath/MobSpawnLocation.position
    # Add some randomness to the direction.
    direction += rand_range(-PI / 4, PI / 4)
    mob.rotation = direction
    # Set the velocity (speed & direction).
    mob.linear_velocity = Vector2(rand_range(mob.min_speed, mob.max_speed), 0)
    mob.linear_velocity = mob.linear_velocity.rotated(direction)
public void OnMobTimerTimeout()
{
    // Choose a random location on Path2D.
    var mobSpawnLocation = GetNode<PathFollow2D>("MobPath/MobSpawnLocation");
    mobSpawnLocation.Offset = _random.Next();

    // Create a Mob instance and add it to the scene.
    var mobInstance = (RigidBody2D)Mob.Instance();
    AddChild(mobInstance);

    // Set the mob's direction perpendicular to the path direction.
    float direction = mobSpawnLocation.Rotation + Mathf.Pi / 2;

    // Set the mob's position to a random location.
    mobInstance.Position = mobSpawnLocation.Position;

    // Add some randomness to the direction.
    direction += RandRange(-Mathf.Pi / 4, Mathf.Pi / 4);
    mobInstance.Rotation = direction;

    // Choose the velocity.
    mobInstance.LinearVelocity = new Vector2(RandRange(150f, 250f), 0).Rotated(direction);
}
Important
Why PI? In functions requiring angles, GDScript uses radians,
not degrees. If you're more comfortable working with
degrees, you'll need to use the deg2rad() and
rad2deg() functions to convert between the two.
Testing the scene
Let's test the scene to make sure everything is working. Add this to _ready():
func _ready():
    randomize()
    new_game()
    public override void _Ready()
    {
        NewGame();
    }
}
Let's also assign Main as our "Main Scene" - the one that runs automatically
when the game launches. Press the "Play" button and select Main.tscn when
prompted.
You should be able to move the player around, see mobs spawning, and see the player disappear when hit by a mob.
When you're sure everything is working, remove the call to new_game() from
_ready().
HUD
The final piece our game needs is a UI: an interface to display things
like score, a "game over" message, and a restart button. Create a new
scene, and add a CanvasLayer node named HUD. "HUD"
stands for "heads-up display", an informational display that appears as an
overlay on top of the game view.
The CanvasLayer node lets us draw our UI elements on a layer above the rest of the game, so that the information it displays isn't covered up by any game elements like the player or mobs.
The HUD needs to display the following information:
Score, changed by
ScoreTimer.A message, such as "Game Over" or "Get Ready!"
A "Start" button to begin the game.
The basic node for UI elements is Control. To create our UI, we'll use two types of Control nodes: Label and Button.
Create the following as children of the HUD node:
Click on the ScoreLabel and type a number into the Text field in the
Inspector. The default font for Control nodes is small and doesn't scale
well. There is a font file included in the game assets called
"Xolonium-Regular.ttf". To use this font, do the following:
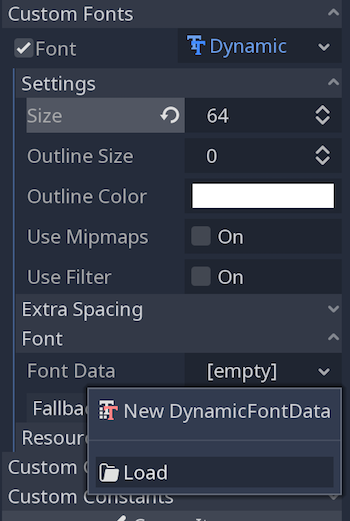
Under "Custom Fonts", choose "New DynamicFont"
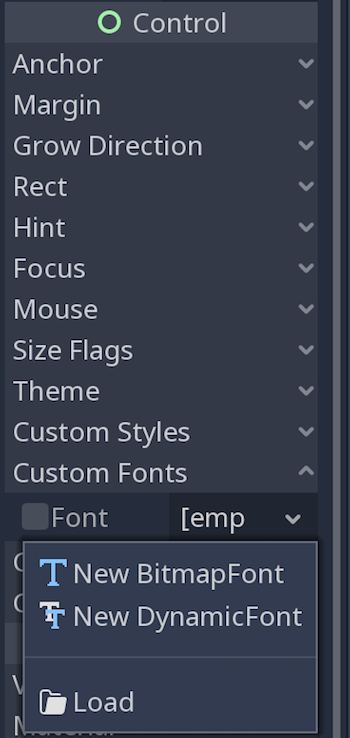
Click on the "DynamicFont" you added, and under "Font/Font Data", choose "Load" and select the "Xolonium-Regular.ttf" file. You must also set the font's
Size. A setting of64works well.
Once you've done this on the ScoreLabel, you can click the down arrow next
to the DynamicFont property and choose "Copy", then "Paste" it in the same place
on the other two Control nodes.
Note
Anchors and Margins: Control nodes have a position and size,
but they also have anchors and margins. Anchors define the
origin - the reference point for the edges of the node. Margins
update automatically when you move or resize a control node. They
represent the distance from the control node's edges to its anchor.
See Design interfaces with the Control nodes for more details.
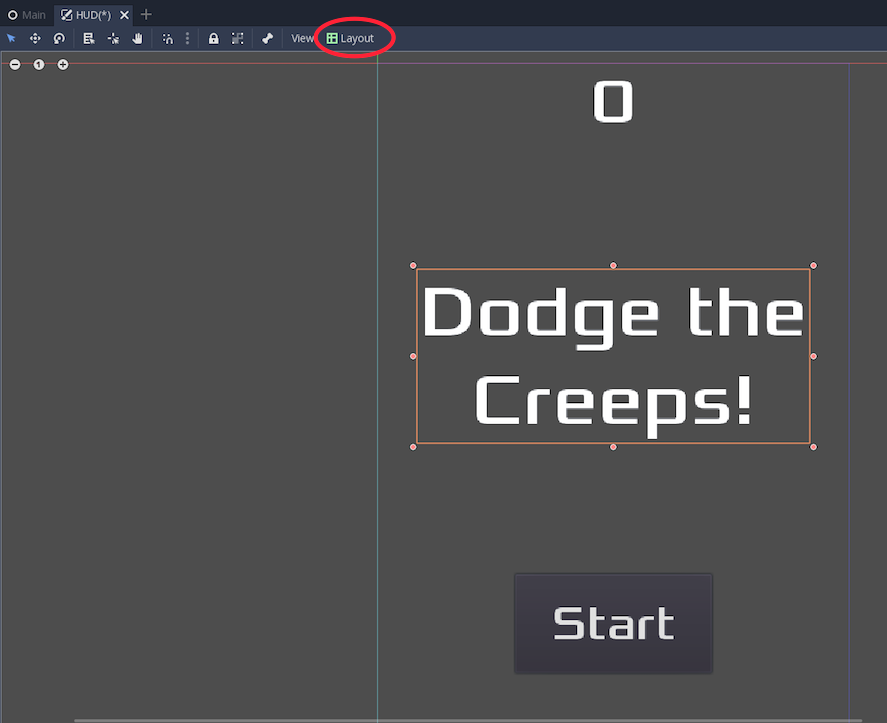
Arrange the nodes as shown below. Click the "Layout" button to set a Control node's layout:
You can drag the nodes to place them manually, or for more precise placement, use the following settings:
ScoreLabel
Layout : "Top Wide"
Text :
0Align : "Center"
Message
Layout : "HCenter Wide"
Text :
Dodge the Creeps!Align : "Center"
Autowrap : "On"
StartButton
Text :
StartLayout : "Center Bottom"
Margin :
Top:
-200Bottom:
-100
On the MessageTimer, set the Wait Time to 2 and set the One Shot
property to "On".
Now add this script to HUD:
extends CanvasLayer

signal start_game
public class HUD : CanvasLayer
{
    // Don't forget to rebuild the project so the editor knows about the new signal.

    [Signal]
    public delegate void StartGame();
}
The start_game signal tells the Main node that the button
has been pressed.
func show_message(text):
    $Message.text = text
    $Message.show()
    $MessageTimer.start()
public void ShowMessage(string text)
{
    var message = GetNode<Label>("Message");
    message.Text = text;
    message.Show();

    GetNode<Timer>("MessageTimer").Start();
}
This function is called when we want to display a message temporarily, such as "Get Ready".
func show_game_over():
    show_message("Game Over")
    # Wait until the MessageTimer has counted down.
    yield($MessageTimer, "timeout")

    $Message.text = "Dodge the\nCreeps!"
    $Message.show()
    # Make a one-shot timer and wait for it to finish.
    yield(get_tree().create_timer(1), "timeout")
    $StartButton.show()
async public void ShowGameOver()
{
    ShowMessage("Game Over");

    var messageTimer = GetNode<Timer>("MessageTimer");
    await ToSignal(messageTimer, "timeout");

    var message = GetNode<Label>("Message");
    message.Text = "Dodge the\nCreeps!";
    message.Show();

    await ToSignal(GetTree().CreateTimer(1), "timeout");
    GetNode<Button>("StartButton").Show();
}
This function is called when the player loses. It will show "Game Over" for 2 seconds, then return to the title screen and, after a brief pause, show the "Start" button.
Note
When you need to pause for a brief time, an alternative to using a
Timer node is to use the SceneTree's create_timer() function. This
can be very useful to add delays such as in the above code, where we want
to wait some time before showing the "Start" button.
func update_score(score):
    $ScoreLabel.text = str(score)
public void UpdateScore(int score)
{
    GetNode<Label>("ScoreLabel").Text = score.ToString();
}
This function is called by Main whenever the score changes.
Connect the timeout() signal of MessageTimer and the
pressed() signal of StartButton and add the following code to the new
functions:
func _on_StartButton_pressed():
    $StartButton.hide()
    emit_signal("start_game")

func _on_MessageTimer_timeout():
    $Message.hide()
public void OnStartButtonPressed()
{
    GetNode<Button>("StartButton").Hide();
    EmitSignal("StartGame");
}

public void OnMessageTimerTimeout()
{
    GetNode<Label>("Message").Hide();
}
Connecting HUD to Main
Now that we're done creating the HUD scene, go back to Main.
Instance the HUD scene in Main like you did the Player scene. The
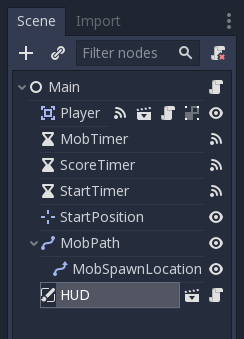
scene tree should look like this, so make sure you didn't miss anything:
Now we need to connect the HUD functionality to our Main script.
This requires a few additions to the Main scene:
In the Node tab, connect the HUD's start_game signal to the
new_game() function of the Main node by typing "new_game" in the "Receiver
Method" in the "Connect a Signal" window. Verify that the green connection icon
now appears next to func new_game() in the script.
In new_game(), update the score display and show the "Get Ready"
message:
$HUD.update_score(score)
$HUD.show_message("Get Ready")
var hud = GetNode<HUD>("HUD");
hud.UpdateScore(_score);
hud.ShowMessage("Get Ready!");
In game_over() we need to call the corresponding HUD function:
$HUD.show_game_over()
GetNode<HUD>("HUD").ShowGameOver();
Finally, add this to _on_ScoreTimer_timeout() to keep the display in
sync with the changing score:
$HUD.update_score(score)
GetNode<HUD>("HUD").UpdateScore(_score);
Now you're ready to play! Click the "Play the Project" button. You will
be asked to select a main scene, so choose Main.tscn.
Removing old creeps
If you play until "Game Over" and then start a new game right away, the creeps from the previous game may still be on the screen. It would be better if they all disappeared at the start of a new game. We just need a way to tell all the mobs to remove themselves. We can do this with the "group" feature.
In the Mob scene, select the root node and click the "Node" tab next to the
Inspector (the same place where you find the node's signals). Next to "Signals",
click "Groups" and you can type a new group name and click "Add".
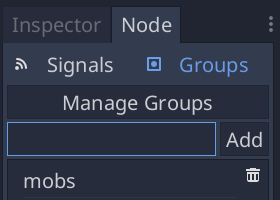
Now all mobs will be in the "mobs" group. We can then add the following line to
the game_over() function in Main:
get_tree().call_group("mobs", "queue_free")
GetTree().CallGroup("mobs", "queue_free");
The call_group() function calls the named function on every node in a group -
in this case we are telling every mob to delete itself.
Finishing up
We have now completed all the functionality for our game. Below are some remaining steps to add a bit more "juice" to improve the game experience. Feel free to expand the gameplay with your own ideas.
Background
The default gray background is not very appealing, so let's change its
color. One way to do this is to use a ColorRect node.
Make it the first node under Main so that it will be drawn behind the other
nodes. ColorRect only has one property: Color. Choose a color
you like and select "Layout" -> "Full Rect" so that it covers the screen.
You could also add a background image, if you have one, by using a
TextureRect node instead.
Sound effects
Sound and music can be the single most effective way to add appeal to the game experience. In your game assets folder, you have two sound files: "House In a Forest Loop.ogg" for background music, and "gameover.wav" for when the player loses.
Add two AudioStreamPlayer nodes as children of Main. Name one of
them Music and the other DeathSound. On each one, click on the
Stream property, select "Load", and choose the corresponding audio
file.
To play the music, add $Music.play() in the new_game() function
and $Music.stop() in the game_over() function.
Finally, add $DeathSound.play() in the game_over() function.
Keyboard shortcut
Since the game is played with keyboard controls, it would be convenient if we
could also start the game by pressing a key on the keyboard. We can do this
with the "Shortcut" property of the Button node.
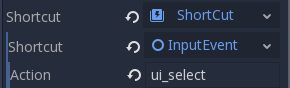
In the HUD scene, select the StartButton and find its Shortcut property
in the Inspector. Select "New Shortcut" and click on the "Shortcut" item. A
second Shortcut property will appear. Select "New InputEventAction" and click
the new "InputEventAction". Finally, in the Action property, type the name ui_select.
This is the default input event associated with the spacebar.
Now when the start button appears, you can either click it or press Space to start the game.
Project files
- You can find a completed version of this project at these locations: