Editor and docs localization
Godot aims to make game development available to everyone, including people who may not know or be comfortable with English. Therefore, we do our best to make the most important resources available in many languages, thanks to the translation effort of the community.
These resources include:
The Godot editor's interface (ca. 15,000 words).
The online documentation (editor manual and tutorials, ca. 300,000 words).
The class reference, available both online and in the editor (ca. 200,000 words).
To manage translations, we use the GNU gettext file format (PO files), and
the open source Weblate web-based localization
platform, which allows easy collaboration of many contributors to complete the
translation for the various components, and keep them up to date. Click the bold
links above to access each resource on Weblate.
This page gives an overview of the general translation workflow on Weblate, and some resource-specific instructions on e.g. how to handle some keywords or the localization of images.
Tip
Translating all the official Godot content is a massive undertaking, so we advise prioritizing the resources as they are listed above: first the editor interface, then the online documentation, and eventually the class reference if there are enough translators to keep up with updates.
Using Weblate for translations
While our translations eventually reside in the Git repositories of the Godot engine and its documentation, all translation updates are handled through Weblate, and thus direct pull requests to the Git repositories are not accepted. Translations are synced manually between Weblate and the Godot repositories by maintainers.
You should therefore register on Weblate to contribute to Godot's translations.
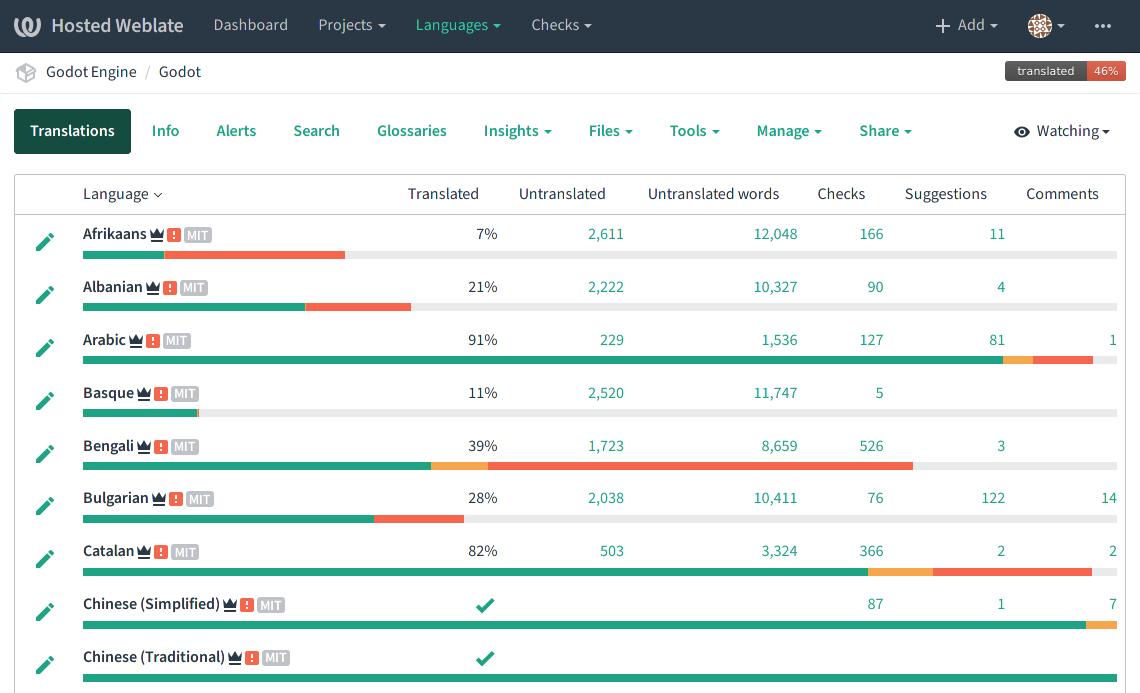
Once signed in, browse to the Godot resource which you want to contribute to (in this page we will use the editor translation as an example) to find the list of all languages:
See also
Feel free to consult Weblate's own documentation on the translation workflow for more details.
Adding a new language
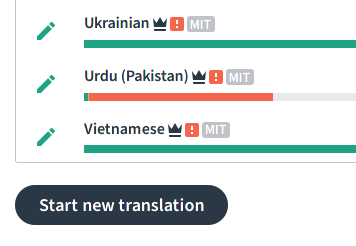
If your language is already listed, click on its name to access the overview, and skip the rest of this section.
If your language is not listed, scroll to the bottom of the list of languages and click the "Start new translation" button, and select the language you want to translate to:
Important
If your language is spoken in several countries with only limited regional
variations, please consider adding it with its generic variant (e.g. fr
for French) instead of a regional variant (e.g. fr_FR for French
(France), fr_CA for French (Canada), or fr_DZ for French (Algeria)).
Godot has a huge amount of content to translate, so duplicating the work for regional variants should only be done if the language variations are significant enough. Additionally, if a translation is done with for a regional variant, it will only be available automatically for users located in this region (or having their system language configured for this region).
When regional variations are significant enough to warrant separate
translations, we advise to focus on completing a generic variant first if
possible, then duplicate the fully completed translation for regional
variants and do the relevant edits. This is typically a good strategy for
e.g. Spanish (work on es first, then duplicate it to es_AR,
es_ES, es_MX, etc. if necessary) or Portuguese (pt_BR vs
pt_PT).
Translation interface
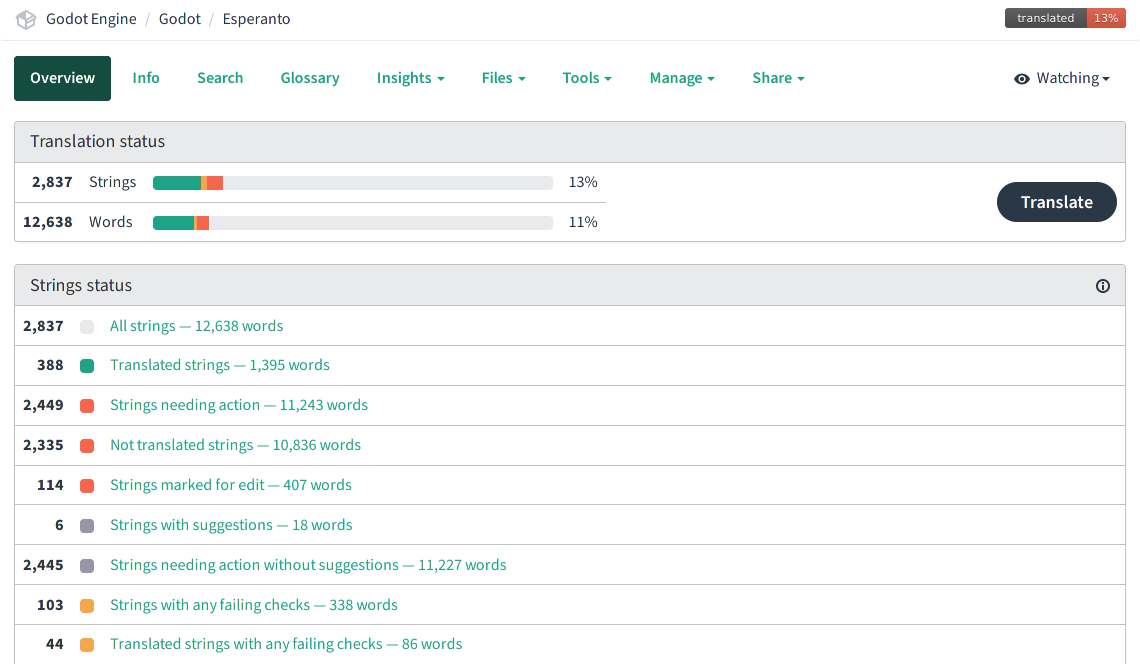
Once a language has been selected, you will see an overview of the translation status, including how many strings are left to translate or review. Each item can be clicked and used to browse through the corresponding list. You can also click the "Translate" button to get started on the list of strings needing action.
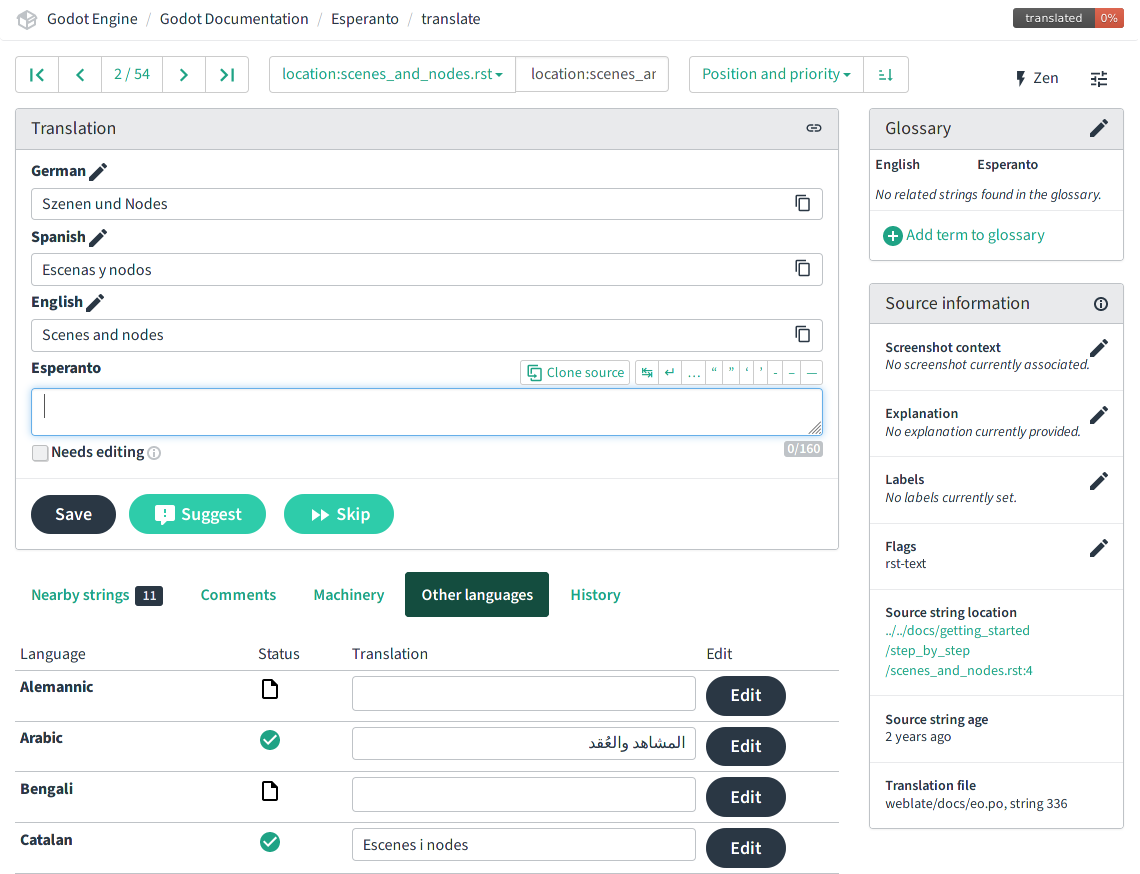
After selecting a list of clicking "Translate", you will see the main translation interface where all the work happens:
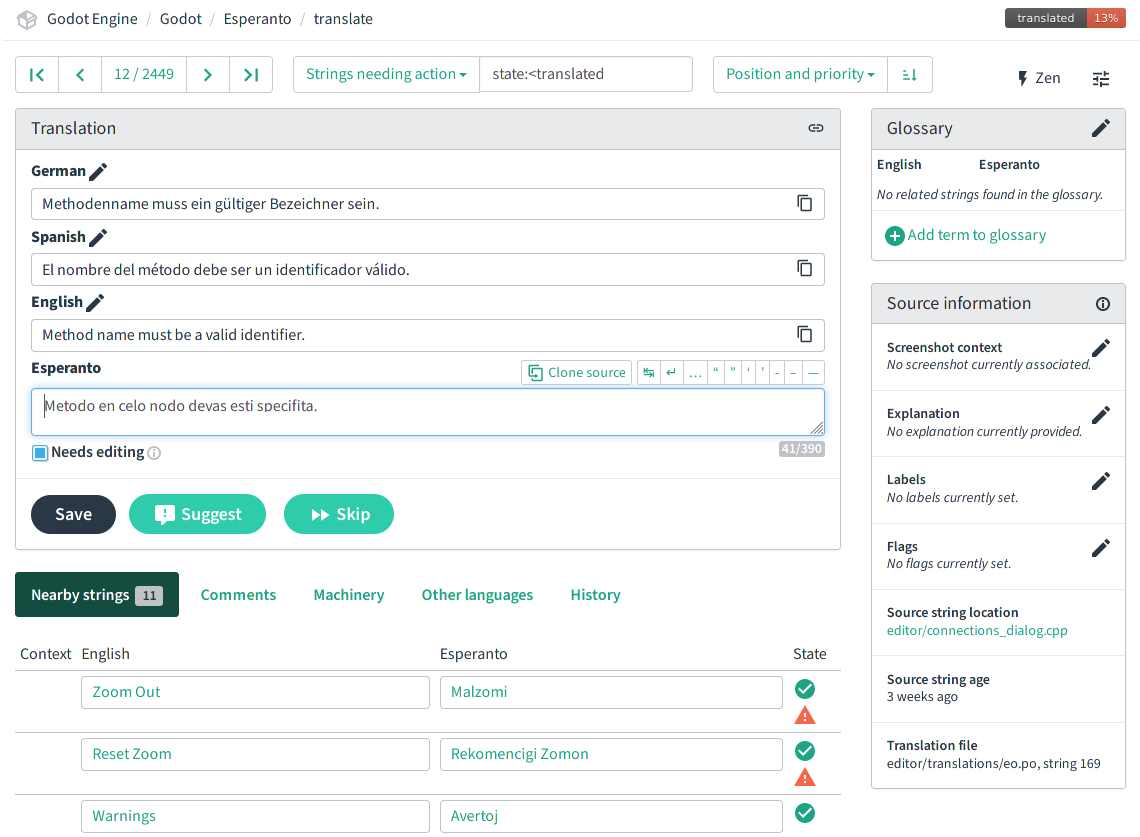
On that page, you have:
A toolbar which lets you cycle through strings of the current list, change to another predefined list or do a custom search, etc. There is also a "Zen" editing mode with a simplified interface.
The actual string you are working on in the "Translation" panel. By default, there should be the English source string and an edit box for your language. If you are familiar with other languages, you can add them in your user settings to give you more context for translation. Once you are done editing the current string, press "Save" to confirm changes and move to the next entry. Alternatively, use the "Skip" button to skip it. The "Needs editing" checkbox means that the original string was updated, and the translation therefore needs review to take those changes into account (in PO jargon, these are so-called "fuzzy" strings). Such strings won't be used in the translation until fixed.
The bottom panel has various tools which can help with the translation effort, such as context from nearby strings (usually from the same editor tool or documentation page, so they might use similar terms), comments from other translators, machine translations, and a list of all other existing translations for that string.
On the top right, the glossary shows terms for which an entry has been added previously, and which are included in the current string. For example, if you decided with fellow translators to use a specific translation for the "node" term in Godot, you can add it to the glossary to ensure that other translators use the same convention.
The bottom right panel includes information on the source string. The most relevant item is the "source string location", which links you to the original string on GitHub. You may need to search for the string in the page to locate it and its surrounding context.
Locating original content
PO files are an ordered list of source strings (msgid) and their translation
(msgstr), and by default, Weblate will present the strings in that order. It
can therefore be useful to understand how the content is organized in the PO
files to help you locate the original content and use it as a reference when
translating.
Important
It is primordial to use the original context as reference when translating, as many words have several possible translations depending on the context. Using the wrong translation can actually be detrimental to the user and make things harder to understand than if they stayed in English. Using the context also makes the translation effort much easier and more enjoyable, as you can see directly if the translation you wrote will make sense in context.
The editor interface's translation template is generated by parsing all the C++ source code in alphabetical order, so all the strings defined in a given file will be grouped together. For example, if the "source string location" indicates
editor/code_editor.cpp, the current string (and the nearby ones) is defined in theeditor/code_editor.cppcode file, and is thereby related to the code editors in Godot (GDScript, shaders).The online documentation's translation template is generated from the source RST files in the same order as seen in the table of contents, so for example the first strings are from the front page of the documentation. The recommended workflow is therefore to find a unique string corresponding to a page that you want to translate, and then translate all the strings with the same source string location while comparing with the online version of that page in English. An example of source string location could be
getting_started/step_by_step/nodes_and_scenes.rstfor the page Nodes and Scenes.The class reference's translation template is generated from the source XML files in alphabetical order, which is also the same as the order of the table of contents for the online version. You can therefore locate the source string corresponding to the brief description of a given class to find the first string to translate and all other descriptions from that class should be in the subsequent strings on Weblate. For example, the descriptions for the Node2D class would have the source string location
doc/classes/Node2D.xml.
A handy tool to locate specific pages/classes is to use Weblate's advanced
search feature, and especially the "Location strings" query (which can also be
used with the location: token, e.g. location:nodes_and_scenes.rst):
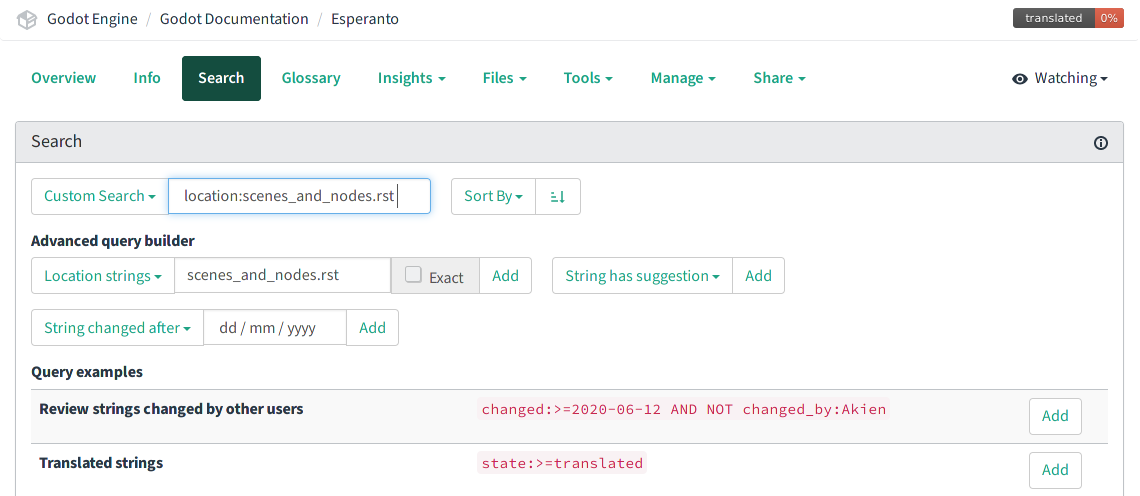
Note
When a given source string is used in multiple source locations, they will
all be concatenated into one. For example, the above
location:nodes_and_scenes.rst query would land first on the
"Introduction" source string which is used in dozens of pages, including
some that come before nodes_and_scenes.rst in the template. Clicking the
"Next" button then brings us to the "Scene and nodes" title string displayed
above.
So it may happen that a given paragraph or section title is not at the
location you'd expect it when reading the online version of a page.
Respecting the markup syntax
Each translation resource originates from a different source code format, and having some notions on the markup language used for each resource is important to avoid creating syntax errors in your translations.
Editor interface (C++)
The editor translations originate from C++ strings, and may use:
C format specifiers such as
%s(a string) or%d(a number). These specifiers are replaced by content at runtime, and should be preserved and placed in your translation where necessary for it to be meaningful after substitution. You may need to refer to the source string location to understand what kind of content will be substituted if it's not clear from the sentence. Example (%swill be substituted with a file name or path):# PO file: "There is no '%s' file." # Weblate: There is no '%s' file.
C escape characters such as
\n(line break) or\t(tabulation). In the Weblate editor, the\ncharacters are replaced by↵(return) and\tby↹. Tabs are not used much, but you should make sure to use line breaks in the same way as the original English string (Weblate will issue a warning if you don't). Line breaks might sometimes be used for vertical spacing, or manual wrapping of long lines which would otherwise be too long especially in the editor translation). Example:# PO file: "Scene '%s' is currently being edited.\n" "Changes will only take effect when reloaded." # Weblate: Scene '%s' is currently being edited.↵ Changes will only take effect when reloaded.
Note
Only logical order of the characters matters, in the right-to-left text, format
specifiers may be displayed as s%.
Online documentation (RST)
The documentation translations originate from reStructuredText (RST) files, which also use their own markup syntax to style text, create internal and external links, etc. Here are some examples:
# "development" is styled bold.
# "Have a look here" is a link pointing to https://docs.godotengine.org/en/latest.
# You should translate "Have a look here", but not the URL, unless there is
# a matching URL for the same content in your language.
# Note: The `, <, >, and _ characters all have a meaning in the hyperlink
# syntax and should be preserved.

Looking for the documentation of the current **development** branch?
`Have a look here <https://docs.godotengine.org/en/latest>`_.

# "|supported|" is an inline reference to an image and should stay unchanged.
# "master" uses the markup for inline code, and will be styled as such.
# Note: Inline code in RST uses 2 backticks on each side, unlike Markdown.
# Single backticks are used for hyperlinks.

|supported| Backwards-compatible new features (backported from the ``master``
branch) as well as bug, security, and platform support fixes.

# The :ref: Sphinx "role" is used for internal references to other pages of
# the documentation.
# It can be used with only the reference name of a page (which should not be
# changed), in which case the title of that page will be displayed:

See :ref:`doc_ways_to_contribute`.

# Or it can be used with an optional custom title, which should thus be translated:

See :ref:`how to contribute <doc_ways_to_contribute>`.

# You may encounter other Sphinx roles, such as :kbd: used for shortcut keys.
# You can translate the content between backticks to match the usual key names,
# if it's different from the English one.

Save the scene. Click Scene -> Save, or press :kbd:`Ctrl + S` on Windows/Linux
or :kbd:`Cmd + S` on macOS.
See also
See Sphinx's reStructured Text primer for a quick overview of the markup language you may find in source strings. You may encounter especially the inline markup (bold, italics, inline code) and the internal and external hyperlink markup.
Class reference (BBCode)
The class reference is documented in the main Godot repository using XML files, and with BBCode-like markup for styling and internal references.
Some of the tags used are from the original BBCode (e.g. [b]Bold[/b] and
[i]Italics[/i]), while others are Godot-specific and used for advanced
features such as inline code (e.g. [code]true[/code]), linking to another
class (e.g. [Node2D]) or to a property in a given class (e.g.
[member Node2D.position]), or for multiline code blocks. Example:
Returns a color according to the standardized [code]name[/code] with [code]alpha[/code] ranging from 0 to 1.
[codeblock]
red = ColorN("red", 1)
[/codeblock]
Supported color names are the same as the constants defined in [Color].
In the above example, [code]name[/code], [code]alpha[/code], and
[Color] should not be translated, as they refer respectively to argument
names and a class of the Godot API. Similarly, the contents of the
[codeblock] should not be translated, as ColorN is a function of the
Godot API and "red" is one of the named colors it supports. At most, you can
translate the name of the variable which holds the result (red = ...).
Note also that in the XML, each line is a paragraph, so you should not add line breaks if they are not part of the original translation.
See also
See our documentation for class reference writers for the list of BBCode-like tags which are used throughout the class reference.
Offline translation and testing
While we advise using the Weblate interface to write translations, you also have the possibility to download the PO file locally to translate it with your preferred PO editing application, such as Poedit or Lokalize.
To download the PO file locally, browse to the translation overview for your language, and select the first item in the "Files" menu:

Once you are done with a series of edits, use the "Upload translation" item in that same menu and select your file. Choose "Add as translation" for the file upload mode.
Note
If a significant amount of time has passed between your download of the PO file and the upload of the edited version, there is a risk to overwrite the translations authored by other contributors in the meantime. This is why we advise to use the online interface so that you always work on the latest version.
If you want to test changes locally (especially for the editor translation), you can use the downloaded PO file and compile Godot from source.
Rename the editor translation PO file to <lang>.po (e.g. eo.po for
Esperanto) and place it in the editor/translations/ folder
(GitHub).
You can also test class reference changes the same way by renaming the PO file
similarly and placing it in the doc/translations/ folder
(GitHub).
Localizing documentation images
The online documentation includes many images, which can be screenshots of the Godot editor, custom-made graphs, of any other kind of visual content. Some of it includes text and might thus be relevant to localize in your language.
This part is not handled via Weblate, but directly on the godot-docs-l10n Git repository where the documentation translations are synced from Weblate.
Note
The workflow is not the most straightforward and requires some knowledge of Git. We plan to work on a simplified Web tool which could be used to manage image localization in a convenient way, abstracting away these steps.
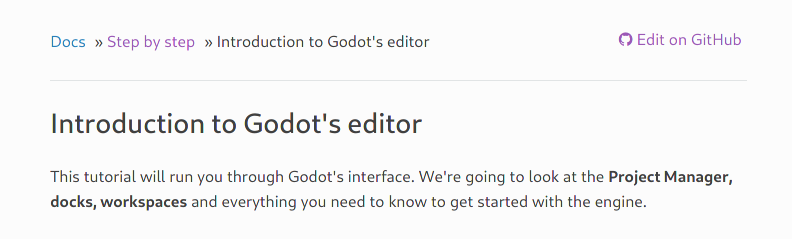
To translate an image, you should first locate it in the original English documentation. To do so, browse the relevant page in the docs, e.g. First look at Godot's editor. Click the "Edit on GitHub" link in the top right corner:
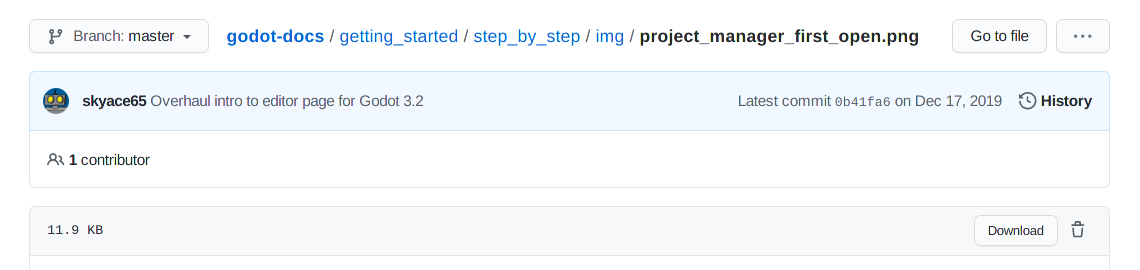
On GitHub, click on the image you want to translate. If relevant, click on
"Download" to download it locally and edit it with an image edition tool.
Note the full path to the image as it will be needed further down (here
getting_started/step_by_step/img/project_manager_first_open.png).
Create your localized version of the image, either by editing the English one,
or by taking a screenshot of the editor with your language, if it's an editor
screenshot. Some images may also have source files available in SVG format, so
you can browse the img/ folder which contains them to check for that.
Name your localized image like the original one, but with the language code
added before the extension, e.g. project_manager_first_open.png would become
project_manager_first_open.fr.png for the French localization.
Finally, on godot-docs-l10n, recreate the same folder structure as for the
original image in the images subfolder
(GitHub),
and place your translated image there. In our example, the end result should be
images/getting_started/step_by_step/img/project_manager_first_open.fr.png.
Repeat this for other images and make a Pull Request.