GDNative C example
Introduction
This tutorial will introduce you to the bare minimum required to create GDNative modules. This should be your starting point into the world of GDNative. Understanding the contents of this tutorial will help you in understanding all that is to come after this.
Before we begin, you can download the source code to the example object we describe below in the GDNative-demos repository.
This example project also contains a SConstruct file that makes compiling a little easier, but in this tutorial we'll be doing things by hand to understand the process.
GDNative can be used to create several types of additions to Godot, using interfaces such as PluginScript or ARVRInterfaceGDNative. In this tutorial we are going to look at creating a NativeScript module. NativeScript allows you to write logic in C or C++ in a similar fashion as you would write a GDScript file. We'll be creating the C equivalent of this GDScript:
extends Reference

var data

func _ready():
    data = "World from GDScript!"

func get_data():
    return data
Future tutorials will focus on the other types of GDNative modules and explain when and how to use each of them.
Prerequisites
Before we start you'll need a few things:
A Godot executable for your target version.
A C compiler. On Linux, install
gccorclangfrom your package manager. On macOS, you can install Xcode from the Mac App Store. On Windows, you can use Visual Studio 2015 or later, or MinGW-w64.A Git clone of the godot-headers repository: these are the C headers for Godot's public API exposed to GDNative.
For the latter, we suggest that you create a dedicated folder for this GDNative example project, open a terminal in that folder and execute:
git clone https://github.com/godotengine/godot-headers.git
This will download the required files into that folder.
Tip
If you plan to use Git for your GDNative project, you can also add
godot-headers as a Git submodule.
Note
The godot-headers repository has different branches. As Godot evolves,
so does GDNative. While we try to preserve compatibility between version,
you should always build your GDNative module against headers matching the
Godot stable branch (e.g. 3.1) and ideally actual release (e.g.
3.1.1-stable) that you use.
GDNative modules built against older versions of the Godot headers may
work with newer versions of the engine, but not the other way around.
The master branch of the godot-headers repository is kept in line with
the master branch of Godot and thus contains the GDNative class and
structure definitions that will work with the latest development builds.
If you want to write a GDNative module for a stable version of Godot, look at
the available Git tags (with git tags) for the one matching your engine
version. In the godot-headers repository, such tags are prefixed with
godot-, so you can e.g. checkout the godot-3.1.1-stable tag for use with
Godot 3.1.1. In your cloned repository, you can do:
git checkout godot-3.1.1-stable
If a tag matching your stable release is missing for any reason, you can fall
back to the matching stable branch (e.g. 3.1), which you would also check
out with git checkout 3.1.
If you are building Godot from source with your own changes that impact
GDNative, you can find the updated class and structure definition in
<godotsource>/modules/gdnative/include
Our C source
Let's start by writing our main code. Eventually, we want to end up with a file structure that looks along those lines:
+ <your development folder>
  + godot-headers
    - <lots of files here>
  + simple
    + bin
      - libsimple.dll/so/dylib
      - libsimple.gdnlib
      - simple.gdns
    main.tscn
    project.godot
  + src
    - simple.c
Open up Godot and create a new project called "simple" alongside your
godot-headers Git clone. This will create the simple folder and
project.godot file. Then manually create a src folder alongside the
simple folder, and a bin subfolder in the simple folder.
We're going to start by having a look at what our simple.c file contains.
Now, for our example here we're making a single C source file without a header
to keep things simple. Once you start writing bigger projects it is advisable
to break your project up into multiple files. That however falls outside of the
scope of this tutorial.
We'll be looking at the source code bit by bit so all the parts below should all be put together into one big file. Each section will be explained as we add it.
#include <gdnative_api_struct.gen.h>

#include <string.h>

const godot_gdnative_core_api_struct *api = NULL;
const godot_gdnative_ext_nativescript_api_struct *nativescript_api = NULL;
The above code includes the GDNative API struct header and a standard header that we will use further down for string operations. It then defines two pointers to two different structs. GDNative supports a large collection of functions for calling back into the main Godot executable. In order for your module to have access to these functions, GDNative provides your application with a struct containing pointers to all these functions.
To keep this implementation modular and easily extendable, the core functions are available directly through the "core" API struct, but additional functions have their own "GDNative structs" that are accessible through extensions.
In our example, we access one of these extension to gain access to the functions specifically needed for NativeScript.
A NativeScript behaves like any other script in Godot. Because the NativeScript API is rather low level, it requires the library to specify many things more verbosely than other scripting systems, such as GDScript. When a NativeScript instance gets created, a library-given constructor gets called. When that instance gets destroyed, the given destructor will be executed.
void *simple_constructor(godot_object *p_instance, void *p_method_data);
void simple_destructor(godot_object *p_instance, void *p_method_data, void *p_user_data);
godot_variant simple_get_data(godot_object *p_instance, void *p_method_data,
        void *p_user_data, int p_num_args, godot_variant **p_args);
These are forward declarations for the functions we'll be implementing for our
object. A constructor and destructor is needed. Additionally, the object will
have a single method called get_data.
Next up is the first of the entry points Godot will call when our dynamic
library is loaded. These methods are all prefixed with godot_ (you can
change this later on) followed by their name. gdnative_init is a function
that initializes our dynamic library. Godot will give it a pointer to a
structure that contains various bits of information we may find useful among
which the pointers to our API structures.
For any additional API structures we need to loop through our extensions array and check the type of extension.
void GDN_EXPORT godot_gdnative_init(godot_gdnative_init_options *p_options) {
    api = p_options->api_struct;

    // Now find our extensions.
    for (int i = 0; i < api->num_extensions; i++) {
        switch (api->extensions[i]->type) {
            case GDNATIVE_EXT_NATIVESCRIPT: {
                nativescript_api = (godot_gdnative_ext_nativescript_api_struct *)api->extensions[i];
            }; break;
            default: break;
        }
    }
}
Next up is gdnative_terminate which is called before the library is
unloaded. Godot will unload the library when no object uses it anymore. Here,
you can do any cleanup you may need to do. For our example, we're simply going
to clear our API pointers.
void GDN_EXPORT godot_gdnative_terminate(godot_gdnative_terminate_options *p_options) {
    api = NULL;
    nativescript_api = NULL;
}
Finally, we have nativescript_init which is the most important function we'll
need today. This function will be called by Godot as part of loading a GDNative
library and communicates back to the engine what objects we make available.
void GDN_EXPORT godot_nativescript_init(void *p_handle) {
    godot_instance_create_func create = { NULL, NULL, NULL };
    create.create_func = &simple_constructor;

    godot_instance_destroy_func destroy = { NULL, NULL, NULL };
    destroy.destroy_func = &simple_destructor;

    nativescript_api->godot_nativescript_register_class(p_handle, "SIMPLE", "Reference",
            create, destroy);

    godot_instance_method get_data = { NULL, NULL, NULL };
    get_data.method = &simple_get_data;

    godot_method_attributes attributes = { GODOT_METHOD_RPC_MODE_DISABLED };

    nativescript_api->godot_nativescript_register_method(p_handle, "SIMPLE", "get_data",
            attributes, get_data);
}
We first tell the engine which classes are implemented by calling
nativescript_register_class. The first parameter here is the handle pointer
given to us. The second is the name of our object class. The third is the type
of object in Godot that we 'inherit' from; this is not true inheritance but it's
close enough. Finally, our fourth and fifth parameters are descriptions for our
constructor and destructor.
We then tell Godot about our methods (well our one method in this case), by
calling nativescript_register_method for each method of our class. In our
case, that is just get_data. Our first parameter is yet again our handle
pointer. The second is again the name of the object class we're registering. The
third is the name of our function as it will be known to GDScript. The fourth is
our attributes setting (see godot_method_rpc_mode enum in
godot-headers/nativescript/godot_nativescript.h for possible values). The
fifth and final parameter is a description of which function to call when the
method gets called.
The description struct instance_method contains the function pointer to the
function itself as first field. The other two fields in these structs are for
specifying per-method userdata. The second is the method_data field which is
passed on every function call as the p_method_data argument. This is useful
to reuse one function for different methods on possibly multiple different
script-classes. If the method_data value is a pointer to memory that needs
to be freed, the third free_func field can contain a pointer to a function
that will free that memory. That free function gets called when the script
itself (not instance!) gets unloaded (so usually at library-unload time).
Now, it's time to start working on the functions of our object. First, we define a structure that we use to store the member data of an instance of our GDNative class.
typedef struct user_data_struct {
    char data[256];
} user_data_struct;
And then, we define our constructor. All we do in our constructor is allocate memory for our structure and fill it with some data. Note that we use Godot's memory functions so the memory gets tracked and then return the pointer to our new structure. This pointer will act as our instance identifier in case multiple objects are instantiated.
This pointer will be passed to any of our functions related to our object as a
parameter called p_user_data, and can both be used to identify our instance
and to access its member data.
void *simple_constructor(godot_object *p_instance, void *p_method_data) {
    user_data_struct *user_data = api->godot_alloc(sizeof(user_data_struct));
    strcpy(user_data->data, "World from GDNative!");

    return user_data;
}
Our destructor is called when Godot is done with our object and we free our instances' member data.
void simple_destructor(godot_object *p_instance, void *p_method_data, void *p_user_data) {
    api->godot_free(p_user_data);
}
And finally, we implement our get_data function. Data is always sent and
returned as variants so in order to return our data, which is a string, we first
need to convert our C string to a Godot string object, and then copy that string
object into the variant we are returning.
godot_variant simple_get_data(godot_object *p_instance, void *p_method_data,
        void *p_user_data, int p_num_args, godot_variant **p_args) {
    godot_string data;
    godot_variant ret;
    user_data_struct *user_data = (user_data_struct *)p_user_data;

    api->godot_string_new(&data);
    api->godot_string_parse_utf8(&data, user_data->data);
    api->godot_variant_new_string(&ret, &data);
    api->godot_string_destroy(&data);

    return ret;
}
Strings are heap-allocated in Godot, so they have a destructor which frees the
memory. Destructors are named godot_TYPENAME_destroy. When a Variant gets
created with a String, it references the String. That means that the original
String can be "destroyed" to decrease the ref-count. If that does not happen the
String memory will leak since the ref-count will never be zero and the memory
never deallocated. The returned variant gets automatically destroyed by Godot.
Note
In more complex operations it can be confusing the keep track of which value
needs to be deallocated and which does not. As a general rule: call
godot_TYPENAME_destroy when a C++ destructor would be called instead.
The String destructor would be called in C++ after the Variant was created,
so the same is necessary in C.
The variant we return is destroyed automatically by Godot.
And that is the whole source code of our module.
Compiling
We now need to compile our source code. As mentioned our example project on GitHub contains a SCons configuration that does all the hard work for you, but for our tutorial here we are going to call the compilers directly.
Assuming you are sticking to the folder structure suggested above, it is best to
open a terminal session in the src folder and execute the commands from
there. Make sure to create the bin folder before you proceed.
On Linux:
gcc -std=c11 -fPIC -c -I../godot-headers simple.c -o simple.o
gcc -rdynamic -shared simple.o -o ../simple/bin/libsimple.so
On macOS:
clang -std=c11 -fPIC -c -I../godot-headers simple.c -o simple.os
clang -dynamiclib simple.os -o ../simple/bin/libsimple.dylib
On Windows:
cl /Fosimple.obj /c simple.c /nologo -EHsc -DNDEBUG /MD /I. /I..\godot-headers
link /nologo /dll /out:..\simple\bin\libsimple.dll /implib:..\simple\bin\libsimple.lib simple.obj
Note
On the Windows build you also end up with a libsimple.lib library. This
is a library that you can compile into a project to provide access to the
DLL. We get it as a byproduct and we do not need it :)
When exporting your game for release this file will be ignored.
Creating the GDNativeLibrary (.gdnlib) file
With our module compiled, we now need to create a corresponding
GDNativeLibrary resource with .gdnlib
extension which we place alongside our dynamic libraries. This file tells Godot
what dynamic libraries are part of our module and need to be loaded per
platform.
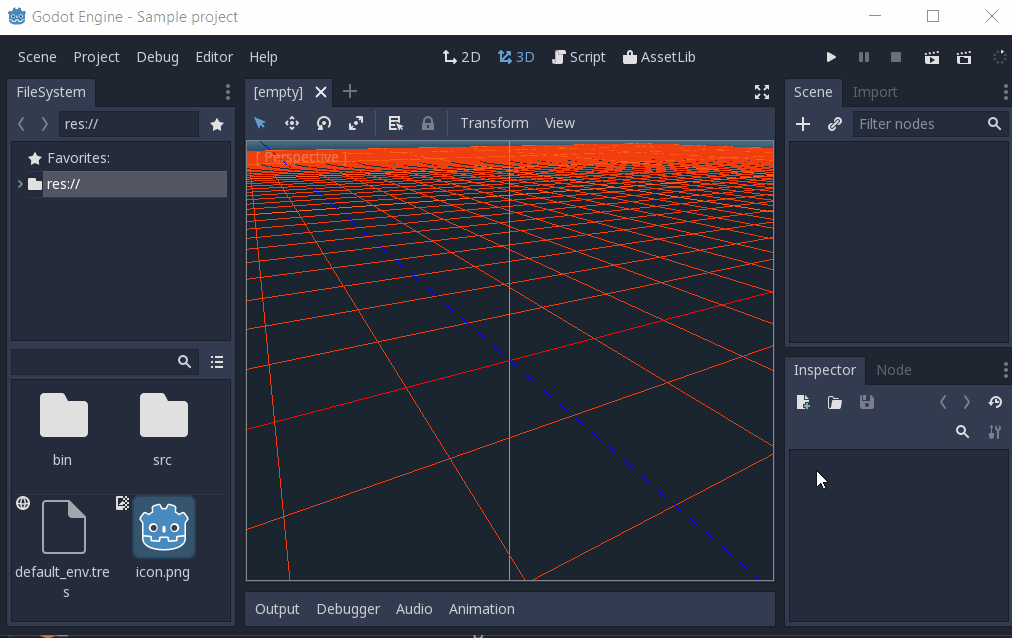
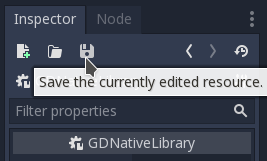
We can use Godot to generate this file, so open the "simple" project in the editor.
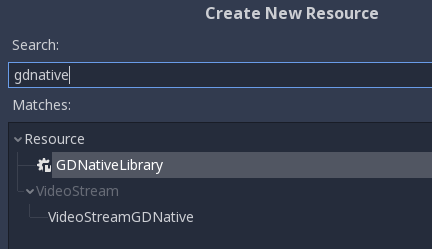
Start by clicking the create resource button in the Inspector:
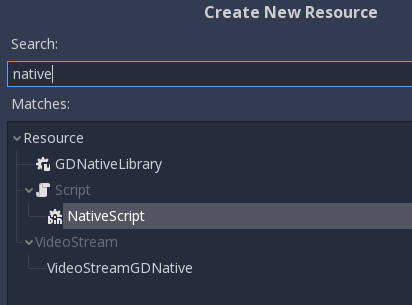
And select GDNativeLibrary:
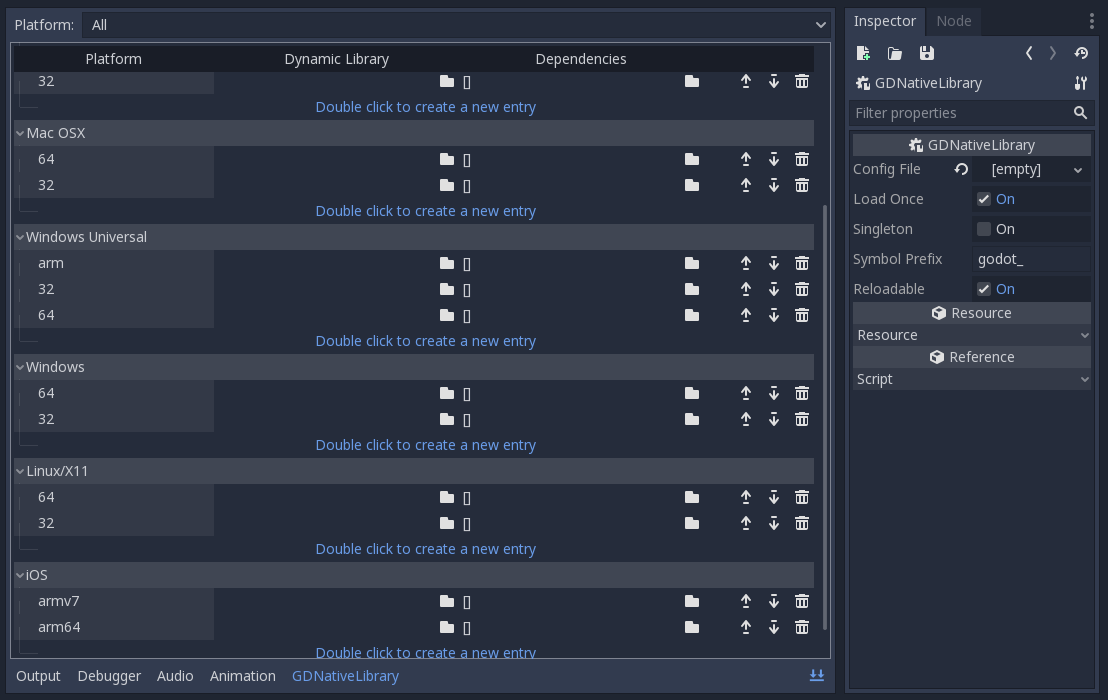
You should see a contextual editor appear in the bottom panel. Use the "Expand Bottom Panel" button in the bottom right to expand it to full height:
General properties
In the Inspector, you have various properties to control loading the library.
If Load Once is enabled, our library is loaded only once and each individual script that uses our library will use the same data. Any variable you define globally will be accessible from any instance of your object you create. If Load Once is disabled, a new copy of the library is loaded into memory each time a script accesses the library.
If Singleton is enabled, our library is automatically loaded and a function
called godot_gdnative_singleton is called. We'll leave that for another
tutorial.
The Symbol Prefix is a prefix for our core functions, such as godot_ in
godot_nativescript_init seen earlier. If you use multiple GDNative libraries
that you wish to statically link, you will have to use different prefixes. This
again is a subject to dive into deeper in a separate tutorial, it is only needed
at this time for deployment to iOS as this platform does not like dynamic
libraries.
Reloadable defines whether the library should be reloaded when the editor loses and gains focus, typically to pick up new or modified symbols from any change made to the library externally.
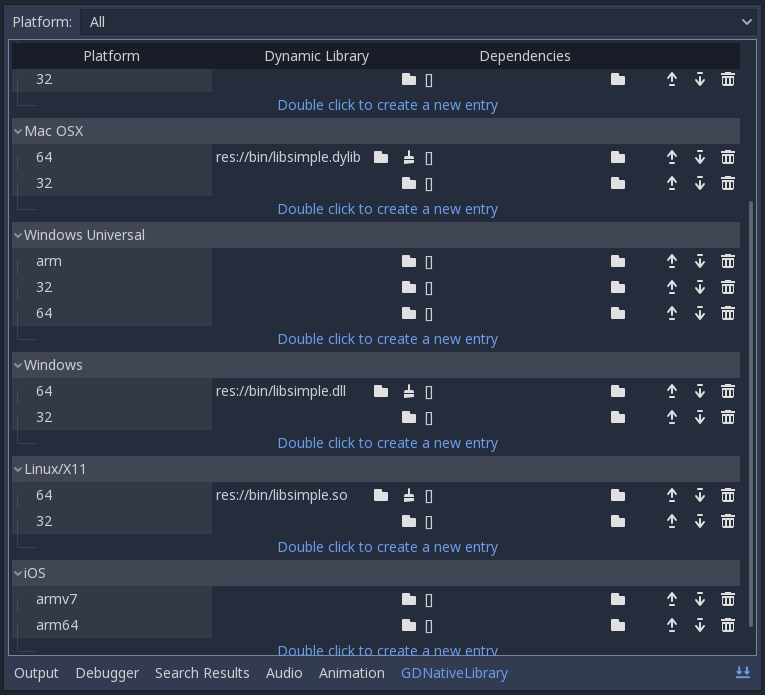
Platform libraries
The GDNativeLibrary editor plugin lets you configure two things for each platform and architecture that you aim to support.
The Dynamic Library column (entry section in the saved file) tells us for
each platform and feature combination which dynamic library has to be loaded.
This also informs the exporter which files need to be exported when exporting to
a specific platform.
The Dependencies column (also dependencies section) tells Godot what other
files need to be exported for each platform in order for our library to work.
Say that your GDNative module uses another DLL to implement functionality from a
3rd party library, this is where you list that DLL.
For our example, we only built libraries for Linux, macOS and/or Windows, so you can link them in the relevant fields by clicking the folder button. If you built all three libraries, you should have something like this:
Saving the resource
We can then save our GDNativeLibrary resource as bin/libsimple.gdnlib with
the Save button in the Inspector:
The file is saved in a text-based format and should have contents similar to this:
[general]

singleton=false
load_once=true
symbol_prefix="godot_"
reloadable=true

[entry]

OSX.64="res://bin/libsimple.dylib"
OSX.32="res://bin/libsimple.dylib"
Windows.64="res://bin/libsimple.dll"
X11.64="res://bin/libsimple.so"

[dependencies]

OSX.64=[  ]
OSX.32=[  ]
Windows.64=[  ]
X11.64=[  ]
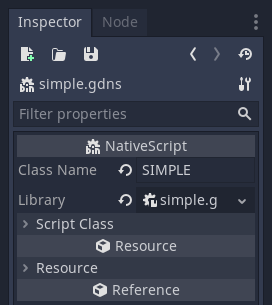
Creating the NativeScript (.gdns) file
With our .gdnlib file we've told Godot how to load our library, now we need
to tell it about our "SIMPLE" object class. We do this by creating a
NativeScript resource file with .gdns extension.
Like done for the GDNativeLibrary resource, click the button to create a new
resource in the Inspector and select NativeScript:
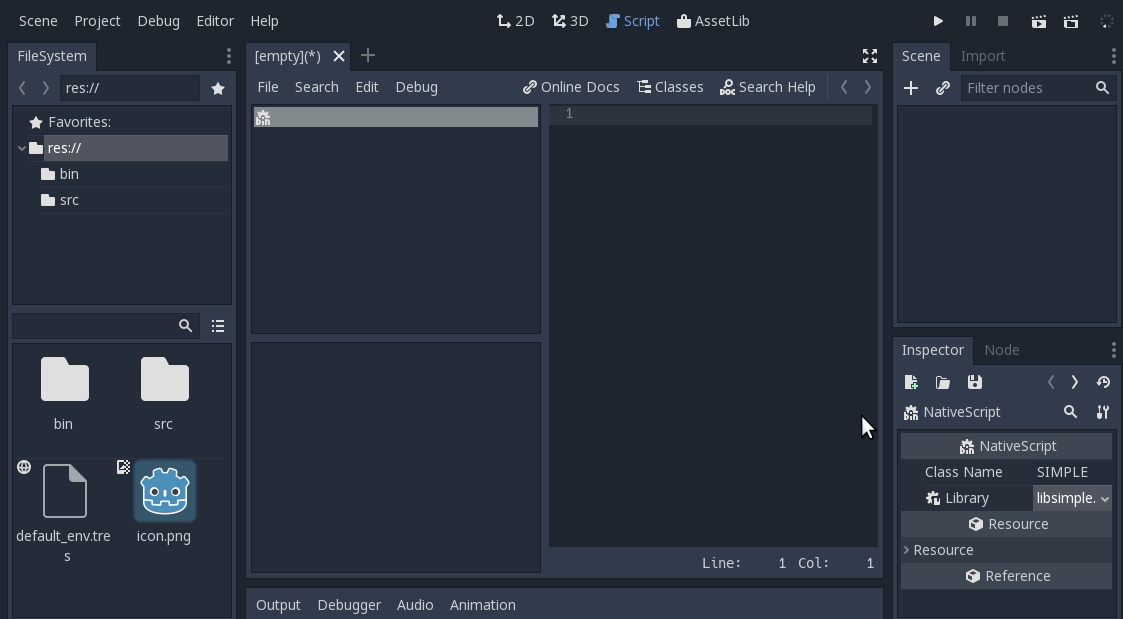
The inspector will show a few properties that we need to fill. As Class Name
we enter "SIMPLE" which is the object class name that we declared in our C
source when calling godot_nativescript_register_class. We also need to
select our .gdnlib file by clicking on Library and selecting Load:
Note
The Class Name must have the same spelling as the one given in godot_nativescript_init
when registering the class.
Finally, click on the save icon and save this as bin/simple.gdns:
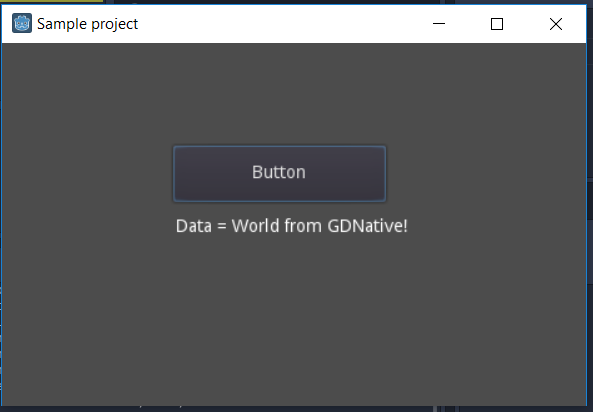
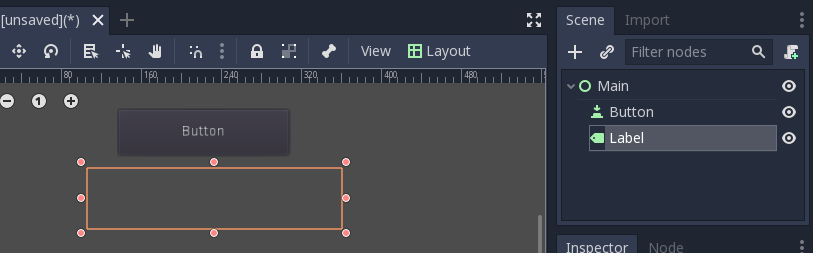
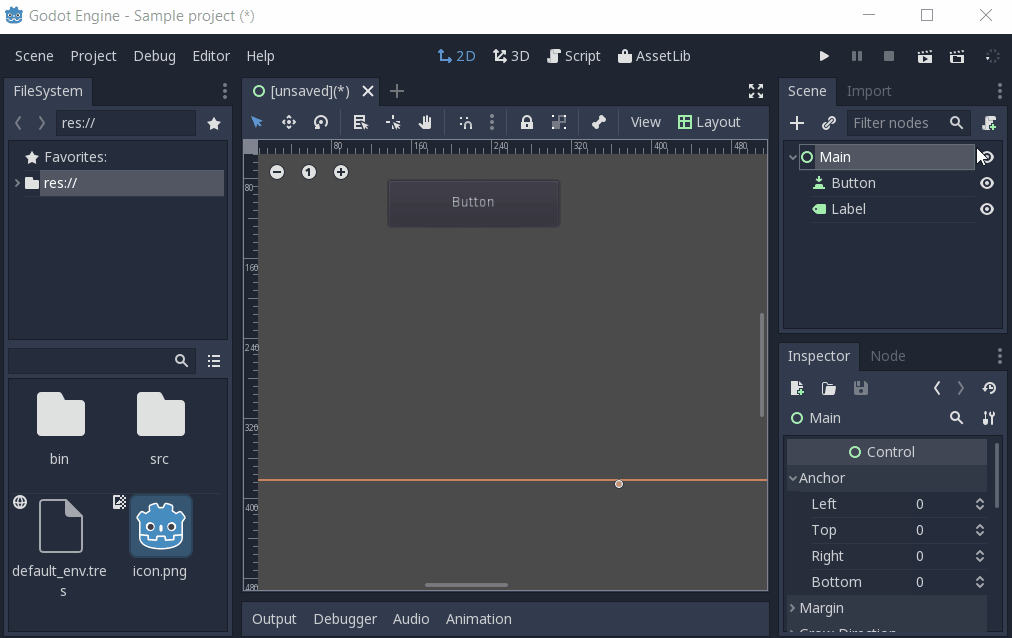
Now it's time to build our scene. Add a Control node to your scene as your root
and call it main. Then add a Button and a Label as child nodes. Place them
somewhere nice on screen and give your button a name.
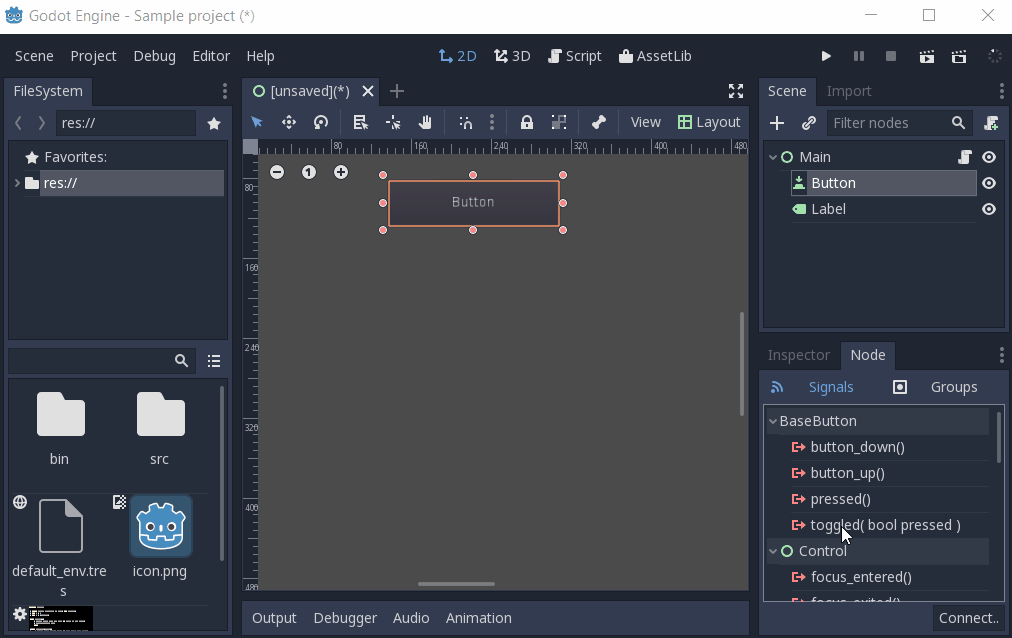
Select the control node and attach a script to it:
Next link up the pressed signal on the button to your script:
Don't forget to save your scene, call it main.tscn.
Now we can implement our main.gd code:
extends Control

# load the Simple library
onready var data = preload("res://bin/simple.gdns").new()

func _on_Button_pressed():
    $Label.text = "Data = " + data.get_data()
After all that, our project should work. The first time you run it Godot will
ask you what your main scene is and you select your main.tscn file and
presto: