Attention: Here be dragons
This is the latest
(unstable) version of this documentation, which may document features
not available in or compatible with released stable versions of Godot.
Checking the stable version of the documentation...
游戏主场景
现在是时候将我们所做的一切整合到一个可玩的游戏场景中了。
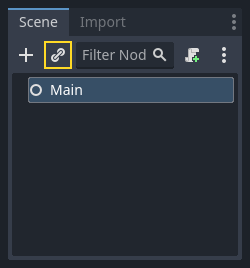
创建新场景并添加一个 Node 节点,命名为 Main。(我们之所以使用 Node 而不是 Node2D,是因为这个节点会作为处理游戏逻辑的容器使用。本身是不需要 2D 功能的。)
点击实例化按钮(由链条图标表示)并选择保存的 player.tscn。
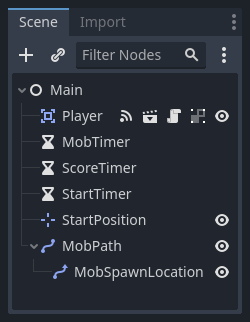
现在,将下列节点添加为 Main 的子节点,并按如下所示对它们进行命名:
Timer(名为
MobTimer)——控制怪物产生的频率Timer(名为
ScoreTimer)——每秒增加分数Timer(名为
StartTimer)——在开始之前给出延迟Marker2D(名为
StartPosition)——表示玩家的起始位置
如下设置每个 Timer 节点的 Wait Time 属性(值以秒为单位):
MobTimer:0.5ScoreTimer:1StartTimer:2
此外,将 StartTimer 的 One Shot 属性设置为“启用”,并将 StartPosition 节点的 Position 设置为 (240, 450)。
生成怪物
主节点将生成新的怪物,我们希望它们出现在屏幕边缘的随机位置。点击场景面板中的 Main 节点,然后添加一个 Path2D 名为 MobPath 的子节点。当选中 Path2D 节点后,你会在编辑器顶部看到一些新按钮:

选中中间的按钮("添加点"),然后通过ctrl+点击屏幕四角添加路径点。若要使点自动吸附到网格上,请确保同时勾选"启用网格吸附"和"启用智能吸附"选项。这两个选项位于"锁定"按钮的左侧,分别显示为磁铁图标和带有交叉线的点阵图标。

重要
以顺时针的顺序绘制路径,否则小怪会向外而非向内生成!
在图像上放置点 4 后,点击“闭合曲线”按钮,你的曲线就完成了。
现在已经定义了路径,添加一个 PathFollow2D 节点作为 MobPath 的子节点,并将其命名为 MobSpawnLocation。 该节点在移动时,将自动旋转并沿着该路径,因此我们可以使用它沿路径来选择随机位置和方向。
你的场景应如下所示:
Main 脚本
将脚本添加到 Main。在脚本的顶部,我们使用 @export var mob_scene: PackedScene 来允许我们选择要实例化的 Mob 场景。
extends Node

@export var mob_scene: PackedScene
var score
using Godot;

public partial class Main : Node
{
    // Don't forget to rebuild the project so the editor knows about the new export variable.

    [Export]
    public PackedScene MobScene { get; set; }

    private int _score;
}
单击 Main 节点,就可以在“检查器”的“Script Variables”(脚本变量)下看到 Mob Scene 属性。
有两种方法来给这个属性赋值:
将
mob.tscn从“文件系统”面板拖放到 Mob Scene 属性里。单击“[空]”旁边的下拉箭头按钮,选择“加载”。选择
mob.tscn。
接下来,在场景面板(Scene dock)中,选中 Main 节点下的 Player 场景实例,然后打开侧边栏上的信号面板(Signals dock)。
你可以看到 Player 的信号列表。找到 hit 信号并双击(或右键选择 "Connect...")将会打开信号连接窗口。接下来创建用于在游戏结束时进行一些处理的 game_over 函数。在信号连接窗口底部的 “Receiver Method” 框中输入 “game_over”,并点击 “Connect”。 你的目标是从 Player 发出 hit 信号,并在 Main 脚本中进行处理。将以下代码添加到新函数中,以及一个 new_game 函数,该函数将为新游戏设置一切:
func game_over():
    $ScoreTimer.stop()
    $MobTimer.stop()

func new_game():
    score = 0
    $Player.start($StartPosition.position)
    $StartTimer.start()
public void GameOver()
{
    GetNode<Timer>("MobTimer").Stop();
    GetNode<Timer>("ScoreTimer").Stop();
}

public void NewGame()
{
    _score = 0;

    var player = GetNode<Player>("Player");
    var startPosition = GetNode<Marker2D>("StartPosition");
    player.Start(startPosition.Position);

    GetNode<Timer>("StartTimer").Start();
}
现在将每个 Timer 节点(StartTimer、ScoreTimer 和 MobTimer)的 timeout() 信号连接到主脚本。对于这三个计时器,依次执行以下操作:在场景停靠栏选中计时器 → 打开节点停靠栏的信号标签页 → 双击列表中的 timeout() 信号 → 在弹出的信号连接对话框中点击 Connect (保持默认设置即可)。
完成这三个计时器的设置后,你可以在它们各自的“信号”选项卡中看到每个计时器的 timeout() 信号都已成功连接,并以绿色高亮显示。
(对于 MobTimer):
_on_mob_timer_timeout()(对于 ScoreTimer):
_on_score_timer_timeout()(对于 StartTimer):
_on_start_timer_timeout()
现在我们通过添加下面的代码来定义这些计时器的操作方式。注意到StartTimer将启动其他两个计时器,然后ScoreTimer 将使得分加 1。
func _on_score_timer_timeout():
    score += 1

func _on_start_timer_timeout():
    $MobTimer.start()
    $ScoreTimer.start()
// We also specified this function name in PascalCase in the editor's connection window.
private void OnScoreTimerTimeout()
{
    _score++;
}

// We also specified this function name in PascalCase in the editor's connection window.
private void OnStartTimerTimeout()
{
    GetNode<Timer>("MobTimer").Start();
    GetNode<Timer>("ScoreTimer").Start();
}
在 _on_mob_timer_timeout() 中, 我们先创建小怪实例,然后沿着 Path2D 路径随机选取起始位置,最后让小怪移动。PathFollow2D 节点将沿路径移动,并会自动旋转,所以我们将使用它来选择怪物的方位和朝向。生成小怪后,我们会在 150.0 和 250.0 之间选取随机值,表示每只小怪的移动速度(如果它们都以相同的速度移动,那么就太无聊了)。
注意,必须使用 add_child() 将新实例添加到场景中。
func _on_mob_timer_timeout():
    # Create a new instance of the Mob scene.
    var mob = mob_scene.instantiate()

    # Choose a random location on Path2D.
    var mob_spawn_location = $MobPath/MobSpawnLocation
    mob_spawn_location.progress_ratio = randf()

    # Set the mob's position to the random location.
    mob.position = mob_spawn_location.position

    # Set the mob's direction perpendicular to the path direction.
    var direction = mob_spawn_location.rotation + PI / 2

    # Add some randomness to the direction.
    direction += randf_range(-PI / 4, PI / 4)
    mob.rotation = direction

    # Choose the velocity for the mob.
    var velocity = Vector2(randf_range(150.0, 250.0), 0.0)
    mob.linear_velocity = velocity.rotated(direction)

    # Spawn the mob by adding it to the Main scene.
    add_child(mob)
// We also specified this function name in PascalCase in the editor's connection window.
private void OnMobTimerTimeout()
{
    // Create a new instance of the Mob scene.
    Mob mob = MobScene.Instantiate<Mob>();

    // Choose a random location on Path2D.
    var mobSpawnLocation = GetNode<PathFollow2D>("MobPath/MobSpawnLocation");
    mobSpawnLocation.ProgressRatio = GD.Randf();

    // Set the mob's direction perpendicular to the path direction.
    float direction = mobSpawnLocation.Rotation + Mathf.Pi / 2;

    // Set the mob's position to a random location.
    mob.Position = mobSpawnLocation.Position;

    // Add some randomness to the direction.
    direction += (float)GD.RandRange(-Mathf.Pi / 4, Mathf.Pi / 4);
    mob.Rotation = direction;

    // Choose the velocity.
    var velocity = new Vector2((float)GD.RandRange(150.0, 250.0), 0);
    mob.LinearVelocity = velocity.Rotated(direction);

    // Spawn the mob by adding it to the Main scene.
    AddChild(mob);
}
重要
为什么要用 PI?在需要传入角度的函数中,Godot 使用的是弧度而不是度数。圆周率(Pi)表示转半圈的弧度,约为 3.1415(还提供了等于 2 * PI 的 TAU)。如果你更喜欢使用度数,则需使用 deg_to_rad() 和 rad_to_deg() 函数在这两种单位之间进行转换。
测试场景
让我们测试这个场景,确保一切正常。请将对 new_game 的调用添加至 _ready():
func _ready():
    new_game()
public override void _Ready()
{
    NewGame();
}
让我们同时指定 Main 作为我们的“主场景”——游戏启动时自动运行的场景。按下“运行”按钮,当弹出提示时选择 main.tscn。
小技巧
如果你已经将别的场景设置为“主场景”了,你可以在“文件系统”面板上右键点击 main.tscn 并选择“设为主场景”。
你应该可以四处移动游戏角色,观察敌人的生成,以及玩家被敌人击中时会消失。
当你确定一切正常时,在 _ready() 中删除对 new_game() 的调用,使用 pass 替代它。
我们的游戏还缺点啥?缺用户界面。在下一课中,我们将会添加标题界面并且显示玩家的分数。