Attention: Here be dragons
This is the latest
(unstable) version of this documentation, which may document features
not available in or compatible with released stable versions of Godot.
Checking the stable version of the documentation...
检查器插件
检查器面板支持以插件的形式来创建自定义小工具编辑属性。尽管可以用它来修改内置类型的检查器小工具,但它在需要处理自定义数据类型和资源时尤其有用。你不但可以为特定的属性或者整个对象设计自定义控件,还可以为特定数据类型设计单独的控件。
这份指南会介绍如何使用 EditorInspectorPlugin 和 EditorProperty 类来为整数类型创建自定义的界面,将默认的行为替换为一个按了以后就会生成 0 到 99 之间随机数的按钮。
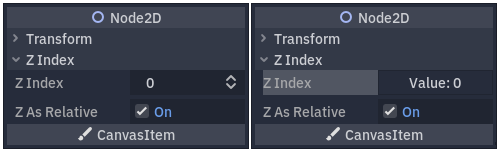
左图为默认行为,右图为最终结果。
创建你的插件
从创建新的空插件开始。
参见
如何创建新插件请参阅 制作插件。
让我们假设你的插件文件夹叫做 my_inspector_plugin。那么此时你新建的 addons/my_inspector_plugin 文件夹中就有两个文件:plugin.cfg 和 plugin.gd。
和之前一样,plugin.gd 是一个扩展了 EditorPlugin 的脚本,你需要在 _enter_tree 和 _exit_tree 方法中加入新的代码。要创建自己的检查器插件,你必须加载对应的脚本,然后创建并调用 add_inspector_plugin() 来添加实例。禁用插件时,你应该调用 remove_inspector_plugin() 将该实例移除。
备注
这里,你正在加载一个脚本,而不是一个打包的场景。因此,你应该使用 new() 而不是 instantiate()。
# plugin.gd
@tool
extends EditorPlugin

var plugin


func _enter_tree():
    plugin = preload("res://addons/my_inspector_plugin/my_inspector_plugin.gd").new()
    add_inspector_plugin(plugin)


func _exit_tree():
    remove_inspector_plugin(plugin)
// Plugin.cs
#if TOOLS
using Godot;

[Tool]
public partial class Plugin : EditorPlugin
{
    private MyInspectorPlugin _plugin;

    public override void _EnterTree()
    {
        _plugin = new MyInspectorPlugin();
        AddInspectorPlugin(_plugin);
    }

    public override void _ExitTree()
    {
        RemoveInspectorPlugin(_plugin);
    }
}
#endif
与检查器交互
要和检查器面板交互,你的 my_inspector_plugin.gd 脚本必须继承自 EditorInspectorPlugin 类。这个类提供了不少虚方法,可以用来控制检查器对属性的处理。
脚本必须实现 can_handle() 方法才能生效。这个函数会针对每个被编辑的 Object 对象调用,插件想要处理该对象或其属性的话,就必须返回 true。
备注
要处理附加在该对象上的 Resource 也同样如此。
你可以实现另外四种方法,在特定位置向检查器添加控件。_parse_begin() 和 _parse_end() 方法在每个对象解析开始时和结束时分别只调用一次。它们可以通过调用 add_custom_control() 在检查器布局的顶部或底部添加控件。
当编辑器解析对象时,它会调用 _parse_category() 和 _parse_property() 方法。在那里,除了 add_custom_control() 之外,你还可以调用 add_property_editor() 和 add_property_editor_for_multiple_properties()。可使用最后两种方法专门添加基于 EditorProperty 的控件。
# my_inspector_plugin.gd
extends EditorInspectorPlugin

var RandomIntEditor = preload("res://addons/my_inspector_plugin/random_int_editor.gd")


func _can_handle(object):
    # We support all objects in this example.
    return true


func _parse_property(object, type, name, hint_type, hint_string, usage_flags, wide):
    # We handle properties of type integer.
    if type == TYPE_INT:
        # Create an instance of the custom property editor and register
        # it to a specific property path.
        add_property_editor(name, RandomIntEditor.new())
        # Inform the editor to remove the default property editor for
        # this property type.
        return true
    else:
        return false
// MyInspectorPlugin.cs
#if TOOLS
using Godot;

public partial class MyInspectorPlugin : EditorInspectorPlugin
{
    public override bool _CanHandle(GodotObject @object)
    {
        // We support all objects in this example.
        return true;
    }

    public override bool _ParseProperty(GodotObject @object, Variant.Type type,
        string name, PropertyHint hintType, string hintString,
        PropertyUsageFlags usageFlags, bool wide)
    {
        // We handle properties of type integer.
        if (type == Variant.Type.Int)
        {
            // Create an instance of the custom property editor and register
            // it to a specific property path.
            AddPropertyEditor(name, new RandomIntEditor());
            // Inform the editor to remove the default property editor for
            // this property type.
            return true;
        }

        return false;
    }
}
#endif
添加编辑属性的界面
EditorProperty 是一种特殊的 Control,可以与检查器面板所编辑的对象进行交互。它本身不显示任何内容,但可以放入其他控件节点,甚至是复杂的场景。
扩展 EditorProperty 的脚本有三个必不可少的部分:
必须定义
_init()方法,设置控件节点的结构。应该实现
_update_property(),处理外部对数据的更改。必须在某处使用
emit_changed触发信号,告知检查器本控件对属性进行了修改。
显示自定义小工具的方法有两种。可以只用默认的 add_child() 方法可以把它显示到属性名称的右边,在 add_child() 之后再调用 set_bottom_editor() 就可以把它显示到名称的下边。
# random_int_editor.gd
extends EditorProperty


# The main control for editing the property.
var property_control = Button.new()
# An internal value of the property.
var current_value = 0
# A guard against internal changes when the property is updated.
var updating = false


func _init():
    # Add the control as a direct child of EditorProperty node.
    add_child(property_control)
    # Make sure the control is able to retain the focus.
    add_focusable(property_control)
    # Setup the initial state and connect to the signal to track changes.
    refresh_control_text()
    property_control.pressed.connect(_on_button_pressed)


func _on_button_pressed():
    # Ignore the signal if the property is currently being updated.
    if (updating):
        return

    # Generate a new random integer between 0 and 99.
    current_value = randi() % 100
    refresh_control_text()
    emit_changed(get_edited_property(), current_value)


func _update_property():
    # Read the current value from the property.
    var new_value = get_edited_object()[get_edited_property()]
    if (new_value == current_value):
        return

    # Update the control with the new value.
    updating = true
    current_value = new_value
    refresh_control_text()
    updating = false

func refresh_control_text():
    property_control.text = "Value: " + str(current_value)
// RandomIntEditor.cs
#if TOOLS
using Godot;

public partial class RandomIntEditor : EditorProperty
{
    // The main control for editing the property.
    private Button _propertyControl = new Button();
    // An internal value of the property.
    private int _currentValue = 0;
    // A guard against internal changes when the property is updated.
    private bool _updating = false;

    public RandomIntEditor()
    {
        // Add the control as a direct child of EditorProperty node.
        AddChild(_propertyControl);
        // Make sure the control is able to retain the focus.
        AddFocusable(_propertyControl);
        // Setup the initial state and connect to the signal to track changes.
        RefreshControlText();
        _propertyControl.Pressed += OnButtonPressed;
    }

    private void OnButtonPressed()
    {
        // Ignore the signal if the property is currently being updated.
        if (_updating)
        {
            return;
        }

        // Generate a new random integer between 0 and 99.
        _currentValue = (int)GD.Randi() % 100;
        RefreshControlText();
        EmitChanged(GetEditedProperty(), _currentValue);
    }

    public override void _UpdateProperty()
    {
        // Read the current value from the property.
        var newValue = (int)GetEditedObject().Get(GetEditedProperty());
        if (newValue == _currentValue)
        {
            return;
        }

        // Update the control with the new value.
        _updating = true;
        _currentValue = newValue;
        RefreshControlText();
        _updating = false;
    }

    private void RefreshControlText()
    {
        _propertyControl.Text = $"Value: {_currentValue}";
    }
}
#endif