Up to date
This page is up to date for Godot 4.2.
If you still find outdated information, please open an issue.
物理介绍
在游戏开发中, 你经常需要知道游戏中的两个对象在何时相交或接触. 这被称为 碰撞检测 . 检测到碰撞时, 你通常希望某些事情发生. 这被称为 碰撞响应 .
Godot在2D和3D中提供了许多碰撞对象, 以提供碰撞检测和响应. 你可能很难决定哪个适合你的项目. 一旦了解了每种方法的工作原理以及它们的优缺点, 你就可以避免出现问题并简化开发过程.
在本指南中,你将学会:
Godot的四种碰撞对象类型
每个碰撞对象的工作原理
何时以及为何选择这种类型而不是另一种类型
备注
本文档的示例将使用2D对象. 每个2D物理对象和碰撞形状在3D中具有直接等价物, 并且在大多数情况下它们以相同的方式工作.
碰撞物体
Godot offers four kinds of collision objects which all extend CollisionObject2D. The last three listed below are physics bodies and additionally extend PhysicsBody2D.
- Area2D
Area2D节点提供 检测 和 影响 . 它们可以检测物体何时重叠, 并在物体进入或离开时发出信号.Area2D也可用于覆盖物理属性, 例如一定区域内的重力或阻尼.
- StaticBody2D
静态主体是物理引擎不移动的主体. 它参与碰撞检测, 但不会响应碰撞而移动. 它们通常用于属于环境的对象或不需要任何动态行为的对象.
- RigidBody2D
这是实现模拟2D物理的节点. 你不直接控制
RigidBody2D, 而是你对它施加力(重力, 冲动等), 物理引擎计算得到的运动. 阅读更多关于使用刚体的信息.
- CharacterBody2D
提供碰撞检测的物体, 但没有物理特性. 所有移动和碰撞响应必须在代码中实现.
物理材质
Static bodies and rigid bodies can be configured to use a PhysicsMaterial. This allows adjusting the friction and bounce of an object, and set if it's absorbent and/or rough.
碰撞形状
物理体可以包含任意数量的 Shape2D 对象作为子对象. 这些形状用于定义对象的碰撞边界并检测与其他对象的接触.
备注
为了检测碰撞, 必须至少为对象分配一个 Shape2D .
分配形状的最常用方法是添加 CollisionShape2D 或 CollisionPolygon2D 作为对象的子项. 这些节点允许你直接在编辑器工作区中绘制形状.
重要
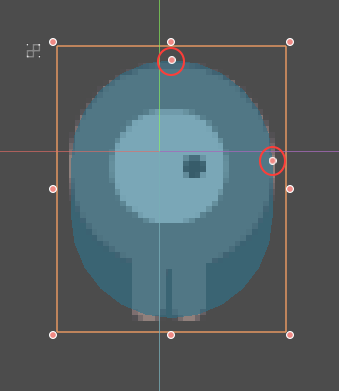
注意,不要在编辑器中缩放碰撞形状。“检查器”中的“Scale”属性应保持为 (1, 1)。改变碰撞形状的大小时,你应该使用尺寸控制柄,而不是 Node2D 缩放控制柄。缩放形状可能会导致意外的碰撞行为。

物理过程回调
The physics engine runs at a fixed rate (a default of 60 iterations per second). This rate is typically different from the frame rate which fluctuates based on what is rendered and available resources.
It is important that all physics related code runs at this fixed rate. Therefore Godot differentiates between physics and idle processing. Code that runs each frame is called idle processing and code that runs on each physics tick is called physics processing. Godot provides two different callbacks, one for each of those processing rates.
The physics callback, Node._physics_process(),
is called before each physics step. Any code that needs to access a body's properties should
be run in here. This method will be passed a delta
parameter, which is a floating-point number equal to the time passed in
seconds since the last step. When using the default 60 Hz physics update rate,
it will typically be equal to 0.01666... (but not always, see below).
备注
建议在物理计算中使用 delta 参数, 以便当你更改物理更新速率或玩家设备跟不上时, 游戏能够正确运行.
碰撞层与遮罩
One of the most powerful, but frequently misunderstood, collision features
is the collision layer system. This system allows you to build up complex
interactions between a variety of objects. The key concepts are layers
and masks. Each CollisionObject2D has 32 different physics layers
it can interact with.
让我们依次看看每个属性:
- collision_layer
表示该对象位于哪些层。默认情况下,所有实体都在图层
1上。
- collision_mask
表示该对象会对哪些层上的实体进行扫描。如果对象不在任何遮罩层中,则该实体将其忽略。默认情况下,所有实体都会扫描图层
1。
可以通过代码配置这些属性,也可以在“检查器”中对其进行编辑。
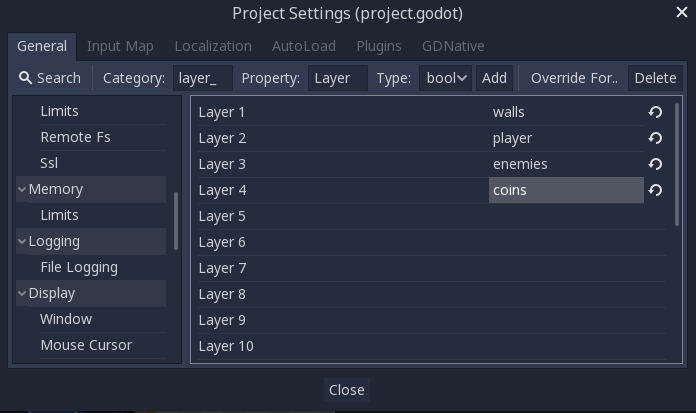
跟踪你正在使用每个图层的内容可能很困难,因此你可能会发现为你正在使用的图层指定名称很有用。可以在“项目设置 -> Layer Names”中指定名称。

图形用户界面示例
游戏中有四种节点类型:墙(Wall)、玩家(Player)、敌人(Enemy)、金币(Coin)。玩家和敌人都应该与墙碰撞。玩家节点应该检测与敌人和硬币的碰撞,但敌人和硬币应该互相忽略。
首先将 1 至 4 层分别命名为“walls”(墙)“player”(玩家)“enemies”(敌人)“coins”(金币)并使用“Layer”属性将每个节点类型放在其各自的层中。然后通过选择它应该与之互动的层来设置每个节点的“Mash”属性。例如,玩家的设置将看起来像这样:


代码示例
In function calls, layers are specified as a bitmask. Where a function enables
all layers by default, the layer mask will be given as 0xffffffff. Your code
can use binary, hexadecimal, or decimal notation for layer masks, depending
on your preference.
如果要用代码来启用第 1、3、4 层:
# Example: Setting mask value for enabling layers 1, 3 and 4

# Binary - set the bit corresponding to the layers you want to enable (1, 3, and 4) to 1, set all other bits to 0.
# Note: Layer 32 is the first bit, layer 1 is the last. The mask for layers 4,3 and 1 is therefore
0b00000000_00000000_00000000_00001101
# (This can be shortened to 0b1101)

# Hexadecimal equivalent (1101 binary converted to hexadecimal)
0x000d
# (This value can be shortened to 0xd)

# Decimal - Add the results of 2 to the power of (layer to be enabled - 1).
# (2^(1-1)) + (2^(3-1)) + (2^(4-1)) = 1 + 4 + 8 = 13
pow(2, 1-1) + pow(2, 3-1) + pow(2, 4-1)
Area2D
Area 节点的作用是检测和影响。它们可以检测物体何时重叠,并在物体进入或离开时发出信号。Area 也可用于覆盖物理属性,例如一定区域内的重力或阻尼。
Area2D 的主要用途有三种:
覆盖给定区域中的物理参数(例如重力)。
检测其他实体何时进入或退出某个区域或当前哪个实体位于某个区域。
检查是否与其他区域重叠。
默认情况下,area还会接收鼠标和触摸屏输入.
StaticBody2D
静态主体是物理引擎不移动的主体. 它参与碰撞检测, 但不会响应碰撞而移动. 然而, 它可以使用它的 constant_linear_velocity 和 constant_angular_velocity 属性将运动或旋转传递给碰撞体, 好像 它正在移动一样.
StaticBody2D 节点最常用于属于环境的对象或不需要任何动态行为的对象.
StaticBody2D 的示例用法:
平台(包括可移动的平台)
输送带
墙壁和其他障碍
RigidBody2D
这是实现模拟2D物理的节点. 你不能直接控制一个 RigidBody2D. 取而代之的是, 对它施加力, 物理引擎会计算由此产生的运动, 包括与其他物体的碰撞, 以及碰撞响应, 如弹跳, 旋转等.
你可以通过“Mass”(质量)“Friction”(摩擦)“Bounce”(反弹)等属性修改刚体的行为,这些都可以在检查器中设置。
物体的行为也受到“项目设置 -> Physics”中设置的世界属性的影响,或者通过输入覆盖全局物理属性的 Area2D。
当一个刚体处于静止状态, 有一段时间没有移动, 它就会进入睡眠状态. 睡眠的物体就像一个静态的物体, 它的力不会被物理引擎计算. 当力被施加时, 无论是通过碰撞还是通过代码, 该物体都会被唤醒.
使用 RigidBody2D
使用刚体的一个好处是,可以“免费”获得许多行为而无需编写任何代码。例如,如果你正在制作一个带有下降块的《愤怒的小鸟》式游戏,你只需要创建 RigidBody2D 并调整它们的属性。堆叠、下降、弹跳将由物理引擎自动计算。
However, if you do wish to have some control over the body, you should take
care - altering the position, linear_velocity, or other physics properties
of a rigid body can result in unexpected behavior. If you need to alter any
of the physics-related properties, you should use the _integrate_forces()
callback instead of _physics_process(). In this callback, you have access
to the body's PhysicsDirectBodyState2D,
which allows for safely changing properties and synchronizing them with
the physics engine.
例如,以下是《爆破彗星》式宇宙飞船的代码:
extends RigidBody2D

var thrust = Vector2(0, -250)
var torque = 20000

func _integrate_forces(state):
    if Input.is_action_pressed("ui_up"):
        state.apply_force(thrust.rotated(rotation))
    else:
        state.apply_force(Vector2())
    var rotation_direction = 0
    if Input.is_action_pressed("ui_right"):
        rotation_direction += 1
    if Input.is_action_pressed("ui_left"):
        rotation_direction -= 1
    state.apply_torque(rotation_direction * torque)
using Godot;

public partial class Spaceship : RigidBody2D
{
    private Vector2 _thrust = new Vector2(0, -250);
    private float _torque = 20000;

    public override void _IntegrateForces(PhysicsDirectBodyState2D state)
    {
        if (Input.IsActionPressed("ui_up"))
            state.ApplyForce(_thrust.Rotated(Rotation));
        else
            state.ApplyForce(new Vector2());

        var rotationDir = 0;
        if (Input.IsActionPressed("ui_right"))
            rotationDir += 1;
        if (Input.IsActionPressed("ui_left"))
            rotationDir -= 1;
        state.ApplyTorque(rotationDir * _torque);
    }
}
请注意, 我们不是直接设置 linear_velocity 或 angular_velocity 属性, 而是将力( thrust 和 torque )施加到物体上并让物理引擎计算出最终的运动.
备注
当一个刚体进入睡眠状态时, _integrate_forces() 函数将不会被调用. 要重写这一行为, 你需要通过创建碰撞, 对其施加力或禁用 can_sleep 属性来保持物体的激活. 请注意, 这可能会对性能产生负面影响.
接触报告
By default, rigid bodies do not keep track of contacts, because this can require a huge amount of memory if many bodies are in the scene. To enable contact reporting, set the max_contacts_reported property to a non-zero value. The contacts can then be obtained via PhysicsDirectBodyState2D.get_contact_count() and related functions.
通过信号的接触监控, 启用 contact_monitor 属性. 请参阅 RigidBody2D 的可用信号列表.
CharacterBody2D
CharacterBody2D 物体能够检测到与其他物体的碰撞,但不会受到重力、摩擦力等物理属性的影响。必须由用户通过代码来控制。物理引擎不会移动角色体。
移动角色体时,你不应该直接设置 position,而应该使用 move_and_collide() 或 move_and_slide() 方法。这些方法会让物体沿着给定的向量移动,与其他物体发生碰撞就会立即停止移动。发生碰撞后,必须手动编写对碰撞的响应逻辑。
响应角色碰撞
发生碰撞后,你可能会希望该物体发生反弹、沿着墙体滑动、或者修改被碰撞对象的属性。处理碰撞响应的方法取决于移动 CharacterBody2D 的方法。
move_and_collide
当使用 move_and_collide() 时, 该函数返回一个 KinematicCollision2D 对象, 其中包含有关碰撞和碰撞体的信息. 你可以使用此信息来确定响应.
例如, 如果要查找发生碰撞的空间点:
extends PhysicsBody2D

var velocity = Vector2(250, 250)

func _physics_process(delta):
    var collision_info = move_and_collide(velocity * delta)
    if collision_info:
        var collision_point = collision_info.get_position()
using Godot;

public partial class Body : PhysicsBody2D
{
    private Vector2 _velocity = new Vector2(250, 250);

    public override void _PhysicsProcess(double delta)
    {
        var collisionInfo = MoveAndCollide(_velocity * (float)delta);
        if (collisionInfo != null)
        {
            var collisionPoint = collisionInfo.GetPosition();
        }
    }
}
或者从碰撞物体反弹:
extends PhysicsBody2D

var velocity = Vector2(250, 250)

func _physics_process(delta):
    var collision_info = move_and_collide(velocity * delta)
    if collision_info:
        velocity = velocity.bounce(collision_info.get_normal())
using Godot;

public partial class Body : PhysicsBody2D
{
    private Vector2 _velocity = new Vector2(250, 250);

    public override void _PhysicsProcess(double delta)
    {
        var collisionInfo = MoveAndCollide(_velocity * (float)delta);
        if (collisionInfo != null)
            _velocity = _velocity.Bounce(collisionInfo.GetNormal());
    }
}
move_and_slide
滑动是一种常见的碰撞响应; 想象一个游戏角色在上帝视角的游戏中沿着墙壁移动, 或者在平台游戏中上下坡. 虽然可在使用 move_and_collide() 之后自己编写这个响应, 但 move_and_slide() 提供了一种快捷方法来实现滑动且无需编写太多代码.
警告
move_and_slide() 在计算中自动包含时间步长, 因此你 不 应将速度向量乘以 delta .
例如, 使用以下代码制作一个可以沿着地面(包括斜坡)行走的角色, 并在站在地面时跳跃:
extends CharacterBody2D

var run_speed = 350
var jump_speed = -1000
var gravity = 2500

func get_input():
    velocity.x = 0
    var right = Input.is_action_pressed('ui_right')
    var left = Input.is_action_pressed('ui_left')
    var jump = Input.is_action_just_pressed('ui_select')

    if is_on_floor() and jump:
        velocity.y = jump_speed
    if right:
        velocity.x += run_speed
    if left:
        velocity.x -= run_speed

func _physics_process(delta):
    velocity.y += gravity * delta
    get_input()
    move_and_slide()
using Godot;

public partial class Body : CharacterBody2D
{
    private float _runSpeed = 350;
    private float _jumpSpeed = -1000;
    private float _gravity = 2500;

    private void GetInput()
    {
        var velocity = Velocity;
        velocity.X = 0;

        var right = Input.IsActionPressed("ui_right");
        var left = Input.IsActionPressed("ui_left");
        var jump = Input.IsActionPressed("ui_select");

        if (IsOnFloor() && jump)
            velocity.Y = _jumpSpeed;
        if (right)
            velocity.X += _runSpeed;
        if (left)
            velocity.X -= _runSpeed;

        Velocity = velocity;
    }

    public override void _PhysicsProcess(double delta)
    {
        var velocity = Velocity;
        velocity.Y += _gravity * (float)delta;
        Velocity = velocity;
        GetInput();
        MoveAndSlide();
    }
}
有关使用 move_and_slide() 的更多详细信息, 请参阅 运动学角色(2D) , 包括带有详细代码的演示项目.