Attention: Here be dragons
This is the latest
(unstable) version of this documentation, which may document features
not available in or compatible with released stable versions of Godot.
Checking the stable version of the documentation...
导入插件
备注
本教程假设你已经知道如何制作通用插件。如有疑问,请参阅制作插件页面。这也假设你熟悉 Godot 的导入系统。
介绍
导入插件是一种特殊的编辑器工具,它允许 Godot 导入自定义资源,并将其作为一等资源对待。编辑器本身捆绑了很多导入插件来处理常见的资源,如 PNG 图片、Collada 和 glTF 模型、Ogg Vorbis 声音等等。
本教程介绍如何创建导入插件以加载自定义文本文件作为材质资源。该文本文件将包含三个以逗号分隔的数值,代表颜色的三个通道,生成的颜色将用作导入材质的反照率(主颜色)。在本示例中,它包含纯蓝色(零红色、零绿色、全蓝色):
0,0,255
配置
首先,我们需要一个通用插件来处理导入插件的初始化和销毁。让我们先添加 plugin.cfg 文件:
[plugin]

name="Silly Material Importer"
description="Imports a 3D Material from an external text file."
author="Yours Truly"
version="1.0"
script="material_import.gd"
然后我们需要 material_import.gd 文件来在需要时添加和移除导入插件:
# material_import.gd
@tool
extends EditorPlugin


var import_plugin


func _enter_tree():
    import_plugin = preload("import_plugin.gd").new()
    add_import_plugin(import_plugin)


func _exit_tree():
    remove_import_plugin(import_plugin)
    import_plugin = null
当这个插件被激活时,它将创建一个新的导入插件实例(我们很快就会制作),并使用 add_import_plugin() 方法将其添加到编辑器。我们在类成员 import_plugin 中存储它的引用,这样我们就可以在以后使用该成员来移除它。remove_import_plugin() 方法在插件停用时被调用,以清理内存并让编辑器知道导入插件不再可用。
注意,导入插件是一个引用类型,所以它不需要使用 free() 函数显式地从内存中释放。当超出其作用域时,它将被引擎自动释放。
EditorImportPlugin 类
这里的主角是 EditorImportPlugin 类。它负责实现 Godot 在需要了解如何处理文件时调用的方法。
让我们开始编写我们的插件,一次一个方法:
# import_plugin.gd
@tool
extends EditorImportPlugin


func _get_importer_name():
    return "demos.sillymaterial"
第一个方法是 _get_importer_name()。这是插件的唯一名称,Godot 使用它来判断某个文件使用了哪种导入方式。当这些文件需要重新导入时,编辑器将知道要调用哪个插件。
func _get_visible_name():
    return "Silly Material"
_get_visible_name() 方法负责返回它导入的类型的名称,并会在导入面板中显示给用户。
你选择的名字应该能接在“导入为”之后,例如“导入为 Silly Material”。你可以随心所欲地命名,但我们建议为你的插件起一个描述性的名字。
func _get_recognized_extensions():
    return ["mtxt"]
Godot 的导入系统通过扩展名检测文件类型。在 _get_recognized_extensions() 方法中,你返回一个字符串数组,表示该插件可以理解的每个扩展名。如果扩展名被多个插件识别,则用户可以在导入文件时选择使用哪个插件。
小技巧
许多插件可能会使用像 .json 和 .txt 这样的常见扩展名。此外,项目中可能存在仅作为游戏数据的文件,不应导入。导入时必须小心验证数据。永远不要假定文件格式正确。
func _get_save_extension():
    return "material"
导入的文件被保存在项目根目录的 .import 文件夹中。它们的扩展名应与你要导入的资源类型匹配,但由于 Godot 无法判断你将使用什么扩展名(因为同一资源可能有多个有效的扩展名),你需要声明将在导入时使用的内容。
由于我们正在导入材质,因此我们将为此类资源类型使用特殊扩展名。如果要导入场景,可以使用 scn。通用资源可以使用 res 扩展名。但是,引擎不会以任何方式强制执行此操作。
func _get_resource_type():
    return "StandardMaterial3D"
导入的资源具有特定类型,编辑器可以据此知道它属于哪个属性栏位。这样就能够将其从文件系统面板拖放到检查器的属性之中。
在我们的示例中,它是一个 StandardMaterial3D,可以应用于 3D 对象。
备注
如果需要从同一扩展中导入不同类型,则必须创建多个导入插件。你可以将导入代码抽象到另一个文件中,以避免代码重复。
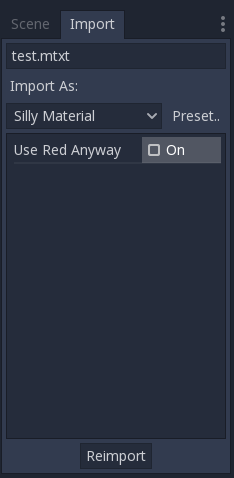
选项和预设
你的插件可以提供不同的选项,以允许用户控制资源的导入方式。如果一组选定的选项很常见,你还可以创建不同的预设以使用户的工作更轻松。下图显示了选项在编辑器中的显示方式:
由于可能有许多预设并且它们用数字标识,因此使用枚举是一个很好的做法,这样你就可以使用名称来引用它们。
@tool
extends EditorImportPlugin


enum Presets { DEFAULT }


...
既然定义了枚举,让我们继续看一下导入插件的方法:
func _get_preset_count():
    return Presets.size()
_get_preset_count() 方法返回该插件定义的预设数量。我们现在只有一个预设,但我们可以通过返回 Presets 枚举的大小来使该方法适应未来的需求。
func _get_preset_name(preset_index):
    match preset_index:
        Presets.DEFAULT:
            return "Default"
        _:
            return "Unknown"
这里我们有 _get_preset_name() 方法,它给出展示给用户的预设的名称,因此请确保使用简短而清晰的名称。
我们可以在这里使用 match 语句,使代码结构更清晰。这样一来,日后添加新的预设也会更加方便。同时,我们使用通配符(catch all)模式来返回一个兜底值。虽然 Godot 不会请求超出你所定义预设数量范围的预设,但以防万一总是更稳妥的做法。
如果只有一个预设,也可以直接返回其名称,但如果你这样做,则在添加更多预设时必须小心。
func _get_import_options(path, preset_index):
    match preset_index:
        Presets.DEFAULT:
            return [{
                       "name": "use_red_anyway",
                       "default_value": false
                    }]
        _:
            return []
这是定义可用选项的方法。_get_import_options() 返回一个字典数组,每个字典包含若干键,Godot 会检查这些键来自定义向用户展示的选项。下表显示了可能的键:
键 |
类型 |
描述 |
|---|---|---|
|
字符串 |
选项的名称。显示时,下划线变为空格,首字母大写。 |
|
任意类型 |
此预设的选项的默认值。 |
|
枚举值 |
PropertyHint 中的一个值,作为提示使用。 |
|
字符串 |
属性的提示文本。与你在 GDScript 中的 |
|
枚举值 |
PropertyUsageFlags 中的一个值来定义用途。 |
name 和 default_value 键是必需的,其余键是可选的。
请注意,_get_import_options 方法接收预设编号,因此你可以为每个不同的预设配置选项(特别是默认值)。在本示例中,我们使用 match 语句,但如果你有很多选项,并且预设只更改了值,你可能需要先创建选项数组,再根据其预设值进行修改。
警告
即使你没有定义预设(通过使 _get_preset_count 返回零),_get_import_options 方法也会被调用。你必须返回一个数组,即使它是空的,否则可能会报错。
func _get_option_visibility(path, option_name, options):
    return true
对于 _get_option_visibility() 方法,我们只需返回 true,因为我们的所有选项(即我们定义的单个选项)始终可见。
如果需要仅当另一个选项设置了某个值时才使某个选项可见,则可以在该方法中添加逻辑。
import 方法
_import() 方法负责将文件转换为资源,这是该过程的核心部分。我们的示例代码有点长,所以我们把它分成几个部分来讲:
func _import(source_file, save_path, options, r_platform_variants, r_gen_files):
    var file = FileAccess.open(source_file, FileAccess.READ)
    if file == null:
        return FileAccess.get_open_error()

    var line = file.get_line()
导入方法的第一部分打开并读取源文件。我们使用 FileAccess 类来执行该操作,并传递编辑器提供的 source_file 参数。
如果打开文件时出错,我们会返回该错误以让编辑器知道导入未成功。
var channels = line.split(",")
if channels.size() != 3:
    return ERR_PARSE_ERROR

var color
if options.use_red_anyway:
    color = Color.from_rgba8(255, 0, 0)
else:
    color = Color.from_rgba8(int(channels[0]), int(channels[1]), int(channels[2]))
该代码取出之前读取的文件行,并将其拆分成以逗号分隔的片段。如果值多于或少于三个,则认为该文件无效并报告错误。
然后它创建一个新的 Color 变量,并根据输入文件设置其值。如果启用了 use_red_anyway 选项,则它会将颜色设置为纯红色。
var material = StandardMaterial3D.new()
material.albedo_color = color
这部分创建了一个新的 StandardMaterial3D,即导入的资源。我们创建一个新的实例,然后将其反照率颜色设置为我们之前得到的值。
return ResourceSaver.save(material, "%s.%s" % [save_path, _get_save_extension()])
这是最后一部分,也是相当重要的部分,因为在这里我们将创建好的资源保存到磁盘。保存文件的路径由编辑器通过 save_path 参数生成并告知。请注意,该路径不带扩展名,因此我们使用 string formatting 添加它。为此,我们调用我们之前定义的 _get_save_extension 方法,这样我们就可以确保两者保持一致。
我们还返回 ResourceSaver.save() 方法的结果,因此如果此步骤出错,编辑器也能得知。
平台变体和生成的文件
你可能已经注意到我们的插件忽略了 import 方法的两个参数。这些是返回参数(因此它们的名称以 r 开头),这意味着编辑器会在调用你的 import 方法之后读取它们。两者都是可以填充信息的数组。
r_platform_variants 参数用于需要根据目标平台以不同方式导入资源的情况。虽然被称为平台变体,但它基于启用的特性标签,所以即使是同一个平台也可以有多个变体,这取决于设置。
要导入平台变体,保存时需要在扩展名之前添加特性标签,然后将添加的标签加入到 r_platform_variants 数组,以便让编辑器知道你添加了标签。
例如,假设我们为移动平台保存一个不同的材质。我们将需要做如下的事情:
r_platform_variants.push_back("mobile")
return ResourceSaver.save(mobile_material, "%s.%s.%s" % [save_path, "mobile", _get_save_extension()])
r_gen_files 参数用于在导入过程中生成并需要保留的额外文件。编辑器将查看它以了解依赖关系并确保不会无意中删除额外文件。
这也是一个数组,应该填充你保存的文件的完整路径。例如,让我们为下一遍渲染创建另一个材质并将其保存在不同的文件中:
var next_pass = StandardMaterial3D.new()
next_pass.albedo_color = color.inverted()
var next_pass_path = "%s.next_pass.%s" % [save_path, _get_save_extension()]

err = ResourceSaver.save(next_pass, next_pass_path)
if err != OK:
    return err
r_gen_files.push_back(next_pass_path)
试试这个插件
以上都是理论讲解,但现在导入插件应该已经完成了,让我们来测试一下。确保你已经按照介绍部分所述创建了示例文件内容,并将其保存为 test.mtxt。然后在项目设置中激活插件。
如果一切顺利,导入插件将添加到编辑器中,文件系统会被扫描,自定义资源就会显示在文件系统面板中。如果选中它并聚焦导入面板,就可以看到那里唯一一个可供选择的选项。
在场景中创建一个 MeshInstance3D 节点,并为其 Mesh 属性设置一个新的 SphereMesh。在检查器中展开 Material 部分,然后将文件从文件系统面板拖到 Material 属性。对象就会在视口中更新为导入材质的蓝色。

转到导入面板,启用“Use Red Anyway”选项,然后单击“重新导入”。这将更新导入的材质,并应该自动更新显示红色的视图。
就是这样!你的第一个导入插件已经完成!现在就发挥创造力,为自己心爱的格式制作插件吧。这对于以自定义格式编写数据并在 Godot 中像原生资源一样使用非常有用。这也展示了导入系统是多么强大和可扩展。