Up to date
This page is up to date for Godot 4.2.
If you still find outdated information, please open an issue.
为 Windows 平台编译
参见
这个页面描述的是如何从源码编译 Windows 编辑器和导出模板二进制文件。如果你要找的是导出项目到 Windows,请阅读 为 Windows 导出。
需求
要在Windows下进行编译, 需要以下内容:
Visual Studio Community ,2017或更高版本. 建议使用VS 2019. 请务必阅读下面的 "安装Visual Studio注意事项", 否则你将不得不再次运行/下载安装程序.
MinGW-w64 with GCC can be used as an alternative to Visual Studio. Be sure to install/configure it to use the
posixthread model. Important: When using MinGW to compile themasterbranch, you need GCC 9 or later.Python 3.6+. Make sure to enable the option to add Python to the ``PATH`` in the installer.
SCons 3.0+ build system. Using the latest release is recommended, especially for proper support of recent Visual Studio releases.
备注
如果你已经安装了 MSYS2,你可以使用以下命令轻松安装 MinGW 和其他依赖项:
pacman -S mingw-w64-x86_64-python3-pip mingw-w64-x86_64-gcc  \
    mingw-w64-i686-python3-pip mingw-w64-i686-gcc make
对于每个 MSYS2 MinGW 子系统,你应该在其 shell 中运行 pip3 install scons。
设置 SCons
要安装 SCons,请打开命令提示符并运行以下命令:
python -m pip install scons
如果你看到提示信息 Defaulting to user installation because normal site-packages is not writeable,那么你就需要提升权限后再重新执行该命令。使用管理员身份打开一个新的命令提示符,然后再执行该命令,确保 SCons 可以通过 PATH 访问。
要检查是否已正确安装Python和SCons, 可以在命令提示符 (cmd.exe) 中键入 python --version 和 scons --version.
如果上面的命令不起作用, 请确保在安装后将Python添加到 PATH 环境变量中, 然后再次检查. 为此, 你可以再次运行Python安装程序并启用将Python添加到 PATH 的选项.
如果 SCons 无法检测到你的 Visual Studio 安装,可能是因为你的 SCons 版本太老了。请使用 python -m pip install --upgrade scons 将其更新为最新版本。
安装 Visual Studio 注意事项
如果安装Visual Studio 2017或2019, 请确保启用要安装的工作流程列表中的 C++ .
如果安装Visual Studio 2015, 请确保运行 自定义 安装而不是 典型 安装, 然后选择 C++ 作为语言.
如果你已经犯了在没有C++支持的情况下安装Visual Studio的错误, 请再次运行安装程序;它将为你提供一个 修改 按钮. 从 添加/删除程序 中运行安装程序只会给你提供 修复 选项, 而该选项将不允许你安装C++工具.
下载 Godot 的源代码
详细步骤请参考 获取源代码。
从现在开始,本教程将假设你将源代码放在了 C:\godot。
警告
为了防止编译过程中由于连续病毒扫描而导致的速度减慢,请将 Godot 源文件夹添加到杀毒软件中的例外列表中。
For Windows Defender, hit the Windows key, type "Windows Security" then hit Enter. Click on Virus & threat protection on the left panel. Under Virus & threat protection settings click on Mange Settings and scroll down to Exclusions. Click Add or remove exclusions then add the Godot source folder.
编译
选择编译器
SCons 将自动查找并使用现有的 Visual Studio 安装。如果你没有安装 Visual Studio,它将尝试使用 MinGW 代替。如果你已经安装了 Visual Studio 并想使用 MinGW,请在 SCons 命令行中传入 use_mingw=yes。注意,MSVC 的构建不能从 MSYS2 或 MinGW 的 shell 中进行。使用 cmd.exe 或 PowerShell 代替。
在开发过程中,通常最好使用 Visual Studio 编译器,因为链接 Godot 二进制文件的速度比 MinGW 更快。但是,MinGW 可以利用链接时优化(见下文)来生成更多优化的二进制文件,从而使其成为生产使用的更好选择。
运行 SCons
打开命令提示符后,(使用 cd)转到引擎源代码的根目录,然后键入:
C:\godot> scons platform=windows
备注
使用多个 CPU 线程进行编译时,SCons 可能会警告 pywin32 丢失。你可以放心地忽略此警告。
If all goes well, the resulting binary executable will be placed in
C:\godot\bin\ with the name godot.windows.editor.x86_32.exe or
godot.windows.editor.x86_64.exe. By default, SCons will build a binary matching
your CPU architecture, but this can be overridden using arch=x86_64 or
arch=x86_32.
该可执行文件包含整个引擎,并且运行时没有任何依赖项。运行它会启动项目管理器。
备注
If you are compiling Godot for production use, then you can
make the final executable smaller and faster by adding the
SCons option target=template_release.
If you are compiling Godot with MinGW, you can make the binary
even smaller and faster by adding the SCons option lto=full.
As link-time optimization is a memory-intensive process,
this will require about 7 GB of available RAM while compiling.
备注
如果你想为自己的 Godot 构建和官方发布使用单独的编辑器设置,你可以通过在 bin/ 文件夹中创建一个名为 ._sc_ 或 _sc_ 的文件来启用 自包含模式。
在 Visual Studio 中进行开发
编译 Godot 不需要使用 IDE,SCons 会处理所有事情。但是如果你想要做引擎开发,或者调试引擎的 C++ 代码,你可能会对配置代码编辑器或者 IDE 感兴趣。
基于文件夹的编辑器不需要任何特殊的设置就可以开始使用 Godot 的代码库。要使用 Visual Studio 来编辑项目,需要先设置解决方案。
你可以通过使用 vsproj=yes 参数运行 SCons 来创建 Visual Studio 解决方案,如下所示:
scons p=windows vsproj=yes
你现在可以在 Visual Studio 解决方案中打开 Godot 的源代码,并能够通过 Visual Studio 的构建按钮构建 Godot。
参见
详情请参阅 Visual Studio。
从其他操作系统为 Windows 交叉编译
如果你是Linux或macOS用户, 你需要安装 MinGW-w64 , 它通常有32位和64位两种版本. 包的名称可能根据你的发行版而不同, 这里有一些已知的包:
Arch Linux |
pacman -Sy mingw-w64
|
Debian / Ubuntu |
apt install mingw-w64
|
Fedora |
dnf install mingw64-gcc-c++ mingw64-winpthreads-static \
            mingw32-gcc-c++ mingw32-winpthreads-static
|
macOS |
brew install mingw-w64
|
Mageia |
urpmi mingw64-gcc-c++ mingw64-winpthreads-static \
      mingw32-gcc-c++ mingw32-winpthreads-static
|
在尝试编译之前,SCons 将在 PATH 环境变量中检查以下二进制文件:
i686-w64-mingw32-gcc
x86_64-w64-mingw32-gcc
If the binaries are not located in the PATH (e.g. /usr/bin),
you can define the following environment variable to give a hint to
the build system:
export MINGW_PREFIX="/path/to/mingw"
Where /path/to/mingw is the path containing the bin directory where
i686-w64-mingw32-gcc and x86_64-w64-mingw32-gcc are located (e.g.
/opt/mingw-w64 if the binaries are located in /opt/mingw-w64/bin).
为了确保你做的事正确,在 shell 中执行以下操作将导致编译器正常工作(版本输出可能因你的系统而异):
${MINGW_PREFIX}/bin/x86_64-w64-mingw32-gcc --version
# x86_64-w64-mingw32-gcc (GCC) 13.2.0
备注
When cross-compiling for Windows using MinGW-w64, keep in mind only
x86_64 and x86_32 architectures are supported. Be sure to
specify the right arch= option when invoking SCons if building
from a different architecture.
故障排除
由于默认配置不支持POSIX线程, 因此从某些Ubuntu版本进行交叉编译可能会导致 此bug .
你可以按照以下说明针对 64 位更改该配置:
sudo update-alternatives --config x86_64-w64-mingw32-gcc
<choose x86_64-w64-mingw32-gcc-posix from the list>
sudo update-alternatives --config x86_64-w64-mingw32-g++
<choose x86_64-w64-mingw32-g++-posix from the list>
对于 32 位:
sudo update-alternatives --config i686-w64-mingw32-gcc
<choose i686-w64-mingw32-gcc-posix from the list>
sudo update-alternatives --config i686-w64-mingw32-g++
<choose i686-w64-mingw32-g++-posix from the list>
创建 Windows 导出模板
Windows 导出模板是通过编译不使用编辑器的 Godot 来创建的,带有以下标志:
C:\godot> scons platform=windows target=template_debug arch=x86_32
C:\godot> scons platform=windows target=template_release arch=x86_32
C:\godot> scons platform=windows target=template_debug arch=x86_64
C:\godot> scons platform=windows target=template_release arch=x86_64
如果计划替换标准导出模板,复制模板到以下位置,并用版本标识符(例如 3.1.1.stable 或 3.2.dev)替换 <version>:
%USERPROFILE%\AppData\Roaming\Godot\templates\<version>\
使用以下名称:
windows_32_debug.exe
windows_32_release.exe
windows_64_debug.exe
windows_64_release.exe
此外, 如果你使用的是自定义模块或自定义引擎代码, 则可能需要在此处将二进制文件配置为自定义导出模板:
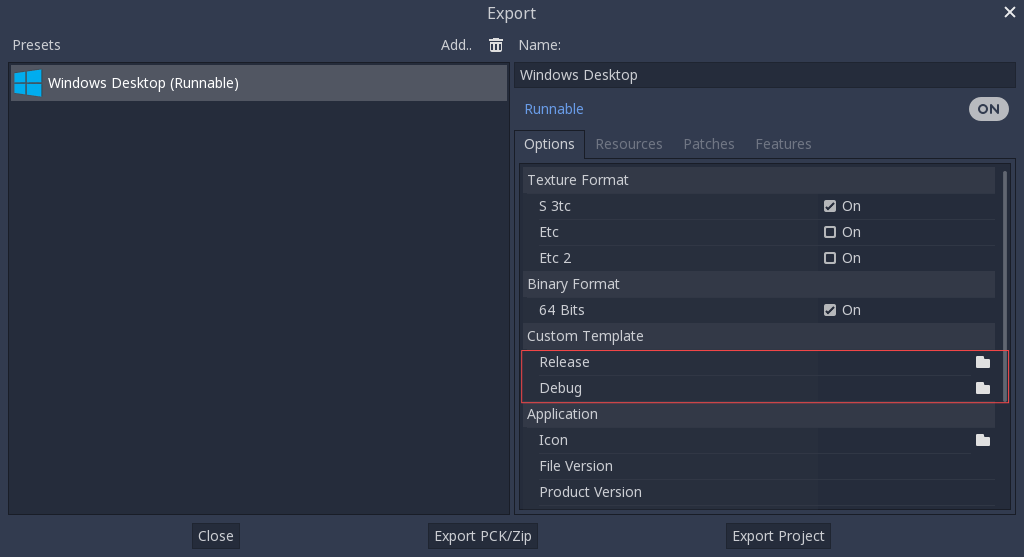
在这种情况下, 你不需要复制它们, 只需引用在Godot源文件夹的 bin\ 目录中生成的文件, 因此下次构建时, 将自动引用自定义模板.