Up to date
This page is up to date for Godot 4.3.
If you still find outdated information, please open an issue.
playerシーンの作成
プロジェクト設定が完了したので、操作できるキャラクターを作成しましょう。
最初のシーンでは、 Player オブジェクトを定義します。Player シーンを独立して作成する利点の 1 つは、たとえゲームの他の部分を作成する前であっても、個別にテストができることです。
ノード構成
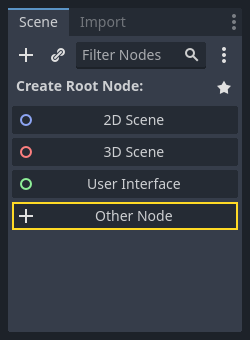
はじめに、プレイヤーオブジェクトのルートノードを選択する必要があります。原則として、シーンのルートノードはオブジェクトに望まれる機能 (オブジェクトが 何であるか ) を反映する必要があります。「その他のノード」のボタンをクリックして、シーンに Area2D ノードを加えます。
When you add the Area2D node, Godot will display the following warning icon
next to it in the scene tree:

This warning tells us that the Area2D node requires a shape to detect collisions or overlaps.
We can ignore the warning temporarily because we will first set up the player's visuals
(using an animated sprite). Once the visuals are ready, we will add a collision shape as a child
node. This will allow us to accurately size and position the shape based on the sprite’s appearance.
Area2D を使用すると、プレイヤーに重なり合ったり、プレイヤーに衝突したりするオブジェクトを検出できます。ノードの名前をダブルクリックして、名前を Player に変更します。シーンのルートノードを決めたので、これにノードを追加して機能を追加できます。
Player ノードに子を追加する前に、それらを誤ってクリックしてしまうことで移動したりサイズを変更したりすることがないようにしておきます。ノードを選択し、鍵アイコンの右側にあるアイコンをクリックします。ツールチップには「選択したノードを子でグループ化します。これにより、子ノードが2Dと3Dビューでクリックされたときに親が選択されるようになります」と書いてあります。

シーンを保存します。 [シーン]-> [シーンを保存]をクリックするか、Windows/Linuxでは Ctrl + S を押し、macOSでは Cmd + S を押します。
注釈
このプロジェクトでは、Godotの命名規則に従います。
GDScript: クラス(ノード)はPascalCaseを使用し、変数と関数はsnake_caseを使用し、定数はALL_CAPSを使用します(GDScriptスタイルガイドを参照)。
C#: クラス、export変数、メソッドはPascalCaseを使用し、プライベートフィールドは _camelCase を使用し、ローカル変数とパラメーターは camelCase を使用します(C# スタイルガイドを参照)。シグナルを接続するときは、メソッド名を正確に入力してください。
スプライトアニメーション
Click on the Player node and add (Ctrl + A on Windows/Linux or
Cmd + A on macOS) a child node AnimatedSprite2D. The AnimatedSprite2D will handle the
appearance and animations for our player. Notice that there is a warning symbol
next to the node. An AnimatedSprite2D requires a SpriteFrames resource, which is a list of the animations it can
display. To create one, find the Sprite Frames property under the Animation tab in the Inspector and click
"[empty]" -> "New SpriteFrames":
Click on the SpriteFrames you just created to open the "SpriteFrames" panel:
On the left is a list of animations. Click the "default" one and rename it to
"walk". Then click the "Add Animation" button to create a second animation named
"up". Find the player images in the "FileSystem" tab - they're in the art
folder you unzipped earlier. Drag the two images for each animation, named
playerGrey_walk[1/2] and playerGrey_walk[2/2], into the "Animation Frames"
side of the panel for the corresponding animation:
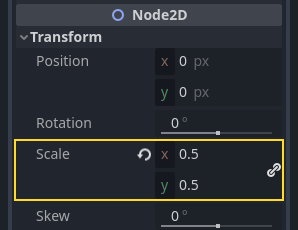
プレーヤーの画像はゲーム ウィンドウに対して少し大きすぎるため、縮小する必要があります。 AnimatedSprite2D ノードをクリックし、 Scale プロパティを (0.5, 0.5) に設定します。 これは、インスペクターの Node2D ヘッダの下にあります。
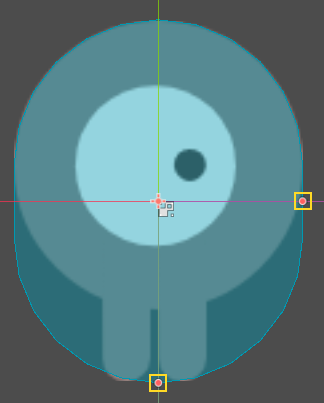
最後に、 CollisionShape2D を Player の子として追加します。 これにより、プレイヤーの「ヒットボックス」、つまり衝突領域の境界が決まります。 このキャラクターの場合、 CapsuleShape2D ノードが最適なフィット感を与えるので、インスペクターの「Shape」項目の横にある「<空>」をクリックし「新規 CapsuleShape2D」を選択します。 2 つのサイズ ハンドルを使用して、スプライトを覆うようにシェイプのサイズを変更します。
完了すると、 Player シーンは次のようになります:
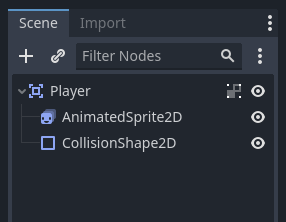
Once this is done, the warning on the Area2D node will disappear, as it now has
a shape assigned and can interact with other objects.
これらの変更後は、必ずシーンを再度保存してください。
次のパートでは、動かしたりアニメーションさせるためのスクリプトをplayerノードに追加します。それから、playerがなにかにあたった事がわかるよう、衝突判定を設定します。