Up to date
This page is up to date for Godot 4.3.
If you still find outdated information, please open an issue.
エディタでコードを実行する
@tool とは?
``@ tool``は強力なコード行で、スクリプトの先頭に追加すると、それがエディタ内で実行されるようになります。また、スクリプトの部分ごとにそれをエディタ内で実行するのか、ゲーム内で実行するのか、それとも両方で実行するのかも決めることができます。
多くの目的のためにそれを使用できますが、レベル設計をするときに、予測が難しいものを視覚的に提示するためにとても役立ちます。使用例は次のとおりです:
物理(重力)の影響を受ける砲弾を撃つ大砲がある場合、砲弾の軌道をエディタ内で表示することで、レベル設計をはるかに簡単にできます。
ジャンプの高さが異なるジャンプパッドがある場合、プレイヤーがジャンプした場合に到達する最大ジャンプ高を描画でき、レベル設計も容易になります。
プレイヤーがスプライトを使用せず、コードを使用して描画を行う場合、エディタ内でその描画コードを実行するようにしてプレイヤーを見られます。
危険
@tool スクリプトはエディタ内で実行され、現在編集されているシーンのシーンツリーにアクセスできます。これは強力な機能ですが警告も伴います。エディタには @tool スクリプトの誤用の可能性に対する保護が含まれていないためです。特に Node.queue_free を介してシーンツリーを操作するときは非常に注意してください、エディタがそれに関連するロジックを実行している間にノードを解放するとクラッシュする可能性があります。
@toolの使用方法
スクリプトをツールにするには、コードの先頭に @tool アノテーションを追加します。
現在の実行環境がエディタ内なのかどうかを確認するには、Engine.is_editor_hint() を使用します。
たとえば、あるコードをエディタでのみ実行したい場合は、次のようにします:
if Engine.is_editor_hint():
    # Code to execute when in editor.
if (Engine.IsEditorHint())
{
    // Code to execute when in editor.
}
反対に、ゲームでのみコードを実行したい場合は、単純に同じプログラムを反転します:
if not Engine.is_editor_hint():
    # Code to execute when in game.
if (!Engine.IsEditorHint())
{
    // Code to execute when in game.
}
上記の2つの条件のいずれにも該当しないコード部分はエディタとゲームの両方で実行されます。
_process() 関数の全体像はこのようになります:
func _process(delta):
    if Engine.is_editor_hint():
        # Code to execute in editor.

    if not Engine.is_editor_hint():
        # Code to execute in game.

    # Code to execute both in editor and in game.
public override void _Process(double delta)
{
    if (Engine.IsEditorHint())
    {
        // Code to execute in editor.
    }

    if (!Engine.IsEditorHint())
    {
        // Code to execute in game.
    }

    // Code to execute both in editor and in game.
}
重要な情報
toolスクリプトが使用する全てのGDScriptは必ずtoolでもある 必要があります。@tool がない全てのGDScriptはエディタ内で使用するとき空のファイルのようにふるまいます!
@tool スクリプトを継承しても継承したスクリプトが自動的に @tool になることはありません。 継承スクリプトに @tool が無い場合は親クラスのツールとしてのふるまいは無効化されます。なので継承スクリプトも @tool アノテーションを明示しなければなりません。
エディタスクリプトでの変更は永続的です。例えば、次のセクションでスクリプトを削除すると、ノードはその時の角度のままになります。不要な変更を避けるよう注意してください。
@tool を試してみる
シーンに Sprite2D ノードを追加し、テクスチャをGodotアイコンに設定します。スクリプトをアタッチして開き、次のように変更します:
@tool
extends Sprite2D

func _process(delta):
    rotation += PI * delta
using Godot;

[Tool]
public partial class MySprite : Sprite2D
{
    public override void _Process(double delta)
    {
        Rotation += Mathf.Pi * (float)delta;
    }
}
スクリプトを保存してエディタに戻りましょう。これで、オブジェクトが回転するようになるはずです。ゲームを実行してみると、ゲーム内でも回転します。
注釈
変化がみられない場合は、シーンをリロードしましょう(閉じてからもう一度開きます)。
次に、どのコードがいつ実行されるのかを選択しましょう。_process() 関数を次のように変更します:
func _process(delta):
    if Engine.is_editor_hint():
        rotation += PI * delta
    else:
        rotation -= PI * delta
public override void _Process(double delta)
{
    if (Engine.IsEditorHint())
    {
        Rotation += Mathf.Pi * (float)delta;
    }
    else
    {
        Rotation -= Mathf.Pi * (float)delta;
    }
}
スクリプトを保存します。これで、オブジェクトはエディタでは時計回りに回転しますが、ゲームを実行すると、反時計回りに回転します。
変数の編集
スクリプトにspeed変数を追加しエクスポートしましょう。speedを更新し回転角度もリセットするため set(new_speed) セッターを追加します。これはインスペクタから入力があった時に実行され、 _process() を修正して回転速度を反映します。
@tool
extends Sprite2D


@export var speed = 1:
    # Update speed and reset the rotation.
    set(new_speed):
        speed = new_speed
        rotation = 0


func _process(delta):
    rotation += PI * delta * speed
using Godot;

[Tool]
public partial class MySprite : Sprite2D
{
    private float _speed = 1;

    [Export]
    public float Speed
    {
        get => _speed;
        set
        {
            // Update speed and reset the rotation.
            _speed = value;
            Rotation = 0;
        }
    }

    public override void _Process(double delta)
    {
        Rotation += Mathf.Pi * (float)delta * speed;
    }
}
注釈
他のノードからのコードはエディタで実行されません。他のノードへのアクセスは制限されています。ツリーとノード、およびそれらのデフォルトのプロパティにはアクセスできますが、ユーザー変数にはアクセスできません。そうしたい場合は、他のノードも同じくエディタで実行する必要があります。 AutoLoadノードにはエディタではまったくアクセスできません。
リソース変更の通知を受け取る
Sometimes you want your tool to use a resource. However, when you change a
property of that resource in the editor, the set() method of your tool will
not be called.
@tool
class_name MyTool
extends Node

@export var resource: MyResource:
    set(new_resource):
        resource = new_resource
        _on_resource_set()

# This will only be called when you create, delete, or paste a resource.
# You will not get an update when tweaking properties of it.
func _on_resource_set():
    print("My resource was set!")
using Godot;

[Tool]
public partial class MyTool : Node
{
    private MyResource _resource;

    [Export]
    public MyResource Resource
    {
        get => _resource;
        set
        {
            _resource = value;
            OnResourceSet();
        }
    }
}

// This will only be called when you create, delete, or paste a resource.
// You will not get an update when tweaking properties of it.
private void OnResourceSet()
{
    GD.Print("My resource was set!");
}
この問題をかいくぐるにはまずリソースをツールにする必要があり、それがプロパティが設定された時にいつでも changed シグナルを発信するようにします:
# Make Your Resource a tool.
@tool
class_name MyResource
extends Resource

@export var property = 1:
    set(new_setting):
        property = new_setting
        # Emit a signal when the property is changed.
        changed.emit()
using Godot;

[Tool]
public partial class MyResource : Resource
{
    private float _property = 1;

    [Export]
    public float Property
    {
        get => _property;
        set
        {
            _property = value;
            // Emit a signal when the property is changed.
            EmitChanged();
        }
    }
}
次に新しいリソースが設定された時のシグナルを接続します:
@tool
class_name MyTool
extends Node

@export var resource: MyResource:
    set(new_resource):
        resource = new_resource
        # Connect the changed signal as soon as a new resource is being added.
        resource.changed.connect(_on_resource_changed)

func _on_resource_changed():
    print("My resource just changed!")
using Godot;

[Tool]
public partial class MyTool : Node
{
    private MyResource _resource;

    [Export]
    public MyResource Resource
    {
        get => _resource;
        set
        {
            _resource = value;
            // Connect the changed signal as soon as a new resource is being added.
            _resource.Changed += OnResourceChanged;
        }
    }
}

private void OnResourceChanged()
{
    GD.Print("My resource just changed!");
}
最後に、シグナルを接続解除するのを忘れないようにしましょう。古いリソースが別の場所で使われ変更されると必要ない更新が起きてしまいます。
@export var resource: MyResource:
    set(new_resource):
        # Disconnect the signal if the previous resource was not null.
        if resource != null:
            resource.changed.disconnect(_on_resource_changed)
        resource = new_resource
        resource.changed.connect(_on_resource_changed)
[Export]
public MyResource Resource
{
    get => _resource;
    set
    {
        // Disconnect the signal if the previous resource was not null.
        if (_resource != null)
        {
            _resource.Changed -= OnResourceChanged;
        }
        _resource = value;
        _resource.Changed += OnResourceChanged;
    }
}
ノード設定の警告を報告する
Godotは ノード設定警告システムを使いノードの設定が不適切なことをユーザーに警告します。ノードが適切に設定されていないとき、シーンドックのノード名の横に黄色の警告マークが現れます。アイコンにカーソルをホバーするかクリックすると、警告メッセージがポップアップします。この機能はあなたやチームがシーン設定をするときにミスを避けるために使えます。
ノード設定警告を使うとき、警告に影響したり消したりする可能性がある値を変更する時には: ref:`update_configuration_warnings<class_Node_method_update_configuration_warnings>`を呼ぶ必要があります。デフォルトでは、警告はシーンを閉じて再度開いたときにのみ更新されます。
# Use setters to update the configuration warning automatically.
@export var title = "":
    set(p_title):
        if p_title != title:
            title = p_title
            update_configuration_warnings()

@export var description = "":
    set(p_description):
        if p_description != description:
            description = p_description
            update_configuration_warnings()


func _get_configuration_warnings():
    var warnings = []

    if title == "":
        warnings.append("Please set `title` to a non-empty value.")

    if description.length() >= 100:
        warnings.append("`description` should be less than 100 characters long.")

    # Returning an empty array means "no warning".
    return warnings
エディタスクリプトで一回限りのスクリプトを実行する
ある時には、エディタから簡単に実行できないような特定の作業を自動化するためにコードを一回だけ実行する必要があるかもしれません。たとえば:
プロジェクトを実行せずにGDScriptやC#スクリプトのプレイグラウンドとして使う。
print()出力をエディタのアプトプットパネルに出力する。編集中のシーンにある光源ノードを拡大縮小し、ライトを好きな場所に配置した後にレベルが暗すぎたり明るすぎたりしないかを確認する。
コピーペーストした複製したノードをシーンインスタンスに置き換え、それらを後で変更しやすいようにする。
Godotでは EditorScript を継承することでこれが可能です。これは個別のスクリプトをエディタプラグインを作ることなくエディタから実行する方法を提供します。
エディタスクリプトを作成するには、ファイルシステムドックのフォルダや空の空間を右クリックし、 ** 新規作成 > スクリプト... ** を選択します。スクリプト作成ダイアログでは、ツリーアイコンを選択して継承元のオブジェクトを選択します。(または EditorScript を直接左のフィールドに入力します。大文字と小文字は区別されます。):
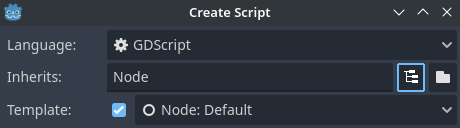
エディタスクリプトを作るスクリプトエディタの作成ダイアログ
これで自動的にエディタスクリプトのためのスクリプトテンプレートが選択され、 _run() メソッドが既に入っています:
@tool
extends EditorScript

# Called when the script is executed (using File -> Run in Script Editor).
func _run():
    pass
この _run() メソッドはスクリプトエディタでスクリプトを開いている時に **ファイル > 実行 ** を使用するかキーボードショートカット Ctrl + Shift + X を使用することで実行されます。このキーボードショートカットはスクリプトエディタで現在フォーカスしているもののみに有効です。
EditorScriptを継承するスクリプトは機能するために必ず @tool スクリプトでなければなりません。
警告
エディタスクリプトには元に戻す/やり直す機能がありません、なのでもしスクリプトがデータを変更するようデザインされているなら ** 実行する前に必ずシーンをセーブしてください ** 。
エディタで編集中のシーンにあるノードにアクセスするには EditorScript.get_scene を使います。これは現在編集中のシーンのルートノードを返します。以下は編集しているシーンにあるすべてのノードを再帰的に取得し、全てのOmniLight3Dノードの範囲を倍にする例です:
@tool
extends EditorScript

func _run():
    for node in get_all_children(get_scene()):
        if node is OmniLight3D:
            # Don't operate on instanced subscene children, as changes are lost
            # when reloading the scene.
            # See the "Instancing scenes" section below for a description of `owner`.
            var is_instanced_subscene_child = node != get_scene() and node.owner != get_scene()
            if not is_instanced_subscene_child:
                node.omni_range *= 2.0

# This function is recursive: it calls itself to get lower levels of child nodes as needed.
# `children_acc` is the accumulator parameter that allows this function to work.
# It should be left to its default value when you call this function directly.
func get_all_children(in_node, children_acc = []):
    children_acc.push_back(in_node)
    for child in in_node.get_children():
        children_acc = get_all_children(child, children_acc)

    return children_acc
Tip
スクリプトビューを開いる間にもエディタの上部から編集中のシーンを変更することができます。これによって EditorScript.get_scene の返り値が変わるので、このスクリプトを実行する前に反復実行を行いたいシーンを選択していることを確認してください。
シーンのインスタンス化
通常はpacked sceneをインスタンス化し、エディタで現在開いているシーンに追加することができます。デフォルトでは、 Node.add_child(node) によって追加されたノードやシーンはシーンツリードックで ** 表示されず ** 、ディスクにも ** 残りません ** 。シーンを保存する時にこのノードやシーンをシーンツリードックで表示したりディスクに保存されるようにするには、子ノードの owner プロパティを編集中のシーンルートに設定する必要があります。
@tool の場合:
func _ready():
    var node = Node3D.new()
    add_child(node) # Parent could be any node in the scene

    # The line below is required to make the node visible in the Scene tree dock
    # and persist changes made by the tool script to the saved scene file.
    node.owner = get_tree().edited_scene_root
public override void _Ready()
{
    var node = new Node3D();
    AddChild(node); // Parent could be any node in the scene

    // The line below is required to make the node visible in the Scene tree dock
    // and persist changes made by the tool script to the saved scene file.
    node.Owner = GetTree().EditedSceneRoot;
}
EditorScript の場合:
func _run():
    # `parent` could be any node in the scene.
    var parent = get_scene().get_node("Parent")
    var node = Node3D.new()
    parent.add_child(node)

    # The line below is required to make the node visible in the Scene tree dock
    # and persist changes made by the tool script to the saved scene file.
    node.owner = get_scene()
public override void _Run()
{
    // `parent` could be any node in the scene.
    var parent = GetScene().GetNode("Parent");
    var node = new Node3D();
    parent.AddChild(node);

    // The line below is required to make the node visible in the Scene tree dock
    // and persist changes made by the tool script to the saved scene file.
    node.Owner = GetScene();
}
警告
@tool を不適切に使用すると、多くのエラーが発生する可能性があります。まずはあなたが望むようにコードを書き、それができた後で @tool キーワードを先頭に追加する方法をお勧めします。また、エディタで実行するコードはゲームで実行するコードから分離するようにしてください。これにより、バグを簡単に見つけることができます。