測試場景
現在是時候將我們所做的一切整合到一個可玩的遊戲場景中了。
創建新場景,然後加入一個 Node 節點,並命名為``Main``。(我們之所以使用 Node 而不是 Node2D ,是因為這個節點是處理遊戲邏輯的容器,本身並不需 2D 的功能。)
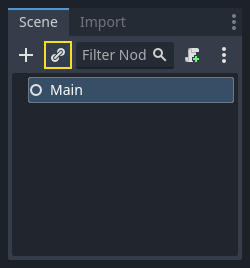
點擊 產生實體 按鈕(由鏈條圖示表示)並選擇保存的 player.tscn 。
現在,將下列節點新增為 Main 的子節點,並依照所示命名:
Timer (名稱為
MobTimer)——用以控制怪物產生的頻率Timer (名稱為
ScoreTimer)——用以每秒增加成績Timer (名稱為
StartTimer)——用以在開始前延遲Marker2D <class_Marker2D>`(命名為 ``StartPosition`)—用來標示玩家的起始位置
將每個 Timer 節點的 等待時間 屬性設定如下(數值單位為秒):
MobTimer:0.5ScoreTimer:1StartTimer:2
另外,將 StartTimer 的 One Shot 屬性設為「開啟」,並將 StartPosition 節點的 Position 設為 (240, 450) 。
產生怪物
The Main node will be spawning new mobs, and we want them to appear at a random
location on the edge of the screen. Click the Main node in the Scene dock, then
add a child Path2D node named MobPath. When you select
Path2D, you will see some new buttons at the top of the editor:

選擇中間的按鈕 (「新增控制點」),然後點擊顯示的轉角處來新增控制點並繪製路徑。若要將控制點吸附到網格上,請開啟「使用網格吸附」與「使用吸附」選項,這兩個選項在「鎖定」按鈕的左邊,顯示的圖示是一個磁鐵跟幾條相交的線。

重要
請確定以 順時針 方向繪製路徑,不然的話怪物會 向外 產生而不是 向內 產生!
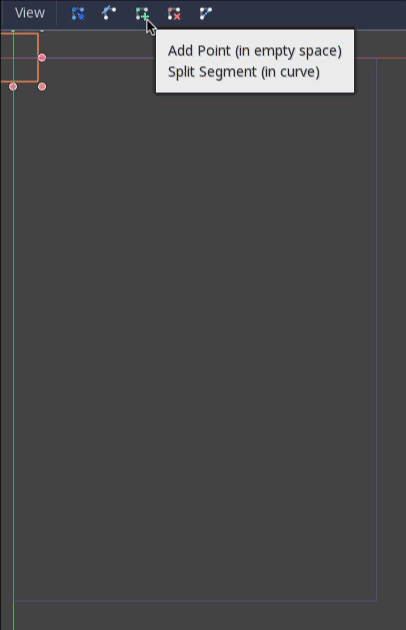
在圖片內放置了點 4 以後,點擊「關閉曲線」按鈕,就可以完成繪製曲線。
現在路徑已經定義好了,接著我們新增一個 PathFollow2D 節點作為 MobPath 的子節點,並將其命名為 MobSpawnLocation 。這個節點會在移動的時候自動旋轉並跟著路徑移動,所以我們可以用 MobPath 來在路徑上隨機選擇位置與方向。
現在場景看起來會這樣:

Main(主要)腳本
為 Main 新增一個腳本。在腳本的頂部,我們會用 export (PackedScene) 來選擇要實體化的 Mob 場景。
extends Node

@export var mob_scene: PackedScene
var score
using Godot;

public partial class Main : Node
{
    // Don't forget to rebuild the project so the editor knows about the new export variable.

    [Export]
    public PackedScene MobScene { get; set; }

    private int _score;
}
點擊 Main 節點,您會在 Inspector(屬性檢視器)中「Main.gd」下方看到 Mob Scene 屬性。
要為這個屬性賦值有兩個方法:
從「檔案系統」面板中拖移
Mob.tscn到Mob屬性來。點擊「[空]」旁邊的下拉箭頭,並選擇「載入」。接著選擇
Mob.tscn。
接著,從場景 Dock 中選擇 Player 節點,然後前往側欄的節點 Dock 中。節選選擇節點 Dock 中的 [訊號] 分頁。
接著應該可以看到所有 Player 節點的訊號。點兩下列表中的 hit 訊號 (或是右鍵點擊然後選擇 [連接...])。這樣便可以打開訊號連接對話框。這裡我們要把新函式命名為 game_over ,這個函式會負責處理遊戲結束時要做的事。在 [連接訊號] 視窗中的 [Receiver 方法] 內輸入「game_over」,並點擊 [連接]。將下列程式碼加到新建立的函式當中,接著新增一個 new_game 函式,負責在遊戲開始時搞定一切:
func game_over():
    $ScoreTimer.stop()
    $MobTimer.stop()

func new_game():
    score = 0
    $Player.start($StartPosition.position)
    $StartTimer.start()
public void GameOver()
{
    GetNode<Timer>("MobTimer").Stop();
    GetNode<Timer>("ScoreTimer").Stop();
}

public void NewGame()
{
    _score = 0;

    var player = GetNode<Player>("Player");
    var startPosition = GetNode<Marker2D>("StartPosition");
    player.Start(startPosition.Position);

    GetNode<Timer>("StartTimer").Start();
}
Now we'll connect the timeout() signal of each Timer node (StartTimer,
ScoreTimer, and MobTimer) to the main script. For each of the three
timers, select the timer in the Scene dock, open the Signals tab of the Node
dock, then double-click the timeout() signal in the list. This will open a new
signal connection dialog. The default settings in this dialog should be fine, so
select Connect to create a new signal connection.
Once all three timers have this set up, you should be able to see each timer
have a Signal connection for their respective timeout() signal, showing in
green, within their respective Signals tabs:
(For MobTimer):
_on_mob_timer_timeout()(For ScoreTimer):
_on_score_timer_timeout()(For StartTimer):
_on_start_timer_timeout()
Now we define how each of these timers operate by adding the code below. Notice
that StartTimer will start the other two timers, and that ScoreTimer
will increment the score by 1.
func _on_score_timer_timeout():
    score += 1

func _on_start_timer_timeout():
    $MobTimer.start()
    $ScoreTimer.start()
// We also specified this function name in PascalCase in the editor's connection window.
private void OnScoreTimerTimeout()
{
    _score++;
}

// We also specified this function name in PascalCase in the editor's connection window.
private void OnStartTimerTimeout()
{
    GetNode<Timer>("MobTimer").Start();
    GetNode<Timer>("ScoreTimer").Start();
}
接著我們在 _on_MobTimer_timeout() 中建立怪物的實體,並沿著 Path2D 來隨機選擇一個起始位置,然後讓怪物開始移動。在跟隨路徑時 PathFollow2D 節點會自動旋轉,所以我們在使用這個節點來選擇怪物的位置的同時也會一起選擇方向。
需要注意的是,新建立的節點必須要使用 add_child() 來將節點新增到場景中。
func _on_mob_timer_timeout():
    # Create a new instance of the Mob scene.
    var mob = mob_scene.instantiate()

    # Choose a random location on Path2D.
    var mob_spawn_location = $MobPath/MobSpawnLocation
    mob_spawn_location.progress_ratio = randf()

    # Set the mob's position to the random location.
    mob.position = mob_spawn_location.position

    # Set the mob's direction perpendicular to the path direction.
    var direction = mob_spawn_location.rotation + PI / 2

    # Add some randomness to the direction.
    direction += randf_range(-PI / 4, PI / 4)
    mob.rotation = direction

    # Choose the velocity for the mob.
    var velocity = Vector2(randf_range(150.0, 250.0), 0.0)
    mob.linear_velocity = velocity.rotated(direction)

    # Spawn the mob by adding it to the Main scene.
    add_child(mob)
// We also specified this function name in PascalCase in the editor's connection window.
private void OnMobTimerTimeout()
{
    // Create a new instance of the Mob scene.
    Mob mob = MobScene.Instantiate<Mob>();

    // Choose a random location on Path2D.
    var mobSpawnLocation = GetNode<PathFollow2D>("MobPath/MobSpawnLocation");
    mobSpawnLocation.ProgressRatio = GD.Randf();

    // Set the mob's direction perpendicular to the path direction.
    float direction = mobSpawnLocation.Rotation + Mathf.Pi / 2;

    // Set the mob's position to a random location.
    mob.Position = mobSpawnLocation.Position;

    // Add some randomness to the direction.
    direction += (float)GD.RandRange(-Mathf.Pi / 4, Mathf.Pi / 4);
    mob.Rotation = direction;

    // Choose the velocity.
    var velocity = new Vector2((float)GD.RandRange(150.0, 250.0), 0);
    mob.LinearVelocity = velocity.Rotated(direction);

    // Spawn the mob by adding it to the Main scene.
    AddChild(mob);
}
重要
為什麼要使用 PI (圓周率)呢?在需要角度的函式中,GDScript 會使用 弧度 而不是角度。如果你比較喜歡用角度的話,則需要使用 deg2rad() (角度轉弧度)與 rad2deg() (弧度轉角度)兩個函式來轉換弧度與角度。
測試場景
來測試一下場景,看看是不是所有東西都正常了。將下面這段程式碼新增至 _ready() 中:
func _ready():
    new_game()
public override void _Ready()
{
    NewGame();
}
同時,將 Main 設為「主要場景」——也就是遊戲啟動後會自動執行的場景。點擊「執行」按鈕,當提示框出現後選擇 Main.tscn 。
小訣竅
如果你已經將別的場景設定為“主場景”了,你可以在“檔案系統”面板上右鍵點擊 main.tscn 並選擇“設為主場景”。
現在應該可以到處移動玩家了,並會看到怪物產生出來。玩家在被怪物撞到後會消失。
當您確定一切運作正常後,請從 _ready() 中移除呼叫 new_game() 的程式碼,並將其替換為 pass 。
我們的遊戲還缺點啥?缺使用者介面。在下一課中,我們將會新增標題介面並且顯示玩家的分數。