建立腳本
In this lesson, you will code your first script to make the Godot icon turn in circles. As we mentioned in the introduction, we assume you have programming foundations.
This tutorial is written for GDScript, and the equivalent C# code is included in another tab of each codeblock for convenience.

也參考
To learn more about GDScript, its keywords, and its syntax, head to the GDScript section. To learn more about C#, head to the C#/.NET section.
設定專案
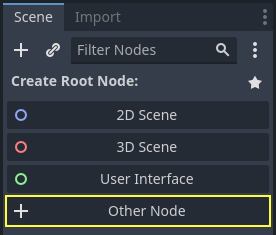
請從頭開始建立一個新專案。您的專案應該包含一張圖片:Godot 圖示,我們經常在社群中使用它來製作原型。
We need to create a Sprite2D node to display it in the game. In the Scene dock, click the Other Node button.
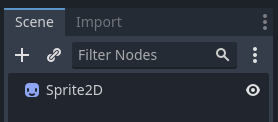
在搜索欄中輸入“Sprite2D”來篩選節點,按兩下 Sprite2D 來建立節點。
你的“場景”分頁現在應該只有一個 Sprite2D 節點。
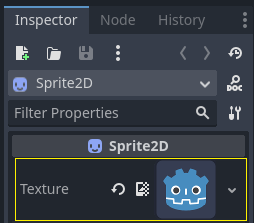
A Sprite2D node needs a texture to display. In the Inspector on the right, you
can see that the Texture property says <empty>. To display the Godot icon,
click and drag the file icon.svg from the FileSystem dock onto the Texture
slot.
備註
您可以通過將圖像拖放到視口上來自動建立 Sprite2D 節點。
然後,點擊並拖動視口中的圖示,使其在遊戲視圖中居中。
建立腳本
To create and attach a new script to our node, right-click on Sprite2D in the Scene dock and select Attach Script.
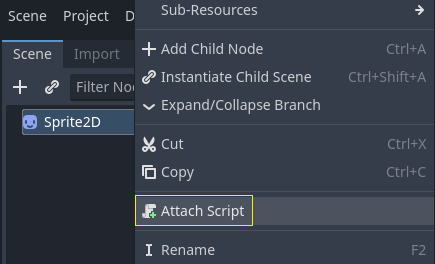
The Attach Node Script window appears. It allows you to select the script's language and file path, among other options.
Change the Template field from Node: Default to Object: Empty to
start with a clean file. Leave the other options set to their default values and
click the Create button to create the script.

備註
C# 腳本的名稱需要與其類別名稱相符。在這個例子中,您應該將檔案命名為 MySprite2D.cs 。
此時 Script 工作區將自動打開並顯示你新建的 sprite_2d.gd 檔,顯示以下程式碼行:
extends Sprite2D
using Godot;
using System;

public partial class MySprite2D : Sprite2D
{
}
每個 GDScript 檔都是一個隱含的類。 extends 關鍵字定義了這個腳本所繼承或擴充的類。本例中它是 Sprite2D ,意味著我們的腳本將獲得 Sprite2D 節點的所有屬性和函式,包括它繼承的 Node2D 、 CanvasItem 、 Node 等類。
備註
在GDScript中,如果你沒有寫帶有 extends 關鍵字的一行,你的類將隱式地擴充自 RefCounted,Godot使用這個類來管理你的應用程式的記憶體。
繼承的屬性包括您可以在“屬性檢視器”面板中看到的屬性,例如節點的 texture 。
備註
“屬性檢視器”預設使用“Title Case”形式展示節點的屬性,將單詞的首字母大寫、用空格分隔。在 GDScript 程式碼中,這些屬性使用的是“snake_case”,全小寫、單詞之間使用底線分隔。
你可以在屬性檢視器中懸停任何屬性的名稱來查看它的描述和在程式碼中的識別字。
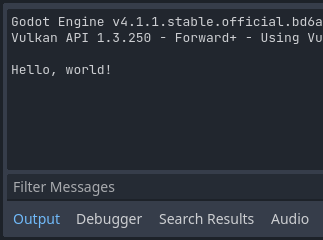
Hello, world!
我們的腳本目前沒有做任何事情。讓我們開始列印文字“Hello, world!”到底部輸出面板。
往腳本中新增以下程式碼:
func _init():
    print("Hello, world!")
public MySprite2D()
{
    GD.Print("Hello, world!");
}
讓我們把它分解一下。 func 關鍵字定義了一個名為 _init 的新函式。這是類建構子的一個特殊名稱。如果你定義了這個函式,引擎會在記憶體中建立每個物件或節點時呼叫 _init() 。
備註
GDScript 是基於縮進的語言。行首的定位字元是 print() 程式碼正常工作的必要條件。如果你省略了它或者沒有正確縮進一行,編輯器將以紅色高亮顯示,並顯示以下錯誤資訊:“Indented block expected”(應有縮進塊)。
如果你還沒有保存場景為 sprite_2d.tscn ,請保存,然後按 F6 (macOS 上為 Cmd + R )來運作它。看一下底部展開的 輸出 面板。它應該顯示“Hello, world!”。
將 _init() 函式刪除,這樣你就只有一行 extends Sprite2D 了。
四處旋轉
是時候讓我們的節點移動和旋轉了。為此,我們將向腳本中新增兩個成員變數:以像素每秒為單位的移動速度,和以弧度每秒為單位的角速度。將下述內容新增到 extends Sprite2D 行的後面。
var speed = 400
var angular_speed = PI
private int _speed = 400;
private float _angularSpeed = Mathf.Pi;
成員變數位於腳本的頂部,在“extends”之後、函式之前。附加了此腳本的每個節點實例都將具有自己的 speed 和 angular_speed 屬性副本。
備註
與其他一些引擎一樣,Godot 中的角度預設使用弧度為單位,但如果您更喜歡以度為單位計算角度,則可以使用內建函式和屬性。
為了移動我們的圖示,我們需要在遊戲迴圈中每一影格更新其位置和旋轉。我們可以使用 Node 類中的虛函式 _process() 。如果你在任何擴充自 Node 類的類中定義它,如 Sprite2D,Godot將在每一影格呼叫該函式,並傳遞給它一個名為 delta 的參數,即從上一影格開始經過的時間。
備註
遊戲的工作方式是每秒鐘算繪許多圖像,每幅圖像稱為一影格,而且是迴圈進行的。我們用每秒影格數(FPS)來衡量一個遊戲產生圖像的速度。大多數遊戲的目標是60FPS,儘管你可能會發現在較慢的移動裝置上的數位是30FPS,或者是虛擬實境遊戲的90至240。
引擎和遊戲開發者盡最大努力以恒定的時間間隔更新遊戲世界和算繪圖像,但在影格的算繪時間上總是存在著微小的變化。這就是為什麼引擎為我們提供了這個delta時間值,使我們的運動與我們的畫面播放速率無關。
在腳本的底部,定義該函式:
func _process(delta):
    rotation += angular_speed * delta
public override void _Process(double delta)
{
    Rotation += _angularSpeed * (float)delta;
}
func 關鍵字定義了一個新函式。在它之後,我們必須在括弧裡寫上函式的名稱和它所接受的參數。冒號結束定義,後面的縮進塊是函式的內容或指令。
備註
請注意 _process() 和 _init() 一樣都是以底線開頭的。按照約定,這是 Godot 的虛函式,也就是你可以覆蓋的與引擎通信的內建函式。
函式內部的那一行 rotation += angular_speed * delta 每一影格都會增加我們的精靈的旋轉量。這裡 rotation 是從 Sprite2D 所擴充的 Node2D 類繼承的屬性。它可以控制我們節點的旋轉,以弧度為單位。
小訣竅
In the code editor, you can Ctrl + Click (Cmd + Click on
macOS) on any built-in property or function like position,
rotation, or _process to open the corresponding documentation
in a new tab.
運作該場景,可以看到 Godot 的圖示在原地轉動。

備註
在 C# 中,請注意 _Process() 所採用的 delta 參數型別是 double 。 故當我們將其應用於旋轉時,需要將其轉換為 float 。
下一頁
現在我們來讓節點移動。在 _process() 函式中新增下面兩行程式碼,確保每一行都和之前的 rotation += angular_speed * delta 行的縮進保持一致。
var velocity = Vector2.UP.rotated(rotation) * speed

position += velocity * delta
var velocity = Vector2.Up.Rotated(Rotation) * _speed;

Position += velocity * (float)delta;
正如我們所看到的, var 關鍵字可以定義新變數。如果你把它放在腳本頂部,定義的就是類的屬性。在函式內部,定義的則是區域變數:只在函式的作用域中存在。
我們定義一個名為 velocity 的區域變數,它是一個代表方向和速度的 2D 向量。為了讓節點向前移動,我們從 Vector2 類別的常數 Vector2.UP 開始,這是一個指向上方的向量,然後透過呼叫 Vector2 的 rotated() 方法來旋轉它。這個表達式 Vector2.UP.rotated(rotation) 是一個相對於我們圖示指向前方的向量。將它乘以我們的 speed 屬性,就能得到一個我們可以用来使節點向前移動的速度。
我們在節點的 position 里加上 velocity * delta 來實作移動。位置本身是 Vector2 型別的,是 Godot 用於表示 2D 向量的內建型別。
運作場景就可以看到 Godot 頭像在繞圈圈。
備註
使用這樣的方法不會考慮與牆壁和地面的碰撞。在 您的第一個 2D 遊戲 中,你會學到另一種移動物件的方法,可以偵測碰撞。
我們的節點目前會自行移動。在下一部分,監聽玩家的輸入,我們將使用玩家輸入來控制它。
GDScript 範例
這是完整的 sprite_2d.gd 檔案,僅供參考。
extends Sprite2D

var speed = 400
var angular_speed = PI


func _process(delta):
    rotation += angular_speed * delta

    var velocity = Vector2.UP.rotated(rotation) * speed

    position += velocity * delta
using Godot;
using System;

public partial class MySprite2D : Sprite2D
{
    private int _speed = 400;
    private float _angularSpeed = Mathf.Pi;

    public override void _Process(double delta)
    {
        Rotation += _angularSpeed * (float)delta;
        var velocity = Vector2.Up.Rotated(Rotation) * _speed;

        Position += velocity * (float)delta;
    }
}