使用圖塊地圖
前言
Gridmaps 是一種用於建立3D遊戲關卡的工具, 方式類似於2D中使用 TileMap . 使用一個定義好的可以放在一個網格中的 3D mesh (a MeshLibrary) (譯注,grid和mesh都譯作網格, 這裡為了清晰,mesh直接使用英文,grid則譯作網格)物件集合搭建關卡, 就像您使用無限多數量的樂高積木搭建世界一樣.
就像使用tilemap的tile一樣, 碰撞和導覽也可以新增到網格中.
範例專案
除了這份說明文件,你可能也會想看看 Godot Demo 專案 。
Unzip this project and add it to the Project Manager using the "Import" button. You may get a popup saying that it needs to be converted to a newer Godot version, click Convert project.godot.
建立 MeshLibrary
首先,您需要一個 MeshLibrary,它是可以在網格地圖中使用的 Mesh 的集合。打開“MeshLibrary_Source.tscn”場景以查看如何設定網格庫的範例。

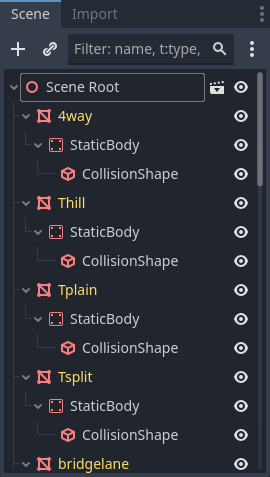
可以看到, 這個場景有一個 Node3D 節點作為它的根, 以及一些 MeshInstance3D 子節點.
如果您的場景中不需要任何物理, 那麼到這裡就完成了. 但是, 在大多數情況下, 您還需要給網格指定碰撞體.
碰撞
您可以手動為每個 Mesh 指定 StaticBody3D 和 CollisionShape3D 。或者,您可以使用“網格”功能表根據 "Mesh" 資料自動建立碰撞體。
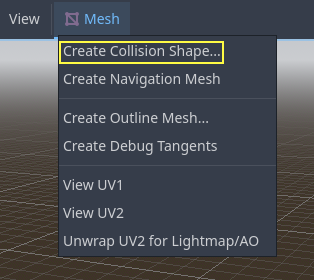
請注意,“凸”(Convex)碰撞體對於簡單 Mesh 效果更好。對於更複雜的形狀,請選擇“建立三角網格靜態體”。一旦每個網格都分配了物理主體和碰撞形狀,就可以使用網格庫了。
材質
在生成網格庫時, 只使用網格內的材質. 節點上設定的材質將被忽略.
導覽網格
和所有網格實例一樣,MeshLibrary 的專案可以用 NavigationMesh 賦值,既可以手動建立,也即可按下面的說明進行烘焙。
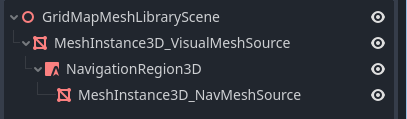
若要從 MeshLibrary 場景匯出建立 NavigationMesh,請在主要的 MeshInstance3D 下方放置一個 NavigationRegion3D 子節點,新增一個有效的 NavigationMesh 資源到 NavigationRegion3D,並在下方新增一些來源幾何體節點,然後烘焙 NavigationMesh。
備註
如果儲存格比較小,一般需要把 NavigationMesh 屬性裡的代理半徑和最小地區大小降低。
NavigationMeshInstance 下的節點在匯出 MeshLibrary 場景時會被忽略,所以可以專門為烘焙導覽網格新增額外的節點,作為來源幾何體。
警告
烘焙 NavigationMesh 的儲存格大小必須與 NavigationServer 地圖的儲存格大小一致,才能把不同 Grid 儲存格的導覽網格合併起來。
MeshLibrary 格式
總結 MeshLibrary 格式的特定限制:一個 MeshLibrary 場景必須以 Node3D 為根節點,並包含多個作為 MeshLibrary 項目的子節點。每個根節點的子節點須:
必須是 MeshInstance3D,並成為 MeshLibrary 項目。只有這個可見的 Mesh 會被匯出。
材質必須設在 mesh 的材質插槽中, 不能 設在 MeshInstance3D 的材質插槽。
最多只能有一個 StaticBody3D 子節點做為碰撞用途。該 StaticBody3D 須包含一個或多個 CollisionShape3D 子節點。
最多只能有一個 NavigationRegion3D 子節點作為導覽用途。該 NavigationRegion3D 可包含一個或多個額外的 MeshInstance3D 子節點,這些可用於烘焙導覽網格,但不會被匯出為可見 Mesh。
僅支援此特定格式。其他類型的子節點不會被識別與匯出。GridMap 並非用來在網格上擺放 節點 的通用系統,而是針對於帶有碰撞與導覽功能的 Mesh 設計的特定優化系統。
匯出 MeshLibrary
要匯出庫,點擊場景 -> 轉換為.. -> 網格庫...,並將其保存為資源。
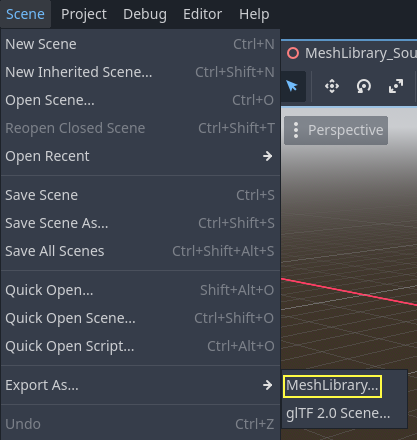
可以在專案中找到已匯出的名為“MeshLibrary.tres”的 MeshLibrary。
使用 GridMap
Create a new scene and add a GridMap node. Add the mesh library by dragging the resource file from the FileSystem dock and dropping it in the Mesh Library property in the Inspector.
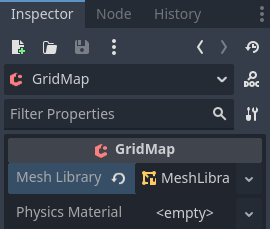
Inspector properties
The Physics Material setting allows you to override the physics material for every mesh in the NavigationMesh.
Under Cells, the Size property should be set to the size of your meshes. You can leave it at the default value for the demo. Uncheck the Center Y property.
The Collision options allow you to set the collision layer, collision mask, and priority for the entire grid. For more information on how those work see the 物理 section.
Under Navigation is the "Bake Navigation" option. If enabled it creates a navigation region for each cell that uses a mesh library item with a navigation mesh.
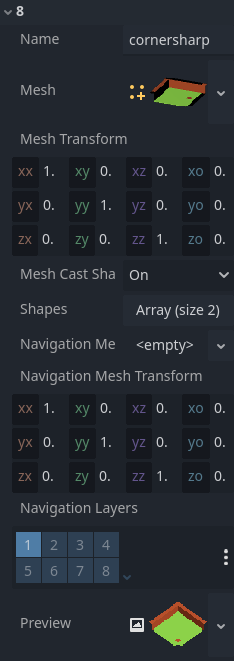
If you click on the MeshLibrary itself in the inspector you can adjust settings for individual meshes, such as their navigation mesh, navigation layers, or if the mesh casts shadows.
GridMap panel
At the bottom of the editor is the GridMap panel, which should have opened automatically when you added the GridMap node.

工具列由左至右功能如下:
Transform: Adds a gizmo to the scene that allows you to change the relative position and rotation of the gridmap in the scene.
Selection: While active you can select an area in the viewport, click and drag to select more than one space on the grid.
Erase: While active, click in the viewport and delete meshes.
Paint: While active, click in the viewport and add whatever mesh is currently selected in the GridMap panel to the scene.
Pick: While active, clicking on a gridmap mesh in the viewport will cause it to be selected in the GridMap panel.
Fill: Fill the area that has been selected in the viewport with whatever mesh is selected in the GridMap bottom panel.
Move: Move whatever mesh or meshes are currently selected in the viewport.
Duplicate: Create a copy of whatever the selected mesh or meshes in the GridMap are.
Delete: Similar to erase, but for the entire selected area.
Cursor Rotate X: While the paint tool is selected, this will rotate the mesh that will be painted on the X-axis. This will also rotate selected areas if they are being moved.
Cursor Rotate Y: While the paint tool is selected, this will rotate the mesh that will be painted on the Y-axis. This will also rotate selected areas if they are being moved.
Cursor Rotate Z: While the paint tool is selected, this will rotate the mesh that will be painted on the Z-axis. This will also rotate selected areas if they are being moved.
Change Grid Floor: Adjusts what floor is currently being worked on, can be changed with the arrows or typing
Filter Meshes: Used to search for a specific mesh in the bottom panel.
Zoom: Controls the zoom level on meshes in the bottom panel.
Layout toggles: These two buttons toggle between different layouts for meshes in the bottom panel.
Tools dropdown: This button opens a dropdown menu with a few more options.
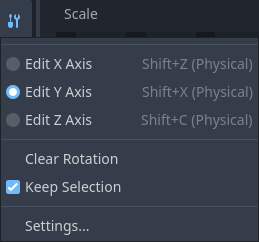
Clicking on Settings in that dropdown brings up a window that allows you to change the Pick Distance, which is the maximum distance at which tiles can be placed on a GridMap, relative to the camera position (in meters).
在程式碼中使用 GridMap
有關節點方法和成員變數的詳細資訊, 請參閱 GridMap.