輸入範例
前言
本教學將帶你學習如何使用 Godot 的 InputEvent 系統來捕捉玩家輸入。你的遊戲可能會用到多種不同的輸入類型——例如鍵盤、手把、滑鼠等等——以及各種將這些輸入轉換為遊戲行動的方法。本文將介紹一些最常見的情境,幫助你作為自己專案的起點。
備註
若想進一步了解 Godot 輸入事件系統的運作方式,請參閱 使用 InputEvent。
事件與輪詢
有時你會希望遊戲對特定輸入事件有反應——像是按下「跳躍」鍵。其他時候,你可能希望只要某個按鍵有被按住(例如移動),就持續發生某些動作。第一種情況可以使用 _input() 方法,當有輸入事件發生時會自動呼叫;第二種情況則可利用 Input 單例來查詢輸入狀態。
範例:
func _input(event):
    if event.is_action_pressed("jump"):
        jump()


func _physics_process(delta):
    if Input.is_action_pressed("move_right"):
        # Move as long as the key/button is pressed.
        position.x += speed * delta
public override void _Input(InputEvent @event)
{
    if (@event.IsActionPressed("jump"))
    {
        Jump();
    }
}

public override void _PhysicsProcess(double delta)
{
    if (Input.IsActionPressed("move_right"))
    {
        // Move as long as the key/button is pressed.
        position.X += speed * (float)delta;
    }
}
這讓你可以更加彈性地混合處理不同類型的輸入方式。
接下來的教學將著重於用 _input() 捕捉單一事件。
輸入事件
輸入事件是繼承自 InputEvent 的物件。根據事件型別,物件會包含該事件專屬的屬性。若要觀察事件本體,請新增一個節點並掛上以下腳本:
extends Node


func _input(event):
    print(event.as_text())
using Godot;

public partial class Node : Godot.Node
{
    public override void _Input(InputEvent @event)
    {
        GD.Print(@event.AsText());
    }
}
當你按下按鍵、移動滑鼠或進行其他輸入時,所有事件都會在輸出視窗中依序顯示。以下是範例輸出:
A
Mouse motion at position ((971, 5)) with velocity ((0, 0))
Right Mouse Button
Mouse motion at position ((870, 243)) with velocity ((0.454937, -0.454937))
Left Mouse Button
Mouse Wheel Up
A
B
Shift
Alt+Shift
Alt
Shift+T
Mouse motion at position ((868, 242)) with velocity ((-2.134768, 2.134768))
如你所見,不同類型的輸入有著完全不同的事件內容。鍵盤事件甚至會直接列印對應的按鍵符號。例如,InputEventMouseButton 就繼承自以下類別:
InputEvent —— 所有輸入事件的基底類別
InputEventWithModifiers —— 增加檢查修飾鍵(如 Shift 或 Alt)是否按下的能力。
InputEventMouse —— 提供滑鼠事件屬性,如
positionInputEventMouseButton —— 包含被按下的按鈕索引值,以及是否為雙擊等資訊。
小訣竅
建議在處理事件時隨時參考官方類別說明,方便查詢各型別事件可用的屬性與方法。
如果你嘗試存取某個輸入型別沒有的屬性(例如在 InputEventKey 上取用 position),會發生錯誤。為避免這種情況,請務必先檢查事件型別:
func _input(event):
    if event is InputEventMouseButton:
        print("mouse button event at ", event.position)
public override void _Input(InputEvent @event)
{
    if (@event is InputEventMouseButton mouseEvent)
    {
        GD.Print("mouse button event at ", mouseEvent.Position);
    }
}
輸入映射表
InputMap 是處理多元輸入的最彈性方式。你可以建立具名的輸入「動作」,並將多組輸入事件(如按鍵、滑鼠點擊等)對應到這些動作。要查看和新增自訂動作,請進入「專案」→「專案設定」,點選「InputMap」分頁:
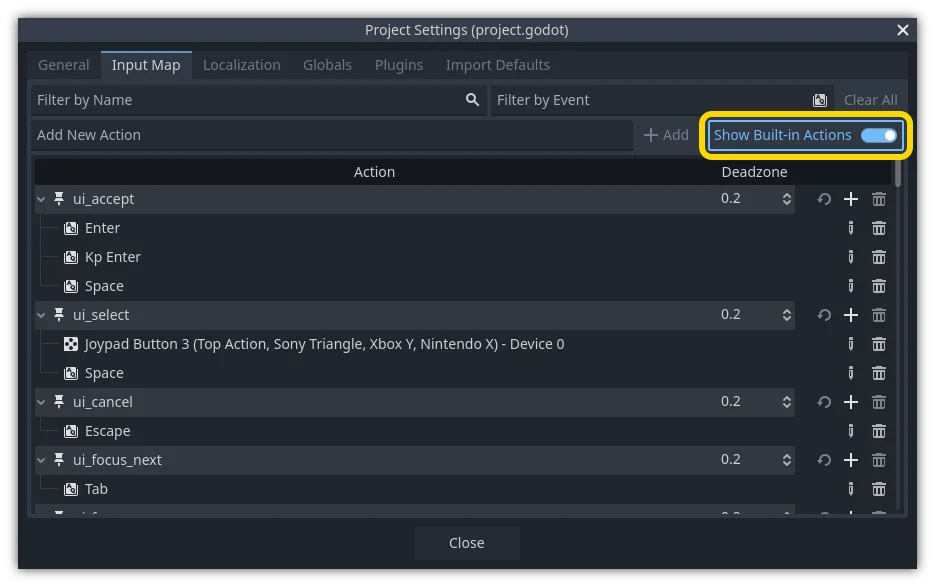
小訣竅
新的 Godot 專案會預先定義許多內建動作。若要檢視這些動作,請在 InputMap 對話視窗中啟用「Show Built-in Actions」(顯示內建動作)。
處理動作
定義好動作後,你可以在腳本中用 is_action_pressed() 和 is_action_released() 這兩個方法,傳入動作名稱來判斷動作是否觸發:
func _input(event):
    if event.is_action_pressed("my_action"):
        print("my_action occurred!")
public override void _Input(InputEvent @event)
{
    if (@event.IsActionPressed("my_action"))
    {
        GD.Print("my_action occurred!");
    }
}
鍵盤事件
鍵盤事件會以 InputEventKey 型別捕捉。雖然建議盡量改用輸入動作,但有時你可能需要直接判斷個別按鍵。以下為偵測 T 按鍵的範例:
func _input(event):
    if event is InputEventKey and event.pressed:
        if event.keycode == KEY_T:
            print("T was pressed")
public override void _Input(InputEvent @event)
{
    if (@event is InputEventKey keyEvent && keyEvent.Pressed)
    {
        if (keyEvent.Keycode == Key.T)
        {
            GD.Print("T was pressed");
        }
    }
}
小訣竅
請參考 @GlobalScope_Key 取得按鍵常數列表。
警告
由於 鍵盤鬼影現象(ghosting),如果同時按下太多按鍵,部分按鍵輸入可能不會被正確偵測。根據按鍵在鍵盤上的位置,有些按鍵更容易發生鬼影現象。有些鍵盤具備硬體層級的抗鬼影(anti-ghosting)功能,但低價鍵盤和筆電鍵盤通常沒有這項設計。
因此,建議設計預設鍵位配置時,需考慮到一般鍵盤(無抗鬼影功能)也能正常使用。詳情可參考 這則 Gamedev Stack Exchange 問題。
鍵盤修飾鍵
修飾鍵屬性繼承自 InputEventWithModifiers,你可以用布林值檢查修飾鍵組合。假如你希望單獨按下 T 和按下 Shift + T 會有不同反應,可以這樣寫:
func _input(event):
    if event is InputEventKey and event.pressed:
        if event.keycode == KEY_T:
            if event.shift_pressed:
                print("Shift+T was pressed")
            else:
                print("T was pressed")
public override void _Input(InputEvent @event)
{
    if (@event is InputEventKey keyEvent && keyEvent.Pressed)
    {
        switch (keyEvent.Keycode)
        {
            case Key.T:
                GD.Print(keyEvent.ShiftPressed ? "Shift+T was pressed" : "T was pressed");
                break;
        }
    }
}
小訣竅
請參考 @GlobalScope_Key 取得按鍵常數列表。
滑鼠事件
滑鼠事件繼承自 InputEventMouse,並細分為 InputEventMouseButton 和 InputEventMouseMotion 兩種型別。也就是說,所有滑鼠事件都會帶有 position 屬性。
滑鼠移動
每當滑鼠移動時,都會產生 InputEventMouseMotion 事件。可以透過 relative 屬性取得移動的距離。
以下為使用滑鼠事件拖曳 Sprite2D 節點的範例:
extends Node


var dragging = false
var click_radius = 32 # Size of the sprite.


func _input(event):
    if event is InputEventMouseButton and event.button_index == MOUSE_BUTTON_LEFT:
        if (event.position - $Sprite2D.position).length() < click_radius:
            # Start dragging if the click is on the sprite.
            if not dragging and event.pressed:
                dragging = true
        # Stop dragging if the button is released.
        if dragging and not event.pressed:
            dragging = false

    if event is InputEventMouseMotion and dragging:
        # While dragging, move the sprite with the mouse.
        $Sprite2D.position = event.position
using Godot;

public partial class MyNode2D : Node2D
{
    private bool _dragging = false;
    private int _clickRadius = 32; // Size of the sprite.

    public override void _Input(InputEvent @event)
    {
        Sprite2D sprite = GetNodeOrNull<Sprite2D>("Sprite2D");
        if (sprite == null)
        {
            return; // No suitable node was found.
        }

        if (@event is InputEventMouseButton mouseEvent && mouseEvent.ButtonIndex == MouseButton.Left)
        {
            if ((mouseEvent.Position - sprite.Position).Length() < _clickRadius)
            {
                // Start dragging if the click is on the sprite.
                if (!_dragging && mouseEvent.Pressed)
                {
                    _dragging = true;
                }
            }
            // Stop dragging if the button is released.
            if (_dragging && !mouseEvent.Pressed)
            {
                _dragging = false;
            }
        }
        else
        {
            if (@event is InputEventMouseMotion motionEvent && _dragging)
            {
                // While dragging, move the sprite with the mouse.
                sprite.Position = motionEvent.Position;
            }
        }
    }
}
觸控事件
如果你使用觸控螢幕裝置,會產生觸控事件。InputEventScreenTouch 相當於滑鼠點擊事件,而 InputEventScreenDrag 則與滑鼠移動事件相似。
小訣竅
若想在非觸控螢幕裝置上測試觸控事件,請於專案設定 > Input Devices/Pointing 區段中,啟用「Emulate Touch From Mouse」(滑鼠模擬觸控)。這樣專案就會將滑鼠點選與移動視為觸控事件。