Creating documentation images and videos
Throughout the documentation, images are often needed to make the explanation of a feature or concept as clear as possible for a reader. This page will explain the process from beginning to end.
Images (Изображения)
Capturing an image
To take a picture of something in Godot, a screen capture tool can be used.
On Windows 10 and 11 that would be the Snip & Sketch program. Pressing Windows + Shift + S lets you take a screenshot of a portion of the screen and save it to the clipboard. After pressing those keys, click and drag over the area you wish to take a picture of.
On macOS, pressing Shift + Command + 3 does the same. To take a picture of the entire screen press Shift + Command + 4. All screenshots taken will be saved to the desktop.
Each Linux desktop environment has it's own screenshot tool. For example, on KDE Plasma the program Spectacle is used for taking screenshots. If your distribution doesn't come with one by default try searching its package repository, or Flathub if that's supported.
All screenshots should ideally be taken on a 1080p screen. Anything higher resolution is adding detail that doesn't make the documentation better and dramatically increases file size. If you're taking screenshots on a higher resolution screen the screenshot should be scaled down. There are instructions on how to do this later on this page.
Format conversion
Текущий формат изображений в документации Godot — WebP (.webp). Хотя некоторые программы Linux поддерживают сохранение снимков экрана в этом формате, macOS и программа Snip & Sketch в Windows — нет. Для изображений, которые не требуют редактирования, например точной обрезки или добавления контуров, можно использовать Squoosh. Squoosh — это конвертер, разработанный Google, с открытым исходным кодом, и при его использовании Google не получает никаких прав на изображения. При выборе сжатия, если вы можете получить изображение размером менее 300 КБ, используйте сжатие без потерь. Если оно больше 300 КБ, используйте сжатие с потерями, достаточное для уменьшения размера изображения. Если это приводит к заметным артефактам сжатия, то можно использовать меньшее сжатие, даже если размер файла больше.
If you already have an image editor such as GIMP, Krita or Photoshop installed it may have the ability to open an image then save it as a WebP file.
Примечание
Since WebP supports animations and the documentation can display videos, GIFs should be avoided. Their compression is inefficient and they only support a 256-color palette with 1-bit transparency.
Cropping
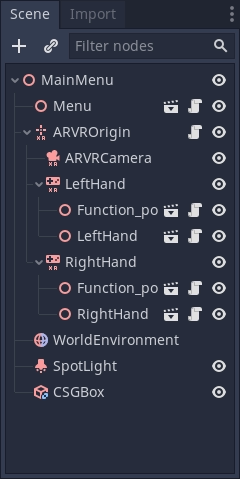
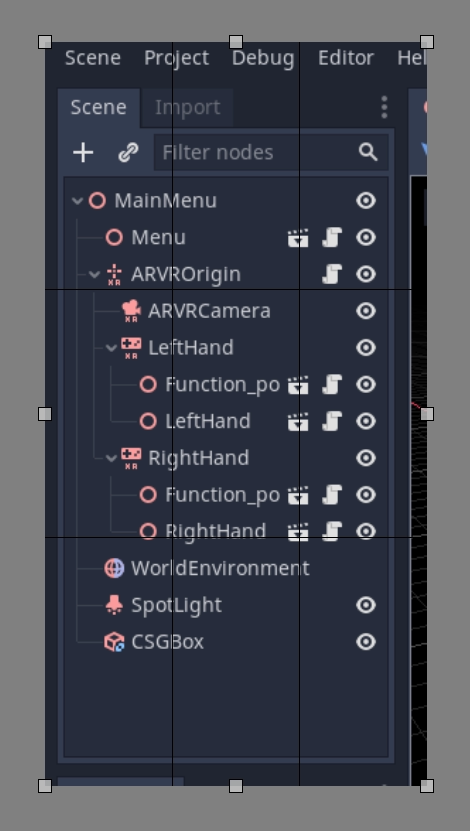
For a screenshot of a 2D or 3D scene in the editor, the above steps will be enough. But for most UI images some extra work should be done, specifically cropping to make an image look clean. Below is an example of good cropping.
For cropping Krita is the recommended program. While some screenshot programs do have cropping built-in it's not always easy to get something precise. And while Krita is designed as a painting program the cropping tool gives you pixel precision by default. Of course, feel free to use a different program you are familiar with.
If you've never used Krita before download it from the official Krita website, on Linux you may also be able to download it from your distributions repository, flathub is also an option. Once it's installed on your computer open Krita then open the image you want to crop. This button on the left panel is the crop tool.

After selecting it, click on the image, you should now have cropping tools available.
Click and drag the white boxes to adjust what gets cropped, if you zoom in close to the image you will see the individual pixels in an image, which is useful for precision.
If you make a mistake and overcrop don't worry, cropping is non-destructive in Krita and can be adjusted. Click on the image with your cropping tool still selected and the controls will return.
Scaling down an image
Как уже упоминалось ранее на этой странице, все изображения, снятые на экране с разрешением выше 1080p, должны быть уменьшены в размерах. Для этого в Krita нажмите на Изображение в верхнем меню и выберите Масштабировать изображение до нового размера из выпадающего списка. Это меню также можно открыть, нажав Ctrl + Alt + I. В этом меню вам нужно настроить пиксельные размеры. Для изображений, снятых на мониторе с разрешением 4K, измените значения ширины и высоты на половину от их текущих значений, а для изображений с разрешением 1440p умножьте ширину и высоту на 0,75. Убедитесь, что внизу меню отмечен параметр Сохранять пропорции, чтобы вам нужно было изменить только одно значение.
Saving as WebP in Krita
To save an image as webp if it isn't already one, Go to File > Save As. Select webp from the Save as type: dropdown, then choose wherever you want to save it. After clicking Save a menu will popup with webp options. Make sure Lossless is checked and Quality is set to 100%. This means the image will not lose detail and will be as small as possible.
If the image is over 300KB in size try compressing it losslessly using Squoosh. If it's still over 300KB change to lossy compression and slowly increase the compression until it's under 300KB. If this results in noticeable compression artifacts using less compression is fine, even if the file size is bigger.
Outlines, arrows and text
Sometimes an image needs something extra to properly direct the readers attention, or make something clear. Outlines and arrows can be used for this purpose. For these types of edits Inkscape is the recommended open source program, it can be downloaded from the official Inkscape website. Like Krita, if you're on Linux you can also check your distributions repository or get it from Flathub.
A full tutorial on creating outlines is not provided here, we recommend searching
for various tutorials on how to use it online. However there are two standards
for doc image outlines and arrows. First, the color should be yellow, specifically
this hex color: fffb44 (fffb44ff if there is a transparency value like in Inkscape).
This color was chosen specifically to make sure color blind people do not have
issues reading the documentation, other colors can be used in addition to this yellow
if multiple outlines on an image are needed, red should be avoided. The second standard
is that all outlines and arrow lines should be 2 pixels wide.
Finally, some images might require text to differentiate multiple parts of an image. There are no strict requirements other than use an easy to read non fancy font. As for color the yellow color from before should also be used, but black or other colors can be used if appropriate. For example, if yellow blends into the image, or if there are multiple outlines in multiple colors.
Adding an image to a documentation page
Once you've finished working on your image, it can be added to the documentation.
All images are stored in folders named img next to the page they are used in.
To add your image, add it to the img folder that's in the same folder as the
.rst file for the page (create it if it doesn't exist). In the .rst page,
images should be included with the following code snippet:
.. image:: img/documentation_image.webp
Where documentation_image.webp would be changed to the name of the image you
created. Name your images in a way that makes their meaning clear, possibly with
a prefix that makes their relationship to a documentation page explicit.
Видео
Захват экрана
Для записи экрана в Godot, может быть использована утилита захвата экрана. Операционные системы обычно не имеют утилит достаточно гибких для этого, так что вам нужно установить стороннюю утилиту.
OBS Studio наиболее популярная опция, но SimpleScreenRecorder может использоваться альтернативно на Linux. ShareX может быть использовано как альтернатива на Windows. Все эти инструменты могут быть настроены на захват всего экрана, выбранного окна или выделенного прямоугольника.
Рекомендованная частота кадров для записи экрана - 60 FPS, хотя вы можете использовать 30 FPS для долгих видео для уменьшения размеров файла. Для полноэкранных видео, используйте разрешение 1280x720.
Примечание
Godot's Movie Maker mode can be used to record the output of a running project, including its audio. This doesn't require installing any third-party software and avoids any frame drops (even when recording on a slow device), but it's less flexible.
Compressing the captured video
The recommendation is to record your video in the highest quality possible (without dropping frames due to excessive CPU/GPU utilization), then re-encode it later to reduce its file size. This results in more efficient compression than directly aiming for a small file size, as real-time compression methods are less efficient than slower compression methods.
To re-encode videos for a smaller file size, use HandBrake or the FFmpeg <https://ffmpeg.org/> command line below:
ffmpeg -i input.mp4 -crf 23 output.webm
The number after -crf adjusts the video quality, with higher numbers
resulting in lower quality (and smaller file sizes). A CRF of 23 is a good
starting point, but you may need to use a higher value for longer videos to
ensure the file size remains reasonable. Try to aim for a file size under 2 MB
if possible.
If the video was recorded in a higher resolution or framerate, you can adjust its output resolution and framerate as follows:
ffmpeg -i input.mp4 -crf 23 -vf scale=1280:-2 -r 30 output.webm
This results in a video resolution around 1280×720 at 30 FPS. The exact video resolution will vary depending on the source's aspect ratio.
Совет
If the video was recorded with an audio track but this audio track is not
necessary, consider stripping it by adding the -an option to the FFmpeg
command line (before the output file name). This will reduce file size and
also ensure audio controls don't show up on the video when played in a
browser.
Adding a video to a documentation page
Once you've finished working on your video, it can be added to the documentation.
All videos are stored in folders named video next to the page they are used in.
To add your video, add it to the video folder that's in the same folder as the
.rst file for the page (create it if it doesn't exist). In the .rst page,
videos should be included with the following code snippet:
.. video:: video/csg_tools.webm
   :alt: Put a text description of the video here
   :autoplay:
   :loop:
   :muted:
   :align: default
Where documentation_video.webp would be changed to the name of the video you
created. Name your videos in a way that makes their meaning clear, possibly with
a prefix that makes their relationship to a documentation page explicit.
The :autoplay:, :loop: and :muted: flags should always be specified
unless the video needs to play audio. In this case, do not specify any of these flags.
The :align: default flag should always be specified.