Использование GridMaps (карты тайлов)
Введение
Gridmaps - это инструмент для создания 3D уровней игры, подобно тому, как TileMap работает в 2D. Вы начинаете с предопределённой коллекции 3D сеток (библиотека MeshLibrary), которые могут быть размещены на сетке, как если бы вы строили уровень из неограниченного количества блоков Lego.
Столкновения и навигацию также можно добавить к сеткам, как это делается с тайлами tilemap`ов.
Пример проекта
Чтобы узнать как работают GridMaps, скачайте тестовый проект : gridmap_starter.zip.
Unzip this project and add it to the Project Manager using the "Import" button. You may get a popup saying that it needs to be converted to a newer Godot version, click Convert project.godot.
Создание MeshLibrary
Для начала вам понадобится MeshLibrary, которая представляет собой коллекцию отдельных сеток, которые могут быть использованы в gridmap. Откройте сцену "mesh_library_source.tscn", чтобы посмотреть пример настройки библиотеки сеток.
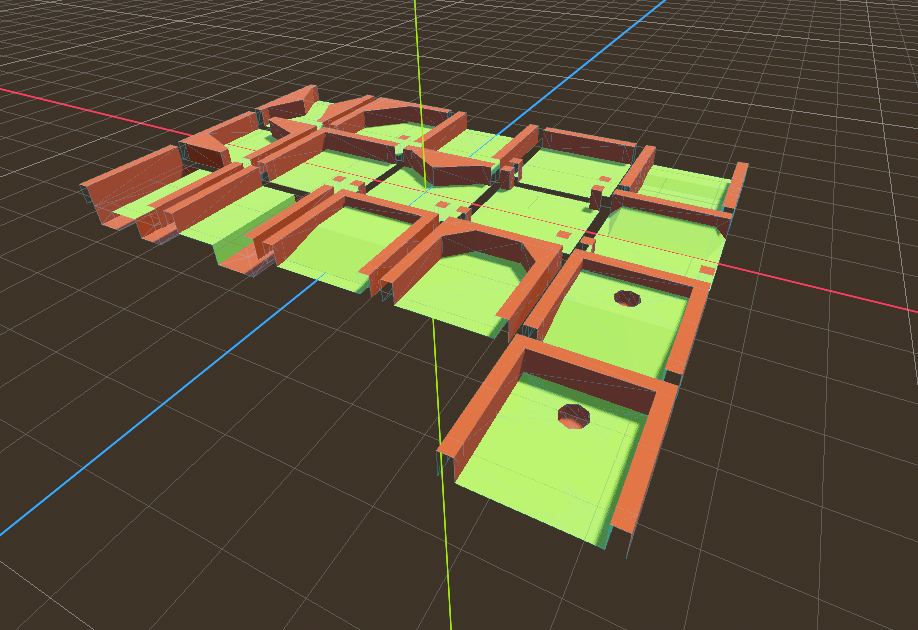
Как вы можете видеть, в этой сцене Node3D - корневой узел, с ним - несколько дочерних MeshInstance3D узлов.
Если вам не нужна физика в вашей сцене, то всё готово. Однако в большинстве случаев вы захотите назначить тела столкновения сеткам.
Коллизии
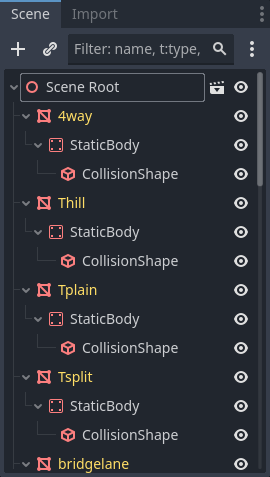
Вы можете вручную назначить class_StaticBody и class_CollisionShape для каждой сетки. В качестве альтернативы можно использовать меню "Сетка" для автоматического создания тела столкновения на основе данных сетки.
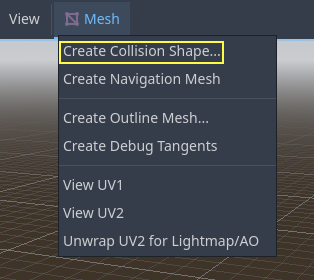
Обратите внимание, что тело столкновения "Convex" будет лучше работать для простых сеток. Для более сложных форм выберите "Create Trimesh Static Body". После того как каждой сетке назначено физическое тело и форма столкновения, ваша библиотека сеток готова к использованию.
Материалы
При генерации библиотеки сеток используются только материалы из сеток. Материалы, установленные на узле, игнорируются.
Навигационные сетки
Как все экземпляры mesh, объекты MeshLibrary могут быть назначенными как ресурс :ref:'class_NavigationMesh', которые могут быть созданными вручную, или запеченными как описано ниже.
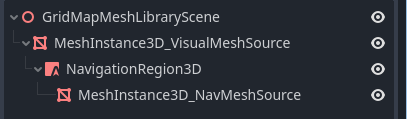
Чтобы создать NavigationMesh из экспорта сцены MeshLibrary, поместите дочерний узел NavigationRegion3D ниже основного MeshInstance3D для элемента GridMap. Добавьте допустимый ресурс NavigationMesh в NavigationRegion3D и несколько исходных узлов геометрии ниже и запеките NavigationMesh.
Примечание
При использовании небольших ячеек сетки обычно необходимо уменьшить свойства NavigationMesh для радиуса агента и минимального размера области.
Узлы ниже NavigationRegion3D игнорируются при экспорте сцены MeshLibrary, поэтому дополнительные узлы можно добавить в качестве исходной геометрии только для запекания навигационной сетки.
Предупреждение
Размер запеченной ячейки NavigationMesh должен соответствовать размеру ячейки карты NavigationServer, чтобы правильно объединить навигационные сетки разных ячеек сетки.
Формат MeshLibrary
Подводя итог конкретным ограничениям формата MeshLibrary, сцена MeshLibrary имеет Node3D в качестве корневого узла и несколько дочерних узлов, которые станут элементами MeshLibrary. Каждый дочерний узел корневого узла должен:
Быть MeshInstance3D, который станет элементом MeshLibrary. Только эта визуальная сетка будет экспортирована.
Поместите материал в слот материала сетки, а не в слоты материала MeshInstance3D.
Иметь до одного StaticBody3D потомка, для столкновения. StaticBody3D должен иметь одного или более CollisionShape3D потомков.
Иметь до одного дочернего элемента NavigationRegion3D для навигации. NavigationRegion3D может иметь один или несколько дополнительных дочерних элементов MeshInstance3D, которые могут быть запечены для навигации, но не будут экспортированы как визуальная сетка.
Распознается только этот конкретный формат. Другие типы узлов, размещенные как дочерние, не будут распознаны и экспортированы. GridMap — это не универсальная система для размещения узлов на сетке, а скорее специальная оптимизированная система, предназначенная для размещения сеток с коллизиями и навигацией.
Экспорт MeshLibrary
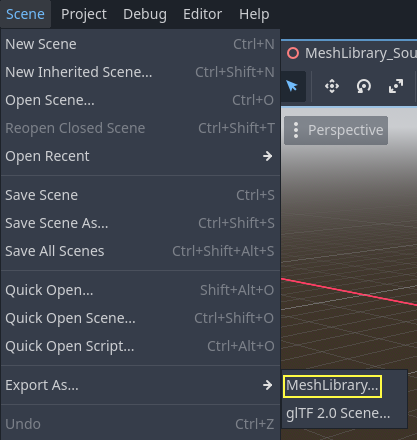
Чтобы экспортировать библиотеку, нажмите Scene > Export As... > MeshLibrary... и сохраните ее как ресурс.
Вы можете найти уже экспортированную MeshLibrary в проекте под названием "MeshLibrary.tres".
Использование GridMap
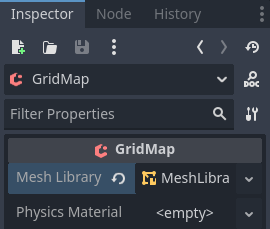
Create a new scene and add a GridMap node. Add the mesh library by dragging the resource file from the FileSystem dock and dropping it in the Mesh Library property in the Inspector.
Inspector properties
The Physics Material setting allows you to override the physics material for every mesh in the NavigationMesh.
Under Cells, the Size property should be set to the size of your meshes. You can leave it at the default value for the demo. Uncheck the Center Y property.
The Collision options allow you to set the collision layer, collision mask, and priority for the entire grid. For more information on how those work see the Физика section.
Under Navigation is the "Bake Navigation" option. If enabled it creates a navigation region for each cell that uses a mesh library item with a navigation mesh.
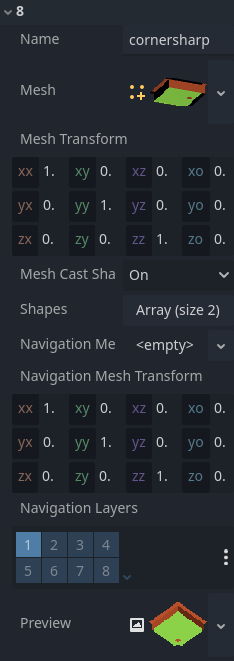
If you click on the MeshLibrary itself in the inspector you can adjust settings for individual meshes, such as their navigation mesh, navigation layers, or if the mesh casts shadows.
GridMap panel
At the bottom of the editor is the GridMap panel, which should have opened automatically when you added the GridMap node.

From left to right in the toolbar:
Transform: Adds a gizmo to the scene that allows you to change the relative position and rotation of the gridmap in the scene.
Selection: While active you can select an area in the viewport, click and drag to select more than one space on the grid.
Erase: While active, click in the viewport and delete meshes.
Paint: While active, click in the viewport and add whatever mesh is currently selected in the GridMap panel to the scene.
Pick: While active, clicking on a gridmap mesh in the viewport will cause it to be selected in the GridMap panel.
Fill: Fill the area that has been selected in the viewport with whatever mesh is selected in the GridMap bottom panel.
Move: Move whatever mesh or meshes are currently selected in the viewport.
Duplicate: Create a copy of whatever the selected mesh or meshes in the GridMap are.
Delete: Similar to erase, but for the entire selected area.
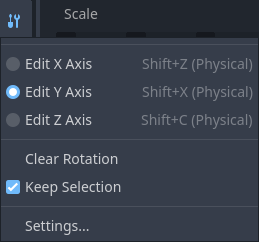
Cursor Rotate X: While the paint tool is selected, this will rotate the mesh that will be painted on the X-axis. This will also rotate selected areas if they are being moved.
Cursor Rotate Y: While the paint tool is selected, this will rotate the mesh that will be painted on the Y-axis. This will also rotate selected areas if they are being moved.
Cursor Rotate Z: While the paint tool is selected, this will rotate the mesh that will be painted on the Z-axis. This will also rotate selected areas if they are being moved.
Change Grid Floor: Adjusts what floor is currently being worked on, can be changed with the arrows or typing
Filter Meshes: Used to search for a specific mesh in the bottom panel.
Zoom: Controls the zoom level on meshes in the bottom panel.
Layout toggles: These two buttons toggle between different layouts for meshes in the bottom panel.
Tools dropdown: This button opens a dropdown menu with a few more options.
Clicking on Settings in that dropdown brings up a window that allows you to change the Pick Distance, which is the maximum distance at which tiles can be placed on a GridMap, relative to the camera position (in meters).
Использование GridMap в коде
Подробности о методах и переменных-членах узла см. в GridMap.