Матрицы и преобразования
Введение
Перед прочтением этого руководства мы рекомендуем вам внимательно прочитать и понять руководство Векторная математика, так как для этого руководства требуются знания векторов.
В этом руководстве мы расскажем о преобразованиях и о том, как мы представляем их в Godot с помощью матриц. Это не исчерпывающее руководство по матрицам. Преобразования чаще всего применяются в виде переноса, поворота и масштабирования, поэтому мы сосредоточимся на том, как представить их с помощью матриц.
Большая часть этого руководства посвящена 2D с использованием Transform2D и Vector2, но в 3D все работает очень похоже.
Примечание
Как упоминалось в предыдущем уроке, важно помнить, что в модели Godot ось Y в двумерном пространстве направлена вниз. Это противоположно тому, как в большинстве школ преподают линейную алгебру, где ось Y направлена вверх.
Примечание
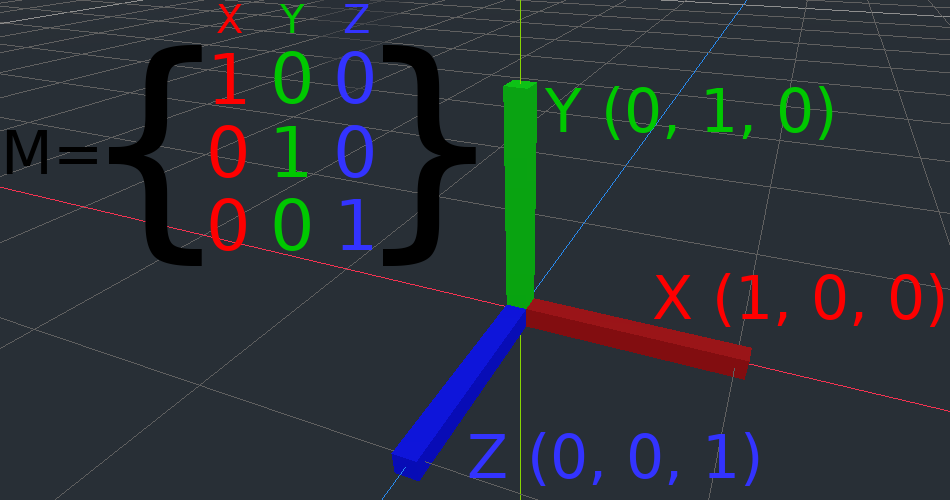
Ось X обозначается красным цветом, ось Y — зелёным, а ось Z — синим. В этом уроке используется соответствующая цветовая схема, но синий цвет также применяется для отображения вектора начала координат.
Компоненты матрицы и Единичная матрица
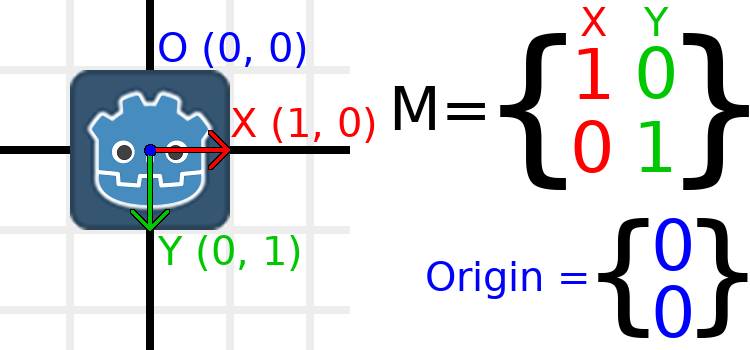
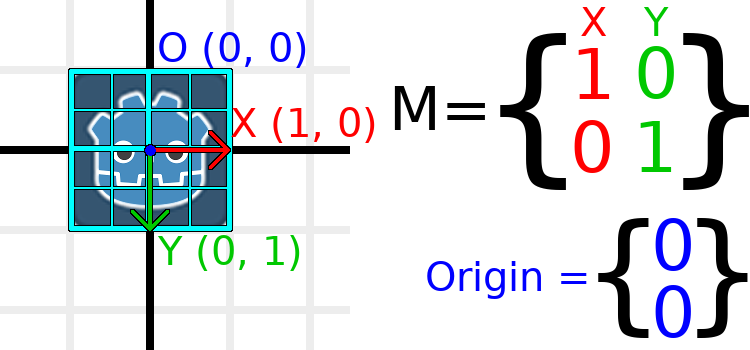
Единичная матрица — это преобразование без перемещения, поворота и масштабирования. Давайте начнём с рассмотрения единичной матрицы и того, как её компоненты связаны с её визуальным представлением.
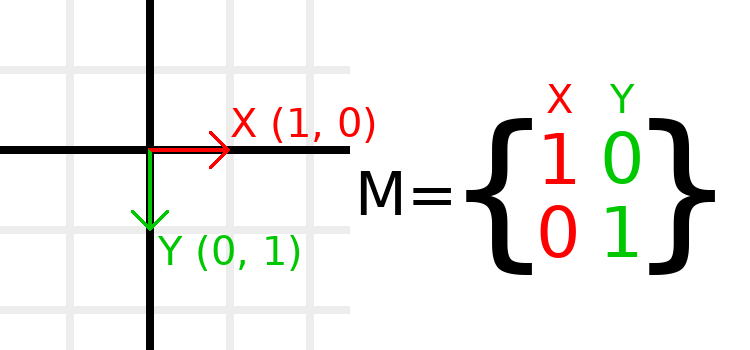
Матрицы состоят из строк и столбцов, а матрица преобразования имеет определенные соглашения о том, что делает каждая из них.
На изображении выше видно, что красный вектор X представлен первым столбцом матрицы, а зелёный вектор Y — вторым. Изменение столбцов изменит эти векторы. В следующих нескольких примерах мы рассмотрим, как ими манипулировать.
Вам не стоит беспокоиться о непосредственной работе со строками, поскольку мы обычно работаем со столбцами. Однако строки матрицы можно рассматривать как индикаторы векторов, способствующих движению в заданном направлении.
Когда мы говорим о значении вроде t.x.y, это Y-компонент вектор-столбца X. Другими словами, левый нижний элемент матрицы. Аналогично, t.x.x — это левый верхний, t.y.x — правый верхний, а t.y.y — правый нижний, где t — это Transform2D.
Scaling the transformation matrix
Масштабирование — одна из самых простых для понимания операций. Начнём с размещения логотипа Godot под нашими векторами, чтобы наглядно увидеть влияние преобразования на объект:
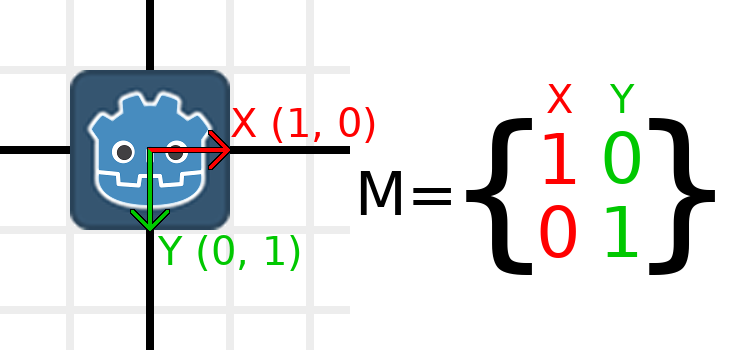
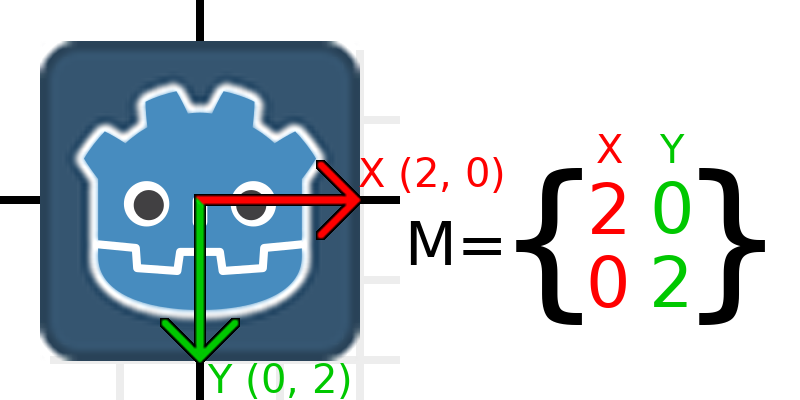
Теперь, чтобы масштабировать матрицу, нам достаточно умножить каждый её компонент на нужный коэффициент масштабирования. Увеличим масштаб в 2 раза.1 умножить на 2 станет 2, а 0 умноженный на 2 останется 0, в результате получаем:
Чтобы сделать это в коде, мы перемножаем каждый из векторов:
var t = Transform2D()
# Scale
t.x *= 2
t.y *= 2
transform = t # Change the node's transform to what we calculated.
Transform2D t = Transform2D.Identity;
// Scale
t.X *= 2;
t.Y *= 2;
Transform = t; // Change the node's transform to what we calculated.
Если нужно вернуть исходный масштаб, достаточно умножить каждый компонент на 0.5. Это, в целом, всё, что требуется знать о масштабировании матрицы преобразования.
Чтобы вычислить масштаб объекта из существующей матрицы преобразования, вы можете использовать length() для каждого из векторов-столбцов.
Примечание
В реальных проектах для выполнения масштабирования можно использовать метод scaled().
Rotating the transformation matrix
Начнём так же, как и ранее — разместим логотип Godot под единичной матрицей:
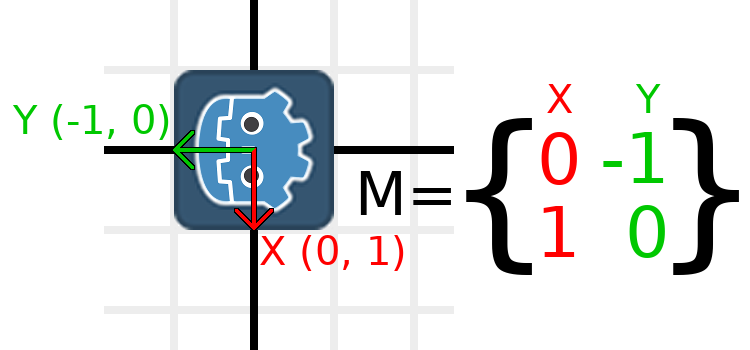
Предположим, мы хотим повернуть наш логотип по часовой стрелке на 90 градусов. Сейчас ось X направлена вправо, а ось Y - вниз. Если мы представим их поворот, то логически увидим, что новая ось X должна указывать вниз, а новая ось Y - влево.
Можете представить, будто вы берёте и логотип Godot, и его векторы, а затем вращаете их вокруг центра. В каком бы положении вы ни остановили вращение, ориентация векторов будет определять значение матрицы.
Нам нужно представить «вниз» и «влево» в нормальных координатах, поэтому мы установим X в (0, 1), а Y в (-1, 0). Это также значения Vector2.DOWN и Vector2.LEFT. Когда мы это сделаем, мы получим желаемый результат в виде вращения объекта:
Если вам сложно понять вышесказанное, попробуйте такое упражнение: вырежьте из бумаги квадрат, нарисуйте на нём векторы X и Y, положите его на лист в клетку, затем поверните и отметьте конечные точки векторов.
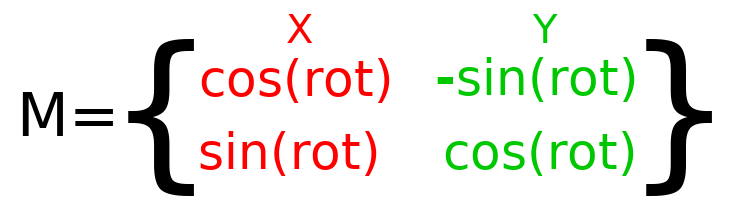
Для выполнения поворота в коде нам нужно уметь программно вычислять значения. Это изображение показывает формулы, необходимые для расчёта матрицы преобразования из угла поворота. Не волнуйтесь, если эта часть кажется сложной — обещаю, это самое трудное, что вам нужно знать.
Примечание
В Godot все вращения задаются в радианах, а не в градусах. Полный оборот равен TAU или PI*2 радиан, а поворот на 90 градусов (четверть оборота) — TAU/4 или PI/2 радиан. Использование TAU обычно делает код более читаемым.
Примечание
Интересный факт: В дополнение к тому, что в Godot ось Y указывает вниз, вращение представлено по часовой стрелке. Это означает, что все математические и тригонометрические функции работают так же, как в системе с осью Y вверх и вращением против часовой стрелки (CCW), поскольку эти различия "компенсируются". Можно считать, что вращение в обеих системах происходит "от X к Y".
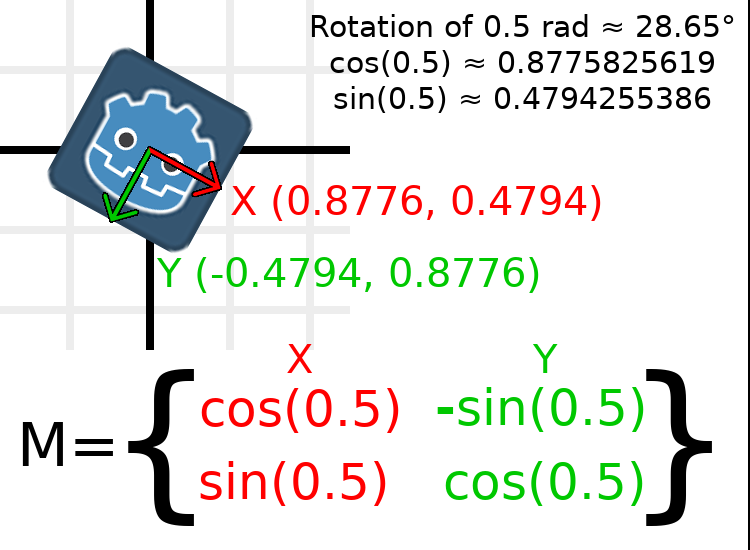
In order to perform a rotation of 0.5 radians (about 28.65 degrees), we plug in a value of 0.5 to the formula above and evaluate to find what the actual values should be:
Вот как это реализуется в коде (поместите скрипт на узел Node2D):
var rot = 0.5 # The rotation to apply.
var t = Transform2D()
t.x.x = cos(rot)
t.y.y = cos(rot)
t.x.y = sin(rot)
t.y.x = -sin(rot)
transform = t # Change the node's transform to what we calculated.
float rot = 0.5f; // The rotation to apply.
Transform2D t = Transform2D.Identity;
t.X.X = t.Y.Y = Mathf.Cos(rot);
t.X.Y = t.Y.X = Mathf.Sin(rot);
t.Y.X *= -1;
Transform = t; // Change the node's transform to what we calculated.
To calculate the object's rotation from an existing transformation
matrix, you can use atan2(t.x.y, t.x.x), where t is the Transform2D.
Примечание
In actual projects, you can use the rotated()
method to perform rotations.
Основа матрицы преобразования
So far we have only been working with the x and y, vectors, which
are in charge of representing rotation, scale, and/or shearing
(advanced, covered at the end). The X and Y vectors are together
called the basis of the transformation matrix. The terms "basis"
and "basis vectors" are important to know.
You might have noticed that Transform2D actually
has three Vector2 values: x, y, and origin.
The origin value is not part of the basis, but it is part of the
transform, and we need it to represent position. From now on we'll
keep track of the origin vector in all examples. You can think of
origin as another column, but it's often better to think of it as
completely separate.
Note that in 3D, Godot has a separate Basis structure for holding the three Vector3 values of the basis, since the code can get complex and it makes sense to separate it from Transform3D (which is composed of one Basis and one extra Vector3 for the origin).
Translating the transformation matrix
Changing the origin vector is called translating the transformation
matrix. Translating is basically a technical term for "moving" the
object, but it explicitly does not involve any rotation.
Разберём пример для понимания. Начнём с единичного преобразования, как в прошлый раз, но теперь будем отслеживать вектор начала координат.
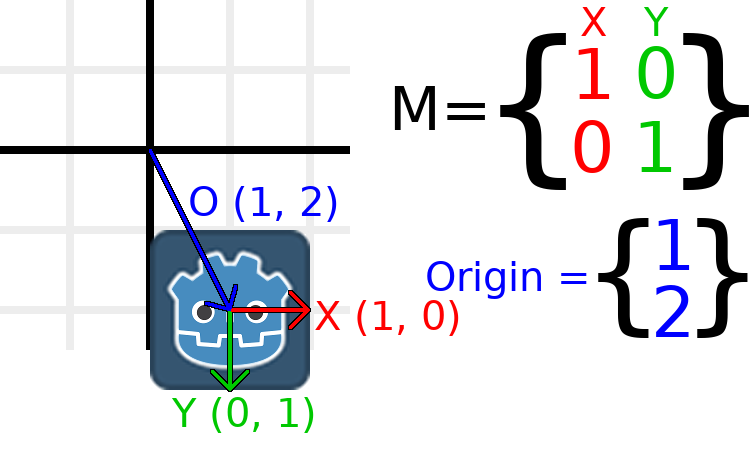
If we want to move the object to a position of (1, 2), we need
to set its origin vector to (1, 2):
There is also a translated_local() method, which performs a different
operation to adding or changing origin directly. The translated_local()
method will translate the object relative to its own rotation.
For example, an object rotated 90 degrees clockwise will move to
the right when translated_local() with Vector2.UP. To translate
relative to the global/parent frame use translated() instead.
Примечание
Godot в 2D использует координаты, основанные на пикселях, поэтому в реальных проектах вам потребуется перемещать объекты на сотни единиц.
Putting it all together
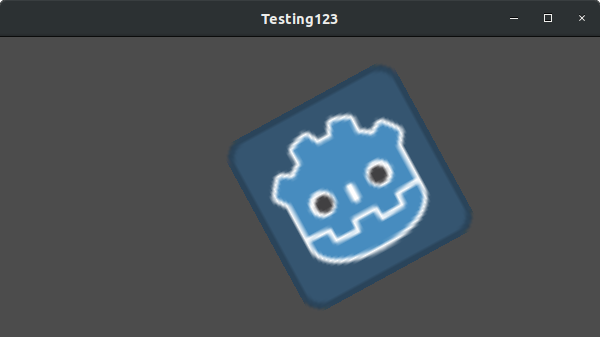
We're going to apply everything we mentioned so far onto one transform. To follow along, create a project with a Sprite2D node and use the Godot logo for the texture resource.
Давайте установим перемещение на (350, 150), поворот на -0.5 радиан и масштаб на 3. Я приложил скриншот и код для воспроизведения, но советую вам попробовать воссоздать скриншот, не заглядывая в код!
var t = Transform2D()
# Translation
t.origin = Vector2(350, 150)
# Rotation
var rot = -0.5 # The rotation to apply.
t.x.x = cos(rot)
t.y.y = cos(rot)
t.x.y = sin(rot)
t.y.x = -sin(rot)
# Scale
t.x *= 3
t.y *= 3
transform = t # Change the node's transform to what we calculated.
Transform2D t = Transform2D.Identity;
// Translation
t.Origin = new Vector2(350, 150);
// Rotation
float rot = -0.5f; // The rotation to apply.
t.X.X = t.Y.Y = Mathf.Cos(rot);
t.X.Y = t.Y.X = Mathf.Sin(rot);
t.Y.X *= -1;
// Scale
t.X *= 3;
t.Y *= 3;
Transform = t; // Change the node's transform to what we calculated.
Скос с помощью матрицы преобразования (дополнительно)
Примечание
Если вам нужно только узнать, как использовать матрицы преобразования, смело пропускайте этот раздел. Здесь рассматривается редко применяемый аспект матриц преобразования для более глубокого понимания их работы.
Node2D provides a shearing property out of the box.
Возможно, вы заметили, что преобразование имеет больше степеней свободы, чем комбинация указанных выше действий. Основа матрицы 2D-преобразования содержит четыре числа в двух значениях Vector2, тогда как угол поворота и Vector2 масштаба — только 3 числа. Этот недостающий параметр называется перекосом (shearing).
Normally, you will always have the basis vectors perpendicular to each other. However, shearing can be useful in some situations, and understanding shearing helps you understand how transforms work.
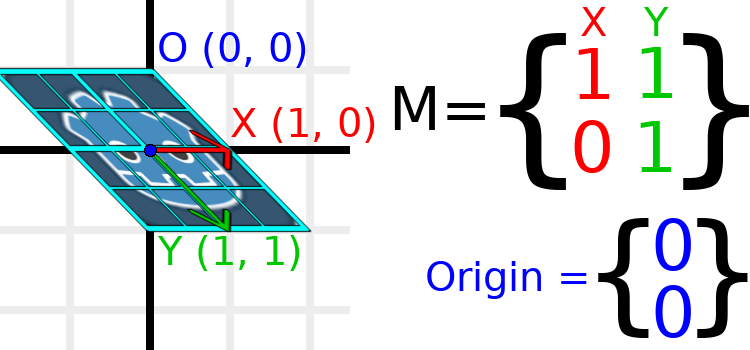
To show you visually how it will look, let's overlay a grid onto the Godot logo:
Each point on this grid is obtained by adding the basis vectors together. The bottom-right corner is X + Y, while the top-right corner is X - Y. If we change the basis vectors, the entire grid moves with it, as the grid is composed of the basis vectors. All lines on the grid that are currently parallel will remain parallel no matter what changes we make to the basis vectors.
As an example, let's set Y to (1, 1):
var t = Transform2D()
# Shear by setting Y to (1, 1)
t.y = Vector2.ONE
transform = t # Change the node's transform to what we calculated.
Transform2D t = Transform2D.Identity;
// Shear by setting Y to (1, 1)
t.Y = Vector2.One;
Transform = t; // Change the node's transform to what we calculated.
Примечание
You can't set the raw values of a Transform2D in the editor, so you must use code if you want to shear the object.
Due to the vectors no longer being perpendicular, the object has been sheared. The bottom-center of the grid, which is (0, 1) relative to itself, is now located at a world position of (1, 1).
The intra-object coordinates are called UV coordinates in textures, so let's borrow that terminology for here. To find the world position from a relative position, the formula is U * X + V * Y, where U and V are numbers and X and Y are the basis vectors.
The bottom-right corner of the grid, which is always at the UV position of (1, 1), is at the world position of (2, 1), which is calculated from X*1 + Y*1, which is (1, 0) + (1, 1), or (1 + 1, 0 + 1), or (2, 1). This matches up with our observation of where the bottom-right corner of the image is.
Аналогично, правый верхний угол сетки, который всегда находится в ультрафиолетовой позиции (1, -1), находится в мировой позиции (0, -1), которая вычисляется по X*1 + Y*-1, что составляет (1, 0) - (1, 1), или (1 - 1, 0 - 1), или (0, -1). Это совпадает с нашими наблюдениями о том, где находится правый верхний угол изображения.
Hopefully you now fully understand how a transformation matrix affects the object, and the relationship between the basis vectors and how the object's "UV" or "intra-coordinates" have their world position changed.
Примечание
In Godot, all transform math is done relative to the parent node. When we refer to "world position", that would be relative to the node's parent instead, if the node had a parent.
If you would like additional explanation, you should check out 3Blue1Brown's excellent video about linear transformations: https://www.youtube.com/watch?v=kYB8IZa5AuE
Practical applications of transforms
In actual projects, you will usually be working with transforms inside transforms by having multiple Node2D or Node3D nodes parented to each other.
However, it's useful to understand how to manually calculate the values we need. We will go over how you could use Transform2D or Transform3D to manually calculate transforms of nodes.
Converting positions between transforms
There are many cases where you'd want to convert a position in and out of a transform. For example, if you have a position relative to the player and would like to find the world (parent-relative) position, or if you have a world position and want to know where it is relative to the player.
We can find what a vector relative to the player would be defined in
world space as using the * operator:
# World space vector 100 units below the player.
print(transform * Vector2(0, 100))
// World space vector 100 units below the player.
GD.Print(Transform * new Vector2(0, 100));
And we can use the * operator in the opposite order to find a what world
space position would be if it was defined relative to the player:
# Where is (0, 100) relative to the player?
print(Vector2(0, 100) * transform)
// Where is (0, 100) relative to the player?
GD.Print(new Vector2(0, 100) * Transform);
Примечание
If you know in advance that the transform is positioned at (0, 0), you can use the "basis_xform" or "basis_xform_inv" methods instead, which skip dealing with translation.
Moving an object relative to itself
A common operation, especially in 3D games, is to move an object relative to itself. For example, in first-person shooter games, you would want the character to move forward (-Z axis) when you press W.
Since the basis vectors are the orientation relative to the parent, and the origin vector is the position relative to the parent, we can add multiples of the basis vectors to move an object relative to itself.
This code moves an object 100 units to its own right:
transform.origin += transform.x * 100
Transform2D t = Transform;
t.Origin += t.X * 100;
Transform = t;
For moving in 3D, you would need to replace "x" with "basis.x".
Примечание
In actual projects, you can use translate_object_local in 3D
or move_local_x and move_local_y in 2D to do this.
Applying transforms onto transforms
One of the most important things to know about transforms is how you can use several of them together. A parent node's transform affects all of its children. Let's dissect an example.
In this image, the child node has a "2" after the component names to distinguish them from the parent node. It might look a bit overwhelming with so many numbers, but remember that each number is displayed twice (next to the arrows and also in the matrices), and that almost half of the numbers are zero.
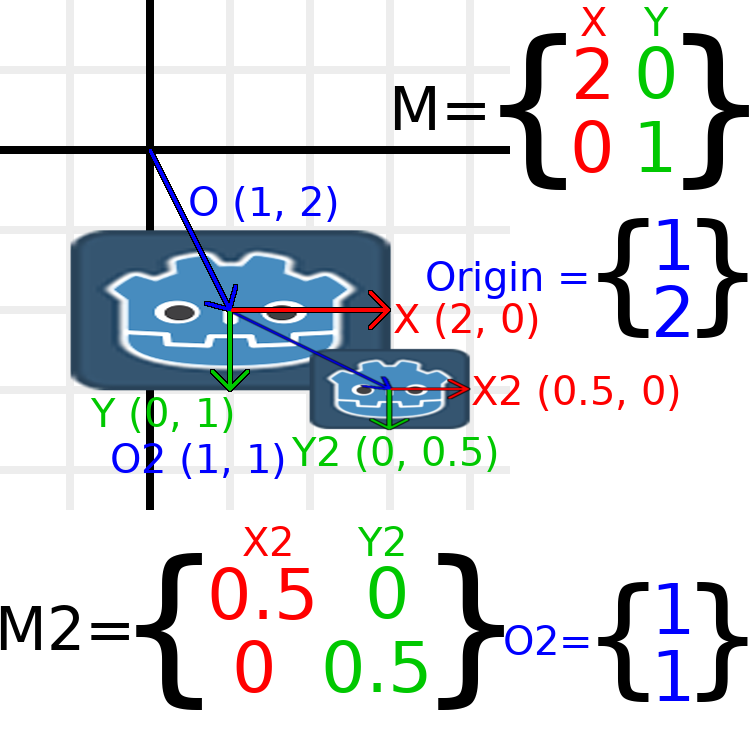
The only transformations going on here are that the parent node has been given a scale of (2, 1), the child has been given a scale of (0.5, 0.5), and both nodes have been given positions.
All child transformations are affected by the parent transformations.
The child has a scale of (0.5, 0.5), so you would expect it to be
a 1:1 ratio square, and it is, but only relative to the parent.
The child's X vector ends up being (1, 0) in world space, because
it is scaled by the parent's basis vectors.
Similarly, the child node's origin vector is set to (1, 1), but this
actually moves it (2, 1) in world space, due to the parent node's
basis vectors.
To calculate a child transform's world space transform manually, this is the code we would use:
# Set up transforms like in the image, except make positions be 100 times bigger.
var parent = Transform2D(Vector2(2, 0), Vector2(0, 1), Vector2(100, 200))
var child = Transform2D(Vector2(0.5, 0), Vector2(0, 0.5), Vector2(100, 100))

# Calculate the child's world space transform
# origin = (2, 0) * 100 + (0, 1) * 100 + (100, 200)
var origin = parent.x * child.origin.x + parent.y * child.origin.y + parent.origin
# basis_x = (2, 0) * 0.5 + (0, 1) * 0
var basis_x = parent.x * child.x.x + parent.y * child.x.y
# basis_y = (2, 0) * 0 + (0, 1) * 0.5
var basis_y = parent.x * child.y.x + parent.y * child.y.y

# Change the node's transform to what we calculated.
transform = Transform2D(basis_x, basis_y, origin)
// Set up transforms like in the image, except make positions be 100 times bigger.
Transform2D parent = new Transform2D(2, 0, 0, 1, 100, 200);
Transform2D child = new Transform2D(0.5f, 0, 0, 0.5f, 100, 100);

// Calculate the child's world space transform
// origin = (2, 0) * 100 + (0, 1) * 100 + (100, 200)
Vector2 origin = parent.X * child.Origin.X + parent.Y * child.Origin.Y + parent.Origin;
// basisX = (2, 0) * 0.5 + (0, 1) * 0 = (0.5, 0)
Vector2 basisX = parent.X * child.X.X + parent.Y * child.X.Y;
// basisY = (2, 0) * 0 + (0, 1) * 0.5 = (0.5, 0)
Vector2 basisY = parent.X * child.Y.X + parent.Y * child.Y.Y;

// Change the node's transform to what we calculated.
Transform = new Transform2D(basisX, basisY, origin);
In actual projects, we can find the world transform of the child by
applying one transform onto another using the * operator:
# Set up transforms like in the image, except make positions be 100 times bigger.
var parent = Transform2D(Vector2(2, 0), Vector2(0, 1), Vector2(100, 200))
var child = Transform2D(Vector2(0.5, 0), Vector2(0, 0.5), Vector2(100, 100))

# Change the node's transform to what would be the child's world transform.
transform = parent * child
// Set up transforms like in the image, except make positions be 100 times bigger.
Transform2D parent = new Transform2D(2, 0, 0, 1, 100, 200);
Transform2D child = new Transform2D(0.5f, 0, 0, 0.5f, 100, 100);

// Change the node's transform to what would be the child's world transform.
Transform = parent * child;
Примечание
При умножении матриц порядок имеет значение! Не смешивайте элементы матриц.
В итоге, применение преобразования тождества никогда ничего не дает.
Если вам нужно дополнительное объяснение, вам стоит посмотреть отличное видео от 3Blue1Brown о композиции (умножении) матриц: https://www.youtube.com/watch?v=XkY2DOUCWMU
Inverting a transformation matrix
The "affine_inverse" function returns a transform that "undoes" the previous transform. This can be useful in some situations. Let's take a look at a few examples.
Умножение обратного преобразования на нормальное отменяет все преобразования:
var ti = transform.affine_inverse()
var t = ti * transform
# The transform is the identity transform.
Transform2D ti = Transform.AffineInverse();
Transform2D t = ti * Transform;
// The transform is the identity transform.
Transforming a position by a transform and its inverse results in the same position:
var ti = transform.affine_inverse()
position = transform * position
position = ti * position
# The position is the same as before.
Transform2D ti = Transform.AffineInverse();
Position = Transform * Position;
Position = ti * Position;
// The position is the same as before.
Как все это работает в 3D?
One of the great things about transformation matrices is that they work very similarly between 2D and 3D transformations. All the code and formulas used above for 2D work the same in 3D, with 3 exceptions: the addition of a third axis, that each axis is of type Vector3, and also that Godot stores the Basis separately from the Transform3D, since the math can get complex and it makes sense to separate it.
Все концепции перемещения, поворота, масштабирования и сдвига, работают в 3D также, как и в 2D. Для масштабирования мы берем каждый компонент и умножаем его; для поворота мы изменяем направление каждого базисного вектора; для перемещения мы управляем началом координат; для сдвига мы делаем базисные векторы неперпендикулярными.
If you would like, it's a good idea to play around with transforms to get an understanding of how they work. Godot allows you to edit 3D transform matrices directly from the inspector. You can download this project which has colored lines and cubes to help visualize the Basis vectors and the origin in both 2D and 3D: https://github.com/godotengine/godot-demo-projects/tree/master/misc/matrix_transform
Примечание
You cannot edit Node2D's transform matrix directly in Godot 4.0's inspector. This may be changed in a future release of Godot.
Если вам нужно дополнительное объяснение, вам следует посмотреть отличное видео от 3Blue1Brown о трехмерных линейных преобразованиях: https://www.youtube.com/watch?v=rHLEWRxRGiM
Representing rotation in 3D (advanced)
The biggest difference between 2D and 3D transformation matrices is how you represent rotation by itself without the basis vectors.
With 2D, we have an easy way (atan2) to switch between a transformation matrix and an angle. In 3D, rotation is too complex to represent as one number. There is something called Euler angles, which can represent rotations as a set of 3 numbers, however, they are limited and not very useful, except for trivial cases.
In 3D we do not typically use angles, we either use a transformation basis (used pretty much everywhere in Godot), or we use quaternions. Godot can represent quaternions using the Quaternion struct. My suggestion to you is to completely ignore how they work under-the-hood, because they are very complicated and unintuitive.
However, if you really must know how it works, here are some great resources, which you can follow in order:
https://www.youtube.com/watch?v=mvmuCPvRoWQ