Work in progress
The content of this page was not yet updated for Godot
4.2
and may be outdated. If you know how to improve this page or you can confirm
that it's up to date, feel free to open a pull request.
Рахунок та повтор
У цій частині ми додамо рахунок, відтворення музики та можливість перезапустити гру.
Ми повинні відстежувати поточний рахунок в змінній і відображати її на екрані за допомогою мінімального інтерфейсу. Для цього ми будемо використовувати текстову мітку.
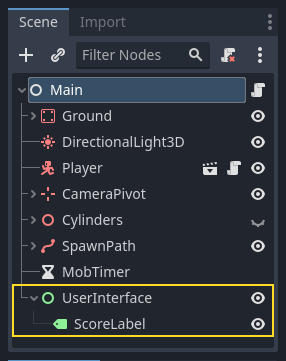
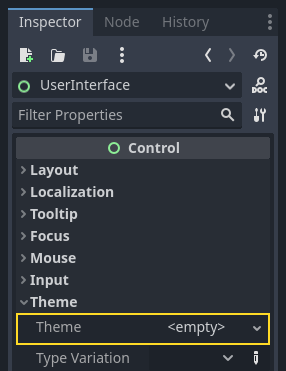
In the main scene, add a new child node Control to Main and name it
UserInterface. You will automatically be taken to the 2D screen, where you can
edit your User Interface (UI).
Додайте вузол Label і назвіть його ScoreLabel
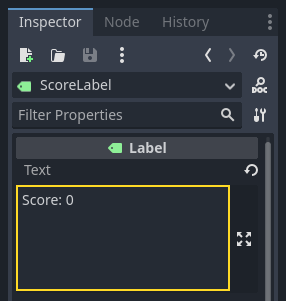
У Інспекторі в Label Text введіть текст "Score: 0" (або "Рахунок: 0", якщо шрифт підтримує кирилицю).
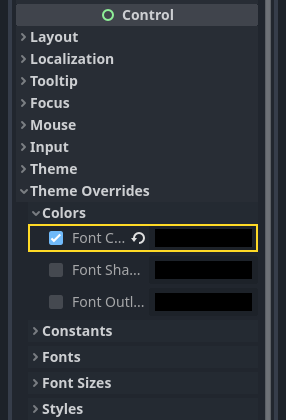
Крім того, текст за замовчуванням білий, як і фон нашої гри. Нам потрібно змінити його колір, щоб побачити під час виконання.
Прокрутіть вниз до Перевизначення теми, розгорніть Кольори та увімкніть Колір шрифту, щоб відтінити текст у чорний колір (який добре контрастує з білою 3D-сценою)
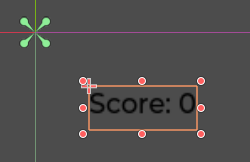
Нарешті, клацніть і перетягніть текст у вікні перегляду, щоб перемістити його до верхнього лівого кута.
The UserInterface node allows us to group our UI in a branch of the scene tree
and use a theme resource that will propagate to all its children. We'll use it
to set our game's font.
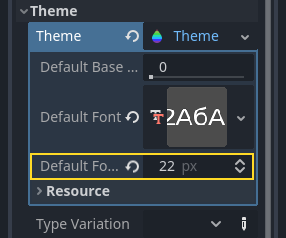
Створення теми інтерфейсу користувача
Once again, select the UserInterface node. In the Inspector, create a new
theme resource in Theme -> Theme.
Натисніть на неї, щоб відкрити редактор тем у нижній панелі. Він дає вам попередній перегляд того, як будуть виглядати всі вбудовані елементи інтерфейсу користувача у вашій темі.
Зображення
За замовчуванням тема має лише одну властивість, Default Font (Шрифт за замовчуванням).
Дивись також
Ви можете додати більше властивостей до теми для розробки складних інтерфейсів користувача, але це виходить за рамки цієї серії. Щоб дізнатися більше про створення та редагування тем гляньте на Introduction to GUI skinning.
Тут має бути файл шрифту, подібний до тих, які є на вашому комп'ютері. DynamicFont підтримує наступні формати.
In the FileSystem dock, expand the fonts directory and click and drag the
Montserrat-Medium.ttf file we included in the project onto the Default Font.
The text will reappear in the theme preview.
The text is a bit small. Set the Default Font Size to 22 pixels to increase the text's size.
Відстеження рахунку
Let's work on the score next. Attach a new script to the ScoreLabel and define
the score variable.
extends Label

var score = 0
using Godot;

public partial class ScoreLabel : Label
{
    private int _score = 0;
}
The score should increase by 1 every time we squash a monster. We can use
their squashed signal to know when that happens. However, because we instantiate
monsters from the code, we cannot connect the mob signal to the ScoreLabel via the editor.
Замість цього, ми повинні закладати зв'язок в коді кожен раз, коли створюємо монстра.
Open the script main.gd. If it's still open, you can click on its name in
the script editor's left column.
Alternatively, you can double-click the main.gd file in the FileSystem
dock.
У нижній частині функції _on_MobTimer_timeout() додайте наступний рядок:
func _on_mob_timer_timeout():
    #...
    # We connect the mob to the score label to update the score upon squashing one.
    mob.squashed.connect($UserInterface/ScoreLabel._on_mob_squashed.bind())
private void OnMobTimerTimeout()
{
    // ...
    // We connect the mob to the score label to update the score upon squashing one.
    mob.Squashed += GetNode<ScoreLabel>("UserInterface/ScoreLabel").OnMobSquashed;
}
This line means that when the mob emits the squashed signal, the
ScoreLabel node will receive it and call the function _on_mob_squashed().
Head back to the ScoreLabel.gd script to define the _on_mob_squashed()
callback function.
В ній ми збільшуємо рахунок та оновлюємо відображуваний текст.
func _on_mob_squashed():
    score += 1
    text = "Score: %s" % score
public void OnMobSquashed()
{
    _score += 1;
    Text = $"Score: {_score}";
}
The second line uses the value of the score variable to replace the
placeholder %s. When using this feature, Godot automatically converts values
to string text, which is convenient when outputting text in labels or
when using the print() function.
Дивись також
You can learn more about string formatting here: Форматований текст GDScript. In C#, consider using string interpolation with "$".
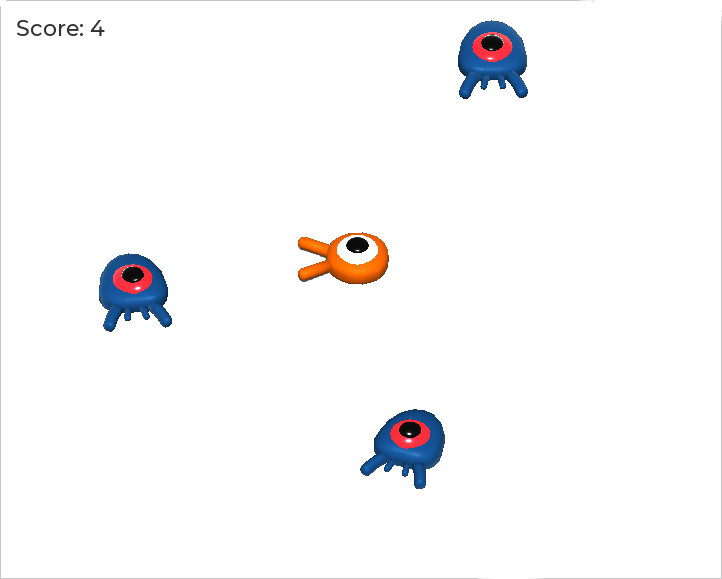
Тепер ви можете зіграти в гру і розчавити кілька ворогів, щоб побачити збільшення рахунку.
Примітка
У складній грі ви можете повністю відокремити свій інтерфейс користувача від ігрового світу. У цьому випадку ви не будете відстежувати рахунок через мітку. Замість цього ви можете зберегти його в окремому, виділеному об'єкті. Але в прототипах, або простих проектах, краще, щоб ваш код був простим. Програмування завжди є балансуванням.
Повторна спроба гри
Тепер ми додамо можливість грати знову після смерті. Коли гравець помре, ми відобразимо повідомлення на екрані і дочекаємося підтвердження.
Head back to the main.tscn scene, select the UserInterface node, add a
child node ColorRect, and name it Retry. This node fills a
rectangle with a uniform color and will serve as an overlay to darken the
screen.
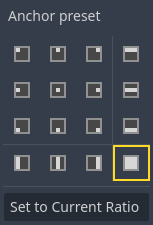
To make it span over the whole viewport, you can use the Anchor Preset menu in the toolbar.

Відкрийте його та застосуйте команду Увесь прямокутник.
Nothing happens. Well, almost nothing; only the four green pins move to the corners of the selection box.
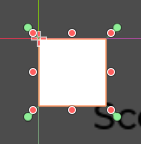
This is because UI nodes (all the ones with a green icon) work with anchors and
margins relative to their parent's bounding box. Here, the UserInterface node
has a small size and the Retry one is limited by it.
Select the UserInterface and apply Anchor Preset -> Full Rect to it as well. The
Retry node should now span the whole viewport.
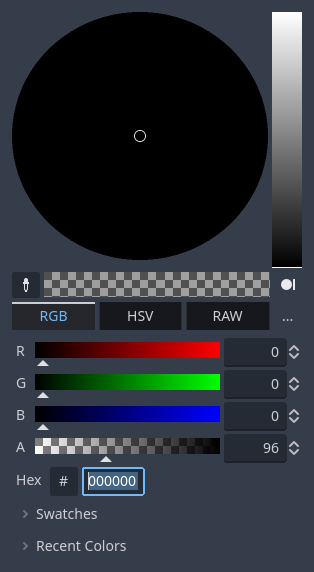
Let's change its color so it darkens the game area. Select Retry and in the
Inspector, set its Color to something both dark and transparent. To do so,
in the color picker, drag the A slider to the left. It controls the color's
Alpha channel, that is to say, its opacity/transparency.
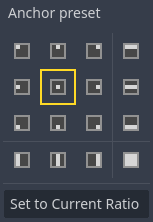
Next, add a Label as a child of Retry and give it the Text
"Press Enter to retry."
To move it and anchor it in the center of the screen, apply Anchor Preset -> Center
to it.
Кодування можливості повторної спроби
We can now head to the code to show and hide the Retry node when the player
dies and plays again.
Open the script main.gd. First, we want to hide the overlay at the start of
the game. Add this line to the _ready() function.
func _ready():
    $UserInterface/Retry.hide()
public override void _Ready()
{
    GetNode<Control>("UserInterface/Retry").Hide();
}
Потім, коли гравець отримує удар, ми показуємо затінення.
func _on_player_hit():
    #...
    $UserInterface/Retry.show()
private void OnPlayerHit()
{
    //...
    GetNode<Control>("UserInterface/Retry").Show();
}
Finally, when the Retry node is visible, we need to listen to the player's
input and restart the game if they press enter. To do this, we use the built-in
_unhandled_input() callback, which is triggered on any input.
If the player pressed the predefined ui_accept input action and Retry is
visible, we reload the current scene.
func _unhandled_input(event):
    if event.is_action_pressed("ui_accept") and $UserInterface/Retry.visible:
        # This restarts the current scene.
        get_tree().reload_current_scene()
public override void _UnhandledInput(InputEvent @event)
{
    if (@event.IsActionPressed("ui_accept") && GetNode<Control>("UserInterface/Retry").Visible)
    {
        // This restarts the current scene.
        GetTree().ReloadCurrentScene();
    }
}
Функція get_tree() дає нам доступ до глобального об'єкта SceneTree, що дозволяє перезавантажити і перезапустити поточну сцену.
Додавання музики
Щоб додати музику, яка постійно відтворюється у фоновому режимі, ми збираємося використовувати іншу функцію в Godot: автозавантаження.
To play audio, all you need to do is add an AudioStreamPlayer node to your scene and attach an audio file to it. When you start the scene, it can play automatically. However, when you reload the scene, like we do to play again, the audio nodes are also reset, and the music starts back from the beginning.
Ви можете використовувати функцію автозавантаження, щоб Godot автоматично завантажував вузол, або сцену, на початку гри, за межами поточної сцени. Ви також можете використовувати його для створення глобально доступних об'єктів.
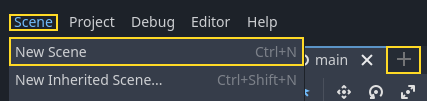
Створіть нову сцену, перейшовши до меню Сцена і натиснувши Нова сцена або за допомогою піктограми + поруч з поточною відкритою сценою.
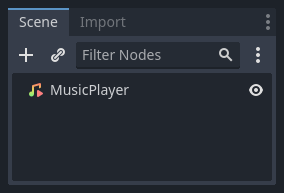
Натисніть кнопку Інший вузол, щоб створити AudioStreamPlayer і перейменувати його на MusicPlayer.
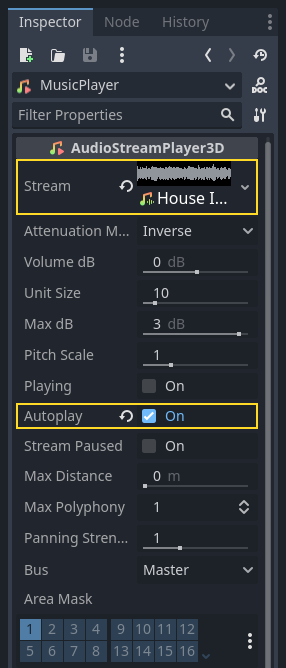
Ми включили музичний саундтрек House In a Forest Loop.ogg до каталогу art/. Клацніть і перетягніть його до властивості Stream у Інспекторі. Крім того, увімкніть автовідтворення Autoplay, щоб музика відтворювалася автоматично на початку гри.
Збережіть сцену під назвою MusicPlayer.tscn.
Для автоматичного завантаження сцени перейдіть до меню Проєкт -> Параметри проєкту на вкладку AutoLoad (Автозавантаження).
У полі Path потрібно ввести шлях до сцени. Клацніть піктограму папки, щоб відкрити файловий браузер, і двічі клацніть на MusicPlayer.tscn. Потім натисніть кнопку Додати праворуч, щоб зареєструвати вузол.

MusicPlayer.tscn now loads into any scene you open or play.
So if you run the game now, the music will play automatically in any scene.
Перш ніж ми завершимо цей урок, ось короткий погляд на те, як все працює всередині. Коли ви запускаєте гру, ваша панель Сцена змінюється, щоб дати вам дві вкладки: Віддалений і Локальний.
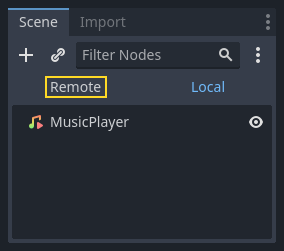
Вкладка Віддалений дозволяє візуалізувати дерево вузлів вашої запущеної гри. Там ви побачите головний вузол Main і все, що містить сцена, і вставлені екземпляри монстрів внизу.
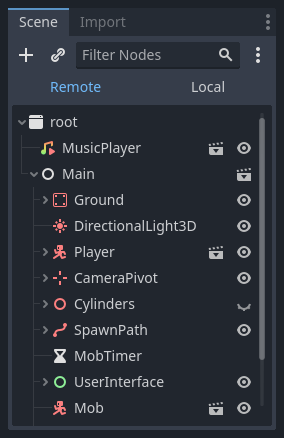
У верхній частині знаходиться автозавантажуваний MusicPlayer і вузол root, який є вікном перегляду вашої гри.
І це все для цього уроку. У наступній частині ми додамо анімацію, щоб гра виглядала набагато приємніше.
Ось повний скрипт main.gd для довідки.
extends Node

@export var mob_scene: PackedScene

func _ready():
    $UserInterface/Retry.hide()


func _on_mob_timer_timeout():
    # Create a new instance of the Mob scene.
    var mob = mob_scene.instantiate()

    # Choose a random location on the SpawnPath.
    # We store the reference to the SpawnLocation node.
    var mob_spawn_location = get_node("SpawnPath/SpawnLocation")
    # And give it a random offset.
    mob_spawn_location.progress_ratio = randf()

    var player_position = $Player.position
    mob.initialize(mob_spawn_location.position, player_position)

    # Spawn the mob by adding it to the Main scene.
    add_child(mob)

    # We connect the mob to the score label to update the score upon squashing one.
    mob.squashed.connect($UserInterface/ScoreLabel._on_mob_squashed.bind())

func _on_player_hit():
    $MobTimer.stop()
    $UserInterface/Retry.show()

func _unhandled_input(event):
    if event.is_action_pressed("ui_accept") and $UserInterface/Retry.visible:
        # This restarts the current scene.
        get_tree().reload_current_scene()
using Godot;

public partial class Main : Node
{
    [Export]
    public PackedScene MobScene { get; set; }

    public override void _Ready()
    {
        GetNode<Control>("UserInterface/Retry").Hide();
    }

    public override void _UnhandledInput(InputEvent @event)
    {
        if (@event.IsActionPressed("ui_accept") && GetNode<Control>("UserInterface/Retry").Visible)
        {
            // This restarts the current scene.
            GetTree().ReloadCurrentScene();
        }
    }

    private void OnMobTimerTimeout()
    {
        // Create a new instance of the Mob scene.
        Mob mob = MobScene.Instantiate<Mob>();

        // Choose a random location on the SpawnPath.
        // We store the reference to the SpawnLocation node.
        var mobSpawnLocation = GetNode<PathFollow3D>("SpawnPath/SpawnLocation");
        // And give it a random offset.
        mobSpawnLocation.ProgressRatio = GD.Randf();

        Vector3 playerPosition = GetNode<Player>("Player").position;
        mob.Initialize(mobSpawnLocation.Position, playerPosition);

        // Spawn the mob by adding it to the Main scene.
        AddChild(mob);

        // We connect the mob to the score label to update the score upon squashing one.
        mob.Squashed += GetNode<ScoreLabel>("UserInterface/ScoreLabel").OnMobSquashed;
    }

    private void OnPlayerHit()
    {
        GetNode<Timer>("MobTimer").Stop();
        GetNode<Control>("UserInterface/Retry").Show();
    }
}