Up to date
This page is up to date for Godot 4.2.
If you still find outdated information, please open an issue.
3D світло та тіні
Вступ
Джерела світла випромінюють світло, яке змішується з матеріалами і дає видимий результат. Світло в сцені може виходити з декількох типів джерел:
From the material itself, in the form of the emission color (though it does not affect nearby objects unless baked or screen-space indirect lighting is enabled).
Light nodes: DirectionalLight3D, OmniLight3D and SpotLight3D.
Ambient light in the Environment or Зонди відображень.
Global illumination (LightmapGI, VoxelGI or SDFGI).
The emission color is a material property. You can read more about it in the Standard Material 3D and ORM Material 3D tutorial.
Дивись також
You can compare various types of lights in action using the 3D Lights and Shadows demo project.
Вузли світла
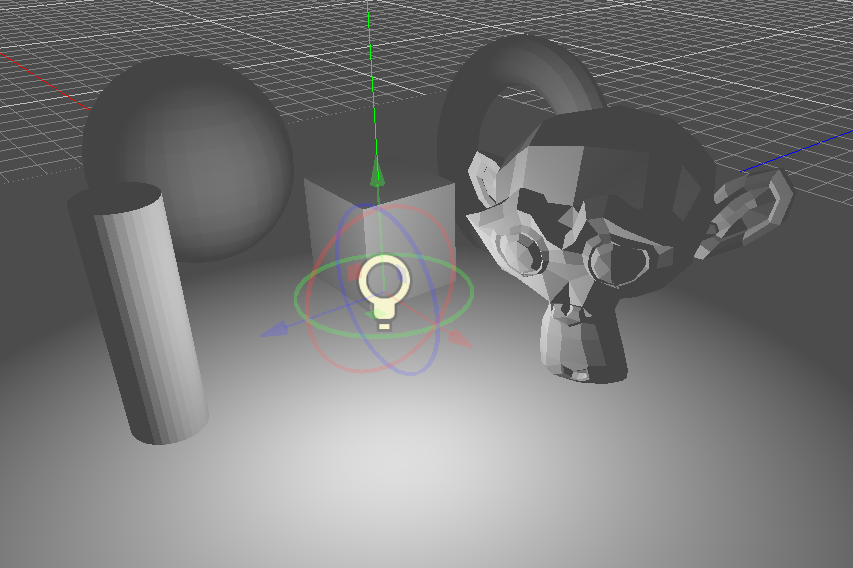
There are three types of light nodes: DirectionalLight3D, OmniLight3D and SpotLight3D. Let's take a look at the common parameters for lights:
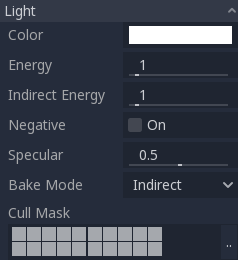
Each property has a specific function:
Color: Base color for emitted light.
Energy: Energy multiplier. This is useful for saturating lights or working with Освітлення з високим динамічним діапазоном.
Indirect Energy: Secondary multiplier used with indirect light (light bounces). This works with Using Lightmap global illumination, VoxelGI or SDFGI.
Volumetric Fog Energy: Secondary multiplier used with volumetric fog. This only has an effect when volumetric fog is enabled.
Negative: Light becomes subtractive instead of additive. It's sometimes useful to manually compensate some dark corners.
Specular: Affects the intensity of the specular blob in objects affected by this light. At zero, this light becomes a pure diffuse light.
Режим запікання: Встановлює режим запікання для світла. Дивіться Using Lightmap global illumination.
Cull Mask: Objects that are in the selected layers below will be affected by this light. Note that objects disabled via this cull mask will still cast shadows. If you don't want disabled objects to cast shadows, adjust the Cast Shadow property on the GeometryInstance3D to the desired value.
Дивись також
See Physical light and camera units if you wish to use real world units to configure your lights' intensity and color temperature.
Light number limits
When using the Forward+ renderer, Godot uses a clustering approach for real-time lighting. As many lights as desired can be added (as long as performance allows). However, there's still a default limit of 512 clustered elements that can be present in the current camera view. A clustered element is an omni light, a spot light, a decal or a reflection probe. This limit can be increased by adjusting the Rendering > Limits > Cluster Builder > Max Clustered Elements advanced project setting.
When using the Forward Mobile renderer, there is a limitation of 8 OmniLights + 8 SpotLights per mesh resource. There is also a limit of 256 OmniLights + 256 SpotLights that can be rendered in the current camera view. These limits currently cannot be changed.
When using the Compatibility renderer, up to 8 OmniLights + 8 SpotLights can be rendered per mesh resource. This limit can be increased in the advanced Project Settings by adjusting Rendering > Limits > OpenGL > Max Renderable Lights and/or Rendering > Limits > OpenGL > Max Lights Per Object at the cost of performance and longer shader compilation times. The limit can also be decreased to reduce shader compilation times and improve performance slightly.
With all rendering methods, up to 8 DirectionalLights can be visible at a time. However, each additional DirectionalLight with shadows enabled will reduce the effective shadow resolution of each DirectionalLight. This is because directional shadow atlas is shared between all lights.
If the rendering limit is exceeded, lights will start popping in and out during camera movement, which can be distracting. Enabling Distance Fade on light nodes can help reduce this issue while also improving performance. Splitting your meshes into smaller portions can also help, especially for level geometry (which also improves culling efficiency).
If you need to render more lights than possible in a given rendering backend, consider using baked lightmaps with lights' bake mode set to Static. This allows lights to be fully baked, which also makes them much faster to render. You can also use emissive materials with any global illumination technique as a replacement for light nodes that emit light over a large area.
Відображення тіней
Світло може при потребі відкидати тіні. Це дає йому більшого реалізму (світло не досягає прихованих областей), але збільшує навантаження на продуктивність. Існує список загальних параметрів тіні для кожного світла:
Enabled: Check to enable shadow mapping in this light.
Opacity: Areas occluded are darkened by this opacity factor. Shadows are fully opaque by default, but this can be changed to make shadows translucent for a given light.
Bias: When this parameter is too low, self-shadowing occurs. When too high, shadows separate from the casters. Tweak to what works best for you.
Normal Bias: When this parameter is too low, self-shadowing occurs. When too high, shadows appear misaligned from the casters. Tweak to what works best for you.
Transmittance Bias: When this parameter is too low, self-shadowing occurs on materials that have transmittance enabled. When too high, shadows will not affect materials that have transmittance enabled consistently. Tweak to what works best for you.
Reverse Cull Face: Some scenes work better when shadow mapping is rendered with face-culling inverted.
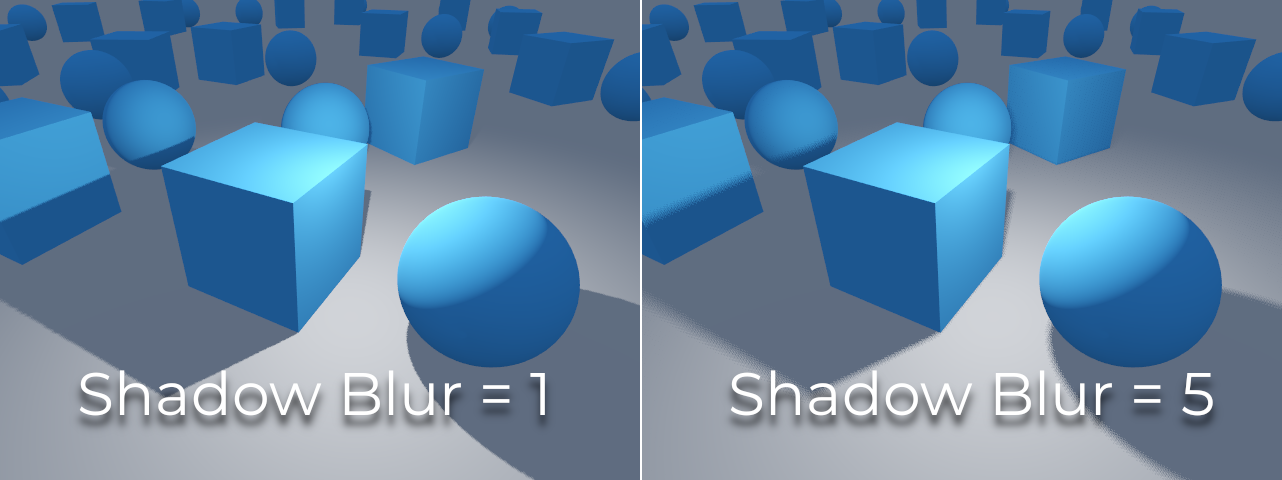
Blur: Multiplies the shadow blur radius for this light. This works with both traditional shadow mapping and contact-hardening shadows (lights with Angular Distance or Size greater than
0.0). Higher values result in softer shadows, which will also appear to be more temporally stable for moving objects. The downside of increasing shadow blur is that it will make the grainy pattern used for filtering more noticeable. See also Shadow filter mode.
Tweaking shadow bias
Below is an image of what tweaking bias looks like. Default values work for most cases, but in general, it depends on the size and complexity of geometry.
If the Shadow Bias or Shadow Normal Bias is set too low for a given light, the shadow will be "smeared" onto the objects. This will cause the light's intended appearance to darken, and is called shadow acne:
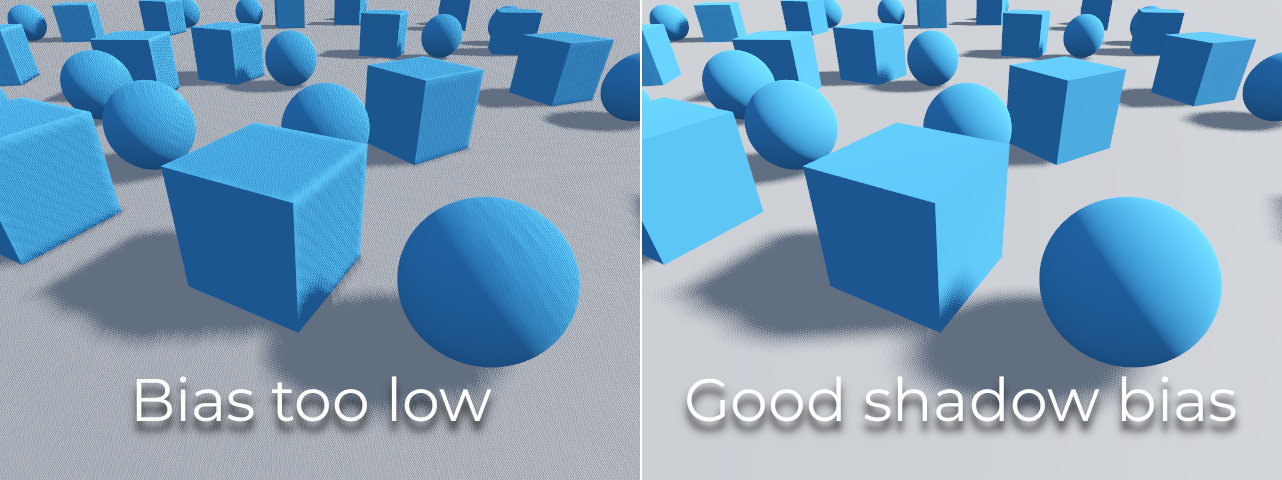
On the other hand, if the Shadow Bias or Shadow Normal Bias is set too high for a given light, the shadow may appear to be disconnected from the object. This is called peter-panning:

In general, increasing Shadow Normal Bias is preferred over increasing Shadow Bias. Increasing Shadow Normal Bias does not cause as much peter-panning as increasing Shadow Bias, but it can still resolve most shadow acne issues efficiently. The downside of increasing Shadow Normal Bias is that it can make shadows appear thinner for certain objects.
Any sort of bias issues can be fixed by increasing the shadow map resolution, at the cost of decreased performance.
Примітка
Tweaking shadow mapping settings is an art – there are no "one size fits all" settings. To achieve the best visuals, you may need to use different shadow bias values on a per-light basis.
Спрямоване світло
Найпоширеніший тип світла, являє собою дуже далеке джерело світла (наприклад, Сонце). Це також найлегше світло для обчислення і його слід використовувати всюди де можливо (хоча у нього не найлегше для обчислення відображення тіней, але про це пізніше).
Спрямоване світло моделює нескінченну кількість паралельних світлових променів, що охоплюють всю сцену. Спрямований світловий вузол представлений великою стрілкою, яка вказує напрямок світлових променів. При цьому положення вузла зовсім не впливає на освітлення і він може бути де завгодно.
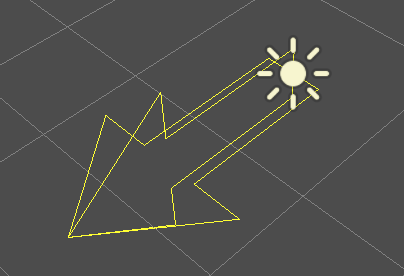
Every face whose front-side is hit by the light rays is lit, while the others stay dark. Unlike most other light types directional lights, don't have specific parameters.
The directional light also offers a Angular Distance property, which
determines the light's angular size in degrees. Increasing this above 0.0
will make shadows softer at greater distances from the caster, while also
affecting the sun's appearance in procedural sky materials. This is called a
contact-hardening shadow (also known as PCSS).
For reference, the angular distance of the Sun viewed from the Earth is
approximately 0.5. This kind of shadow is expensive, so check the
recommendations in PCSS recommendations if setting
this value above 0.0 on lights with shadows enabled.
Відображення тіней для спрямованого світла
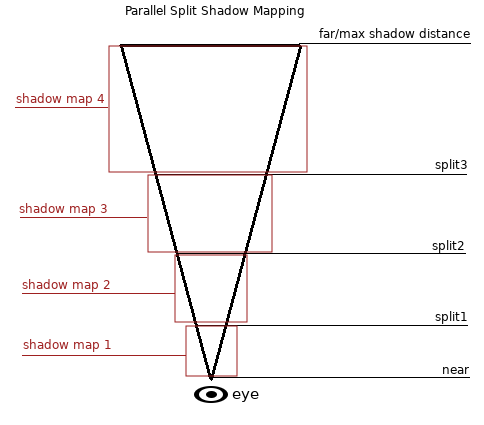
To compute shadow maps, the scene is rendered (only depth) from an orthogonal point of view that covers the whole scene (or up to the max distance). There is, however, a problem with this approach because objects closer to the camera receive low-resolution shadows that may appear blocky.
To fix this, a technique named Parallel Split Shadow Maps (PSSM) is used. This splits the view frustum in 2 or 4 areas. Each area gets its own shadow map. This allows small areas close to the viewer to have the same shadow resolution as a huge, far-away area.
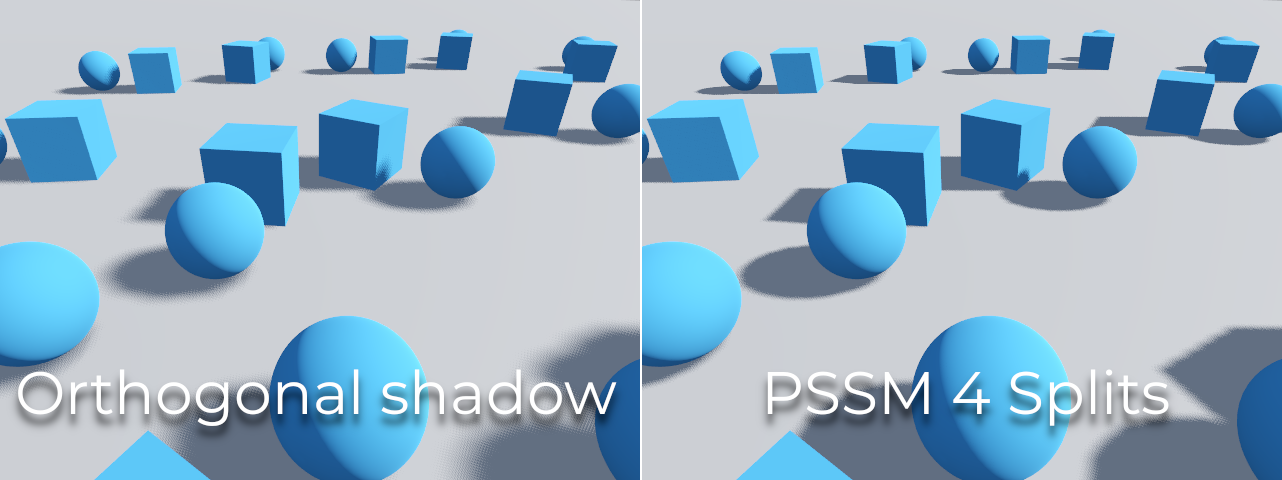
В результаті тіні стають детальнішими і гладкішими:
Техніка PSSM керується рядом параметрів:
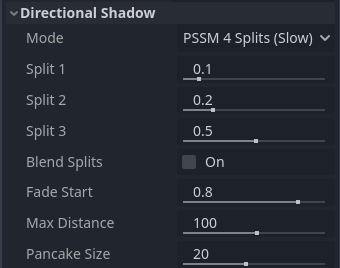
Each split distance is controlled relative to the camera far (or shadow
Max Distance if greater than 0.0). 0.0 is the eye position and
1.0 is where the shadow ends at a distance. Splits are in-between.
Default values generally work well, but tweaking the first split a bit is common
to give more detail to close objects (like a character in a third-person game).
Always make sure to set a shadow Max Distance according to what the scene
needs. A lower maximum distance will result in better-looking shadows and better
performance, as fewer objects will need to be included in shadow rendering. You
can also adjust Fade Start to control how aggressive the shadow fade-out
should be at a distance. For scenes where the Max Distance fully covers the
scene at any given camera position, you can increase Fade Start to 1.0
to prevent the shadow from fading at a distance. This should not be done in
scenes where Max Distance doesn't fully cover the scene, as the shadow will
appear to be suddenly cut off at a distance.
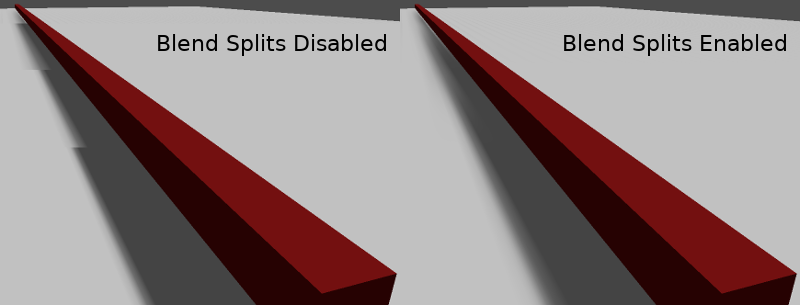
Sometimes, the transition between a split and the next can look bad. To fix this, the Blend Splits option can be turned on, which sacrifices detail and performance in exchange for smoother transitions:
The Shadow > Normal Bias parameter can be used to fix special cases of self-shadowing when objects are perpendicular to the light. The only downside is that it makes the shadow a bit thinner. Consider increasing Shadow > Normal Bias before increasing Shadow > Bias in most situations.
Lastly, Pancake Size is a property that can be adjusted to fix missing shadows when using large objects with unsubdivided meshes. Only change this value if you notice missing shadows that are not related to shadow biasing issues.
Світло навсібіч
Світло навсібіч це точка, яка випромінює світло сферично на всі сторони в межах вказаного радіуса.
У реальному житті загасання світла є зворотною функцією, а це означає, що світла навсібіч не мають радіуса. Це проблема, тому що це означає, що обчислення декількох джерел такого світла, стане вимогливим.
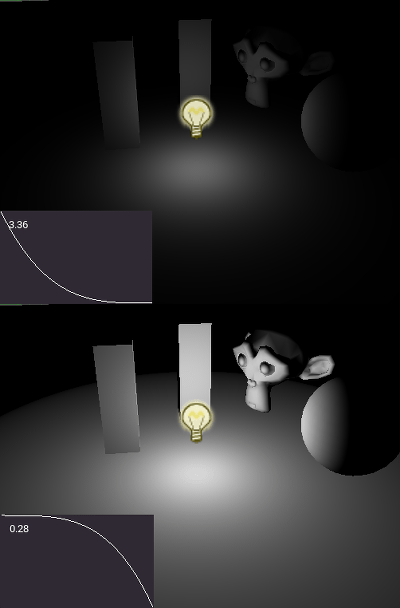
To solve this, a Range parameter is introduced together with an attenuation function.
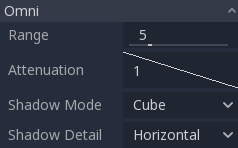
Ці два параметри дозволяють налаштувати візуальну роботу світла і знайти естетично приємні результати.
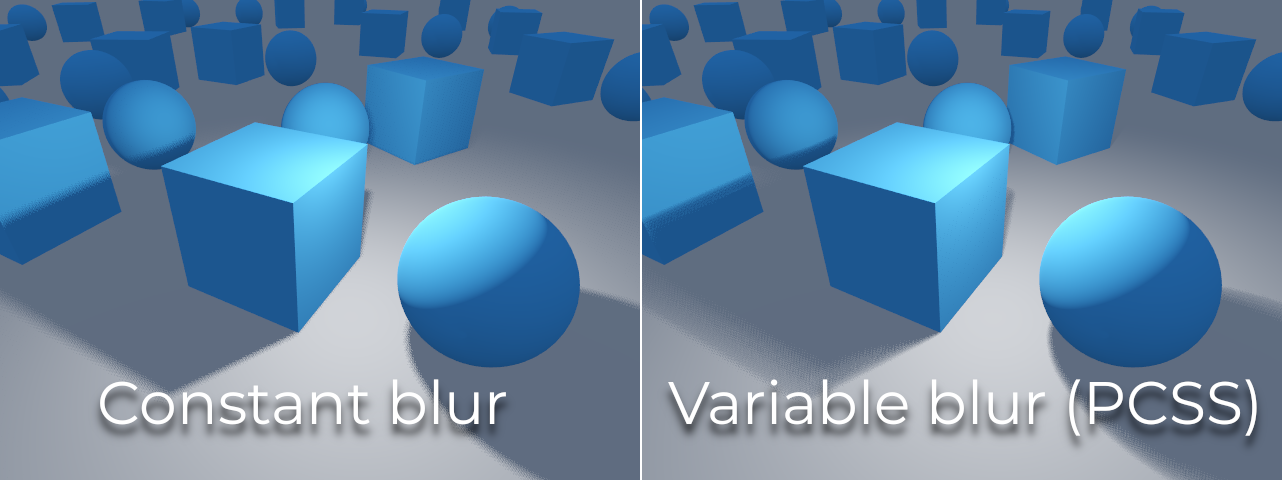
A Size parameter is also available in OmniLight3D. Increasing this value
will make the light fade out slower and shadows appear blurrier when far away
from the caster. This can be used to simulate area lights to an extent. This is
called a contact-hardening shadow (also known as PCSS). This kind of shadow is
expensive, so check the recommendations in
PCSS recommendations if setting this value above
0.0 on lights with shadows enabled.
Відображення тіней світла навсібіч
Відображення тіней світла навсібіч відносно просте. Основною проблемою, яку необхідно розглянути, є алгоритм, який використовується для візуалізації.
Omni Shadows can be rendered as either Dual Paraboloid or Cube mapped. Dual Parabolid renders quickly, but can cause deformations, while Cube is more correct, but slower. The default is Cube, but consider changing it to Dual Parabolid for lights where it doesn't make much of a visual difference.
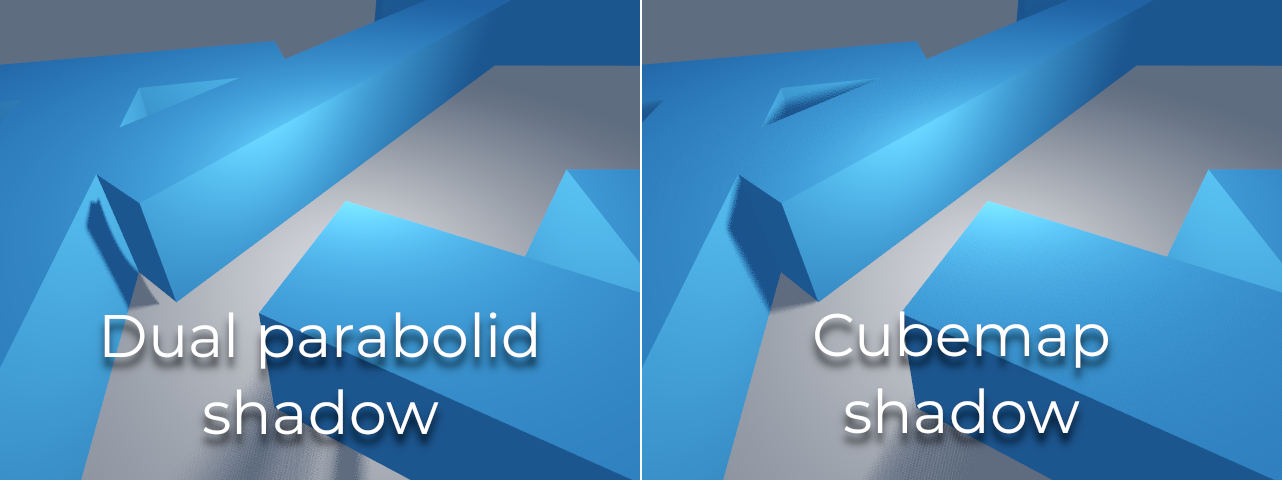
If the objects being rendered are mostly irregular and subdivided, Dual Paraboloid is usually enough. In any case, as these shadows are cached in a shadow atlas (more on that at the end), it may not make a difference in performance for most scenes.
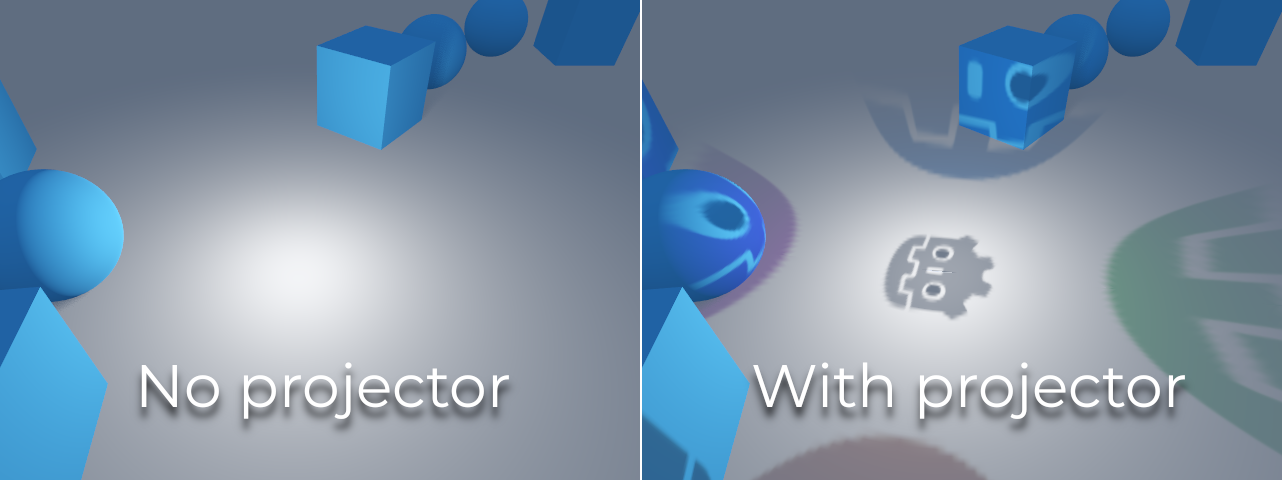
Omni lights with shadows enabled can make use of projectors. The projector texture will multiply the light's color by the color at a given point on the texture. As a result, lights will usually appear to be darker once a projector texture is assigned; you can increase Energy to compensate for this.
Omni light projector textures require a special 360° panorama mapping, similar to PanoramaSkyMaterial textures.
With the projector texture below, the following result is obtained:
Порада
If you've acquired omni projectors in the form of cubemap images, you can use this web-based conversion tool to convert them to a single panorama image.
Обмежене світло
Обмежене світло схоже на світло навсібіч, тільки випромінює світло в конус (або «відріз»). Воно корисне для імітації ліхтариків, автомобільних ліхтарів, відбивачів, прожекторів і всього іншого, що освітлює одну точку, через що даний тип світла ще називають точковим. Цей тип світла також послаблюється в протилежному напрямку, на який він вказує.
Spot lights share the same Range, Attenuation and Size as OmniLight3D, and add two extra parameters:
Кут: Кут апертури світла.
Angle Attenuation: The cone attenuation, which helps soften the cone borders.
Відображення тіней від обмеженого світла
Spots feature the same parameters as omni lights for shadow mapping. Rendering spot shadow maps is significantly faster compared to omni lights, as only one shadow texture needs to be rendered (instead of rendering 6 faces, or 2 in dual parabolid mode).
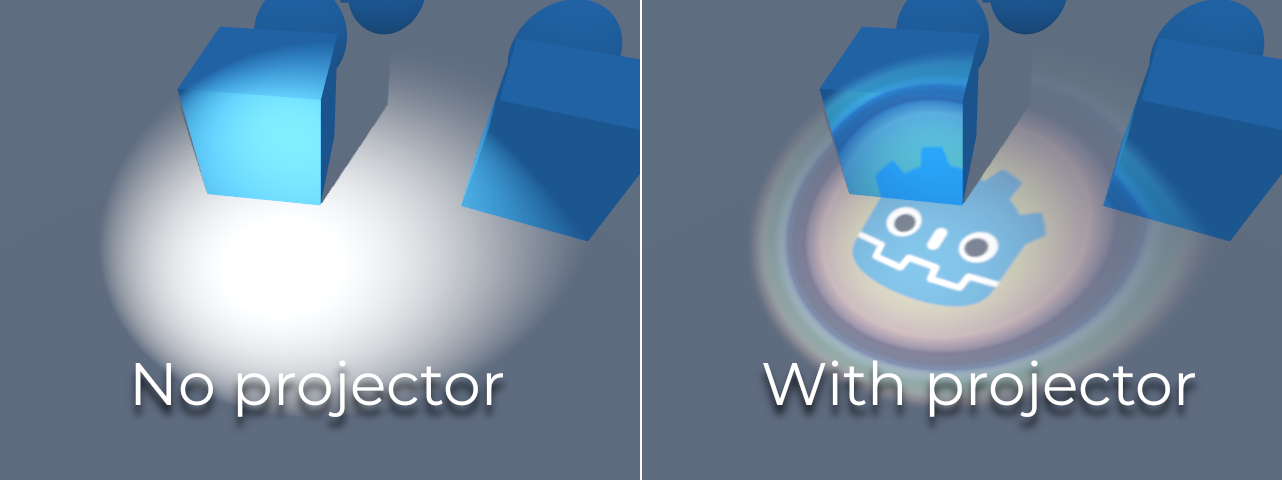
Spot lights with shadows enabled can make use of projectors. The projector texture will multiply the light's color by the color at a given point on the texture. As a result, lights will usually appear to be darker once a projector texture is assigned; you can increase Energy to compensate for this.
Unlike omni light projectors, a spot light projector texture doesn't need to follow a special format to look correct. It will be mapped in a way similar to a decal.
With the projector texture below, the following result is obtained:

Примітка
Spot lights with wide angles will have lower-quality shadows than spot lights with narrow angles, as the shadow map is spread over a larger surface. At angles wider than 89 degrees, spot light shadows will stop working entirely. If you need shadows for wider lights, use an omni light instead.
Атлас тіней
Unlike Directional lights, which have their own shadow texture, omni and spot lights are assigned to slots of a shadow atlas. This atlas can be configured in the advanced Project Settings (Rendering > Lights And Shadows > Positional Shadow).
The resolution applies to the whole shadow atlas. This atlas is divided into four quadrants:
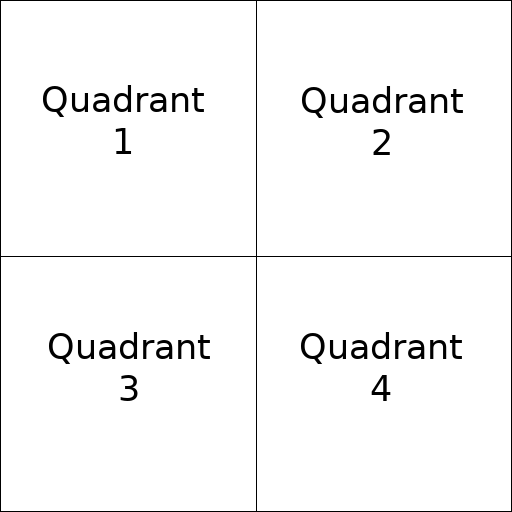
Кожен квадрант може бути розділений на частини будь-якої кількості карт відображення тіней; нижче наведено поділ за замовчуванням:
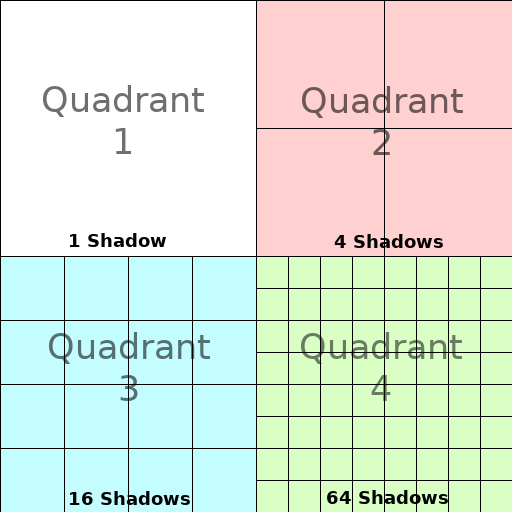
The shadow atlas allocates space as follows:
The biggest shadow map size (when no subdivision is used) represents a light the size of the screen (or bigger).
Subdivisions (smaller maps) represent shadows for lights that are further away from view and proportionally smaller.
Кожен кадр, наступна процедура виконується для кожного світла:
Перевіряється, чи є світло на полі правильного розміру. Якщо ні, світло перемальовується наново і переміщується на більше/менше поле.
Перевіряється, чи змінився будь-який об'єкт, що впливає на відображення тіні. Якщо так, то знову перемальовується світло.
Якщо нічого з перерахованого не сталося, нічого не робиться, і тінь залишається без змін.
If the slots in a quadrant are full, lights are pushed back to smaller slots, depending on size and distance. If all slots in all quadrants are full, some lights will not be able to render shadows even if shadows are enabled on them.
The default shadow allocation strategy allows rendering up to 88 lights with shadows enabled in the camera frustum (4 + 4 + 16 + 64):
The first and most detailed quadrant can store 4 shadows.
The second quadrant can store 4 other shadows.
The third quadrant can store 16 shadows, with less detail.
The fourth and least detailed quadrant can store 64 shadows, with even less detail.
Using a higher number of shadows per quadrant allows supporting a greater amount of total lights with shadows enabled, while also improving performance (as shadows will be rendered at a lower resolution for each light). However, increasing the number of shadows per quadrant comes at the cost of lower shadow quality.
In some cases, you may want to use a different allocation strategy. For example, in a top-down game where all lights are around the same size, you may want to set all quadrants to have the same subdivision so that all lights have shadows of similar quality level.
Balancing performance and quality
Shadow rendering is a critical topic in 3D rendering performance. It's important to make the right choices here to avoid creating bottlenecks.
Directional shadow quality settings can be changed at run-time by calling the appropriate RenderingServer methods.
Positional (omni/spot) shadow quality settings can be changed at run-time on the root Viewport.
Shadow map size
High shadow resolutions result in sharper shadows, but at a significant
performance cost. It should also be noted that sharper shadows are not always
more realistic. In most cases, this should be kept at its default value of
4096 or decreased to 2048 for low-end GPUs.
If positional shadows become too blurry after decreasing the shadow map size, you can counteract this by adjusting the shadow atlas quadrants to contain fewer shadows. This will allow each shadow to be rendered at a higher resolution.
Shadow filter mode
Several shadow map quality settings can be chosen here. The default Soft Low is a good balance between performance and quality for scenes with detailed textures, as the texture detail will help make the dithering pattern less noticeable.
However, in projects with less detailed textures, the shadow dithering pattern may be more visible. To hide this pattern, you can either enable Часове згладжування (TAA), AMD FidelityFX Super Resolution 2.2 (FSR2), Швидке наближене згладжування (FXAA), or increase the shadow filter quality to Soft Medium or higher.
The Soft Very Low setting will automatically decrease shadow blur to make artifacts from the low sample count less visible. Conversely, the Soft High and Soft Ultra settings will automatically increase shadow blur to better make use of the increased sample count.
16-bits versus 32-bit
By default, Godot uses 16-bit depth textures for shadow map rendering. This is recommended in most cases as it performs better without a noticeable difference in quality.
If 16 Bits is disabled, 32-bit depth textures will be used instead. This can result in less artifacting in large scenes and large lights with shadows enabled. However, the difference is often barely visible, yet this can have a significant performance cost.
Light/shadow distance fade
OmniLight3D and SpotLight3D offer several properties to hide distant lights. This can improve performance significantly in large scenes with dozens of lights or more.
Enabled: Controls whether distance fade (a form of LOD) is enabled. The light will fade out over Begin + Length, after which it will be culled and not sent to the shader at all. Use this to reduce the number of active lights in a scene and thus improve performance.
Begin: The distance from the camera at which the light begins to fade away (in 3D units).
Shadow: The distance from the camera at which the shadow begins to fade away (in 3D units). This can be used to fade out shadows sooner compared to the light, further improving performance. Only available if shadows are enabled for the light.
Length: The distance over which the light and shadow fades (in 3D units). The light becomes slowly more transparent over this distance and is completely invisible at the end. Higher values result in a smoother fade-out transition, which is more suited when the camera moves fast.
PCSS recommendations
Percentage-closer soft shadows (PCSS) provide a more realistic shadow mapping appearance, with the penumbra size varying depending on the distance between the caster and the surface receiving the shadow. This comes at a high performance cost, especially for directional lights.
To avoid performance issues, it's recommended to:
Only use a handful of lights with PCSS shadows enabled at a given time. The effect is generally most visible on large, bright lights. Secondary light sources that are more faint usually don't benefit much from using PCSS shadows.
Provide a setting for users to disable PCSS shadows. On directional lights, this can be done by setting the DirectionalLight3D's
light_angular_distanceproperty to0.0in a script. On positional lights, this can be done by setting the OmniLight3D or SpotLight3D'slight_sizeproperty to0.0in a script.
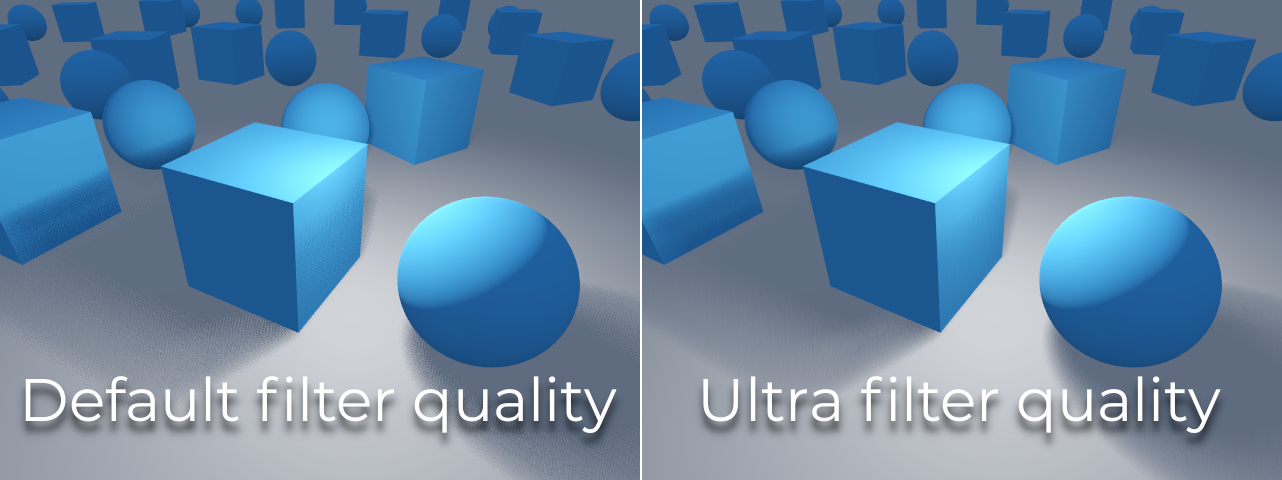
Projector filter mode
The way projectors are rendered also has an impact on performance. The Rendering > Textures > Light Projectors > Filter advanced project setting lets you control how projector textures should be filtered. Nearest/Linear do not use mipmaps, which makes them faster to render. However, projectors will look grainy at distance. Nearest/Linear Mipmaps will look smoother at a distance, but projectors will look blurry when viewed from oblique angles. This can be resolved by using Nearest/Linear Mipmaps Anisotropic, which is the highest-quality mode but also the most expensive.
If your project has a pixel art style, consider setting the filter to one of the Nearest values so that projectors use nearest-neighbor filtering. Otherwise, stick to Linear.