Up to date
This page is up to date for Godot 4.2.
If you still find outdated information, please open an issue.
Відтворення відео
Godot supports video playback with the VideoStreamPlayer node.
Підтримувані формати відтворення
Єдиним підтримуваним форматом в ядрі є Ogg Theora (не плутати з Ogg Vorbis audio). Розширення можуть додавати підтримку додаткових форматів, але станом на липень 2022 року таких розширень ще не існує.
H.264 і H.265 не підтримуються в ядрі Godot, оскільки обидва вони обтяжені патентами на програмне забезпечення. AV1 не потребує ліцензійних відрахувань, але він повільно декодується на CPU, а апаратна підтримка декодування поки що доступна не на всіх графічних процесорах, що використовуються.
WebM was supported in core in Godot 3.x, but support for it was removed in 4.0 as it was too buggy and difficult to maintain.
Примітка
Ви можете знайти відео з розширеннями .ogg або .ogx, які є загальними розширеннями даних у контейнері Ogg.
Перейменування цих розширень на .ogv може дозволити імпортувати відео до Godot. Однак не всі файли з розширеннями .ogg або .ogx є відео - деякі з них можуть містити лише аудіо.
Setting up VideoStreamPlayer
Create a VideoStreamPlayer node using the Create New Node dialog.
Select the VideoStreamPlayer node in the scene tree dock, go to the inspector and load an
.ogvfile in the Stream property.Якщо у вас ще немає відео у форматі Ogg Theora, перейдіть за посиланням Рекомендовані параметри кодування Theora.
If you want the video to play as soon as the scene is loaded, check Autoplay in the inspector. If not, leave Autoplay disabled and call
play()on the VideoStreamPlayer node in a script to start playback when desired.
Робота зі зміною розміру та різними співвідношеннями сторін
By default in Godot 4.0, the VideoStreamPlayer will automatically be resized to match the video's resolution. You can make it follow usual Control sizing by enabling Expand on the VideoStreamPlayer node.
To adjust how the VideoStreamPlayer node resizes depending on window size, adjust the anchors using the Layout menu at the top of the 2D editor viewport. However, this setup may not be powerful enough to handle all use cases, such as playing fullscreen videos without distorting the video (but with empty space on the edges instead). For more control, you can use an AspectRatioContainer node, which is designed to handle this kind of use case:
Додайте вузол AspectRatioContainer. Переконайтеся, що він не є нащадком іншого вузла контейнера. Виділіть вузол AspectRatioContainer, а потім встановіть його Макет у верхній частині 2D-редактора на Увесь прямокутник. Встановіть Ratio у вузлі AspectRatioContainer відповідно до співвідношення сторін вашого відео. Ви можете використовувати математичні формули в інспекторі, щоб допомогти собі. Не забудьте зробити один з операндів десятковим. Інакше результат ділення завжди буде цілим числом.
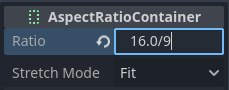
Результат буде (приблизно) 1.777778
Once you've configured the AspectRatioContainer, reparent your VideoStreamPlayer node to be a child of the AspectRatioContainer node. Make sure Expand is enabled on the VideoStreamPlayer. Your video should now scale automatically to fit the whole screen while avoiding distortion.
Дивись також
Дивіться Multiple resolutions для отримання додаткових порад щодо підтримки різних співвідношень сторін у вашому проекті.
Відображення відео на 3D-поверхні
Using a VideoStreamPlayer node as a child of a SubViewport node, it's possible to display any 2D node on a 3D surface. For example, this can be used to display animated billboards when frame-by-frame animation would require too much memory.
Це можна зробити за допомогою наступних кроків:
Create a SubViewport node. Set its size to match your video's size in pixels.
Create a VideoStreamPlayer node as a child of the SubViewport node and specify a video path in it. Make sure Expand is disabled, and enable Autoplay if needed.
Create a MeshInstance3D node with a PlaneMesh or QuadMesh resource in its Mesh property. Resize the mesh to match the video's aspect ratio (otherwise, it will appear distorted).
Create a new StandardMaterial3D resource in the Material Override property in the GeometryInstance3D section.
Enable Local To Scene in the StandardMaterial3D's Resource section (at the bottom). This is required before you can use a ViewportTexture in its Albedo Texture property.
In the StandardMaterial3D, set the Albedo > Texture property to New ViewportTexture. Edit the new resource by clicking it, then specify the path to the SubViewport node in the Viewport Path property.
Enable Albedo Texture Force sRGB in the StandardMaterial3D to prevent colors from being washed out.
If the billboard is supposed to emit its own light, set Shading Mode to Unshaded to improve rendering performance.
Дивіться Using Viewports та демонстрацію графічного інтерфейсу у 3D для отримання додаткової інформації про налаштування.
Looping a video
For looping a video, the Loop property can be enabled. This will seamlessly restart the video when it reaches its end.
Note that setting the project setting Video Delay Compensation to a non-zero value might cause your loop to not be seamless, because the synchronization of audio and video takes place at the start of each loop causing occasional missed frames. Set Video Delay Compensation in your project settings to 0 to avoid frame drop issues.
Умови декодування відео та рекомендована роздільна здатність
Декодування відео виконується на центральному процесорі, оскільки графічні процесори не мають апаратного прискорення для декодування відео Theora. Сучасні настільні центральні процесори можуть декодувати відео Ogg Theora з роздільною здатністю 1440p при 60 FPS або більше, але мобільні процесори низького класу, швидше за все, не зможуть впоратися з відео високої роздільної здатності.
Щоб забезпечити плавне декодування ваших відео на різному обладнанні:
При розробці ігор для настільних платформ рекомендується кодувати відео з роздільною здатністю не вище 1080p (бажано з частотою 30 кадрів в секунду). Більшість людей все ще використовують дисплеї з роздільною здатністю 1080p або нижчою, тому кодування відео з вищою роздільною здатністю може бути не варте збільшення розміру файлу та вимог до процесора.
При розробці ігор для мобільних або веб-платформ рекомендується кодувати в 720p максимум (бажано з частотою 30 кадрів в секунду або навіть нижче). Візуальна різниця між відео 720p і 1080p на мобільному пристрої зазвичай не дуже помітна.
Обмеження відтворення
Існує кілька обмежень у поточній реалізації відтворення відео в Godot:
Перегляд відео з певної точки не підтримується.
Changing playback speed is not supported. VideoStreamPlayer also won't follow Engine.time_scale.
Потокове відео з URL-адреси не підтримується.
Рекомендовані параметри кодування Theora
Порада: не покладайтеся на вбудовані експортери Ogg Theora (здебільшого). Є 2 причини, чому вам краще віддати перевагу зовнішній програмі для кодування вашого відео:
Деякі програми, такі як Blender, можуть рендерити в Ogg Theora. Однак, стандартні параметри якості за замовчуванням зазвичай дуже низькі за сучасними стандартами. Ви можете збільшити параметри якості у програмному забезпеченні, яке ви використовуєте, але ви можете виявити, що якість на виході залишається не ідеальною (враховуючи збільшений розмір файлу). Зазвичай це означає, що програмне забезпечення підтримує лише кодування з постійним бітрейтом (CBR), а не зі змінним бітрейтом (VBR). У більшості випадків слід надавати перевагу кодуванню VBR, оскільки воно забезпечує краще співвідношення якості та розміру файлу.
Деякі інші програми взагалі не можуть рендерити в Ogg Theora.
У цьому випадку ви можете рендерити відео у проміжний високоякісний формат (наприклад, відео з високим бітрейтом H.264), а потім перекодувати його в Ogg Theora. В ідеалі, вам слід використовувати формат без втрат або без стиснення як проміжний формат, щоб максимізувати якість вихідного відео Ogg Theora, але це може вимагати багато місця на диску.
HandBrake (GUI) та FFmpeg (CLI) - популярні інструменти з відкритим вихідним кодом для цієї мети. FFmpeg має крутішу криву навчання, але він більш потужний.
Нижче наведено приклади команд FFmpeg для перетворення MP4-відео в Ogg Theora. Оскільки FFmpeg підтримує багато вхідних форматів, ви зможете використовувати наведені нижче команди майже з будь-яким вхідним форматом відео (AVI, MOV, WebM, ...).
Примітка
Переконайтеся, що вашу копію FFmpeg скомпільовано з підтримкою libtheora і libvorbis. Ви можете перевірити це, виконавши команду ffmpeg без жодних аргументів, а потім переглянувши рядок configuration: у виведенні команди.
Баланс якості та розміру файлу
Рівень якості відео (-q:v) повинен бути між 1 і 10. Якість 6 є хорошим компромісом між якістю та розміром файлу. Якщо ви кодуєте з високою роздільною здатністю (наприклад, 1440p або 4K), ви, ймовірно, захочете зменшити -q:v до 5, щоб зберегти розмір файлу розумним. Оскільки щільність пікселів у відео з роздільною здатністю 1440p, або 4K, вища, пресети з нижчою якістю у вищій роздільній здатності виглядатимуть так само добре, або навіть краще, ніж відео з низькою роздільною здатністю.
The audio quality level (-q:a) must be between -1 and 10. Quality
6 provides a good compromise between quality and file size. In contrast to
video quality, increasing audio quality doesn't increase the output file size
nearly as much. Therefore, if you want the cleanest audio possible, you can
increase this to 9 to get perceptually lossless audio. This is especially
valuable if your input file already uses lossy audio compression. Higher quality
audio does increase the CPU usage of the decoder, so it might lead to audio
dropouts in case of high system load. See
this page
for a table listing Ogg Vorbis audio quality presets and their respective
variable bitrates.
FFmpeg: Конвертуйте, зберігаючи оригінальну роздільну здатність відео
Наступна команда конвертує відео зі збереженням початкової роздільної здатності. Бітрейт відео та аудіо буде змінюватися, щоб максимізувати якість і заощадити місце в тих частинах відео/аудіо, які не потребують високого бітрейту (наприклад, статичні сцени).
ffmpeg -i input.mp4 -q:v 6 -q:a 6 output.ogv
FFmpeg: Змініть розмір відео, а потім конвертуйте його
Наступна команда змінює розмір відео до 720 пікселів (720p) зі збереженням існуючого співвідношення сторін. Це допомагає значно зменшити розмір файлу, якщо джерело записано з вищою роздільною здатністю, ніж 720p:
ffmpeg -i input.mp4 -vf "scale=-1:720" -q:v 6 -q:a 6 output.ogv
Chroma Key Videos
Chroma key, commonly known as the "green screen" or "blue screen" effect, allows you to remove a specific color from an image or video and replace it with another background. This effect is widely used in video production to composite different elements together seamlessly.

We will achieve the chroma key effect by writing a custom shader in GDScript and using a VideoStreamPlayer node to display the video content.
Scene Setup
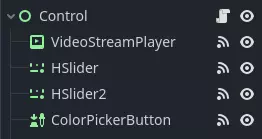
Ensure that the scene contains a VideoStreamPlayer node to play the video and a Control node to hold the UI elements for controlling the chroma key effect.
Writing the Custom Shader
To implement the chroma key effect, follow these steps:
Select the VideoStreamPlayer node in the scene and go to its properties. Under CanvasItem > Material, create a new shader named "ChromaKeyShader.gdshader."
In the "ChromaKeyShader.gdshader" file, write the custom shader code as shown below:
shader_type canvas_item;

# Uniform variables for chroma key effect
uniform vec3 chroma_key_color : source_color = vec3(0.0, 1.0, 0.0);
uniform float pickup_range : hint_range(0.0, 1.0) = 0.1;
uniform float fade_amount : hint_range(0.0, 1.0) = 0.1;

void fragment() {
    # Get the color from the texture at the given UV coordinates
    vec4 color = texture(TEXTURE, UV);

    # Calculate the distance between the current color and the chroma key color
    float distance = length(color.rgb - chroma_key_color);

    # If the distance is within the pickup range, discard the pixel
    # the lesser the distance more likely the colors are
    if (distance <= pickup_range) {
        discard;
    }

    # Calculate the fade factor based on the pickup range and fade amount
    float fade_factor = smoothstep(pickup_range, pickup_range + fade_amount, distance);

    # Set the output color with the original RGB values and the calculated fade factor
    COLOR = vec4(color.rgb, fade_factor);
}
The shader uses the distance calculation to identify pixels close to the chroma key color and discards them, effectively removing the selected color. Pixels that are slightly further away from the chroma key color are faded based on the fade_factor, blending them smoothly with the surrounding colors. This process creates the desired chroma key effect, making it appear as if the background has been replaced with another image or video.
The code above represents a simple demonstration of the Chroma Key shader, and users can customize it according to their specific requirements.
UI Controls
To allow users to manipulate the chroma key effect in real-time, we created sliders in the Control node. The Control node's script contains the following functions:
extends Control

func _on_color_picker_button_color_changed(color):
    # Update the "chroma_key_color" shader parameter of the VideoStreamPlayer's material
    $VideoStreamPlayer.material.set("shader_parameter/chroma_key_color", color)

func _on_h_slider_value_changed(value):
    # Update the "pickup_range" shader parameter of the VideoStreamPlayer's material
    $VideoStreamPlayer.material.set("shader_parameter/pickup_range", value)

func _on_h_slider_2_value_changed(value):
    # Update the "fade_amount" shader parameter of the VideoStreamPlayer's material
    $VideoStreamPlayer.material.set("shader_parameter/fade_amount", value)

func _on_video_stream_player_finished():
    # Restart the video playback when it's finished
    $VideoStreamPlayer.play()
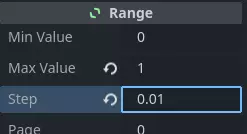
also make sure that the range of the sliders are appropriate, our settings are :
Signal Handling
Connect the appropriate signal from the UI elements to the Control node's script. you created in the Control node's script to control the chroma key effect. These signal handlers will update the shader's uniform variables in response to user input.
Save and run the scene to see the chroma key effect in action! With the provided UI controls, you can now adjust the chroma key color, pickup range, and fade amount in real-time, achieving the desired chroma key functionality for your video content.