Up to date
This page is up to date for Godot 4.2.
If you still find outdated information, please open an issue.
Процес імпорту
Importing assets in Godot
To import assets in Godot, place your assets (image files, scenes, audio files, fonts, etc) directly in the project folder. There are 2 ways to achieve this:
For any file type: Copy files manually with your operating system's file manager.
For file types that can be imported by Godot: Drag-and-drop files from the operating system's file manager to the editor's FileSystem dock. This only works with resource file types (i.e. file types that Godot can import).
Godot will automatically import these files internally and keep the imported
resources hidden in a res://.godot/imported/ folder.
This means that when trying to access imported assets through code, you need to use the Resource Loader as it will automatically take into account where the internal files are saved. If you try and access an imported asset using the FileAccess class, it will work in the editor, but it will break in the exported project.
However, the Resource Loader cannot access non-imported files. Only the FileAccess class can.
Зміна параметрів імпорту
Примітка
Import parameters are only present in non-native Godot resource types.
This means Godot's own scene and resource file formats (.tscn, .scn,
.tres, .res) don't have import options you can select in the Import
dock.
To change the import parameters of an asset in Godot, select the relevant resource in the FileSystem dock:

After adjusting the parameters, click Reimport. Be careful: if you select another file in the FileSystem dock before clicking Reimport, changes will be discarded. After clicking Reimport, the chosen parameters will only be used for this asset and on future reimports.
Можлива зміна параметрів імпорту кількох активів одночасно. Просто виберіть їх усіх разом на панелі ресурсів, і відкриті параметри будуть застосовані до всіх при повторному імпорті.
Повторний імпорт кількох активів
Під час роботи над проєктом ви можете виявити, що для кількох активів потрібно змінити однакові параметри, наприклад, увімкнення mipmaps, але ви хочете змінити лише ці конкретні параметри. Для цього виберіть усі активи, які потрібно повторно імпортувати у файлову систему. На вкладці імпорту тепер буде галочка ліворуч від кожного параметра імпорту.
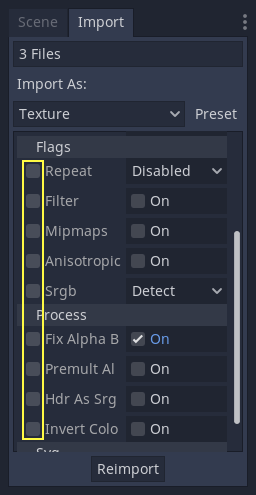
Установіть галочку серед параметрів, які потрібно змінити для імпортованих активів, а потім змініть параметри в звичайному режимі. Нарешті, натисніть кнопку повторного імпорту, і кожен вибраний актив буде повторно імпортований із зміною лише цих параметрів.
Автоматичний повторний імпорт
Коли контрольна сума MD5 вихідного ресурсу зміниться, Godot здійснить автоматичний повторний імпорт, застосувавши попередньо налаштований для цього конкретний ресурс.
Згенеровані файли
Імпорт додасть додатковий файл <asset>.import до вихідного файлу, що містить конфігурацію імпорту.
Make sure to commit these files to your version control system, as these files contain important metadata.
$ ls
example.png
example.png.import
project.godot
Additionally, extra assets will be present in the hidden
res://.godot/imported/ folder:
$ ls .godot/imported
example.png-218a8f2b3041327d8a5756f3a245f83b.ctex
example.png-218a8f2b3041327d8a5756f3a245f83b.md5
Якщо будь-який з файлів, присутніх у цій теці, буде видалено (або всю теку), ресурс або ресурси буде імпортовано автоматично. Тому не рекомендується фіксувати теку .godot/ у системі контролю версій. Хоча фіксація цієї теки може скоротити час повторного імпортування при виході з системи на іншому комп'ютері, вона вимагає значно більшого простору і пропускної здатності.
The default version control metadata that can be generated on project creation
will automatically ignore the .godot/ folder.
Зміна типу ресурсу імпорту
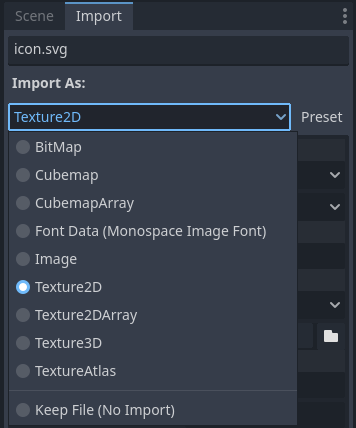
Some source assets can be imported as different types of resources. For this, select the relevant type of resource desired then click Reimport:
Зміна параметрів імпорту за замовчуванням
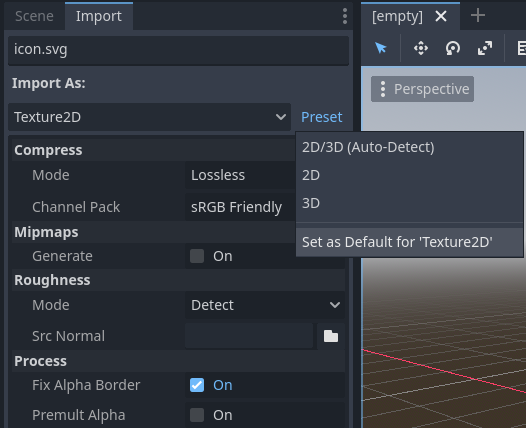
Different types of projects might require different defaults. Changing the import options to a predefined set of options can be achieved by using the Preset... Menu. Besides some resource types offering presets, the default settings can be saved and cleared too:
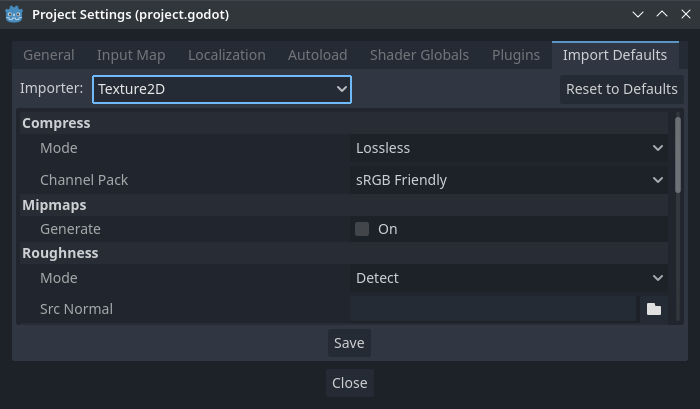
The default import parameters for a given resource type can be changed project-wide using the Import Defaults tab of the Project Settings dialog:
Further reading
This workflow takes a little time to get used to, but it enforces a more correct way to deal with resources.
Існує багато типів активів, доступних для імпорту. Продовжуйте читати, щоб зрозуміти, як працювати з ними: