Attention: Here be dragons
This is the latest
(unstable) version of this documentation, which may document features
not available in or compatible with released stable versions of Godot.
Checking the stable version of the documentation...
Programování hráče
V této lekci přidáme pohyb hráče a jeho animaci a nastavíme jej, aby detekoval kolize.
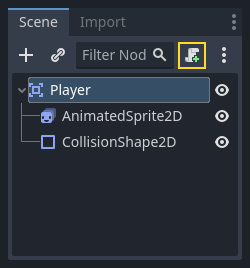
K tomu potřebujeme přidat nějaké funkce, které v žádném vestavěném uzlu nenajdeme, takže přidáme skript. Klikněte na uzel Player ("hráč") a klikněte na tlačítko "Připojit skript":
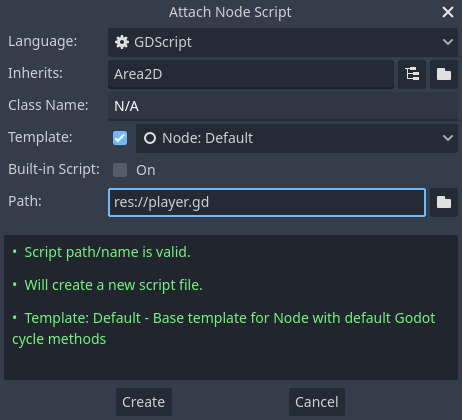
V okně nastavení skriptu můžete ponechat výchozí nastavení. Stačí kliknout na "Vytvořit":
Poznámka
Pokud vytváříte skript C# nebo jiné jazyky, předtím než stisknete tlačítko Vytvořit, zvolte odpovídající jazyk v rozbalovací nabídce.
Poznámka
Pokud se s GDScriptem setkáváte poprvé, přečtěte si prosím nejprve Skriptovací jazyky.
Začněme deklarací členských proměnných, které bude tento objekt potřebovat:
extends Area2D

@export var speed = 400 # How fast the player will move (pixels/sec).
var screen_size # Size of the game window.
using Godot;

public partial class Player : Area2D
{
    [Export]
    public int Speed { get; set; } = 400; // How fast the player will move (pixels/sec).

    public Vector2 ScreenSize; // Size of the game window.
}
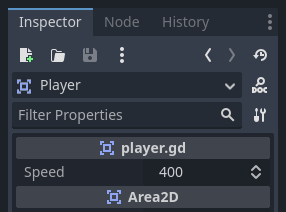
Using the export keyword on the first variable speed allows us to set
its value in the Inspector. This can be handy for values that you want to be
able to adjust just like a node's built-in properties. Click on the Player
node and you'll see the property now appears in the Inspector in a new section
with the name of the script. Remember, if you change the value here, it will
override the default value specified in the script (the script won't be modified).
Varování
Pokud používáte C#, musíte (znovu) sestavit projektová sestavení, kdykoli chcete vidět nové exportované proměnné nebo signály. Sestavení lze spustit ručně kliknutím na tlačítko Sestavení v pravém horním rohu editoru.

Váš skript player.gd by již měl obsahovat funkce _ready() ("připraveno") a _process() ("zpracování"). Pokud jste nevybrali výchozí šablonu zobrazenou výše, vytvořte tyto funkce během lekce.
Funkce _ready () se volá, když uzel vstoupí do stromu scény, což je dobrý čas pro získání velikosti okna hry:
func _ready():
    screen_size = get_viewport_rect().size
public override void _Ready()
{
    ScreenSize = GetViewportRect().Size;
}
Nyní můžeme pomocí funkce _process () definovat, co bude hráč dělat. _process () se volá v každém snímku takže tuto funkci použijeme k aktualizaci těch prvků naší hry, které se často mění. Pro hráče musíme udělat následující:
Zkontrolovat vstup.
Pohnout se v požadovaném směru.
Přehrát příslušnou animaci.
Nejprve musíme zkontrolovat vstup – drží hráč stisknutou klávesu? Pro tuto hru musíme zkontrolovat 4 směrové vstupy. Vstupní akce jsou definovány v Nastavení projektu pod "Mapa vstupů". Zde můžete definovat vlastní události a přiřadit jim různé klávesy, události myši nebo jiné vstupy. V této hře namapujeme klávesy se šipkami do čtyř směrů.
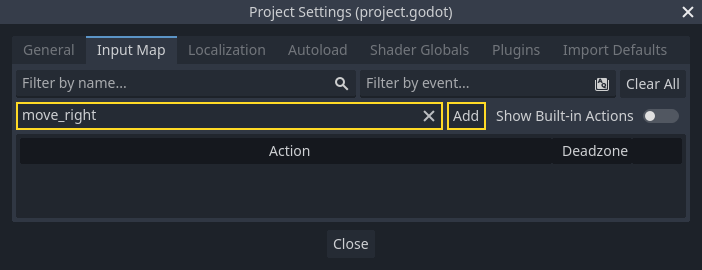
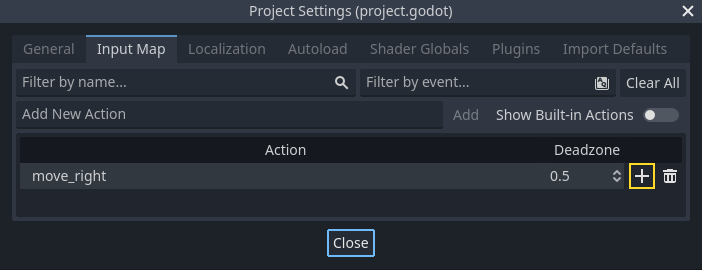
Kliknutím na Projekt -> Nastavení projektu otevřete okno nastavení projektu a klikněte na záložku Mapa vstupů v horní části. Do horní lišty napište "move_right" a kliknutím na tlačítko "Přidat" akci move_right ("pohnout_doprava")přidejte.
Akci musíme přiřadit klávesu. Kliknutím na ikonu "+" vpravo otevřete okno správce událostí.
Automaticky by mělo být vybráno pole "Čekání na vstup...". Stiskněte pravou šipku na klávesnici a nabídka by nyní měla vypadat takto.
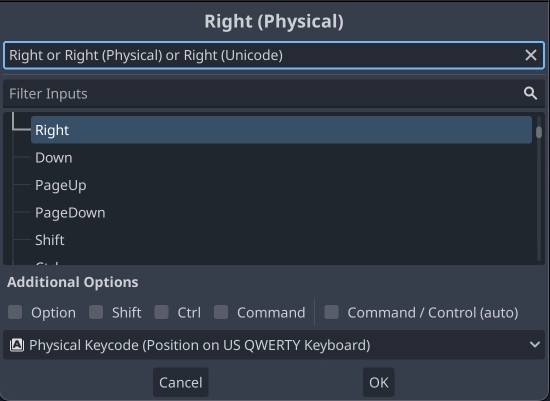
Zvolte tlačítko "ok". Pravá šipka je nyní spojena s akcí move_right.
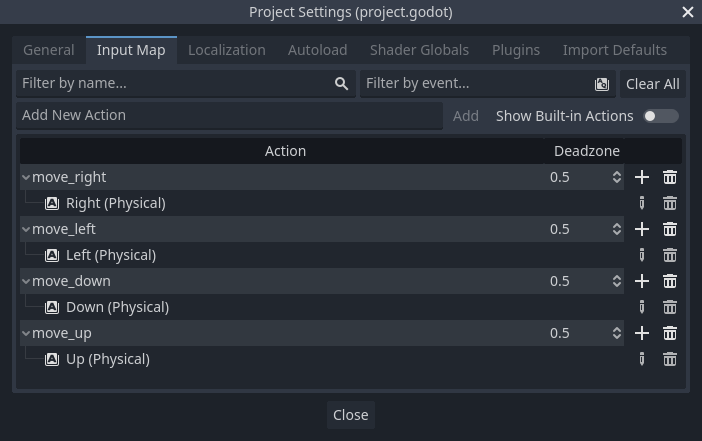
Zopakujte tento postup pro zbylá tři mapování:
move_leftmapované na šipku doleva.move_upmapované na šipku nahoru.A nakonec
move_downmapované na šipku dolů.
Záložka mapy vstupu by měla vypadat takto:
Kliknutím na tlačítko "Zavřít" zavřete nastavení projektu.
Poznámka
Ke každé vstupní akci jsme namapovali pouze jednu klávesu, ale můžete k jedné vstupní akci namapovat více různých kláves, tlačítek joysticku nebo tlačítek myši.
Zda je klávesa stisknuta můžete zjistit pomocí funkce Input.is_action_pressed() ("je akce stisknuta"), která vrací true, pokud je stisknuta, nebo false, pokud není.
func _process(delta):
    var velocity = Vector2.ZERO # The player's movement vector.
    if Input.is_action_pressed("move_right"):
        velocity.x += 1
    if Input.is_action_pressed("move_left"):
        velocity.x -= 1
    if Input.is_action_pressed("move_down"):
        velocity.y += 1
    if Input.is_action_pressed("move_up"):
        velocity.y -= 1

    if velocity.length() > 0:
        velocity = velocity.normalized() * speed
        $AnimatedSprite2D.play()
    else:
        $AnimatedSprite2D.stop()
public override void _Process(double delta)
{
    var velocity = Vector2.Zero; // The player's movement vector.

    if (Input.IsActionPressed("move_right"))
    {
        velocity.X += 1;
    }

    if (Input.IsActionPressed("move_left"))
    {
        velocity.X -= 1;
    }

    if (Input.IsActionPressed("move_down"))
    {
        velocity.Y += 1;
    }

    if (Input.IsActionPressed("move_up"))
    {
        velocity.Y -= 1;
    }

    var animatedSprite2D = GetNode<AnimatedSprite2D>("AnimatedSprite2D");

    if (velocity.Length() > 0)
    {
        velocity = velocity.Normalized() * Speed;
        animatedSprite2D.Play();
    }
    else
    {
        animatedSprite2D.Stop();
    }
}
Začneme nastavením rychlosti velocity na (0, 0) - ve výchozím nastavení by se hráč neměl pohybovat. Pak zkontrolujeme každý vstup a přidáme / odečteme z velocity, abychom získali celkový směr. Pokud například podržíte right a down současně, bude výsledný vektor velocity (1, 1). V tomto případě, protože přidáváme vodorovný a svislý pohyb, by se hráč pohyboval rychleji diagonálně, než kdyby se pohyboval vodorovně.
Tomu můžeme zabránit normalizací vektoru rychlosti, což znamená, že nastavíme jeho velikost na 1 a násladně jej vynásobíme velikostí požadované rychlosti. Tím pádem se budeme pohybovat stejně rychle bez ohledu na směr.
Tip
Pokud jste nikdy dříve vektorovou matematiku nepoužívali, nebo potřebujete opakování, vysvětlení fungování vektorů v Godotu najdete v Vektorová matematika. Je dobré s vektory umět pracovat, ale po zbytek tohoto tutoriálu to nebude nutné.
Dále zkontrolujeme, zda se hráč pohybuje, abychom mohli na AnimatedSprite2D ("2D animovaný sprite") zavolat play() ("přehrávat") nebo stop() ("zastavit").
Tip
$ je zkratka pro get_node() ("získat uzel"). Ve výše uvedeném kódu je tedy $AnimatedSprite.play() totéž co get_node("AnimatedSprite").play().
V GDScriptu vrací $ cestu k vzbranému uzlu relativní vzhledem k aktuálnímu uzlu, případně null, pokud uzel nebyl nalezen. Protože AnimatedSprite2D je potomek aktuálního uzlu, můžeme použít $AnimatedSprite2D.
Nyní když máme směr pohybu, můžeme aktualizovat pozici hráče. Můžeme také použít funkci clamp() ("sevřít"), abychom hráči zabránili opustit obrazovku. Sevření hodnoty znamená její omezení na určitý rozsah. Na konec funkce _process přidejte následující (ujistěte se, že kód není odsazen jako pokračování větve else):
position += velocity * delta
position = position.clamp(Vector2.ZERO, screen_size)
Position += velocity * (float)delta;
Position = new Vector2(
    x: Mathf.Clamp(Position.X, 0, ScreenSize.X),
    y: Mathf.Clamp(Position.Y, 0, ScreenSize.Y)
);
Tip
Parametr delta ve funkci _process() označuje délku snímku, tj. dobu, kterou předchozí snímek potřeboval k dokončení. Použitím této hodnoty zajistíte, že pohyb zůstane konzistentní, i když se změní snímková frekvence.
Klikněte na "Spustit aktuální scénu" (F6, Cmd + R v systému MacOS) a ujistěte se, že můžete hráčem posunovat po obrazovce ve všech směrech.
Varování
Pokud se v panelu "Ladění" zobrazí následující chyba
Pokus o volání funkce 'play' v základní 'null instance' na null instance
znamená to pravděpodobně, že jste špatně zadali název uzlu AnimatedSprite2D. Názvy uzlů rozlišují velká a malá písmena a $NodeName musí odpovídat jménu, které vidíte ve stromu scény.
Výběr animací
Nyní když se hráč může pohybovat, musíme změnit podle směru jeho pohybu animaci, kterou AnimatedSprite2D přehrává. Máme animaci "walk" (chůze), která ukazuje pohyb hráče doprava, Tato animace by se pro pohyb doleva měla vodorovně převrátit pomocí vlastnosti flip_h ("překlopit horizontálně"). Máme také animaci "up", která by se pro pohyb dolů měla svisle převrátit za pomoci flip_v ("překlopit vertikálně"). Přidejme tento kód na konec funkce _process():
if velocity.x != 0:
    $AnimatedSprite2D.animation = "walk"
    $AnimatedSprite2D.flip_v = false
    # See the note below about the following boolean assignment.
    $AnimatedSprite2D.flip_h = velocity.x < 0
elif velocity.y != 0:
    $AnimatedSprite2D.animation = "up"
    $AnimatedSprite2D.flip_v = velocity.y > 0
if (velocity.X != 0)
{
    animatedSprite2D.Animation = "walk";
    animatedSprite2D.FlipV = false;
    // See the note below about the following boolean assignment.
    animatedSprite2D.FlipH = velocity.X < 0;
}
else if (velocity.Y != 0)
{
    animatedSprite2D.Animation = "up";
    animatedSprite2D.FlipV = velocity.Y > 0;
}
Poznámka
Booleovská přiřazení ve výše uvedeném kódu jsou běžnými zkratkami při programování. Protože provádíme (booleovské) porovnání a následně přiřazujeme booleovskou hodnotu, můžeme oba kroky provést současně. Porovnejte tento kód s jednořádkovým přiřazením výše:
if velocity.x < 0:
    $AnimatedSprite2D.flip_h = true
else:
    $AnimatedSprite2D.flip_h = false
if (velocity.X < 0)
{
    animatedSprite2D.FlipH = true;
}
else
{
    animatedSprite2D.FlipH = false;
}
Spusťte scénu znovu a zkontrolujte, že jsou animace ve všech směrech správné.
Tip
Častou chybou je nesprávné zadání názvů animací. Názvy animací v panelu Snímky spritu se musí shodovat s těmi, které zadáte v kódu. Pokud jste animaci pojmenovali "Walk", musíte v kódu také použít velké písmeno "W".
Pokud jste si jisti, že pohyb funguje správně, přidejte tento řádek do _ready (), takže hráč bude při spuštění hry skrytý:
hide()
Hide();
Příprava na kolize
Chceme, aby Player detekoval, když je zasažen nepřítelem, ale zatím jsme žádného nepřítele nevytvořili! To je v pořádku, protože zde použijeme signály Godotu.
Přidejte následující kód do horní části skriptu. Pokud používáte GDScript, přidejte jej za extends Area2D. Pokud používáte C#, přidejte jej za public partial class Player : Area2D:
signal hit
// Don't forget to rebuild the project so the editor knows about the new signal.

[Signal]
public delegate void HitEventHandler();
This defines a custom signal called "hit" that we will have our player emit
(send out) when it collides with an enemy. We will use Area2D to detect the
collision. Select the Player node and click the Signals tab next to the
Inspector tab to see the list of signals the player can emit:
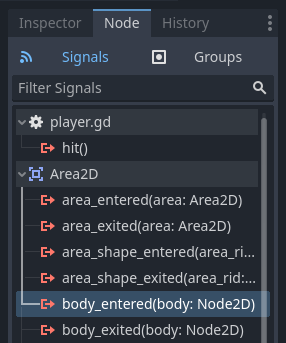
Náš vlastní signál "hit" je tam také! Protože našimi nepřáteli budou uzly RigidBody2D ("2D pevná tělesa"), chceme signál body_entered(body: Node2D) ("těleso vstoupilo"). Tento signál bude vyslán, když se hráče dotkne libovolné těleso. Klikněte na "Připojit.." a zobrazí se okno "Připojit signál".
Godot pro vás vytvoří funkci pojmenovanou přesně takto přímo ve skriptu. V tomto případě není třeba měnit výchozí nastavení.
Varování
Pokud používáte externí textový editor (například Visual Studio Code), aktuálně tomuto brání chyba v Godotu. Budete odesláni do externího editoru, ale nová funkce tam nebude.
Napište do Player skriptu funkci sami.

Povšimněte si zelené ikony, která značí, že je k této funkci připojen signál. To neznamená, že funkce existuje, pouze to, že se signál pokusí připojit k funkci s tímto jménem, takže znovu zkontrolujte, zda se název funkce přesně shoduje!
Dále přidejte do funkce tento kód:
func _on_body_entered(_body):
    hide() # Player disappears after being hit.
    hit.emit()
    # Must be deferred as we can't change physics properties on a physics callback.
    $CollisionShape2D.set_deferred("disabled", true)
// We also specified this function name in PascalCase in the editor's connection window.
private void OnBodyEntered(Node2D body)
{
    Hide(); // Player disappears after being hit.
    EmitSignal(SignalName.Hit);
    // Must be deferred as we can't change physics properties on a physics callback.
    GetNode<CollisionShape2D>("CollisionShape2D").SetDeferred(CollisionShape2D.PropertyName.Disabled, true);
}
Pokaždé, když hráče zasáhne nepřítel, signál se vyšle. Abychom signál hit nespustili více než jednou, musíme následně kolize hráče deaktivovat.
Poznámka
Deaktivace kolizního tvaru oblasti může způsobit chybu, pokud k ní dojde uprostřed zpracování kolizí enginem. Použití set_deferred() ("nastavit odložené") instruuje Godot, aby s deaktivací tvaru počkal, než to bude bezpečné.
Nakonec ještě potředbujeme přidat funkci, kterou hráče resetujeme při začátku nové hry.
func start(pos):
    position = pos
    show()
    $CollisionShape2D.disabled = false
public void Start(Vector2 position)
{
    Position = position;
    Show();
    GetNode<CollisionShape2D>("CollisionShape2D").Disabled = false;
}
S hráčem zprovozněným se v příští lekci zaměříme na nepřítele.