Attention: Here be dragons
This is the latest
(unstable) version of this documentation, which may document features
not available in or compatible with released stable versions of Godot.
Checking the stable version of the documentation...
Vytváření instancí
Poznámka
Tento návod pojednává o instancování scén v editoru. Chcete-li se dovědět, jako instancovat scény v kódu, přečtěte si Instance uzlů a scén.
Přístup Godotu k instancování popsaný níže by neměl být zaměňován s hardwarovým instancováním, což je technika, kterou lze efektivně vykreslovat velká množství podobných objektů. Hledáte-li informace k ní, přejděte na Optimalizace pomocí MultiMeshes.
V předchozí části jsme si ukázali, že scéna je kolekce uzlů uspořádaných do stromové struktury s jedním kořenovým uzlem. Svůj projekt můžete rozdělit do libovolného počtu scén, což vám pomůže lépe rozčlenit a organizovat jednotlivé komponenty vaší hry.
Můžete vytvořit tolik scén, kolik jen chcete, a uložit je jako soubory s příponou .tscn (zkratka pro "textová scéna"). Jeden takový příklad jsme už viděli: byl soubor to label.tscn z předchozí lekce. Takovéto soubory nazýváme "zabalené scény", protože jsou vlastně balíčkem informací o obsahu vaší scény.
Zde máme ukázku míče. Skládá se z kořenového uzlu RigidBody2D ("2D pevné těleso") s názvem Míč, který mu umožňuje padat a odrážet se od stěn, uzlu Sprite2D a uzlu CollisionShape2D ("2D kolizní tvar").

Poté, co scénu uložíte, funguje jako šablona: můžete ji opakovaně vkládat do dalších scén, kolikrát chcete. Tento způsob opakovaného použití objektu na základě šablony se nazývá instancování.

Jak jsme zmínili v předchozí části, instance scén se chovají jako běžné uzly: editor ve výchozím nastavení skryje jejich vnitřní strukturu. Když tedy instancujete scénu Míč, uvidíte jen uzel s názvem Míč. Všimněte si také, že každý duplikát má jedinečný název.
Každá instance scény Míč vychází ze stejné struktury a vlastností definováných v souboru mic.tscn. Každou z nich však můžete nezávisle upravit – například změnit, jak moc se odráží, jak je těžká nebo jakoukoli vlastnost, kterou zdrojová scéna nabízí.
Praktická ukázka
Pojďme si instancování vyzkoušet v praxi. Začněte stažením ukázkového projektu míče, který jsme pro vás připravili: instancing_starter.zip.
Extract the archive on your computer. To import it, you need the Project Manager. The Project Manager is accessed by opening Godot, or if you already have Godot opened, click on (Ctrl + Shift + Q, Ctrl + Option + Cmd + Q on macOS)
In the Project Manager, click the button to import the project.

V následujícím okně přejděte do složky, kterou jste rozbalili. Otevřete soubor project.godot dvojklikem.

Finally, click the button.

A window notifying you that the project was last opened in an older Godot version may appear. That's not an issue. Click to open the project.
V projektu jsou dvě zabalené scény: main.tscn, která obsahuje stěny, od kterých se míč může odrážet a ball.tscn. Automaticky by se měla otevřít hlavní scéna Main. Pokud místo ní vidíte prázdnou 3D scénu, klikněte na tlačítko 2D v horní části obrazovky.


Přidejme míč jako potomka hlavního uzlu. V doku Scéna vyberte hlavní uzel (Main) a poté klikněte na ikonu řetězu v horní části doku scény. Ta umožňuje přidat instanci scény jako potomka aktuálně vybraného uzlu.

Dvojklikem na scénu míče ji instancujte.

Míč se zobrazí v levém horním rohu průzoru.

Klikněte na něj a přetáhněte ho do středu zobrazení.

Spusťte hru stiknutím F5 (Cmd + B na macOS). Míč by měl začít padat.
Nyní bychom chtěli vytvořit více instancí uzlu Ball. Zatímco máte stále zvolený míč, stiskněte Ctrl + D (Cmd + D na macOS). To je příkaz pro duplikaci. Přetáhněte nový míč na jiné místo.

Tento postup můžete opakovat a vytvořit jich vescéně scéně několik.

Spusťte hru znovu. Každý míč by měl padat nezávisle na ostatních. To je to, co instance dělají. Každá je nezávislou reprodukcí šablonové scény.
Úpravy scén a instancí
Instance toho umožňují více. S těmito funkcemi mužete:
Change the properties of one ball without affecting the others using the Inspector.
Změnit výchozí vlastnosti všech míčů zaráz tak, že otevřete soubor
ball.tscna změníte uzel Ball v ní. Jakmile změny uložíte, všem instancím uzlu Ball v projektu se hodnoty aktualizují.
Poznámka
Změna vlastnosti v instanci vždy přepíše hodnotu z odpovídající zabalené scény.
Vyzkoušejme to. Dvojklikem na ball.tscn v Souborovém systému jej otevřete.

In the Scene dock on the left, select the Ball node. Then, in the Inspector on the right, click on the PhysicsMaterial property to expand it.
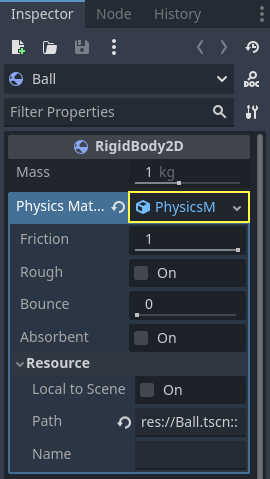
Nastavte jeho vlastnost Odraz na 0.5. To uděláte tak, že kliknete na číselné pole, napíšete 0.5 a zmáčknete Enter.

Pro připomenutí, hru můžete znovu spustit stisknutím F5 (Cmd + B na macOS). Míče nyní budou skákat mnohem více. Protože scéna Ball je šablonou pro všechny instance, když ji změníme, změníme odpovídajícím způsobem právě i je.
Nyní pozměňme samostatnou instanci. Klikněte na opdovídající záložku nad průzorem a vraťte se zpět do hlavní scény Main.

Select one of the instanced Ball nodes and, in the Inspector, set its
Gravity Scale value to 10.

Vedle pozměněné hodnoty se objeví šedé tlačítko "vrátit zpět".
Tato ikona značí, že výchozí hodnotu ze zdrojové zabalené scény přepisujete. I když upravíte vlastnost v původní scéně, přepsání hodnoty bude v instanci zachováno. Kliknutím na ikonu vrátit zpět se vlastnost obnoví na hodnotu v uložené scéně.
Naposledy spusťte hru a sledujte, jak tento máč padá mnohem rychleji, než ostatní.
Poznámka
You may notice you are unable to change the values of the PhysicsMaterial of the ball. This is because PhysicsMaterial is a resource, and needs to be made unique before you can edit it in a scene that is linking to its original scene. To make a resource unique for one instance, right-click on the Physics Material property in the Inspector and click in the context menu.
Zdroje jsou další základní stavební kámen her v Godotu a blíže je probereme v budoucí lekci.
Instance scén jako designový jazyk
Instance a scény v Godotu nabízejí vynikající návrhový jazyk, kterým se tento engine odlišuje od ostatních. Navrhli jsme jej od základů kolem tohoto konceptu.
Při vytváření her v Godotu vám doporučujeme zapomenout na architektonické návrhové vzory jako Model-View-Controller (MVC) nebo Entity-Relationship diagramy. Místo nich můžete začít tím, že si představíte jednotlivé prvky, které hráči ve vaší hře uvidí a svůj kód strukturovat kolem nich.
Takto byste například mohli rozdělit střílečku:
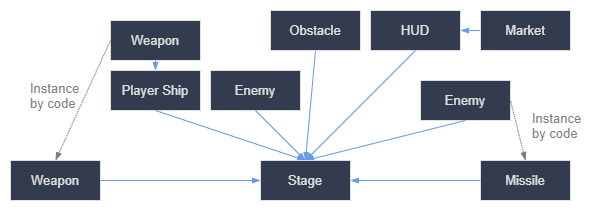
You can come up with a diagram like this for almost any type of game. Each rectangle represents an entity that's visible in the game from the player's perspective. The arrows point towards the instantiator of each scene.
Jakmile máte připravený diagram, doporučujeme tvořit hru tak, že postupně vytvoříte scénu pro každý objekt v něm uvedený. Za pomoci instancování, ať už v kódu nebo přímo v editoru, tak vybudujete svůj strom scén.
Programátoři při tvorbě her často stráví spoustu času navrhováním abstraktních architektur a snahou vměstnat do nich jednotlivé komponenty. Navrhování na základě scén vede k rychlejšímu a přímočařejšímu vývoji, u kterého se můžete soustředit na samotnou herní logiku. Protože většinu herních komponent lze přímo přeložit na scénu, budete díky využití designu založeném na instancování scén potřebovat jen minimum dodatečného kódu pro architekturu.
Zde máme příklad diagramu scén pro hru s otevřeným světem, ve kterém potřebujeme spoustu zdrojů a vnořených prvků:

Řekněme, že chceme začít vytvořením místnosti. Mohli bychom vytvořit několik různých scén místností s rozličně rozmístěným nábytkem. Později bychom mohli vytvořit scénu domu, která využívá několik instancí místnosti pro definici vnitřku. Ze mnoha instancovaných domů bychom mohli vytvořit citadelu a tu umístit na rozsáhlý terén. Každá z těchto scén by instancovala jednu nebo více podscén.
Později bychom mohli vytvořit scény představující stráže přidat je do citadely. Tím bychom je také nepřímo přidali do celého herního světa.
V Godotu je takovéto postupné budování vaší hry snadné, protože vše, co musíte udělat, je vytvořit a instancovat více scén. Editor jsme navrhli tak, aby byl uživatelsky přívětivý pro programátory, návrháře i umělce. Typický týmový vývojový proces zahrnuje 2D nebo 3D umělce, návrháře úrovní, herní návrháře a animátory, kteří všichni můžou pracovat v editoru Godotu.
Shrnutí
Instancování je proces, ve kterém vytváříme objekty ze šablony. Je velmi užitečný. Ve spojení se scénami vám umožňuje:
Rozdělit hru na opakovaně použitelné komponenty.
Strukturovat komplexní systémy a zapouzdřit je.
Přirozeně přemýšlet nad vaším projektem a navrhovat jeho strukturu.