Attention: Here be dragons
This is the latest
(unstable) version of this documentation, which may document features
not available in or compatible with released stable versions of Godot.
Checking the stable version of the documentation...
Vychytávky
Nyní máme všechny funkce naší hry hotové. Níže uvádíme několik zbývajících kroků, kterými můžeme vychytat herní zážitek.
Nebojte se hru rozšířit o své vlastní nápady.
Pozadí
Výchozí šedé pozadí není příliš přitažlivé, tak proč jeho barvu nezměnit? To můžeme udělat například použitím uzlu ColorRect ("barevný obdélník"). Udělejte z něj hned první uzel pod Main, aby byl vykreslen za ostatními uzly. ColorRect má pouze jednu vlastnost: Color. Vyberte si barvu, která se vám líbí, a vyberte "Rozvržení" -> "Profil ukotvení" -> "Celý obdélník" (buď v panelu nástrojů v horní části průzoru, nebo v inspektoru), aby pokrýval celou obrazovku.
Můžete také, pokud jej máte, místo změny barvy přidat pomocí uzlu TextureRect ("texturový obdélník") na pozadí obrázek.
Zvukové efekty
Zvuk a hudba mohou být tím nejúčinnějším způsobem, jak zvýšit přitažlivost hry. Ve složce herních zdrojů art máte dva zvukové soubory: "House in a Forest Loop.ogg" pro hudbu na pozadí a "gameover.wav" pro přehrání, když hráč prohraje.
Přidejte dva AudioStreamPlayer ("přehrávač zvukových streamů") uzly jako potomky uzlu Main. Jeden pojmenujte Music ("hudba") a druhý DeathSound ("zvuk smrti"). U každého klikněte na vlastnost Stream, vyberte "Načíst" a zvolte odpovídající zvukový soubor.
Veškerý zvuk je automaticky importován s vypnutým nastavením Loop ("smyčka"). Pokud chcete, aby se hudba plynule opakovala, klikněte na šipku souboru Streamu, vyberte Udělat unikátní, poté klikněte na soubor Streamu a zaškrtněte políčko Smyčka.

Chcete-li hudbu přehrát, přidejte $Music.play() ("přehrát") do funkce new_game() a $Music.stop() ("zastavit") do funkce game_over().
Nakonec přidejte do funkce game_over() $ DeathSound.play().
func game_over():
    ...
    $Music.stop()
    $DeathSound.play()

func new_game():
    ...
    $Music.play()
public void GameOver()
{
    ...
    GetNode<AudioStreamPlayer>("Music").Stop();
    GetNode<AudioStreamPlayer>("DeathSound").Play();
}

public void NewGame()
{
    ...
    GetNode<AudioStreamPlayer>("Music").Play();
}
Klávesová zkratka
Protože se hra ovládá pomocí klávesnice, bylo by vhodné, kdybychom ji mohli také spustit stisknutím klávesy na klávesnici. Toho docílíme pomocí vlastnosti "Zkratka" v uzlu Button.
V předchozí lekci jsme vytvořili čtyři vstupní akce pro pohyb postavy. Podobnout vstupní akci vytvoříme i pro mapování na tlačítko spustit.
Vyberte "Projekt" -> "Nastavení projektu" a poté klikněte na záložku "Mapa vstupů". Stejně jako jste vytvořili vstupní akce pro pohyb, vytvořte novou vstupní akci s názvem start_game a namapujte ji na klávesu Enter.

Nyní by také bylo vhodné přidat podporu ovladače, pokud nějaký máte k dispozici. Připojte nebo spárujte ovladač a poté pod každou vstupní akcí, které chcete přidat podporu ovladače, klikněte na tlačítko "+" a stiskněte odpovídající tlačítko, směrové tlačítko nebo páčku, které chcete namapovat na příslušnou vstupní akci.
Ve scéně HUD vyberte StartButton a najděte jeho vlastnost Zkratka v Inspektoru. Vytvořte nový zdroj Shortcut ("zkratka") kliknutím dovnitř pole, otevřete pole Události a přidejte do něj nový prvek kliknutím na Array[InputEvent] (velikost 0).

Create a new InputEventAction and select the start_game action.
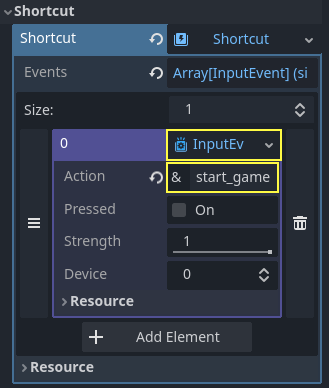
Nyní, když se objeví tlačítko spustit, můžete spustit hru buď tím, že na něj kliknete, nebo stisknete Enter.
Právě jste dokončili svou první 2D hru v Godotu.
Vytvořili jste hráčem ovládanou postavu, nepřátele, kteří se náhodně objevují na herním ploše, zahrnuli počítání skóre, implementovali obrazovky pro konec hry a restart, uživatelské rozhraní, zvuky a další. Gratulujeme!
Je toho mnoho, co se naučit. Teď si ale dejte chvilku a zkuste ocenit, čeho jste dosáhli.
A až budete připraveni, můžete přejít na Vaše první 3D hra, kde v Godotu vytvoříte od kompletní 3D hru od začátku do konce.