Attention: Here be dragons
This is the latest
(unstable) version of this documentation, which may document features
not available in or compatible with released stable versions of Godot.
Checking the stable version of the documentation...
Proces importu
Importing assets in Godot
To import assets in Godot, place your assets (image files, scenes, audio files, fonts, etc) directly in the project folder. There are 2 ways to achieve this:
For any file type: Copy files manually with your operating system's file manager.
For file types that can be imported by Godot: Drag-and-drop files from the operating system's file manager to the editor's FileSystem dock. This only works with resource file types (i.e. file types that Godot can import).
Godot will automatically import these files internally and keep the imported
resources hidden in a res://.godot/imported/ folder.
This means that when trying to access imported assets through code, you need to use the Resource Loader as it will automatically take into account where the internal files are saved. If you try and access an imported asset using the FileAccess class, it will work in the editor, but it will break in the exported project.
However, the Resource Loader cannot access non-imported files. Only the FileAccess class can.
Změna parametrů importu
Poznámka
Import parameters are only present in non-native Godot resource types.
This means Godot's own scene and resource file formats (.tscn, .scn,
.tres, .res) don't have import options you can select in the Import
dock.
To change the import parameters of an asset in Godot, select the relevant resource in the FileSystem dock:
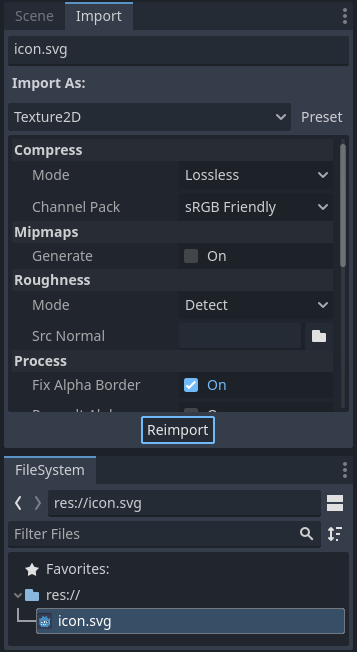
After adjusting the parameters, click Reimport. Be careful: if you select another file in the FileSystem dock before clicking Reimport, changes will be discarded. After clicking Reimport, the chosen parameters will only be used for this asset and on future reimports.
Changing the import parameters of several assets at the same time is also possible. Select all of them together in the FileSystem dock and the exposed parameters will apply to all of them when reimporting.
Opětovný import více položek
Při práci na projektu můžete zjistit, že je třeba změnit stejné parametry u několika zdrojů, například povolit mipmapy, ale chcete změnit pouze tyto konkrétní parametry. Za tímto účelem vyberte v systému souborů každý zdroj, který chcete znovu importovat. Na kartě import se nyní vlevo od každého parametru importu objeví zaškrtávací políčko.
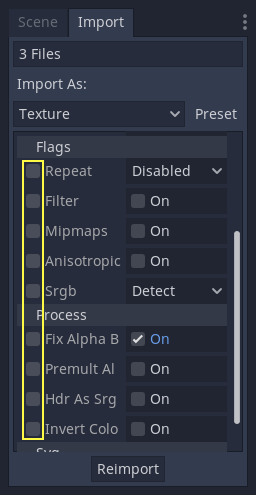
Zaškrtněte políčko u parametrů, které chcete u importovaných zdrojů změnit, a poté parametry normálně změňte. Nakonec klikněte na tlačítko reimportovat a každý vybraný zdroj bude znovu importován pouze se změněnými parametry.
Automatický reimport
Pokud se kontrolní součet MD5 položky zdroje změní, Godot provede jeho automatický reimport a použije předvolbu nakonfigurovanou pro daný zdroj.
Ignorování určitých složek
Sometimes, you have files that you don't want to be imported by Godot, such as images used in a game's press kit or promotional materials. You can place those files in a folder that you instruct Godot to ignore. Ignoring a folder ensures it is not imported by Godot; this also hides the folder from the FileSystem dock. Ignoring a folder also results in its contents not being exported with the project, therefore reducing the exported PCK size.
See Ignorování určitých složek in the project organization tutorial for details.
Vygenerované soubory
Při importu se přidá další soubor <asset>.import, který obsahuje konfiguraci importu.
Make sure to commit these files to your version control system, as these files contain important metadata.
ls
example.png
example.png.import
project.godot
Additionally, extra assets will be present in the hidden
res://.godot/imported/ folder:
ls .godot/imported
example.png-218a8f2b3041327d8a5756f3a245f83b.ctex
example.png-218a8f2b3041327d8a5756f3a245f83b.md5
Pokud dojde k vymazání některého ze souborů v této složce (nebo celé složky), zdroj nebo zdroje budou automaticky reimportovány. Odeslání této složky do systému správy verzí je proto volitelné. Může zkrátit dobu opětovného importu při kontrole na jiném počítači, ale zabere podstatně více místa a času pro přenos. Vyberte si svoje.
The default version control metadata that can be generated on project creation
will automatically ignore the .godot/ folder.
Změna typu importovaného zdroje
Some source assets can be imported as different types of resources. For this, select the relevant type of resource desired then click Reimport:
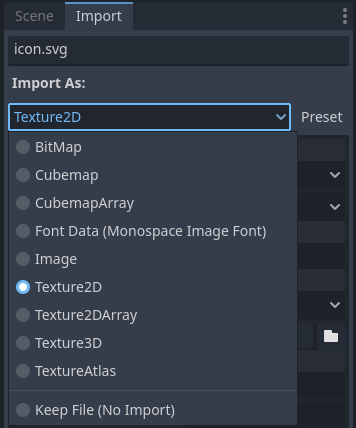
Select Keep File (exported as is) as resource type to skip file import, files
with this resource type will be preserved as is during project export.
Select Skip File (not exported) as resource type to skip file import and ignore
file during project export.
Změna výchozích parametrů importu
Different types of projects might require different defaults. Changing the import options to a predefined set of options can be achieved by using the Preset... Menu. Besides some resource types offering presets, the default settings can be saved and cleared too:
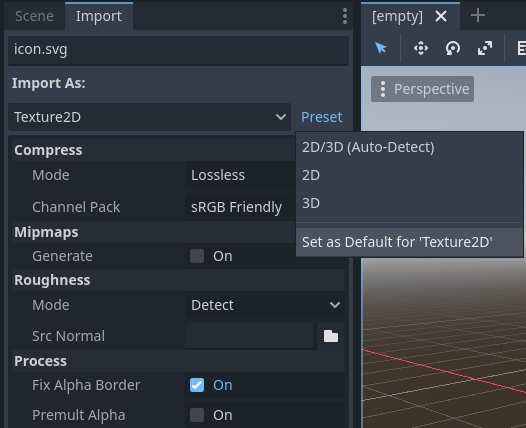
The default import parameters for a given resource type can be changed project-wide using the Import Defaults tab of the Project Settings dialog:

Further reading
This workflow takes a little time to get used to, but it enforces a more correct way to deal with resources.
Pro import je k dispozici mnoho typů zdrojů, proto pokračujte ve čtení, abyste pochopili, jak se všemi pracovat: