Attention: Here be dragons
This is the latest
(unstable) version of this documentation, which may document features
not available in or compatible with released stable versions of Godot.
Checking the stable version of the documentation...
Používání signálů
V této lekci se podíváme na signály. To jsou zprávy, které uzly vysílají, když se jim něco konkrétního stane, například když hráč stiskne tlačítko. K signálům se mohou připojovat další uzly a volat své vlastní funkce, když k odpovídající události dojde.
Signály jsou mechanismus delegace vestavěný do Godotu, který umožňuje jednomu hernímu objektu reagovat na změnu v jiném bez toho, aby na sebe musely přímo odkazovat. Použití signálů snižuje provázanost a nechává váš kód flexibilní.
Můžete například mít na obrazovce ukazatel života, který představuje zdraví hráče. Když hráč utrpí zranění nebo použije léčivý lektvar, chcete, aby se v ukazateli projevila odpovídající změna. K tomu v Godotu typicky použijete signál.
Stejně jako metody (Callable) jsou signály od Godotu 4.0 typem první třídy. To znamená, že je můžete předávat jako argumenty metod přímo, aniž byste je museli předávat jako řetězce. To umožňuje lepší automatické dokončování kódu a je to přístup méně náchylný k chybám. Pro seznam všeho, co můžete dělat přímo s typem Signal se můžete podívat na referenční dokumentaci třídy Signal .
Viz také
Jak bylo zmíněno v úvodu, signály jsou verze vzoru observer (pozorovatel) v Godotu. Více se o tomto vzoru můžete dozvědět v Game Programming Patterns.
Nyní použijeme signál, abychom naši ikonu Godotu z předchozí lekce (Poslouchání pro hráčský vstup) nechali hýbat nebo zastavili stisknutím tlačítka.
Poznámka
V tomto projektu budeme dodržovat konvence Godotu pro názvy identifikátorů.
GDScript: Třídy (uzly) používají PascalCase, proměnné a funkce používají snake_case a konstanty používají ALL_CAPS (viz Průvodce stylem GDScript).
C #: Třídy, exportované proměnné a metody používají PascalCase, soukromá pole používají _camelCase, místní proměnné a parametry používají camelCase (viz C# style guide). Při připojování signálů dávejte pozor, abyste názvy metod zadali přesně.
Příprava scény
Abychom do naší hry přidali tlačítko, vytvoříme novou scénu, která bude obsahovat jak Button ("tlačítko"), tak scénu sprite_2d.tscn, kterou jsme vytvořili v lekci Vytvoření prvního skriptu.
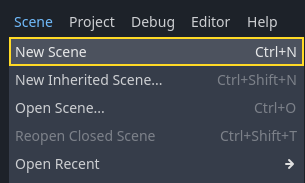
Create a new scene by going to the menu .
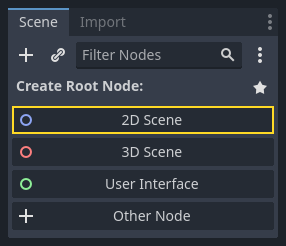
In the Scene dock, click the button. This will add a Node2D as our root.
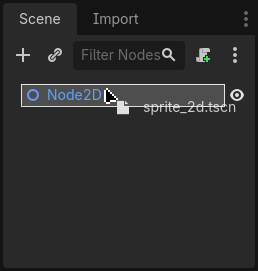
Přetáhněte soubor sprite_2d.tscn, který jste dříve uložili, z doku Souborový systém na uzel Node2D. Tím instancujete scénu.
We want to add another node as a sibling of the Sprite2D. To do so, right-click on Node2D and select .
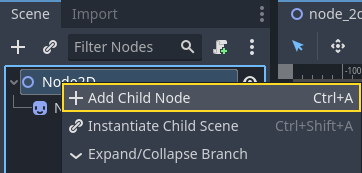
Vyhledejte uzel s názvem Button a přidejte jej.
Uzel je ve výchozím nastavení malý. Změňte jeho velikost kliknutím na pravý dolní úchyt tlačítka v průzoru a jeho roztažením.
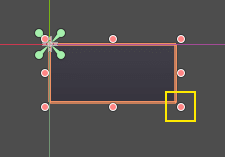
Pokud úchyty nevidíte, ujistěte se, že je v panelu nástrojů aktivní nástroj Vybrat.
Přesuňte tlačítko blíže ke spritu tím, že kliknete na něj samotné a přetáhnete ho.
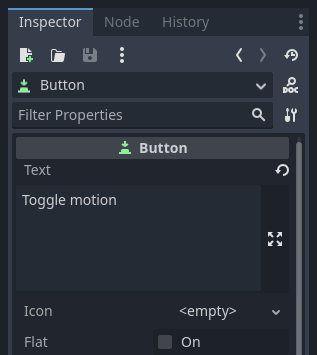
You can also write a label on the Button by editing its Text property
in the Inspector. Enter Toggle motion.
Strom scény a průzor by teď měly vypadat takto.
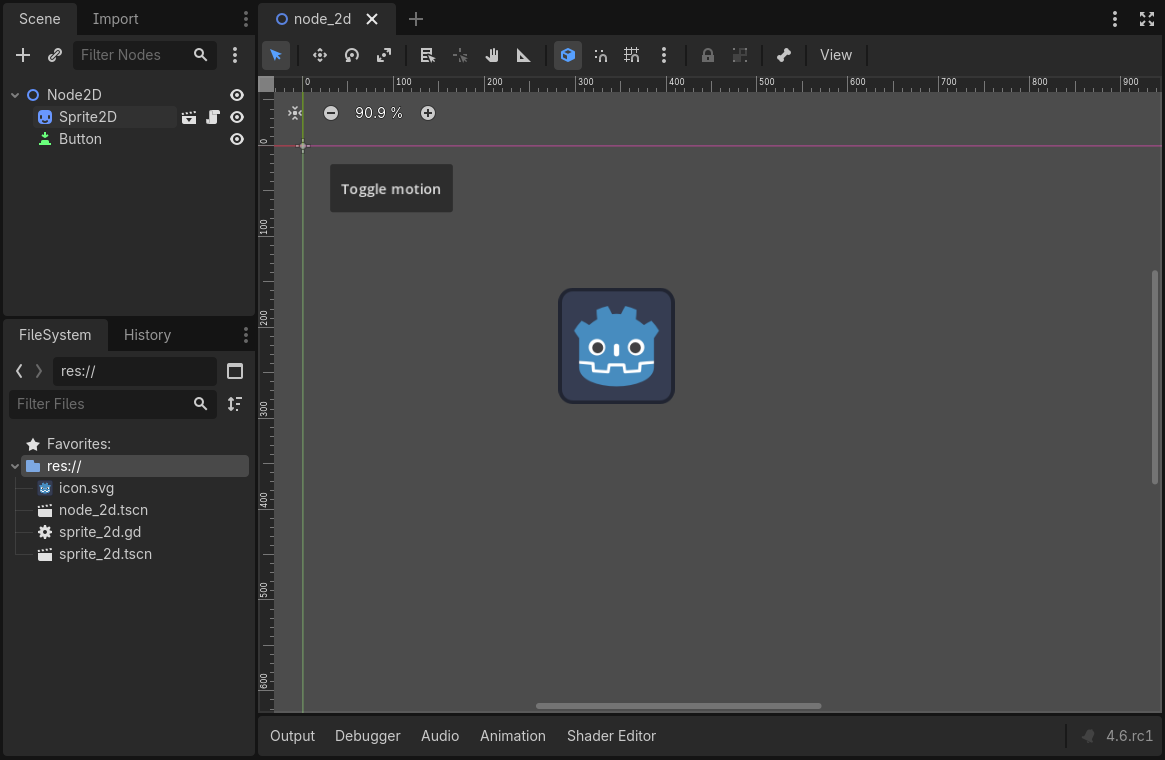
Pokud jste tak ještě neučinili, uložte svou nově vytvořenou scénu jako node_2d.tscn. Poté ji můžete spustit pomocí F6 (Cmd + R na macOS). Teď bude tlačítko viditelné, ale když jej stisknete, nic se nestane.
Připojení signálu v editoru
Chceme propojit signál tlačítka "pressed" ("stisknuto") s naším Sprite2D a zavolat novou funkci, která bude zapínat a vypínat jeho pohyb. K uzlu Sprite2D musíme mít připojený skript, což z předchozí lekce máme.
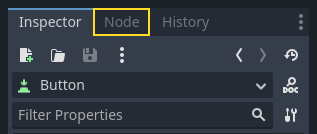
You can connect signals in the Signals dock. Select the Button node and, on the right side of the editor, click on the tab named Signals next to the Inspector.
Dok zobrazuje seznam signálů dostupných ve vybraném uzlu.
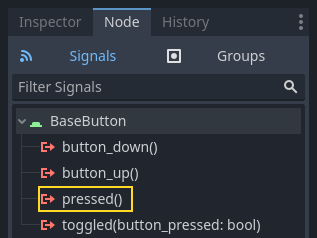
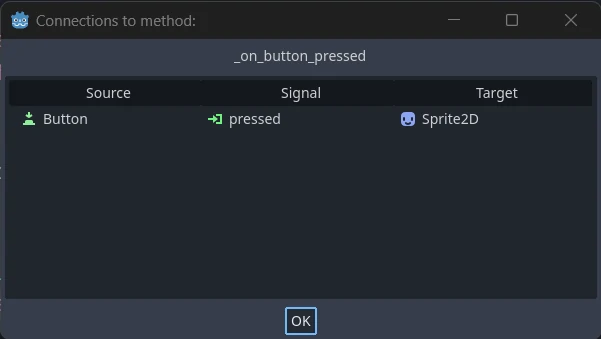
Dvojklikem na signál "pressed" otevřete okno připojení uzlu.

Zde můžete signál připojit k uzlu Sprite2D. Uzel potřebuje přijímací metodu, tj. funkci, kterou Godot zavolá, když tlačítko vyšle signál. Editor vám metodu vygeneruje. Podle konvence nazýváme tyto metody zpětného volání "_on_nazev_uzlu_nazev_signalu". Zde to bude "_on_button_pressed".
Poznámka
When connecting signals via the editor's Signals dock, you can use two modes. The simple one only allows you to connect to nodes that have a script attached to them and creates a new callback function on them.
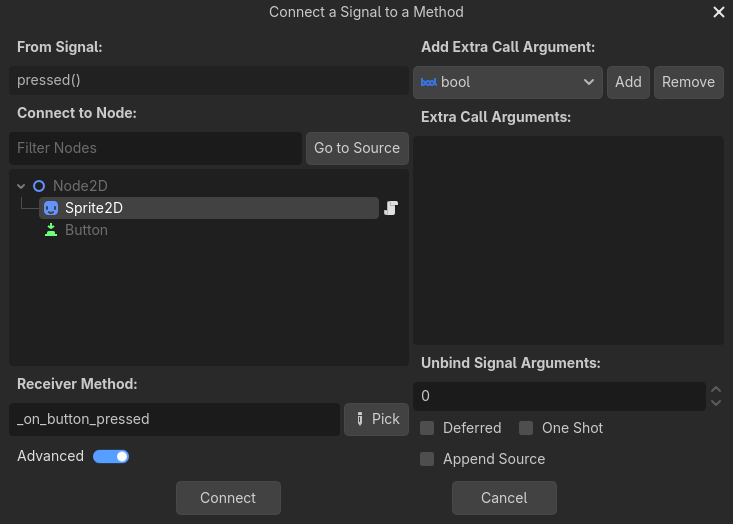
The advanced view lets you connect to any node and any built-in function, add arguments to the callback, and set options. You can toggle the mode in the window's bottom-right by clicking the button.
Poznámka
Pokud používáte externí editor (například VS Code), toto automatické generování kódu nemusí fungovat. V takovém případě musíte signál připojit pomocí kódu, jak je vysvětleno v následující části.
Click the button to complete the signal connection and jump to the Script workspace. You should see the new method with a connection icon in the left margin.
Když na ikonu kliknete, zobrazí se okno s informacemi o připojení. Tato funkce je dostupná pouze při připojení uzlů v editoru.
Řádek s klíčovým slovem pass ("vynechat") nahradíme kódem, který přepne pohyb uzlu.
Náš Sprite2D se pohybuje díky kódu ve funkci _process() ("zpracování"). Godot poskytuje metodu pro zapínání a vypínání zpracování: Node.set_process() ("nastavit zpracování"). Další metoda třídy Node, is_processing() ("zpracovává"), vrací true, pokud je aktivní nečinné zpracování. K invertování hodnoty můžeme použít klíčové slovo not.
func _on_button_pressed():
    set_process(not is_processing())
// We also specified this function name in PascalCase in the editor's connection window.
private void OnButtonPressed()
{
    SetProcess(!IsProcessing());
}
Tato funkce při stisknutí tlačítka přepne zpracování a tím i pohyb ikony.
Než hru vyzkoušíme, musíme zjednodušit naši funkci _process() tak, aby se uzel pohyboval automaticky a nečekal na vstup uživatele. Nahraďte jej následujícím kódem, který jsme viděli před dvěma lekcemi:
func _process(delta):
    rotation += angular_speed * delta
    var velocity = Vector2.UP.rotated(rotation) * speed
    position += velocity * delta
public override void _Process(double delta)
{
    Rotation += _angularSpeed * (float)delta;
    var velocity = Vector2.Up.Rotated(Rotation) * _speed;
    Position += velocity * (float)delta;
}
Váš kompletní kód sprite_2d.gd by měl vypadat následovně.
extends Sprite2D

var speed = 400
var angular_speed = PI


func _process(delta):
    rotation += angular_speed * delta
    var velocity = Vector2.UP.rotated(rotation) * speed
    position += velocity * delta


func _on_button_pressed():
    set_process(not is_processing())
using Godot;

public partial class MySprite2D : Sprite2D
{
    private float _speed = 400;
    private float _angularSpeed = Mathf.Pi;

    public override void _Process(double delta)
    {
        Rotation += _angularSpeed * (float)delta;
        var velocity = Vector2.Up.Rotated(Rotation) * _speed;
        Position += velocity * (float)delta;
    }

    // We also specified this function name in PascalCase in the editor's connection window.
    private void OnButtonPressed()
    {
        SetProcess(!IsProcessing());
    }
}
Run the current scene by pressing F6 (Cmd + R on macOS), and click the button to see the sprite start and stop.
Připojení signálů v kódu
Namísto použití editoru můžete signály propojit pomocí kódu. To je nutné, když vytváříte uzly nebo instancujete scény uvnitř skriptu.
Zde použijeme jiný uzel. Godot má uzel Timer ("časovač"), který je užitečný, když chcete implementovat oddálené obnovení dovedností, přebíjení zbraní a podobně.
Vraťte se do pracovního prostoru 2D. Můžete buď kliknout na text "2D" v horní části okna nebo stisknout Ctrl + F1 (Ctrl + Cmd + 1 na macOS).
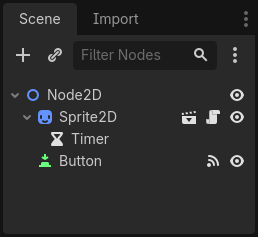
V doku Scéna klikněte pravým tlačítkem na uzel Sprite2D a přidejte nový podřízený uzel. Vyhledejte Timer a přidejte odpovídající uzel. Vaše scéna by nyní měla vypadat takto.
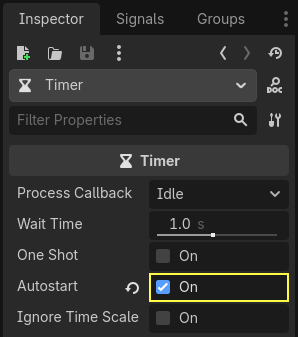
With the Timer node selected, go to the Inspector and enable the Autostart property.
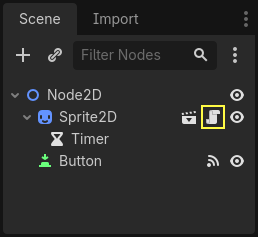
Kliknutím na ikonu skriptu vedle Sprite2D přejdete zpět do pracovního prostoru pro skriptování.
Pro propojení uzlů pomocí kódu musíme provést dvě operace:
Získat odkaz na časovač Timer ze Sprite2D.
Zavolat metodu
connect()("připojit") na signál "timeout" ("čas vypršel") Timeru.
Poznámka
Pro připojení signálu v kódu musíte zavolat metodu connect() toho signálu, který chcete poslouchat. V tomto případě chceme poslouchat signál Timeru "timeout“.
Chceme připojit signál ve chvíli, když scénu instancujeme. To můžeme udělat pomocí vestavěné funkce Node._ready() ("připraveno"), kterou engine automaticky zavolá v momentě, kdy je uzel plně instancován.
Abychom získali odkaz na uzel vzhledem k aktuálnímu, použijeme metodu Node.get_node() ("získat uzel"). Odkaz si můžeme uložit do proměnné.
func _ready():
    var timer = get_node("Timer")
public override void _Ready()
{
    var timer = GetNode<Timer>("Timer");
}
Funkce get_node() se podívá na potomky Sprite2D a získá uzly podle jejich jména. Pokud byste například v editoru přejmenovali uzel Timer na "CasovacBlikani", museli byste změnit volání na get_node("CasovacBlikani").
Nyní můžeme Timer připojit ke Sprite2D ve funkci _ready().
func _ready():
    var timer = get_node("Timer")
    timer.timeout.connect(_on_timer_timeout)
public override void _Ready()
{
    var timer = GetNode<Timer>("Timer");
    timer.Timeout += OnTimerTimeout;
}
Řádek můžeme číst takto: připojíme signál "timeout" Timeru k uzlu, ke kterému je skript připojen. Když Timer vyšle timeout, chceme zavolat funkci _on_timer_timeout(), kterou ještě musíme definovat. Přidáme ji na konec našeho skriptu a použijeme k přepínání viditelnosti spritu.
Poznámka
Podle konvence nazýváme tyto metody zpětného volání v GDScriptu "_on_nazev_uzlu_nazev_signalu" a v C# "OnNazevUzluNazevSignalu". Zde to bude "_on_timer_timeout" pro GDScript a OnTimerTimeout() pro C#.
func _on_timer_timeout():
    visible = not visible
private void OnTimerTimeout()
{
    Visible = !Visible;
}
Vlastnost visible ("viditelné") je booleovská hodnota, která řídí viditelnost našeho uzlu. Řádek visible = not visible hodnotu přepíná. Je-li visible true, stane se z něj false a naopak.
Když scénu Node2D spustíte nyní, uvidíte, že se sprite zapíná a vypíná v jednosekundových intervalech.
Kompletní skript
To je pro naši malou ukázku pohyblivé a blikající ikony Godotu vše! Zde je úplný soubor sprite_2d.gd pro vaši kontrolu.
extends Sprite2D

var speed = 400
var angular_speed = PI


func _ready():
    var timer = get_node("Timer")
    timer.timeout.connect(_on_timer_timeout)


func _process(delta):
    rotation += angular_speed * delta
    var velocity = Vector2.UP.rotated(rotation) * speed
    position += velocity * delta


func _on_button_pressed():
    set_process(not is_processing())


func _on_timer_timeout():
    visible = not visible
using Godot;

public partial class MySprite2D : Sprite2D
{
    private float _speed = 400;
    private float _angularSpeed = Mathf.Pi;

    public override void _Ready()
    {
        var timer = GetNode<Timer>("Timer");
        timer.Timeout += OnTimerTimeout;
    }

    public override void _Process(double delta)
    {
        Rotation += _angularSpeed * (float)delta;
        var velocity = Vector2.Up.Rotated(Rotation) * _speed;
        Position += velocity * (float)delta;
    }

    // We also specified this function name in PascalCase in the editor's connection window.
    private void OnButtonPressed()
    {
        SetProcess(!IsProcessing());
    }

    private void OnTimerTimeout()
    {
        Visible = !Visible;
    }
}
Vlastní signály
Poznámka
Tato sekce slouží jako reference pro definování a používání vašich vlastních signálů. Nestaví na projektu, který jsme vytvořili v předchozích lekcích.
Vlastní signály můžete definovat ve skriptu. Řekněme, že chcete ukázat obrazovku pro konec hry, když životy hráče klesnou na nulu. K tomu můžete definovat signál s názvem "died" ("zemřel") nebo třeba "health_depleted" ("životy vyčerpány"), když životy dosáhnou 0.
extends Node2D

signal health_depleted

var health = 10
using Godot;

public partial class MyNode2D : Node2D
{
    [Signal]
    public delegate void HealthDepletedEventHandler();

    private int _health = 10;
}
Poznámka
Protože signály představují události, které právě nastaly, obecně v jejich názvech používáme sloveso popisující akci v minulém čase.
Your signals work the same way as built-in ones: they appear in the Signals tab and you can connect to them like any other.

Chcete-li ve svých skriptech signál vyslat, zavolejte na něm metodu emit() ("vyslat").
func take_damage(amount):
    health -= amount
    if health <= 0:
        health_depleted.emit()
public void TakeDamage(int amount)
{
    _health -= amount;

    if (_health <= 0)
    {
        EmitSignal(SignalName.HealthDepleted);
    }
}
Signál může také volitelně deklarovat jeden nebo více argumentů. Jejich názvy uveďte mezi závorkami:
extends Node2D

signal health_changed(old_value, new_value)

var health = 10
using Godot;

public partial class MyNode : Node
{
    [Signal]
    public delegate void HealthChangedEventHandler(int oldValue, int newValue);

    private int _health = 10;
}
Poznámka
The signal arguments show up in the editor's Signals dock, and Godot can use them to generate callback functions for you. However, you can still emit any number of arguments when you emit signals. So it's up to you to emit the correct values.
Chcete-li spolu se signálem předat hodnoty, přidejte je jako dodatečné argumenty funkce emit():
func take_damage(amount):
    var old_health = health
    health -= amount
    health_changed.emit(old_health, health)
public void TakeDamage(int amount)
{
    int oldHealth = _health;
    _health -= amount;
    EmitSignal(SignalName.HealthChanged, oldHealth, _health);
}
Shrnutí
Jakýkoli uzel v Godotu vysílá signály, když se jim něco konkrétního stane, například když hráč stiskne tlačítko. K jednotlivým signálům se mohou připojovat ostatní uzly a reagovat na vybrané události.
Signály mají mnoho využití. Můžete s nimi reagovat na to, když uzel vstoupí nebo opustí herní svět, na kolize, na to, že hráč vstoupil do oblasti nebo ji opustil, na změnu velikosti prvku uživatelského rozhraní a mnoho dalšího.
Například Area2D ("2D oblast") představující minci může vyslat signál body_entered ("těleso vstoupilo"), kdykoli fyzikální těleso hráče vstoupí do jejího kolizního tvaru, díky čemuž dokážete zaznamenat okamžik, kdy hráč minci sebral.
V následující sekci, Vaše první 2D hra ,vytvoříte kompletní 2D hru a uvedete vše, co jste se doposud naučili, do praxe.