Work in progress
The content of this page was not yet updated for Godot
4.2
and may be outdated. If you know how to improve this page or you can confirm
that it's up to date, feel free to open a pull request.
Agregando monstruos
En esta parte, generaremos monstruos aleatoriamente según la ruta. Cuando termines, tendrás monstruos vagando la tablero.
Haz doble clic en el archivo main.tscn en el panel de Sistema de Archivos para abrir la escena Main.
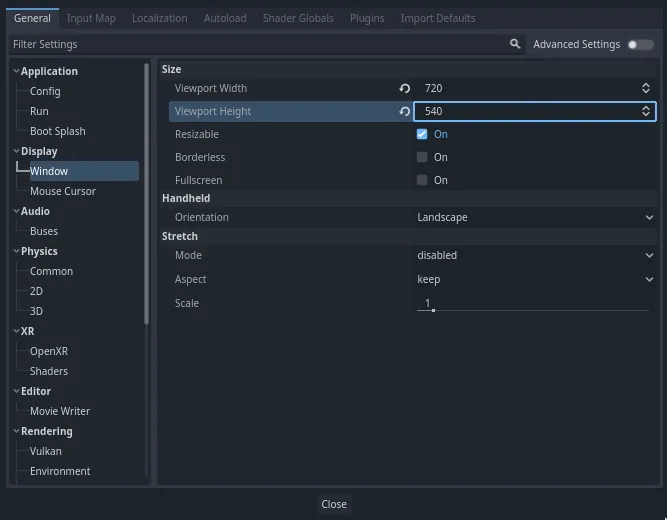
Antes de dibujar el camino, vamos a cambiar el resolución del juego. Nuestro juego tiene un tamaño por defecto de ventana de 1152x648. Vamos a cambiarla a 720x540`, una ventana pequeña.
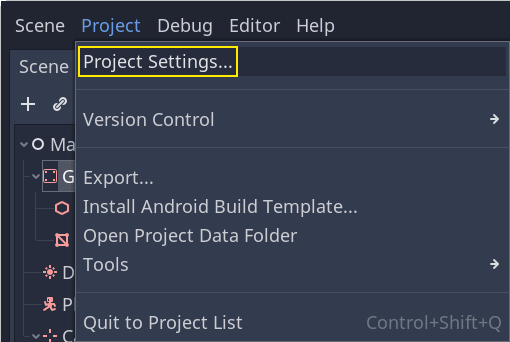
Vaya a Proyecto -> Configuración del Proyecto.
En el menú de la izquierda, ve hacia abajo hasta Display -> Window. En el lado derecho, establece el Ancho en "720" y el Alto en "540".
Creando la ruta de generación
Al igual que lo hiciste en el tutorial de juego 2D, vas a diseñar una ruta y usar un nodo PathFollow3D para muestrear ubicaciones aleatorias en ella.
Pero en 3D, es un poco mas complicado dibujar la ruta. Queremos que esté alrededor de la vista, para que los monstruos aparezcan un poco fuera de la escena. Pero si dibujamos una ruta, no la podremos ver en la vista previa de la cámara.
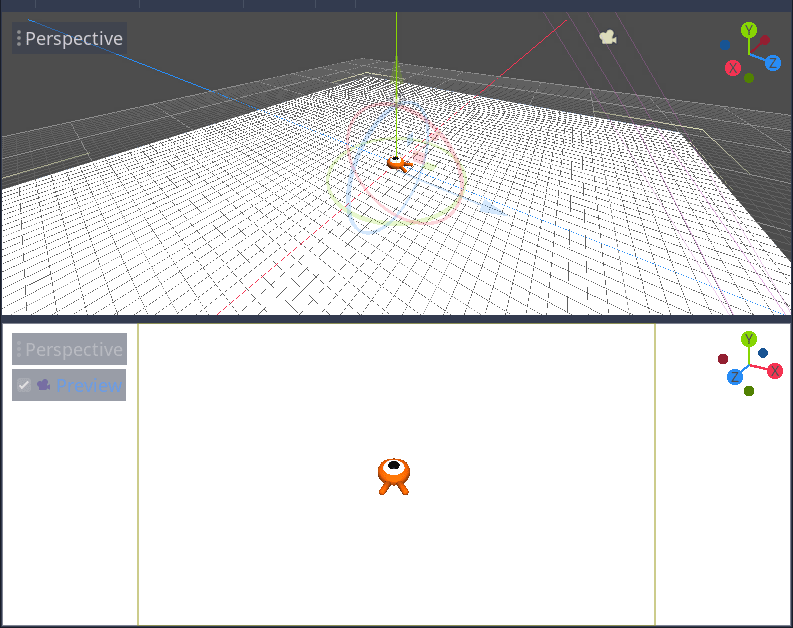
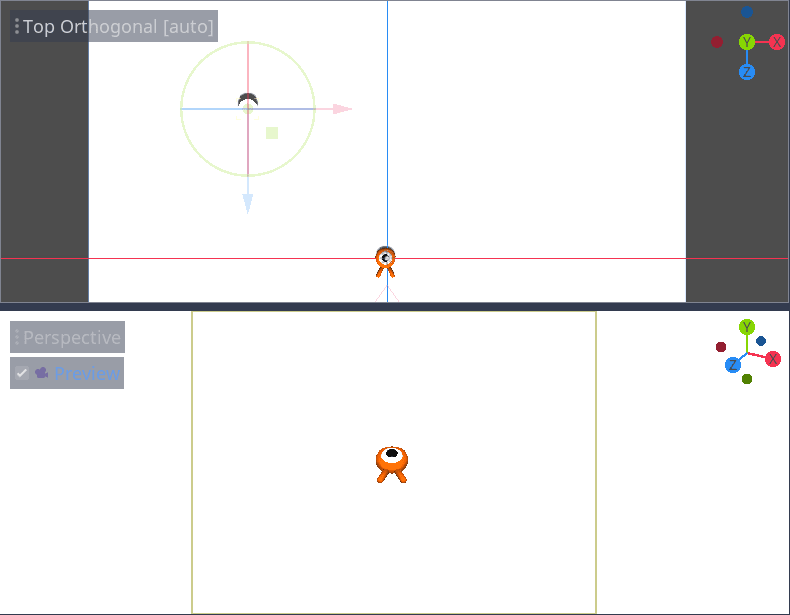
Para encontrar los límites de la vista, podemos usar algunos modelos temporales. Tu vista aún debe estar dividida en dos partes, con la vista previa de la cámara en la parte inferior. Si ese no es el caso, presiona Ctrl + 2 (Cmd + 2 en macOS) para dividir la vista en dos. Selecciona el nodo Camera3D y marca la casilla de verificación Previsualización en la vista inferior.
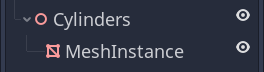
Agregando cilindros de marcadores temporales
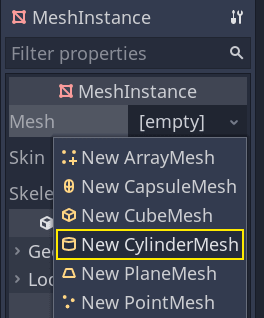
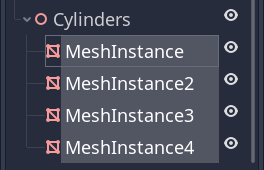
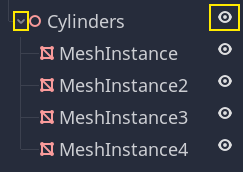
Vamos a agregar los modelos provisionales. Agrega un nuevo Node3D como hijo del nodo Main y nómbralo Cylinders. Lo utilizaremos para agrupar los cilindros. Selecciona Cylinders y agrega como hijo un nodo MeshInstance3D
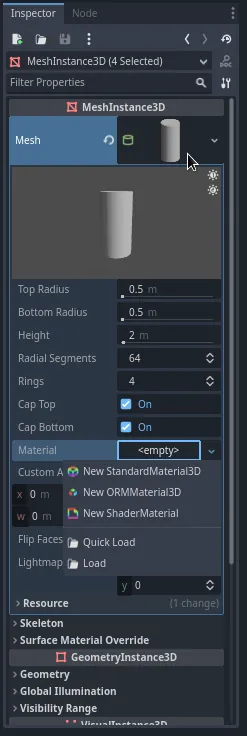
En el Inspector, asigna una CylinderMesh a la propiedad Mesh.
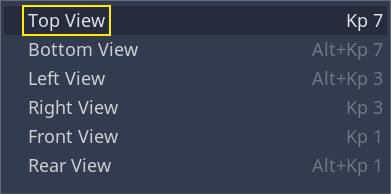
Establece la vista superior del viewport a la vista superior ortogonal utilizando el menú en la esquina superior izquierda del viewport. Alternativamente, puedes presionar la tecla 7 del teclado numérico.
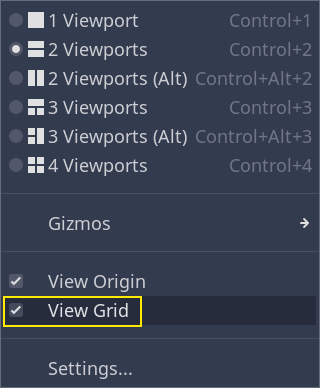
La cuadrícula podría distraer. La puedes activar o desactivar yendo al menú Ver en la barra de herramientas y haciendo clic en Ver Cuadrícula.
Ahora quieres mover el cilindro a lo largo del plano del suelo, observando la vista previa de la cámara en el viewport inferior. Recomiendo usar el ajuste a la cuadrícula para hacerlo. Puedes activarlo o desactivarlo haciendo clic en el icono del imán en la barra de herramientas o presionando la tecla Y.
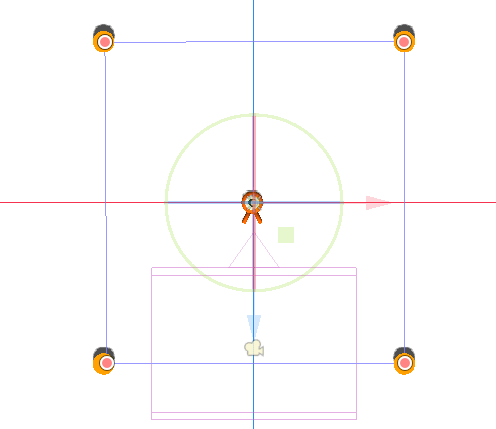
Mueve el cilindro justo fuera de la vista de la cámara en la esquina superior izquierda.
Vamos a crear copias del modelo y colocarlos alrededor del área de juego. Presiona Ctrl + D (Cmd + D en macOS) para duplicar el nodo. También puedes hacer clic derecho en el nodo en el panel de Scene y seleccionar Duplicate. Mueve la copia hacia abajo a lo largo del eje azul Z hasta que esté justo fuera de la vista previa de la cámara.
Selecciona ambos cilindros manteniendo presionada la tecla Shift y haciendo clic en el que no está seleccionado, luego duplica los cilindros.
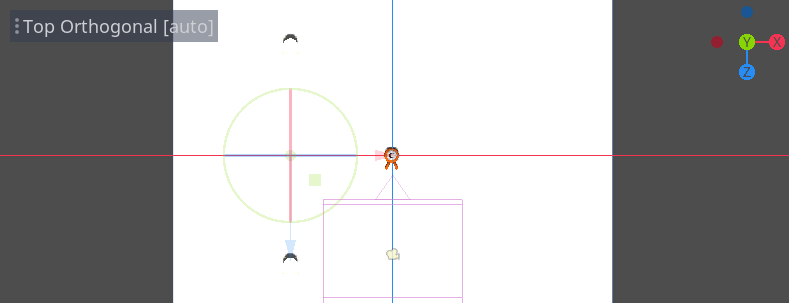
Muévelos a la derecha por arrastrando el eje X en rojo.
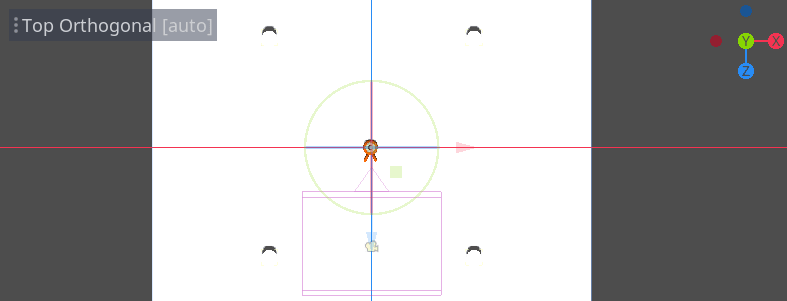
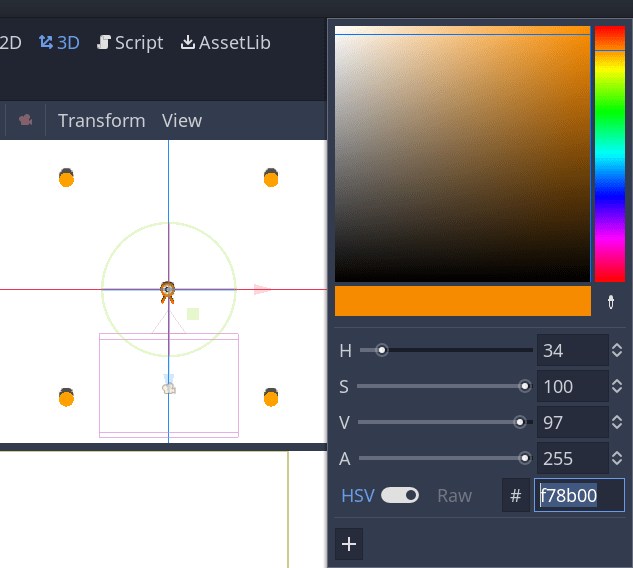
¿Es un poco difícil verlos sobre blanco, no? Vamos hacer que resalten con un nuevo material.
En 3D, los materiales definen las propiedades visuales de una superficie como el color, cómo refleja la luz, y más. Podemos usarlos para cambiar el color de una malla.
Podemos actualizar los cuatro cilintros a la vez. Seleciona todas las instancias de malla en el panel de Escena. Para ello, haz clic en la primera y Shift clic en la última.
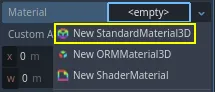
En el Inspector, espande la sección Material y asigna un StandardMaterial3D en el slot 0.
Haga clic en el icono esfera para abrir el recurso material. Obtiene una vista previa por el material y una lista larga de secciones con propiedades. Puede usarlos para crear todos tipos de superficies, como metal, roca, y agua.
Expande la sección Albedo.
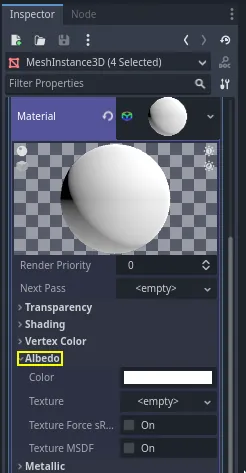
Establece el color en algo que contraste con el fondo, como un naranja brillante.
Ahora podemos utilizar los cilindros como guías. Pliega los cilindros en el panel de Scene haciendo clic en la flecha gris junto a ellos. En adelante, también puedes alternar su visibilidad haciendo clic en el icono del ojo junto a Cylinders.
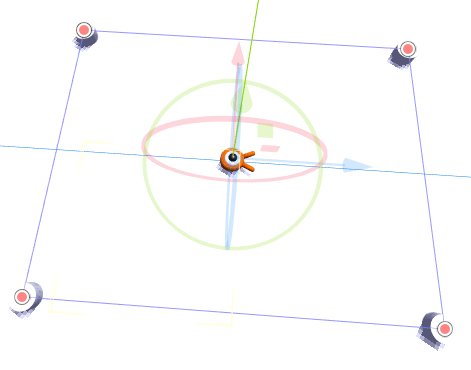
Agrega un nodo ref:Path3D <class_Path3D> como hijo de Main. En la barra de herramientas, aparecen cuatro iconos. Haz clic en la herramienta Añadir Punto, el icono con el signo "+" verde.

Nota
Puede pasar el ratón por encima de cualquier icono para ver una descripción de la herramienta.
Haz clic en el centro de cada cilindro para crear un punto. Luego, haz clic en el icono Cerrar Curva en la barra de herramientas para cerrar la ruta. Si algún punto está desalineado, puedes hacer clic y arrastrar sobre él para reposicionarlo.

Tu ruta debería verse así.
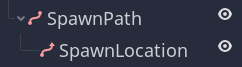
To sample random positions on it, we need a PathFollow3D node. Add a
PathFollow3D as a child of the Path3D. Rename the two nodes to SpawnLocation and
SpawnPath, respectively. It's more descriptive of what we'll use them for.
Ahora, estamos listos para programar el mecanismo de generación.
Agregando monstruos aleatoriamente
Haz clic derecho sobre el nodo Main y adjúntale un nuevo script.
Primero exportamos una variable al Inspector para que podamos asignarle mob.tscn o cualquier otro monstruo.
extends Node

@export var mob_scene: PackedScene
using Godot;

public partial class Main : Node
{
    // Don't forget to rebuild the project so the editor knows about the new export variable.

    [Export]
    public PackedScene MobScene { get; set; }
}
Queremos generar enemigos a intervalos de tiempo regulares. Para ello, debemos volver a la escena y agregar un temporizador.Sin embargo, antes de eso, deberemos asignar el archivo Mob.tscn a la propiedad mob_scene (de otro modo, será nula)
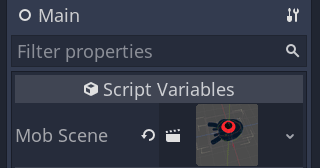
Regresa a la pantalla 3D y selecciona el nodo Main. Arrastra mob.tscn desde el panel Sistema de Archivos hacia el espacio para Mob Scene en el Inspector.
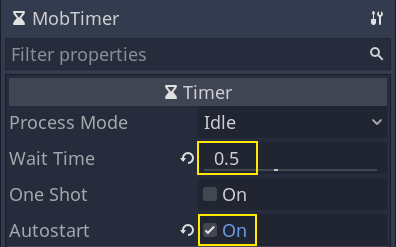
Agrega un nuevo nodo Timer como hijo de Main. Nómbralo MobTimer.

En el Inspector, establece el Wait Time del temporizador en 0.5 segundos y activa Autostart para que se inicie automáticamente cuando ejecutemos el juego.
Los temporizadores emiten una señal timeout cada vez que alcanzan el final de su Wait Time. Por defecto, se reinician automáticamente, emitiendo la señal en un ciclo. Podemos conectarnos a esta señal desde el nodo Main para generar enemigos cada 0.5 segundos.
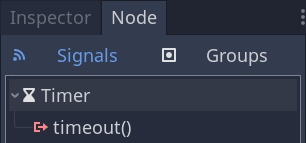
Con el MobTimer aún seleccionado, ve al panel de Node a la derecha y haz doble clic en la señal timeout.
Conéctelo al nodo Main.
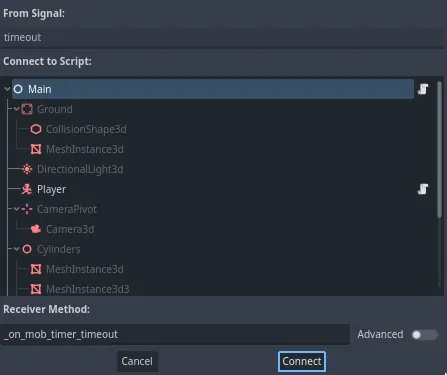
Esto te llevará de vuelta al script, con una nueva función vacía llamada _on_mob_timer_timeout().
Vamos a programar la lógica de generación de enemigos. Vamos a:
Instancia la escena enemigo.
Muestrear una posición aleatoria en la ruta de generación.
Obten la posición del jugador.
Llamar al método
initialize()del enemigo, pasándole la posición aleatoria y la posición del jugador.Agregar el enemigo como hijo del nodo Main.
func _on_mob_timer_timeout():
    # Create a new instance of the Mob scene.
    var mob = mob_scene.instantiate()

    # Choose a random location on the SpawnPath.
    # We store the reference to the SpawnLocation node.
    var mob_spawn_location = get_node("SpawnPath/SpawnLocation")
    # And give it a random offset.
    mob_spawn_location.progress_ratio = randf()

    var player_position = $Player.position
    mob.initialize(mob_spawn_location.position, player_position)

    # Spawn the mob by adding it to the Main scene.
    add_child(mob)
// We also specified this function name in PascalCase in the editor's connection window
private void OnMobTimerTimeout()
{
    // Create a new instance of the Mob scene.
    Mob mob = MobScene.Instantiate<Mob>();

    // Choose a random location on the SpawnPath.
    // We store the reference to the SpawnLocation node.
    var mobSpawnLocation = GetNode<PathFollow3D>("SpawnPath/SpawnLocation");
    // And give it a random offset.
    mobSpawnLocation.ProgressRatio = GD.Randf();

    Vector3 playerPosition = GetNode<Player>("Player").Position;
    mob.Initialize(mobSpawnLocation.Position, playerPosition);

    // Spawn the mob by adding it to the Main scene.
    AddChild(mob);
}
Arriba, randf() produce valores al azar entre 0 y 1, esto es lo que progress_ratio del nodo PathFollow espera: 0 es el inicio de la ruta, 1 es el fin de la ruta. La ruta que hemos creado está alrededor del viewport de la cámara, así que cualquier valor al azar entre 0 y 1 será una posición al azar a lo largo del borde del viewport!
Aqui está el script main.gd completo hasta ahora, como referencia.
extends Node

@export var mob_scene: PackedScene


func _on_mob_timer_timeout():
    # Create a new instance of the Mob scene.
    var mob = mob_scene.instantiate()

    # Choose a random location on the SpawnPath.
    # We store the reference to the SpawnLocation node.
    var mob_spawn_location = get_node("SpawnPath/SpawnLocation")
    # And give it a random offset.
    mob_spawn_location.progress_ratio = randf()

    var player_position = $Player.position
    mob.initialize(mob_spawn_location.position, player_position)

    # Spawn the mob by adding it to the Main scene.
    add_child(mob)
using Godot;

public partial class Main : Node
{
    [Export]
    public PackedScene MobScene { get; set; }

    private void OnMobTimerTimeout()
    {
        // Create a new instance of the Mob scene.
        Mob mob = MobScene.Instantiate<Mob>();

        // Choose a random location on the SpawnPath.
        // We store the reference to the SpawnLocation node.
        var mobSpawnLocation = GetNode<PathFollow3D>("SpawnPath/SpawnLocation");
        // And give it a random offset.
        mobSpawnLocation.ProgressRatio = GD.Randf();

        Vector3 playerPosition = GetNode<Player>("Player").Position;
        mob.Initialize(mobSpawnLocation.Position, playerPosition);

        // Spawn the mob by adding it to the Main scene.
        AddChild(mob);
    }
}
Puedes probar la escena presionando F6. Deberías ver que los monstruos aparecen y se mueven en línea recta.
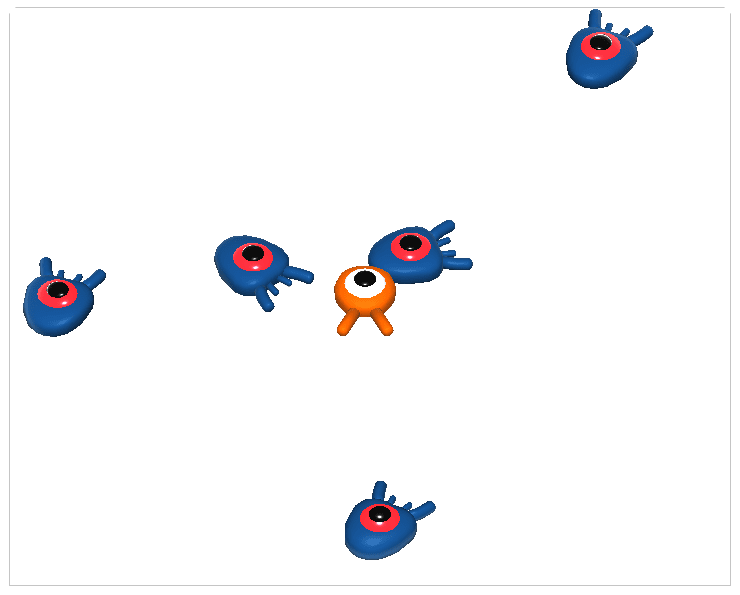
Por ahora, chocan y se deslizan entre sí cuando sus rutas se cruzan. Abordaremos esto en la próxima parte.