Work in progress
The content of this page was not yet updated for Godot
4.2
and may be outdated. If you know how to improve this page or you can confirm
that it's up to date, feel free to open a pull request.
Animación de personajes
En esta lección final, utilizaremos las herramientas de animación incorporadas de Godot para hacer que nuestros personajes floten y aleteen. Aprenderás a diseñar animaciones en el editor y a utilizar código para que tu juego cobre vida.
Vamos a empezar con una Introducción al uso del editor de animación.
Usando el editor de animación
El motor viene con herramientas para crear animaciones en el editor. Luego puedes usar el código para reproducirlas y controlarlas en tiempo de ejecución.
Abre la escena del jugador, selecciona el nodo Player y agrega un nodo AnimationPlayer.
Aparece el panel inferior de Animación.

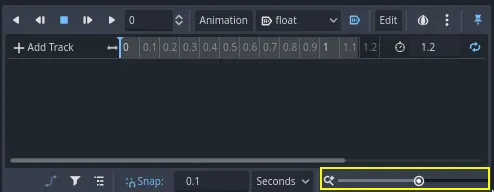
Cuenta con una barra de herramientas y un menú desplegable de animación en la parte superior, un editor de pistas en el medio que actualmente está vacío, y opciones de filtro, ajuste y zoom en la parte inferior.
Vamos a crear una animación. Haz clic en Animación -> Nueva.
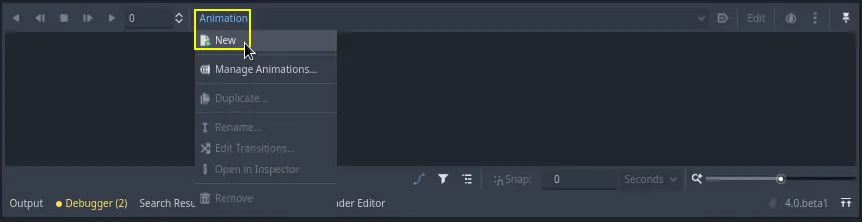
Nombra la animación "float".

Una vez que hayas creado la animación, aparecerá la línea de tiempo con números que representan el tiempo en segundos.

Queremos que la animación comience a reproducirse automáticamente al inicio del juego. Además, debe repetirse en bucle.
Para hacerlo, puedes hacer clic en el botón con un icono de "A+" en la barra de herramientas de animación y en las flechas de repetición, respectivamente.
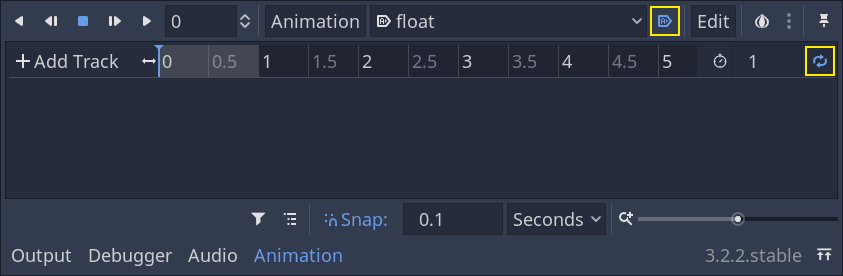
También puedes fijar el editor de animación haciendo clic en el icono de pin en la parte superior derecha. Esto evita que se pliegue cuando haces clic en el viewport y deseleccionas los nodos.
![]()
Establece la duración de la animación en 1.2 segundos en la parte superior derecha del panel.

Deberías ver que la cinta gris se ensancha un poco. Esto te muestra el inicio y el final de tu animación, y la línea vertical azul es tu cursor de tiempo.
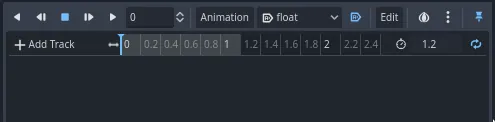
Puedes hacer clic y arrastrar el deslizador en la parte inferior derecha para hacer zoom dentro y fuera de la línea de tiempo.
La animación de flotar
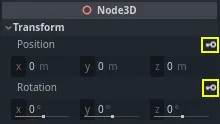
Con el nodo AnimationPlayer, puedes animar la mayoría de las propiedades en tantos nodos como necesites. Observa el icono de llave junto a las propiedades en el Inspector. Puedes hacer clic en cualquiera de ellos para crear un fotograma clave, un par de tiempo y valor para la propiedad correspondiente. El fotograma clave se inserta donde se encuentra el cursor de tiempo en la línea de tiempo.
Vamos a insertar nuestras primeras claves. Aquí, animaremos tanto la posición como la rotación del nodo Character.
Selecciona el nodo Character y en el Inspector expande la sección Transform. Haz clic en el icono de la llave junto a Position y Rotation.
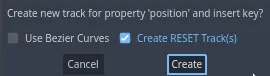
Para este tutorial, crea una pista RESET que es la elección por defecto
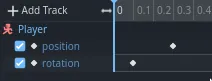
Aparecerán dos pistas en el editor con un icono de diamante que representa cada fotograma clave.
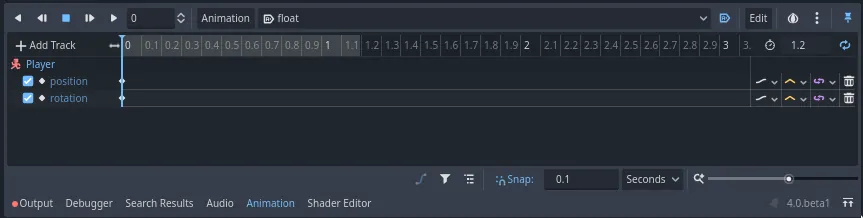
Puedes hacer clic y arrastrar los diamantes para moverlos en el tiempo. Mueve la clave de posición a 0.3 segundos y la clave de rotación a 0.1 segundos.
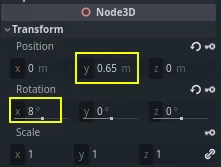
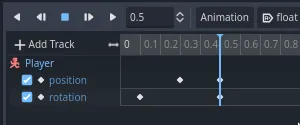
Mueve el cursor a 0.5 segundos haciendo clic y arrastrando en la línea de tiempo gris.

En el Inspector, establece el eje Y de Position a aproximadamente 0.65 metros y el eje X de Rotation a 8.
Crea claves para ambas propiedades
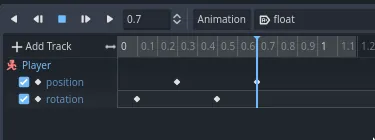
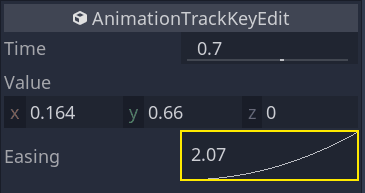
Ahora, desplaza la clave de posición a 0.7 segundos arrastrándola por la línea de tiempo.
Nota
Una conferencia sobre los principios de la animación está más allá del alcance de este tutorial. Solo ten en cuenta que no quieres que todo esté cronometrado y espaciado de manera uniforme. En su lugar, los animadores juegan con el tiempo y el espacio, dos principios fundamentales de la animación. Quieres crear desfases y contrastes en el movimiento de tu personaje para que se sienta vivo.
Mueve el cursor de tiempo al final de la animación, en 1.2 segundos. Establece la posición en el eje Y a aproximadamente 0.35 y la rotación en el eje X a -9 grados. Una vez más, crea una clave para ambas propiedades.

Puedes previsualizar el resultado haciendo clic en el botón de reproducción o presionando Shift + D. Haz clic en el botón de detener o presiona S para detener la reproducción.

Puedes ver que el motor interpola entre tus fotogramas clave para producir una animación continua. Sin embargo, en este momento, el movimiento se siente muy robótico. Esto se debe a que la interpolación predeterminada es lineal, lo que provoca transiciones constantes, a diferencia de cómo se mueven los seres vivos en el mundo real.
Podemos controlar la transición entre los fotogramas clave utilizando curvas de interpolación.
Haz clic y arrastra alrededor de los dos primeros fotogramas clave en la línea de tiempo para seleccionarlos en un recuadro.
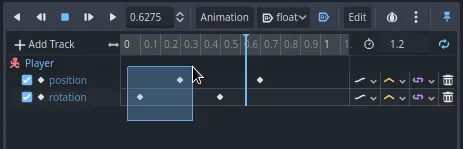
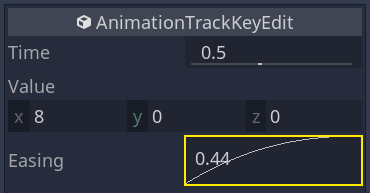
Puedes editar las propiedades de ambos fotogramas clave simultáneamente en el Inspector, donde puedes ver una propiedad de Easing (interpolación).
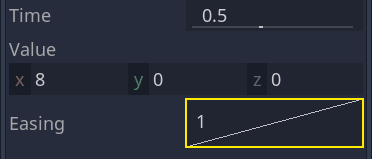
Haz clic y arrastra en la curva, tirándola hacia la izquierda. Esto la hará suavizar, es decir, transicionar rápidamente al principio y luego disminuir la velocidad a medida que el cursor de tiempo alcance el siguiente fotograma clave.

Reproduce la animación nuevamente para ver la diferencia. La primera mitad debería sentirse un poco más animada.
Aplica un ease-out al segundo fotograma clave en la pista de rotación.
Haz lo contrario para la segunda clave de posición, arrastrándola hacia la derecha.
Tu animación debería lucir algo así.
Nota
Las animaciones actualizan las propiedades de los nodos animados en cada fotograma, sobrescribiendo los valores iniciales. Si animáramos directamente el nodo Player, nos impediría moverlo en el código. Es aquí donde el nodo Pivot resulta útil: aunque animemos el nodo Character, aún podemos mover y rotar el Pivot y aplicar cambios adicionales en la capa superior de la animación mediante un script.
Si juegas el juego, ¡la criatura del jugador ahora flotará!
Si la criatura está un poco demasiado cerca del suelo, puedes mover el Pivot hacia arriba para compensarlo.
Controlando la animación en código
Podemos usar código para controlar la reproducción de la animación según la entrada del jugador. Cambiemos la velocidad de la animación cuando el personaje se esté moviendo.
Abre el script del Player haciendo clic en el ícono de script que está junto a él.
![]()
En _physics_process(), después de la línea donde verificamos el vector direction, agrega el siguiente código.
func _physics_process(delta):
    #...
    if direction != Vector3.ZERO:
        #...
        $AnimationPlayer.speed_scale = 4
    else:
        $AnimationPlayer.speed_scale = 1
public override void _PhysicsProcess(double delta)
{
    // ...
    if (direction != Vector3.Zero)
    {
        // ...
        GetNode<AnimationPlayer>("AnimationPlayer").SpeedScale = 4;
    }
    else
    {
        GetNode<AnimationPlayer>("AnimationPlayer").SpeedScale = 1;
    }
}
Este código hace que cuando el jugador se mueve, multipliquemos la velocidad de reproducción por 4. Cuando se detiene, la restablecemos a su valor normal.
Mencionamos que el Pivot puede aplicar transformaciones adicionales sobre la animación. Podemos hacer que el personaje se arquee al saltar utilizando la siguiente línea de código. Agrégala al final de _physics_process().
func _physics_process(delta):
    #...
    $Pivot.rotation.x = PI / 6 * velocity.y / jump_impulse
public override void _PhysicsProcess(double delta)
{
    // ...
    var pivot = GetNode<Node3D>("Pivot");
    pivot.Rotation = new Vector3(Mathf.Pi / 6.0f * Velocity.Y / JumpImpulse, pivot.Rotation.Y, pivot.Rotation.Z);
}
Animando los enemigos
Aquí tienes otro truco útil con las animaciones en Godot: siempre y cuando utilices una estructura de nodos similar, puedes copiarlas en diferentes escenas.
Por ejemplo, tanto las escenas Mob como Player tienen un nodo Pivot y un nodo Character, por lo que podemos reutilizar animaciones entre ellos.
Abre la escena Player, selecciona el nodo de animación y abre la animación "float". A continuación, haz clic en Animación > Copiar. Luego abre el archivo mob.tscn y abre su nodo de animación. Haz clic en Animación > Pegar. Eso es todo. Ahora todos los monstruos reproducirán la animación de flotar.
Podemos cambiar la velocidad de reproducción según la variable random_speed de la criatura. Abre el script de Mob y al final de la función initialize(), agrega la siguiente línea.
func initialize(start_position, player_position):
    #...
    $AnimationPlayer.speed_scale = random_speed / min_speed
public void Initialize(Vector3 startPosition, Vector3 playerPosition)
{
    // ...
    GetNode<AnimationPlayer>("AnimationPlayer").SpeedScale = randomSpeed / MinSpeed;
}
Y con eso, has terminado de programar tu primer juego completo en 3D.
Felicitaciones!
En la próxima parte, haremos un breve resumen de lo que aprendiste y te proporcionaremos algunos enlaces para que puedas seguir aprendiendo más. Pero por ahora, aquí tienes los scripts completos de Player.gd y Mob.gd para que puedas comparar tu código con ellos.
Aqui está el script Player.
extends CharacterBody3D

signal hit

# How fast the player moves in meters per second.
@export var speed = 14
# The downward acceleration while in the air, in meters per second squared.
@export var fall_acceleration = 75
# Vertical impulse applied to the character upon jumping in meters per second.
@export var jump_impulse = 20
# Vertical impulse applied to the character upon bouncing over a mob
# in meters per second.
@export var bounce_impulse = 16

var target_velocity = Vector3.ZERO


func _physics_process(delta):
    # We create a local variable to store the input direction
    var direction = Vector3.ZERO

    # We check for each move input and update the direction accordingly
    if Input.is_action_pressed("move_right"):
        direction.x = direction.x + 1
    if Input.is_action_pressed("move_left"):
        direction.x = direction.x - 1
    if Input.is_action_pressed("move_back"):
        # Notice how we are working with the vector's x and z axes.
        # In 3D, the XZ plane is the ground plane.
        direction.z = direction.z + 1
    if Input.is_action_pressed("move_forward"):
        direction.z = direction.z - 1

    # Prevent diagonal movement being very fast
    if direction != Vector3.ZERO:
        direction = direction.normalized()
        $Pivot.look_at(position + direction,Vector3.UP)
        $AnimationPlayer.speed_scale = 4
    else:
        $AnimationPlayer.speed_scale = 1

    # Ground Velocity
    target_velocity.x = direction.x * speed
    target_velocity.z = direction.z * speed

    # Vertical Velocity
    if not is_on_floor(): # If in the air, fall towards the floor
        target_velocity.y = target_velocity.y - (fall_acceleration * delta)

    # Jumping.
    if is_on_floor() and Input.is_action_just_pressed("jump"):
        target_velocity.y = jump_impulse

    # Iterate through all collisions that occurred this frame
    # in C this would be for(int i = 0; i < collisions.Count; i++)
    for index in range(get_slide_collision_count()):
        # We get one of the collisions with the player
        var collision = get_slide_collision(index)

        # If the collision is with ground
        if collision.get_collider() == null:
            continue

        # If the collider is with a mob
        if collision.get_collider().is_in_group("mob"):
            var mob = collision.get_collider()
            # we check that we are hitting it from above.
            if Vector3.UP.dot(collision.get_normal()) > 0.1:
                # If so, we squash it and bounce.
                mob.squash()
                target_velocity.y = bounce_impulse
                # Prevent further duplicate calls.
                break

    # Moving the Character
    velocity = target_velocity
    move_and_slide()

    $Pivot.rotation.x = PI / 6 * velocity.y / jump_impulse

# And this function at the bottom.
func die():
    hit.emit()
    queue_free()

func _on_mob_detector_body_entered(body):
    die()
using Godot;

public partial class Player : CharacterBody3D
{
    // Emitted when the player was hit by a mob.
    [Signal]
    public delegate void HitEventHandler();

    // How fast the player moves in meters per second.
    [Export]
    public int Speed { get; set; } = 14;
    // The downward acceleration when in the air, in meters per second squared.
    [Export]
    public int FallAcceleration { get; set; } = 75;
    // Vertical impulse applied to the character upon jumping in meters per second.
    [Export]
    public int JumpImpulse { get; set; } = 20;
    // Vertical impulse applied to the character upon bouncing over a mob in meters per second.
    [Export]
    public int BounceImpulse { get; set; } = 16;

    private Vector3 _targetVelocity = Vector3.Zero;

    public override void _PhysicsProcess(double delta)
    {
        // We create a local variable to store the input direction.
        var direction = Vector3.Zero;

        // We check for each move input and update the direction accordingly.
        if (Input.IsActionPressed("move_right"))
        {
            direction.X += 1.0f;
        }
        if (Input.IsActionPressed("move_left"))
        {
            direction.X -= 1.0f;
        }
        if (Input.IsActionPressed("move_back"))
        {
            // Notice how we are working with the vector's X and Z axes.
            // In 3D, the XZ plane is the ground plane.
            direction.Z += 1.0f;
        }
        if (Input.IsActionPressed("move_forward"))
        {
            direction.Z -= 1.0f;
        }

        // Prevent diagonal movement being very fast.
        if (direction != Vector3.Zero)
        {
            direction = direction.Normalized();
            GetNode<Node3D>("Pivot").LookAt(Position + direction, Vector3.Up);
            GetNode<AnimationPlayer>("AnimationPlayer").PlaybackSpeed = 4;
        }
        else
        {
            GetNode<AnimationPlayer>("AnimationPlayer").PlaybackSpeed = 1;
        }

        // Ground velocity
        _targetVelocity.X = direction.X * Speed;
        _targetVelocity.Z = direction.Z * Speed;

        // Vertical velocity
        if (!IsOnFloor())
        {
            _targetVelocity.Y -= FallAcceleration * (float)delta;
        }

        // Jumping.
        if (IsOnFloor() && Input.IsActionJustPressed("jump"))
        {
            _targetVelocity.Y += JumpImpulse;
        }

        // Iterate through all collisions that occurred this frame.
        for (int index = 0; index < GetSlideCollisionCount(); index++)
        {
            // We get one of the collisions with the player.
            KinematicCollision3D collision = GetSlideCollision(index);

            // If the collision is with a mob.
            if (collision.GetCollider() is Mob mob)
            {
                // We check that we are hitting it from above.
                if (Vector3.Up.Dot(collision.GetNormal()) > 0.1f)
                {
                    // If so, we squash it and bounce.
                    mob.Squash();
                    _targetVelocity.Y = BounceImpulse;
                    // Prevent further duplicate calls.
                    break;
                }
            }
        }

        // Moving the character
        Velocity = _targetVelocity;
        MoveAndSlide();

        var pivot = GetNode<Node3D>("Pivot");
        pivot.Rotation = new Vector3(Mathf.Pi / 6.0f * Velocity.Y / JumpImpulse, pivot.Rotation.Y, pivot.Rotation.Z);
    }

    private void Die()
    {
        EmitSignal(SignalName.Hit);
        QueueFree();
    }

    private void OnMobDetectorBodyEntered(Node body)
    {
        Die();
    }
}
Y el script Mob.
extends CharacterBody3D

# Minimum speed of the mob in meters per second.
@export var min_speed = 10
# Maximum speed of the mob in meters per second.
@export var max_speed = 18

# Emitted when the player jumped on the mob
signal squashed

func _physics_process(_delta):
    move_and_slide()

# This function will be called from the Main scene.
func initialize(start_position, player_position):
    # We position the mob by placing it at start_position
    # and rotate it towards player_position, so it looks at the player.
    look_at_from_position(start_position, player_position, Vector3.UP)
    # Rotate this mob randomly within range of -90 and +90 degrees,
    # so that it doesn't move directly towards the player.
    rotate_y(randf_range(-PI / 4, PI / 4))

    # We calculate a random speed (integer)
    var random_speed = randi_range(min_speed, max_speed)
    # We calculate a forward velocity that represents the speed.
    velocity = Vector3.FORWARD * random_speed
    # We then rotate the velocity vector based on the mob's Y rotation
    # in order to move in the direction the mob is looking.
    velocity = velocity.rotated(Vector3.UP, rotation.y)

    $AnimationPlayer.speed_scale = random_speed / min_speed

func _on_visible_on_screen_notifier_3d_screen_exited():
    queue_free()

func squash():
    squashed.emit()
    queue_free() # Destroy this node
using Godot;

public partial class Mob : CharacterBody3D
{
    // Emitted when the played jumped on the mob.
    [Signal]
    public delegate void SquashedEventHandler();

    // Minimum speed of the mob in meters per second
    [Export]
    public int MinSpeed { get; set; } = 10;
    // Maximum speed of the mob in meters per second
    [Export]
    public int MaxSpeed { get; set; } = 18;

    public override void _PhysicsProcess(double delta)
    {
        MoveAndSlide();
    }

    // This function will be called from the Main scene.
    public void Initialize(Vector3 startPosition, Vector3 playerPosition)
    {
        // We position the mob by placing it at startPosition
        // and rotate it towards playerPosition, so it looks at the player.
        LookAtFromPosition(startPosition, playerPosition, Vector3.Up);
        // Rotate this mob randomly within range of -90 and +90 degrees,
        // so that it doesn't move directly towards the player.
        RotateY((float)GD.RandRange(-Mathf.Pi / 4.0, Mathf.Pi / 4.0));

        // We calculate a random speed (integer).
        int randomSpeed = GD.RandRange(MinSpeed, MaxSpeed);
        // We calculate a forward velocity that represents the speed.
        Velocity = Vector3.Forward * randomSpeed;
        // We then rotate the velocity vector based on the mob's Y rotation
        // in order to move in the direction the mob is looking.
        Velocity = Velocity.Rotated(Vector3.Up, Rotation.Y);

        GetNode<AnimationPlayer>("AnimationPlayer").SpeedScale = randomSpeed / MinSpeed;
    }

    public void Squash()
    {
        EmitSignal(SignalName.Squashed);
        QueueFree(); // Destroy this node
    }

    private void OnVisibilityNotifierScreenExited()
    {
        QueueFree();
    }
}