Up to date
This page is up to date for Godot 4.2.
If you still find outdated information, please open an issue.
Introducción a las funciones de animación
El nodo AnimationPlayer permite crear desde animaciones simples hasta complejas.
En esta guía aprenderás a hacerlo:
Trabajar con el Panel de Animación
Animar cualquier propiedad de cualquier nodo
Crear una animación simple
In Godot, you can animate anything available in the Inspector, such as Node transforms, sprites, UI elements, particles, visibility and color of materials, and so on. You can also modify values of script variables and even call functions.
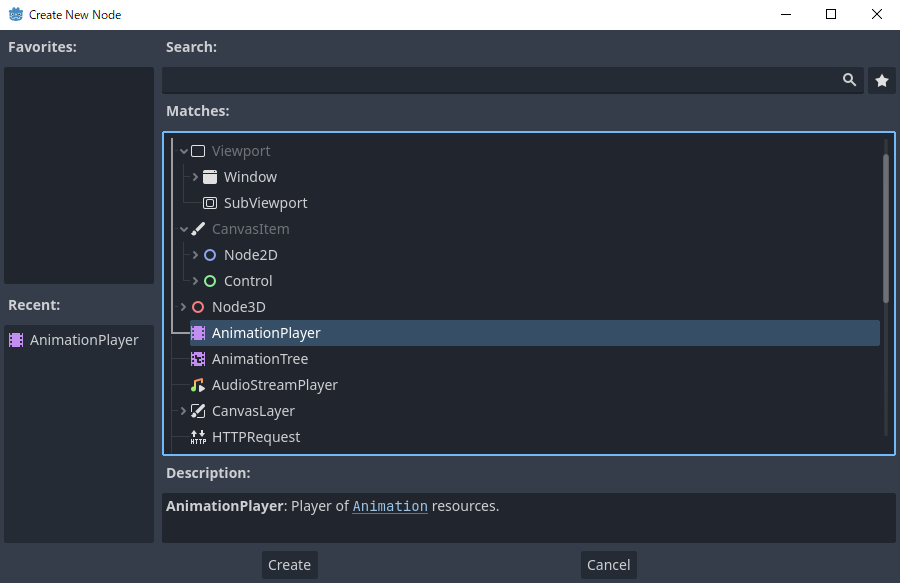
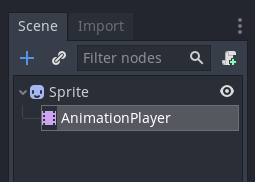
Crear un nodo AnimationPlayer
Para usar las herramientas de animación primero tenemos que crear un nodo AnimationPlayer.
The AnimationPlayer node type is the data container for your animations. One AnimationPlayer node can hold multiple animations, which can automatically transition to one another.
El nodo AnimationPlayer
After you create an AnimationPlayer node, click on it to open the Animation Panel at the bottom of the viewport.

La posición del panel de animación
The animation panel consists of four parts:
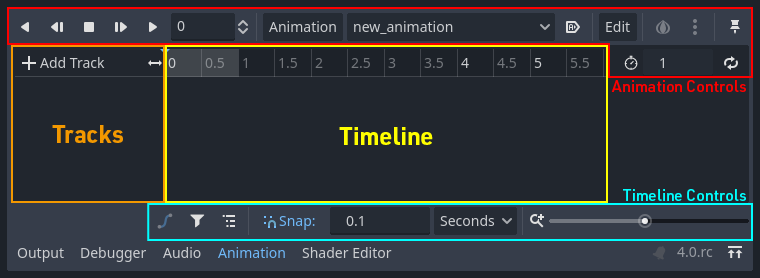
El panel de animación
Controles de animación (es decir, añadir, cargar, guardar y eliminar animaciones)
El listado de pistas
La línea de tiempo con fotogramas clave
The timeline and track controls, where you can zoom the timeline and edit tracks, for example.
La animación por computadora se basa en fotogramas clave
A keyframe defines the value of a property at a point in time.
Diamond shapes represent keyframes in the timeline. A line between two keyframes indicates that the value doesn't change between them.
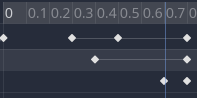
Fotogramas clave en Godot
You set values of a node's properties and create animation keyframes for them. When the animation runs, the engine will interpolate the values between the keyframes, resulting in them gradually changing over time.
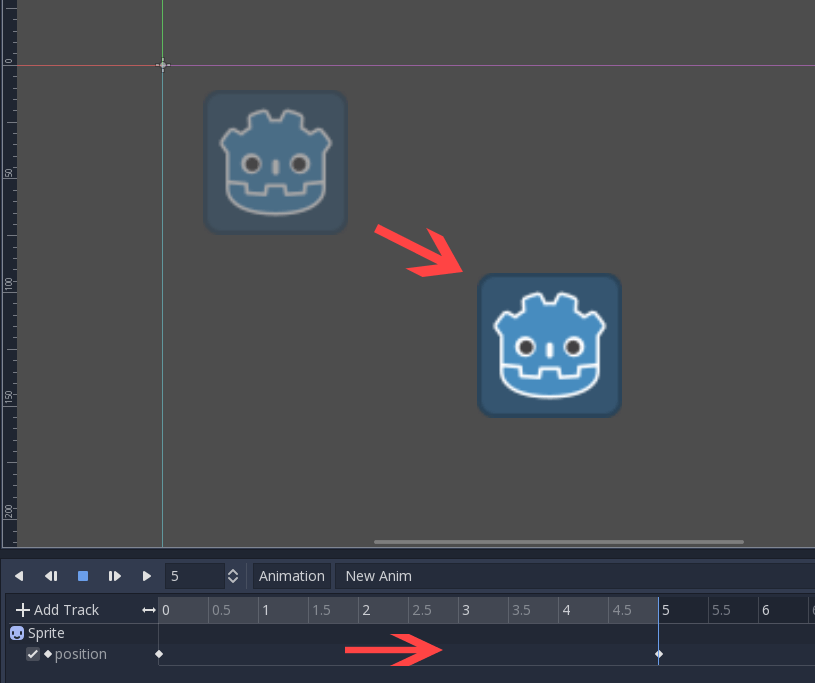
Dos fotogramas clave son todo lo que se necesita para obtener un movimiento suave
The timeline defines how long the animation will take. You can insert keyframes at various points, and change their timing.

La línea de tiempo en el panel de animación
Each line in the Animation Panel is an animation track that references a
Normal or Transform property of a node. Each track stores a path to
a node and its affected property. For example, the position track
in the illustration refers to the position property of the Sprite2D
node.

Ejemplo de pistas de animación normales
Truco
If you animate the wrong property, you can edit a track's path at any time
by double-clicking on it and typing the new path. Play the animation using the
"Play from beginning" button  (or pressing
Shift + D on keyboard) to see the changes instantly.
(or pressing
Shift + D on keyboard) to see the changes instantly.
Tutorial: Crear una animación simple
Configuración de la escena
Para este tutorial, crearemos un nodo Sprite con un AnimationPlayer como su hijo. Animaremos el sprite para que se mueva entre dos puntos en la pantalla.
Nuestra configuración de la escena
Advertencia
AnimationPlayer inherits from Node instead of Node2D or Node3D, which means that the child nodes will not inherit the transform from the parent nodes due to a bare Node being present in the hierarchy.
Por lo tanto, no se recomienda agregar nodos que tengan una transformación 2D/3D como hijos de un nodo AnimationPlayer.
The sprite holds an image texture. For this tutorial, select the Sprite2D node, click Texture in the Inspector, and then click Load. Select the default Godot icon for the sprite's texture.
Adding an animation
Select the AnimationPlayer node and click the "Animation" button in the
animation editor. From the list, select "New" ( ) to add a new
animation. Enter a name for the animation in the dialog box.
) to add a new
animation. Enter a name for the animation in the dialog box.
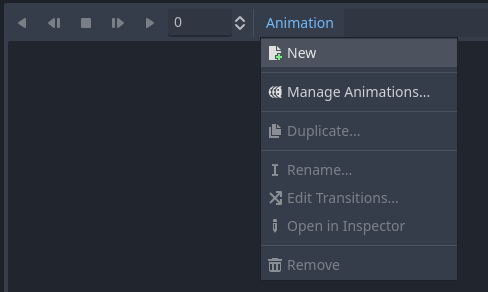
Añadir una nueva animación
Manage an animation libraries
For reusability, the animation is registered in a list in the animation library resource. If you add an animation to AnimationPlayer without specifying any particular settings, the animation will be registered in the [Global] animation library that AnimationPlayer has by default.
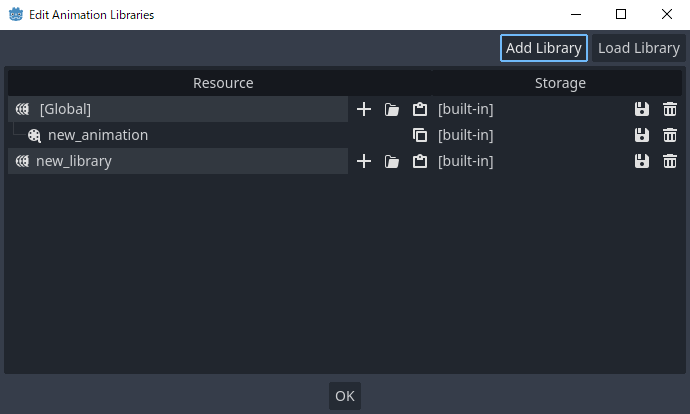
Manage animations
If there are multiple animation libraries and you try to add an animation, a dialog box will appear with options.
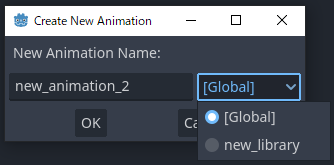
Add a new animation with library option
Añadir una pista
To add a new track for our sprite, select it and take a look at the toolbar:

Botones de conveniencia
These switches and buttons allow you to add keyframes for the selected node's location, rotation, and scale. Since we are only animating the sprite's position, make sure that only the location switch is selected. The selected switches are blue.
Click on the key button to create the first keyframe. Since we don't have a track set up for the Position property yet, Godot will offer to create it for us. Click Create.
Godot will create a new track and insert our first keyframe at the beginning of the timeline:

La pista de sprite
El segundo fotograma clave
We need to set our sprite's end location and how long it will take for it to get there.
Let's say we want it to take two seconds to move between the points. By default, the animation is set to last only one second, so change the animation length to 2 in the controls on the right side of the animation panel's timeline header.

Duración de la animación
Now, move the sprite right, to its final position. You can use the Move tool in the toolbar or set the Position's X value in the Inspector.
Click on the timeline header near the two-second mark in the animation panel and then click the key button in the toolbar to create the second keyframe.
Reproducir la animación
Haz clic en el botón " Reproducir desde el principio" ().
¡Genial! Nuestra animación funciona:
La animación
De un lado a otro
Godot has an interesting feature that we can use in animations. When Animation Looping is set but there's no keyframe specified at the end of the animation, the first keyframe is also the last.
This means we can extend the animation length to four seconds now, and Godot will also calculate the frames from the last keyframe to the first, moving our sprite back and forth.

Bucle de animación
You can change this behavior by changing the track's loop mode. This is covered in the next chapter.
Ajustes de pista
Each track has a settings panel at the end, where you can set its update mode, track interpolation, and loop mode.

Ajustes de pista
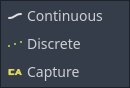
El modo de actualización de una pista le indica a Godot cuándo actualizar los valores de la propiedad. Este puede ser:
Continuous: Actualiza la propiedad en cada frame
Discrete: Sólo se actualiza la propiedad en fotogramas clave
Capture: if the first keyframe's time is greater than
0.0, the current value of the property will be remembered and will be blended with the first animation key. For example, you could use the Capture mode to move a node that's located anywhere to a specific location.
Modo de pista
You will usually use "Continuous" mode. The other types are used to script complex animations.
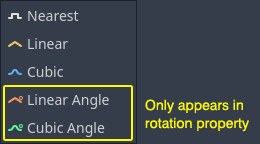
Track interpolation tells Godot how to calculate the frame values between keyframes. These interpolation modes are supported:
Nearest: Se establece el valor de fotograma clave más cercano
Lineal: Se establece el valor basado en un cálculo de función lineal entre los dos fotogramas clave
Cúbica: Se establece el valor basado en el cálculo de una función cúbica entre los dos fotogramas clave
Linear Angle (Only appears in rotation property): Linear mode with shortest path rotation
Cubic Angle (Only appears in rotation property): Cubic mode with shortest path rotation
Interpolación de pista
With Cubic interpolation, animation is slower at keyframes and faster between them, which leads to more natural movement. Cubic interpolation is commonly used for character animation. Linear interpolation animates changes at a fixed pace, resulting in a more robotic effect.
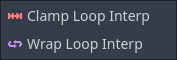
Godot supports two loop modes, which affect the animation when it's set to loop:
Modos de bucle
Clamp loop interpolation: Cuando se selecciona esta opción, la animación se detiene después del último fotograma clave de esta pista. Cuando se alcanza de nuevo el primer fotograma clave, la animación se restablece a sus valores.
Wrap loop interpolation: Cuando se selecciona esta opción, Godot calcula la animación después del último fotograma clave para alcanzar de nuevo los valores del primer fotograma clave.
Los fotogramas clave para otras propiedades
Godot's animation system isn't restricted to position, rotation, and scale. You can animate any property.
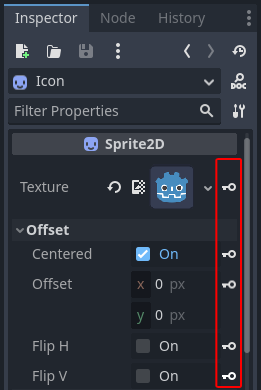
If you select your sprite while the animation panel is visible, Godot will display a small keyframe button in the Inspector for each of the sprite's properties. Click on one of these buttons to add a track and keyframe to the current animation.
Los fotogramas clave para otras propiedades
Editar fotogramas clave
You can click on a keyframe in the animation timeline to display and edit its value in the Inspector.
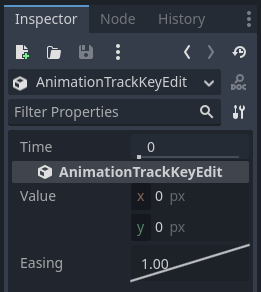
Editor de fotogramas clave editando una clave
You can also edit the easing value for a keyframe here by clicking and dragging its easing curve. This tells Godot how to interpolate the animated property when it reaches this keyframe.
Puedes ajustar tus animaciones de este modo hasta que el movimiento se "vea bien"
Usando REINICIO de pista
Puedes configurar una animación especial de RESET para contener la "pose predeterminada" (default pose). Esto se utiliza para asegurarse de que la pose predeterminada se restablezca cuando guardas la escena y la vuelves a abrir en el editor.
Para las pistas existentes, puedes agregar una animación llamada "RESET" (distingue entre mayúsculas y minúsculas) y luego agregar pistas para cada propiedad que deseas restablecer. El único fotograma clave debe estar en el tiempo 0 y debes asignarle el valor predeterminado deseado para cada pista.
Si la propiedad Reset On Save del AnimationPlayer está configurada como true, la escena se guardará con los efectos de la animación de reinicio aplicados (como si se hubiera buscado en el tiempo 0.0). Esto solo afecta al archivo guardado, las pistas de propiedades en el editor permanecerán en su posición original.
If you want to reset the tracks in the editor, select the AnimationPlayer node, open the Animation bottom panel then choose Apply Reset in the animation editor's Edit dropdown menu.
Al agregar pistas en nuevas animaciones, el editor te pedirá que crees automáticamente una pista de RESET al utilizar el ícono de fotograma clave junto a una propiedad en el inspector. Esto no se aplica a las pistas creadas con versiones anteriores a Godot 3.4, ya que la función de pista de reinicio de animación se agregó en la versión 3.4.
Nota
RESET tracks is also used as a reference value for blending. See also For better blending.