Up to date
This page is up to date for Godot 4.2.
If you still find outdated information, please open an issue.
Reproduciendo videos
Godot supports video playback with the VideoStreamPlayer node.
Formatos de reproducción admitidos
El único formato admitido en el núcleo es Ogg Theora (no debe confundirse con el audio Ogg Vorbis). Es posible que las extensiones brinden soporte para formatos adicionales, pero hasta julio de 2022 no existen extensiones de este tipo.
H.264 y H.265 no pueden ser admitidos en el núcleo de Godot, ya que ambos están afectados por patentes de software. AV1 es libre de regalías, pero aún es lento para decodificar en la CPU y el soporte de decodificación de hardware no está ampliamente disponible en todas las GPU que se utilizan actualmente.
WebM was supported in core in Godot 3.x, but support for it was removed in 4.0 as it was too buggy and difficult to maintain.
Nota
Puedes encontrar videos con extensiones .ogg o .ogx, que son extensiones genéricas para datos dentro de un contenedor Ogg.
Renombrar estas extensiones de archivo a .ogv puede permitir la importación de los videos en Godot. Sin embargo, no todos los archivos con extensiones .ogg o .ogx son videos, algunos de ellos pueden contener solo audio.
Setting up VideoStreamPlayer
Create a VideoStreamPlayer node using the Create New Node dialog.
Select the VideoStreamPlayer node in the scene tree dock, go to the inspector and load an
.ogvfile in the Stream property.Si aún no tienes tu video en formato Ogg Theora, ve a Configuraciones recomendadas para la codificación de Theora para obtener la configuración recomendada de codificación de Theora.
If you want the video to play as soon as the scene is loaded, check Autoplay in the inspector. If not, leave Autoplay disabled and call
play()on the VideoStreamPlayer node in a script to start playback when desired.
Manejo de redimensionamiento y relaciones de aspecto diferentes
By default in Godot 4.0, the VideoStreamPlayer will automatically be resized to match the video's resolution. You can make it follow usual Control sizing by enabling Expand on the VideoStreamPlayer node.
To adjust how the VideoStreamPlayer node resizes depending on window size, adjust the anchors using the Layout menu at the top of the 2D editor viewport. However, this setup may not be powerful enough to handle all use cases, such as playing fullscreen videos without distorting the video (but with empty space on the edges instead). For more control, you can use an AspectRatioContainer node, which is designed to handle this kind of use case:
Agrega un nodo AspectRatioContainer. Asegúrate de que no sea un hijo de ningún otro nodo contenedor. Selecciona el nodo AspectRatioContainer y luego establece su opción Layout en la parte superior del editor 2D en Full Rect. Establece el valor de Ratio en el nodo AspectRatioContainer para que coincida con la relación de aspecto de tu video. Puedes utilizar fórmulas matemáticas en el inspector para ayudarte. Recuerda convertir uno de los operandos en un número decimal (float). De lo contrario, el resultado de la división siempre será un número entero.
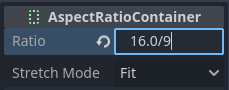
Esto se evaluará como (aproximadamente) 1.777778
Once you've configured the AspectRatioContainer, reparent your VideoStreamPlayer node to be a child of the AspectRatioContainer node. Make sure Expand is enabled on the VideoStreamPlayer. Your video should now scale automatically to fit the whole screen while avoiding distortion.
Ver también
Consulta Múltiples resoluciones para obtener más consejos sobre cómo admitir múltiples relaciones de aspecto en tu proyecto.
Monstrando un video en una superficie 3D
Using a VideoStreamPlayer node as a child of a SubViewport node, it's possible to display any 2D node on a 3D surface. For example, this can be used to display animated billboards when frame-by-frame animation would require too much memory.
Esto se puede hacerse siguiendo los pasos:
Create a SubViewport node. Set its size to match your video's size in pixels.
Create a VideoStreamPlayer node as a child of the SubViewport node and specify a video path in it. Make sure Expand is disabled, and enable Autoplay if needed.
Create a MeshInstance3D node with a PlaneMesh or QuadMesh resource in its Mesh property. Resize the mesh to match the video's aspect ratio (otherwise, it will appear distorted).
Create a new StandardMaterial3D resource in the Material Override property in the GeometryInstance3D section.
Enable Local To Scene in the StandardMaterial3D's Resource section (at the bottom). This is required before you can use a ViewportTexture in its Albedo Texture property.
In the StandardMaterial3D, set the Albedo > Texture property to New ViewportTexture. Edit the new resource by clicking it, then specify the path to the SubViewport node in the Viewport Path property.
Enable Albedo Texture Force sRGB in the StandardMaterial3D to prevent colors from being washed out.
If the billboard is supposed to emit its own light, set Shading Mode to Unshaded to improve rendering performance.
Consulta Usando Viewports y el demo de GUI en 3D para obtener más información sobre cómo configurar esto.
Looping a video
For looping a video, the Loop property can be enabled. This will seamlessly restart the video when it reaches its end.
Note that setting the project setting Video Delay Compensation to a non-zero value might cause your loop to not be seamless, because the synchronization of audio and video takes place at the start of each loop causing occasional missed frames. Set Video Delay Compensation in your project settings to 0 to avoid frame drop issues.
Condiciones de decodificación de video y resoluciones recomendadas
La decodificación de video se realiza en la CPU, ya que las GPU no tienen aceleración de hardware para decodificar videos Theora. Las CPU de escritorio modernas pueden decodificar videos Ogg Theora a 1440p @ 60 FPS o más, pero las CPU móviles de gama baja probablemente tendrán dificultades con videos de alta resolución.
Para asegurarte de que tus videos se decodifiquen sin problemas en diferentes hardware:
Al desarrollar juegos para plataformas de escritorio, se recomienda codificar como máximo en 1080p (preferiblemente a 30 FPS). La mayoría de las personas todavía utilizan pantallas con resolución de 1080p o inferior, por lo que codificar videos de mayor resolución puede no valer la pena debido al aumento del tamaño de archivo y los requisitos de la CPU.
Al desarrollar juegos para plataformas móviles o web, se recomienda codificar como máximo en 720p (preferiblemente a 30 FPS o incluso menos). La diferencia visual entre videos de 720p y 1080p en un dispositivo móvil generalmente no es muy notable.
Limitaciones de reproducción
La actual implementación de la reproducción de vídeo en Godot presenta varias limitaciones:
No se admite buscar (hacer un salto) en un video hasta un punto específico.
Changing playback speed is not supported. VideoStreamPlayer also won't follow Engine.time_scale.
No se admite la transmisión de un video desde una URL.
Configuraciones recomendadas para la codificación de Theora
Un consejo es evitar depender de los exportadores incorporados de Ogg Theora (la mayoría de las veces). Hay dos razones por las que puede ser preferible usar un programa externo para codificar tu video:
Algunos programas como Blender pueden renderizar en Ogg Theora. Sin embargo, los pre-ajustes de calidad por defecto suelen ser muy bajos según los estándares actuales. Es posible que puedas aumentar las opciones de calidad en el software que estás utilizando, pero es posible que encuentres que la calidad de salida sigue siendo menos que ideal (dado el aumento del tamaño del archivo). Esto generalmente significa que el software solo admite la codificación a tasa de bits constante (CBR), en lugar de tasa de bits variable (VBR). En la mayoría de los escenarios, se debe preferir la codificación VBR, ya que ofrece una mejor relación calidad-tamaño de archivo.
Algunos otros programas no pueden renderizar en Ogg Theora en absoluto.
En este caso, puedes renderizar el video en un formato intermedio de alta calidad (como un video H.264 de alta tasa de bits) y luego volver a codificarlo en Ogg Theora. Idealmente, deberías utilizar un formato sin pérdida o sin comprimir como formato intermedio para maximizar la calidad del video Ogg Theora resultante, pero esto puede requerir mucho espacio en el disco.
HandBrake (interfaz gráfica de usuario) y FFmpeg (línea de comandos) son herramientas de código abierto populares para este propósito. HandBrake es más fácil de usar con su interfaz gráfica, mientras que FFmpeg tiene una curva de aprendizaje más pronunciada pero es más potente.
Aquí tienes ejemplos de comandos FFmpeg para convertir un video MP4 a Ogg Theora. Dado que FFmpeg admite muchos formatos de entrada, deberías poder utilizar los comandos a continuación con casi cualquier formato de video de entrada (AVI, MOV, WebM, ...).
Nota
Asegúrate de que tu versión de FFmpeg esté compilada con soporte para libtheora y libvorbis. Puedes verificar esto ejecutando el comando ffmpeg sin argumentos y luego revisando la línea configuration: en la salida del comando.
Balanceando calidad y tamaño de archivo
El nivel de calidad de video (-q:v) debe estar entre 1 y 10. La calidad 6 es un buen compromiso entre calidad y tamaño de archivo. Si estás codificando a una alta resolución (como 1440p o 4K), probablemente querrás disminuir -q:v a 5 para mantener los tamaños de archivo razonables. Dado que la densidad de píxeles es mayor en un video de 1440p o 4K, los pre-ajustes de calidad más bajos en resoluciones más altas se verán igual de bien o mejor en comparación con videos de baja resolución.
The audio quality level (-q:a) must be between -1 and 10. Quality
6 provides a good compromise between quality and file size. In contrast to
video quality, increasing audio quality doesn't increase the output file size
nearly as much. Therefore, if you want the cleanest audio possible, you can
increase this to 9 to get perceptually lossless audio. This is especially
valuable if your input file already uses lossy audio compression. Higher quality
audio does increase the CPU usage of the decoder, so it might lead to audio
dropouts in case of high system load. See
this page
for a table listing Ogg Vorbis audio quality presets and their respective
variable bitrates.
FFmpeg: Convertir preservando la resolución de video original
El siguiente comando convierte el video manteniendo su resolución original. La tasa de bits del video y del audio será variable para maximizar la calidad al mismo tiempo que se ahorra espacio en partes del video/audio que no requieren una alta tasa de bits (como escenas estáticas).
ffmpeg -i input.mp4 -q:v 6 -q:a 6 output.ogv
FFmpeg: Cambiar el tamaño del video y luego convertirlo
El siguiente comando cambia el tamaño de un video para que tenga una altura de 720 píxeles (720p), mientras se conserva su relación de aspecto existente. Esto ayuda a reducir considerablemente el tamaño del archivo si la fuente se grabó a una resolución superior a 720p:
ffmpeg -i input.mp4 -vf "scale=-1:720" -q:v 6 -q:a 6 output.ogv
Chroma Key Videos
Chroma key, commonly known as the "green screen" or "blue screen" effect, allows you to remove a specific color from an image or video and replace it with another background. This effect is widely used in video production to composite different elements together seamlessly.
We will achieve the chroma key effect by writing a custom shader in GDScript and using a VideoStreamPlayer node to display the video content.
Scene Setup
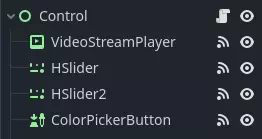
Ensure that the scene contains a VideoStreamPlayer node to play the video and a Control node to hold the UI elements for controlling the chroma key effect.
Writing the Custom Shader
To implement the chroma key effect, follow these steps:
Select the VideoStreamPlayer node in the scene and go to its properties. Under CanvasItem > Material, create a new shader named "ChromaKeyShader.gdshader."
In the "ChromaKeyShader.gdshader" file, write the custom shader code as shown below:
shader_type canvas_item;

# Uniform variables for chroma key effect
uniform vec3 chroma_key_color : source_color = vec3(0.0, 1.0, 0.0);
uniform float pickup_range : hint_range(0.0, 1.0) = 0.1;
uniform float fade_amount : hint_range(0.0, 1.0) = 0.1;

void fragment() {
    # Get the color from the texture at the given UV coordinates
    vec4 color = texture(TEXTURE, UV);

    # Calculate the distance between the current color and the chroma key color
    float distance = length(color.rgb - chroma_key_color);

    # If the distance is within the pickup range, discard the pixel
    # the lesser the distance more likely the colors are
    if (distance <= pickup_range) {
        discard;
    }

    # Calculate the fade factor based on the pickup range and fade amount
    float fade_factor = smoothstep(pickup_range, pickup_range + fade_amount, distance);

    # Set the output color with the original RGB values and the calculated fade factor
    COLOR = vec4(color.rgb, fade_factor);
}
The shader uses the distance calculation to identify pixels close to the chroma key color and discards them, effectively removing the selected color. Pixels that are slightly further away from the chroma key color are faded based on the fade_factor, blending them smoothly with the surrounding colors. This process creates the desired chroma key effect, making it appear as if the background has been replaced with another image or video.
The code above represents a simple demonstration of the Chroma Key shader, and users can customize it according to their specific requirements.
UI Controls
To allow users to manipulate the chroma key effect in real-time, we created sliders in the Control node. The Control node's script contains the following functions:
extends Control

func _on_color_picker_button_color_changed(color):
    # Update the "chroma_key_color" shader parameter of the VideoStreamPlayer's material
    $VideoStreamPlayer.material.set("shader_parameter/chroma_key_color", color)

func _on_h_slider_value_changed(value):
    # Update the "pickup_range" shader parameter of the VideoStreamPlayer's material
    $VideoStreamPlayer.material.set("shader_parameter/pickup_range", value)

func _on_h_slider_2_value_changed(value):
    # Update the "fade_amount" shader parameter of the VideoStreamPlayer's material
    $VideoStreamPlayer.material.set("shader_parameter/fade_amount", value)

func _on_video_stream_player_finished():
    # Restart the video playback when it's finished
    $VideoStreamPlayer.play()
also make sure that the range of the sliders are appropriate, our settings are :

Signal Handling
Connect the appropriate signal from the UI elements to the Control node's script. you created in the Control node's script to control the chroma key effect. These signal handlers will update the shader's uniform variables in response to user input.
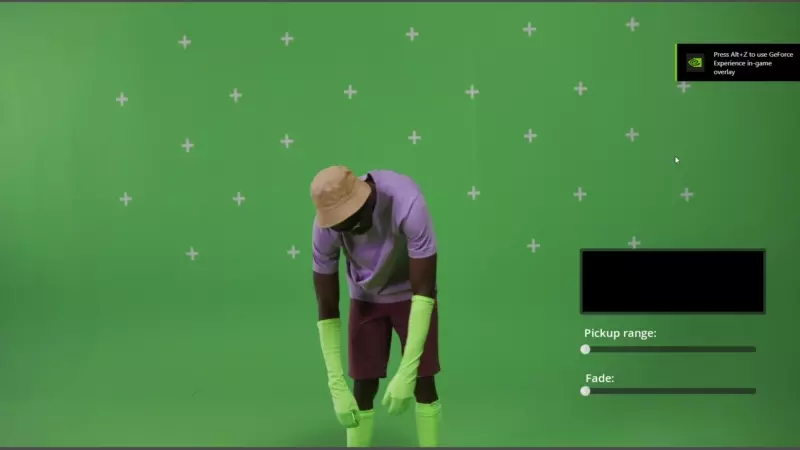
Save and run the scene to see the chroma key effect in action! With the provided UI controls, you can now adjust the chroma key color, pickup range, and fade amount in real-time, achieving the desired chroma key functionality for your video content.