Up to date
This page is up to date for Godot 4.2.
If you still find outdated information, please open an issue.
Tu primer shader 2D
Introducción
Los shaders son programas especiales que se ejecutan en la GPU y se utilizan para renderizar gráficos. Todo el renderizado moderno se realiza mediante shaders. Para obtener una descripción más detallada de qué son los shaders, consulta Qué son los shaders.
Este tutorial se centrará en los aspectos prácticos de la escritura de programas shaders, guiándole a través del proceso de escritura de un shader con funciones tanto de vértice como de fragmento. Este tutorial está dirigido a principiantes absolutos de shaders.
Nota
Si tienes experiencia escribiendo shaders y sólo buscas una visión general de cómo funcionan los shaders en Godot, ver la Shading Reference.
Organización
CanvasItem shaders are used to draw all 2D objects in Godot, while Spatial shaders are used to draw all 3D objects.
In order to use a shader it must be attached inside a Material which must be attached to an object. Materials are a type of Resource. To draw multiple objects with the same material, the material must be attached to each object.
All objects derived from a CanvasItem have a material property. This includes all GUI elements, Sprite2Ds, TileMaps, MeshInstance2Ds etc. They also have an option to inherit their parent's material. This can be useful if you have a large number of nodes that you want to use the same material.
To begin, create a Sprite2D node. You can use any CanvasItem, so long as it is drawing to the canvas, so for this tutorial we will use a Sprite2D, as it is the easiest CanvasItem to start drawing with.
In the Inspector, click beside "Texture" where it says "[empty]" and select "Load", then select "icon.svg". For new projects, this is the Godot icon. You should now see the icon in the viewport.
A continuación, mira en el Inspector, en la sección CanvasItem, haz clic al lado de "Material" y selecciona "New ShaderMaterial". Esto crea un nuevo recurso material. Haz clic en la esfera que aparece. Actualmente, Godot no sabe si está escribiendo un CanvasItem Shader o un Spatial Shader y previsualiza la salida de los shaders espaciales. Así que lo que está viendo es la salida del Spatial Shader por defecto.
Click beside "Shader" and select "New Shader". Finally, click on the shader you just created and the shader editor will open. You are now ready to begin writing your first shader.
Tu primer shader CanvasItem
En Godot, todos los shaders deben especificar el tipo en la primera línea, en el siguiente formato:
shader_type canvas_item;
Porque estamos escribiendo un shader de CanvasItem, especificamos canvas_item en la primera línea. Todo nuestro código irá debajo de esta declaración.
Esta línea le dice al motor cuáles son las variables incorporadas y la funcionalidad que debe suministrarles.
En Godot puedes sobreescribir tres funciones para controlar el funcionamiento del shader: vertex, fragment y light. Este tutorial te guiará a través de la escritura de shader con ambas funciones de vértice y fragmento. Las funciones de la luz son significativamente más complejas que las funciones de vértice y fragmento, por lo que no serán tratadas aquí.
Tu primera función fragment
The fragment function runs for every pixel in a Sprite2D and determines what color that pixel should be.
They are restricted to the pixels covered by the Sprite2D, that means you cannot use one to, for example, create an outline around a Sprite2D.
La función de fragmento más básica no hace nada excepto asignar un solo color a cada píxel.
We do so by writing a vec4 to the built-in variable COLOR. vec4 is
shorthand for constructing a vector with 4 numbers. For more information about
vectors see the Vector math tutorial. COLOR is both
an input variable to the fragment function and the final output from it.
void fragment(){
  COLOR = vec4(0.4, 0.6, 0.9, 1.0);
}

¡Felicidades! Ya has terminado. Has escrito con éxito tu primer shader en Godot.
Ahora hagamos las cosas más complejas.
There are many inputs to the fragment function that you can use for calculating
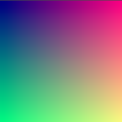
COLOR. UV is one of them. UV coordinates are specified in your Sprite2D
(without you knowing it!) and they tell the shader where to read from textures
for each part of the mesh.
En la función de fragmentos sólo puedes leer desde UV, pero puedes usarla en otras funciones o para asignar valores a COLOR directamente.
"UV" varía entre 0-1 de izquierda a derecha y de arriba a abajo.
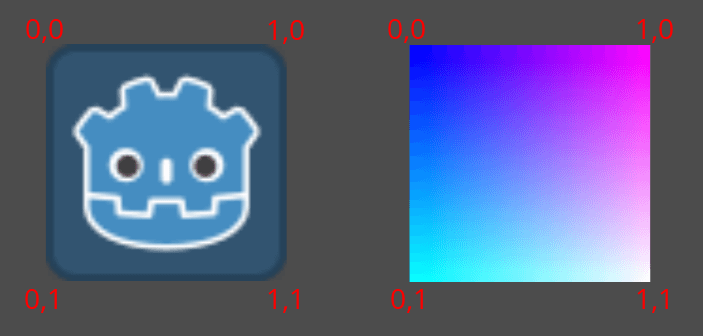
void fragment() {
  COLOR = vec4(UV, 0.5, 1.0);
}
Usando la TEXTURE incorporada
The default fragment function reads from the set Sprite2D texture and displays it.
When you want to adjust a color in a Sprite2D you can adjust the color from the texture manually like in the code below.
void fragment(){
  // This shader will result in a blue-tinted icon
  COLOR.b = 1.0;
}
Certain nodes, like Sprite2Ds, have a dedicated texture variable that can be accessed
in the shader using TEXTURE. If you want to use the Sprite2D texture to combine
with other colors, you can use the UV with the texture function to access
this variable. Use them to redraw the Sprite2D with the texture.
void fragment(){
  COLOR = texture(TEXTURE, UV); // Read from texture again.
  COLOR.b = 1.0; //set blue channel to 1.0
}

Entrada uniform
La entrada uniforme se utiliza para pasar los datos a un shader que será el mismo en todo el shader.
Puedes usar los uniformes definiéndolos en la parte superior de tu shader así:
uniform float size;
Para más información sobre el uso, lee Shading Language doc.
Add a uniform to change the amount of blue in our Sprite2D.
uniform float blue = 1.0; // you can assign a default value to uniforms

void fragment(){
  COLOR = texture(TEXTURE, UV); // Read from texture
  COLOR.b = blue;
}
Now you can change the amount of blue in the Sprite2D from the editor. Look back at the Inspector under where you created your shader. You should see a section called "Shader Param". Unfold that section and you will see the uniform you just declared. If you change the value in the editor, it will overwrite the default value you provided in the shader.
Interactuando con shaders desde código
You can change uniforms from code using the function set_shader_parameter()
which is called on the node's material resource. With a Sprite2D node, the
following code can be used to set the blue uniform.
var blue_value = 1.0
material.set_shader_parameter("blue", blue_value)
Observe que el nombre del uniforme es una string. La string debe coincidir exactamente con la forma en que está escrita en el shader, incluyendo la ortografía y las mayúsculas.
Tu primera función vertex
Ahora que tenemos una función de fragmento, escribamos una función de vértice.
Utiliza la función de vértice para calcular en qué parte de la pantalla debe terminar cada vértice.
La variable más importante en la función de vértice es VERTEX. Inicialmente, especifica las coordenadas de los vértices en tu modelo, pero también le escribes para determinar dónde dibujar esos vértices. VERTEX es un vec2 que se presenta inicialmente en el espacio local (es decir, no en relación con la cámara, el puerto de visualización, o los nodos principales).
Puedes desplazar los vértices añadiendo directamente a VERTEX.
void vertex() {
  VERTEX += vec2(10.0, 0.0);
}
Combined with the TIME built-in variable, this can be used for basic
animation.
void vertex() {
  // Animate Sprite2D moving in big circle around its location
  VERTEX += vec2(cos(TIME)*100.0, sin(TIME)*100.0);
}
Conclusión
En su núcleo, los shaders hacen lo que has visto hasta ahora, calculan el VERTEX y el COLOR. Depende de ti soñar con estrategias matemáticas más complejas para asignar valores a esas variables.
Para inspirarse, eche un vistazo a algunos de los tutoriales de shaders más avanzados, y mira a otros sitios como Shadertoy y The Book of Shaders.