Work in progress
The content of this page was not yet updated for Godot
4.2
and may be outdated. If you know how to improve this page or you can confirm
that it's up to date, feel free to open a pull request.
Tamaño y anclas
Si un juego siempre va a ser ejecutado en el mismo dispositivo y con la misma resolución, los controles de posicionamiento serían una simple cuestión de establecer la posición y el tamaño de cada uno de ellos. Desafortunadamente, ese es raramente el caso.
Sólo los televisores de hoy en día tienen una resolución y relación de aspecto estándar. Todo lo demás, desde los monitores de ordenador hasta las tabletas, las consolas portátiles y los teléfonos móviles tienen diferentes resoluciones y relaciones de aspecto.
Hay varias maneras de manejar esto, pero por ahora, imaginemos que la resolución de la pantalla ha cambiado y los controles deben ser reubicados. Algunos necesitarán seguir la parte inferior de la pantalla, otros la parte superior de la pantalla, o tal vez los márgenes derecho o izquierdo.

This is done by editing the margin properties of controls. Each control has four margins: left, right, bottom, and top, which correspond to the respective edges of the control. By default, all of them represent a distance in pixels relative to the top-left corner of the parent control or (in case there is no parent control) the viewport.
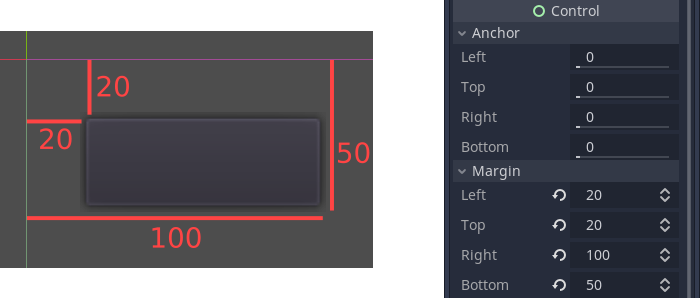
So to make the control wider you can make the right margin larger and/or make the left margin smaller. This lets you set the exact placement and shape of the control.
The anchor properties adjust where the margin distances are relative to. Each margin has an individual anchor that can be adjusted from the beginning to the end of the parent. So the vertical (top, bottom) anchors adjust from 0 (top of parent) to 1.0 (bottom of parent) with 0.5 being the center, and the control margins will be placed relative to that point. The horizontal (left, right) anchors similarly adjust from left to right of the parent.
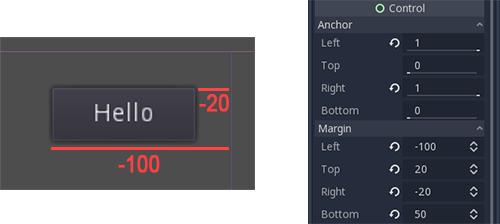
Note that when you wish the edge of a control to be above or left of the anchor point, you must change the margin value to be negative.
For example: when horizontal anchors are changed to 1, the margin values become relative to the top-right corner of the parent control or viewport.
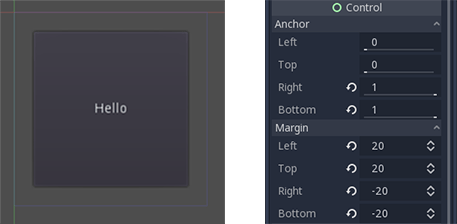
Adjusting the two horizontal or the two vertical anchors to different values will make the control change size when the parent control does. Here, the control is set to anchor its bottom-right corner to the parent's bottom-right, while the top-left control margins are still anchored to the top-left of the parent, so when re-sizing the parent, the control will always cover it, leaving a 20 pixel margin:
Centrando un control
Para centrar un control en su padre, pongan sus anclas a 0.5 y cada margen a la mitad de su dimensión relevante. Por ejemplo, el siguiente código muestra cómo una TextureRect puede ser centrada en su padre:
var rect = TextureRect.new()
rect.texture = load("res://icon.png")
rect.anchor_left = 0.5
rect.anchor_right = 0.5
rect.anchor_top = 0.5
rect.anchor_bottom = 0.5
var texture_size = rect.texture.get_size()
rect.offset_left = -texture_size.x / 2
rect.offset_right = texture_size.x / 2
rect.offset_top = -texture_size.y / 2
rect.offset_bottom = texture_size.y / 2
add_child(rect)
var rect = new TextureRect();

rect.Texture = ResourceLoader.Load<Texture>("res://icon.png");
rect.AnchorLeft = 0.5f;
rect.AnchorRight = 0.5f;
rect.AnchorTop = 0.5f;
rect.AnchorBottom = 0.5f;

var textureSize = rect.Texture.GetSize();

rect.OffsetLeft = -textureSize.X / 2;
rect.OffsetRight = textureSize.X / 2;
rect.OffsetTop = -textureSize.Y / 2;
rect.OffsetBottom = textureSize.Y / 2;
AddChild(rect);
Poniendo cada ancla a 0.5 mueve el punto de referencia de los márgenes al centro de su padre. A partir de ahí, establecemos márgenes negativos para que el control obtenga su tamaño natural.
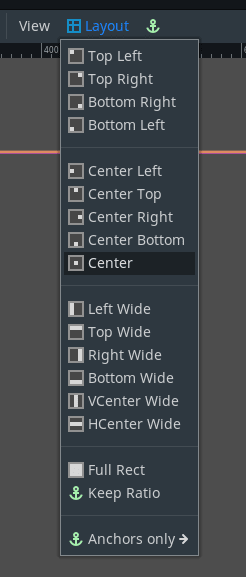
Presets de Diseño
En lugar de ajustar manualmente los valores de margen y anclaje, puedes utilizar el menú de Diseño en la barra de herramientas, ubicada encima del viewport. Además de centrar, este menú te proporciona muchas opciones para alinear y redimensionar nodos de control. Esto te permite trabajar de manera más eficiente al organizar y diseñar interfaces gráficas.