Umgebung und Nachbearbeitung
Godot 3 bietet eine neu gestaltete Umgebungsressource sowie ein neues Nachbearbeitungssystem mit vielen sofort verfügbaren Effekten.
Umgebung
In der Umgebungsressource werden alle Informationen gespeichert, die zum Steuern der Renderumgebung erforderlich sind. Dies umfasst Himmel, Umgebungsbeleuchtung, Tonzuordnung, Effekte und Anpassungen. Von alleine passiert nichts, aber es wird aktiviert, sobald es an einem der folgenden Orte in dieser Reihenfolge verwendet wird:
Kamera-Node
Eine Umgebung kann auf eine Kamera eingestellt werden. Es hat Vorrang vor allen anderen Einstellungen.
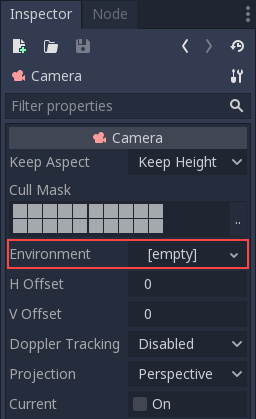
Dies ist vor allem dann nützlich, wenn Sie eine vorhandene Umgebung überschreiben möchten. Im Allgemeinen ist es jedoch besser, die folgende Option zu verwenden.
WorldEnvironment-Node
The WorldEnvironment node can be added to any scene, but only one can exist per active scene tree. Adding more than one will result in a warning.
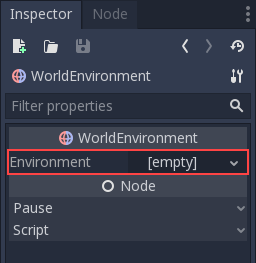
Any Environment added has higher priority than the default Environment (explained below). This means it can be overridden on a per-scene basis, which makes it quite useful.
Standard Umgebung
A default environment can be set, which acts as a fallback when no Environment was set to a Camera or WorldEnvironment. Just head to Project Settings -> Rendering -> Environment:
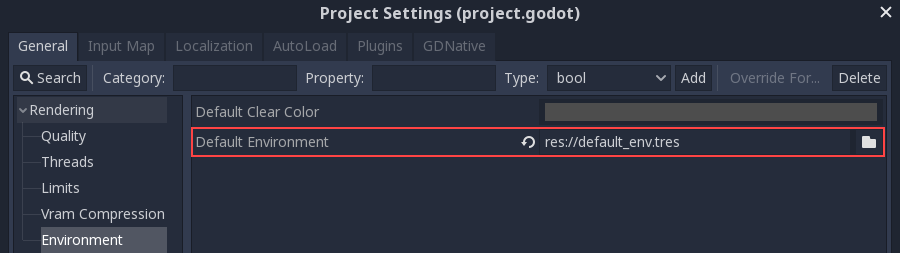
New projects created from the Project Manager come with a default environment
(default_env.tres). If one needs to be created, save it to disk before
referencing it here.
Umgebungs-Einstellungen
Im Folgenden finden Sie eine detaillierte Beschreibung aller Umgebungsoptionen und deren Verwendung.
Hintergrund
The Background section contains settings on how to fill the background (parts of the screen where objects were not drawn). In Godot 3.0, the background not only serves the purpose of displaying an image or color, it can also change how objects are affected by ambient and reflected light.

Es gibt viele Möglichkeiten, den Hintergrund festzulegen:
Clear Color uses the default clear color defined by the project. The background will be a constant color.
Benutzerdefinierte Farbe ist wie Klare Farbe, jedoch mit einem benutzerdefinierten Farbwert.
Sky lets you define a panorama sky (a 360 degree sphere texture) or a procedural sky (a simple sky featuring a gradient and an optional sun). Objects will reflect it and absorb ambient light from it.
Color+Sky lets you define a sky (as above), but uses a constant color value for drawing the background. The sky will only be used for reflection and ambient light.
Umgebungslicht
Ambient (as defined here) is a type of light that affects every piece of geometry with the same intensity. It is global and independent of lights that might be added to the scene.
There are two types of ambient light: the Ambient Color (which is a constant color multiplied by the material albedo) and then one obtained from the Sky (as described before, but a sky needs to be set as background for this to be enabled).
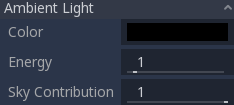
When a Sky is set as background, it's possible to blend between ambient color and sky using the Sky Contribution setting (this value is 1.0 by default for convenience, so only the sky affects objects).
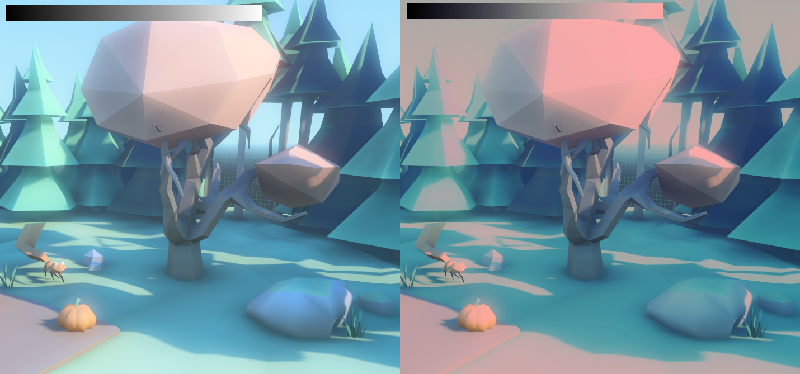
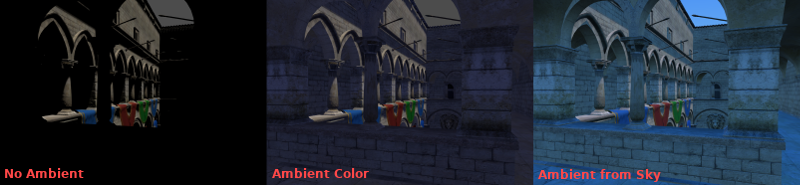
Hier ist ein Vergleich, wie sich unterschiedliches Umgebungslicht auf eine Szene auswirkt:
Finally, there is an Energy setting, which is a multiplier. It's useful when working with HDR.
In general, ambient light should only be used for simple scenes, large exteriors, or for performance reasons (ambient light is cheap), as it does not provide the best lighting quality. It's better to generate ambient light from ReflectionProbe or GIProbe, which will more faithfully simulate how indirect light propagates. Below is a comparison, in terms of quality, between using a flat ambient color and a GIProbe:
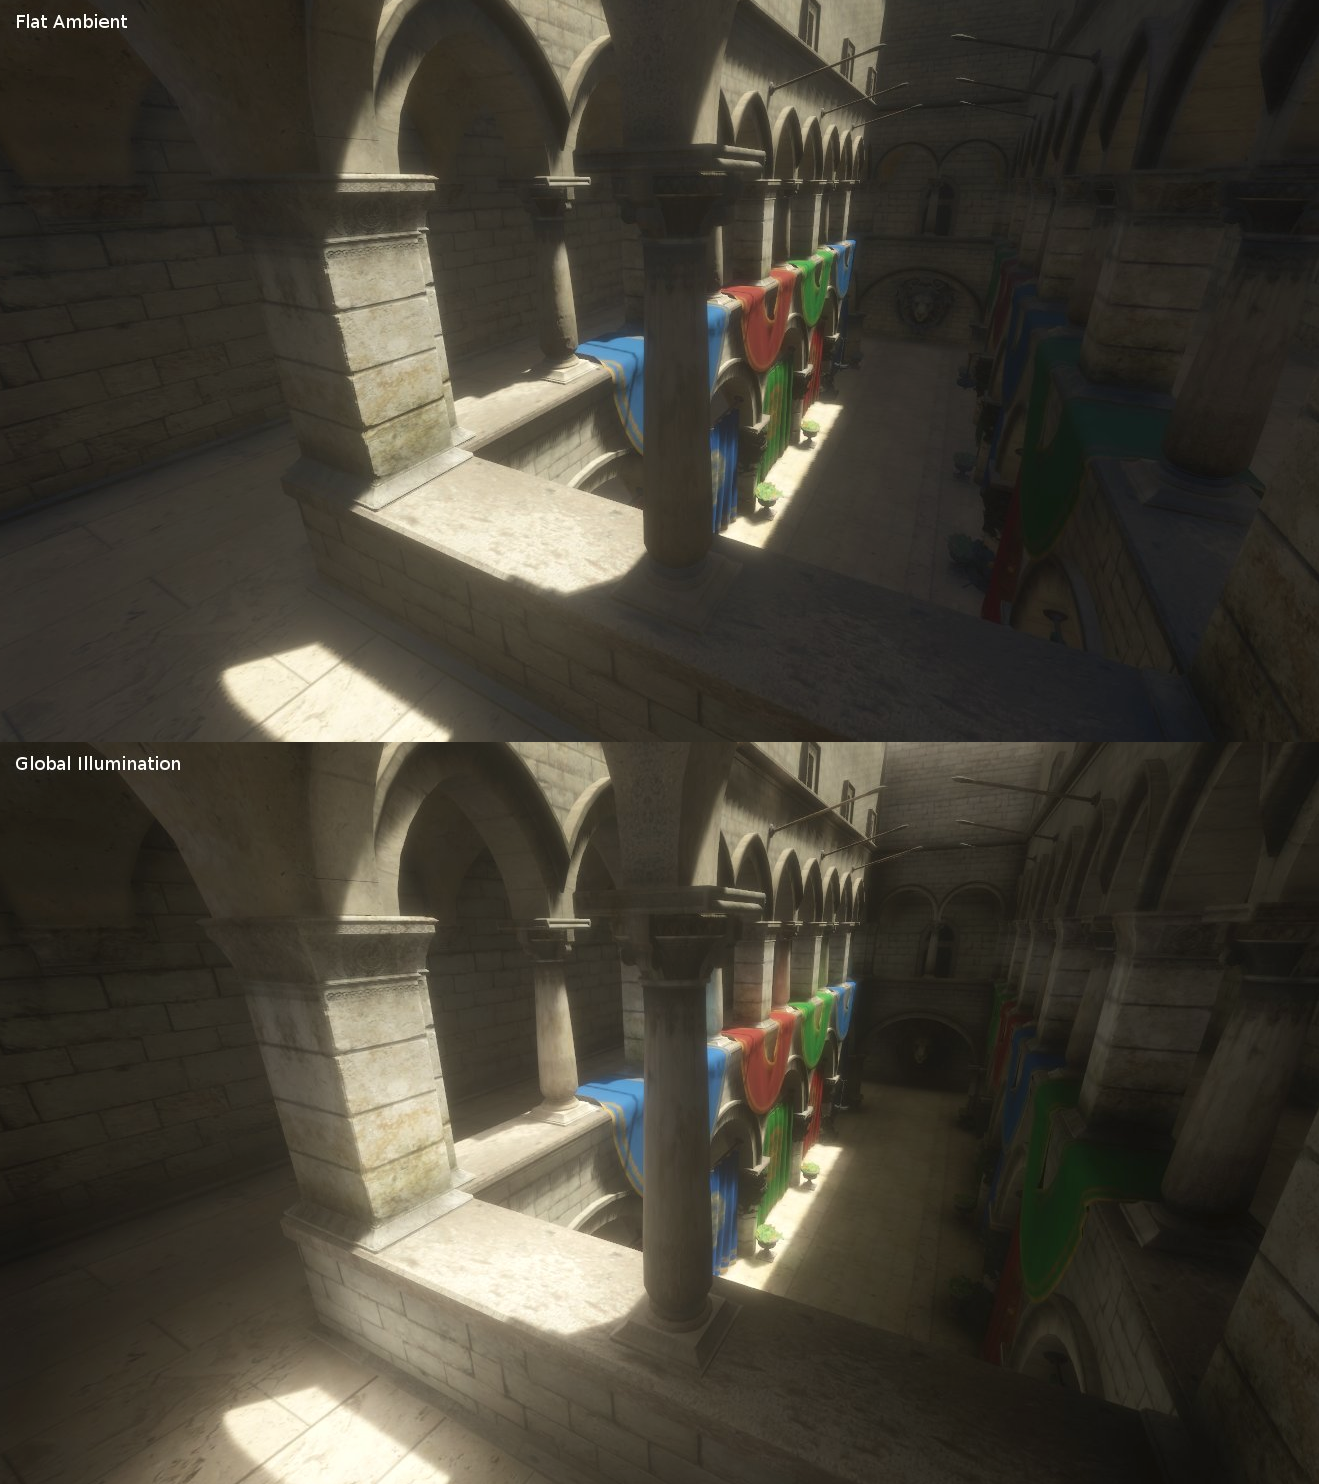
Using one of the methods described above, objects get constant ambient lighting replaced by ambient light from the probes.
Nebel
Fog, as in real life, makes distant objects fade away into an uniform color. The physical effect is actually pretty complex, but Godot provides a good approximation. There are two kinds of fog in Godot:
Tiefennebel: Dieser wird basierend auf der Entfernung von der Kamera angewendet.
Height Fog: This one is applied to any objects below (or above) a certain height, regardless of the distance from the camera.
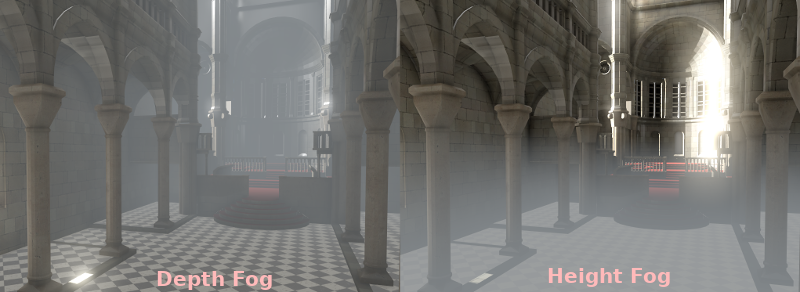
Both of these fog types can have their curve tweaked, making their transition more or less sharp.
Zwei Eigenschaften können verändert werden, um den Nebel-Effekt interessanter zu machen:
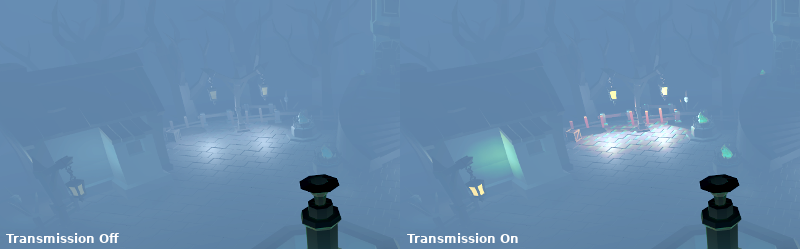
The first is Sun Amount, which makes use of the Sun Color property of the fog. When looking towards a directional light (usually a sun), the color of the fog will be changed, simulating the sunlight passing through the fog.
The second is Transmit Enabled which simulates more realistic light transmittance. In practice, it makes light stand out more across the fog.
Dynamikkompression
Diese Features ist nur bei Verwendung des GLES3-Backends verfügbar.
Selects the tonemapping curve that will be applied to the scene, from a list of standard curves used in the film and game industry. Tonemapping operators other than Linear are used to make light and dark areas more homogeneous, while also avoiding clipping of bright highlights.
The tone mapping options are:
Mode: The tone mapping mode to use.
Linear: The default tonemapping mode. This is the fastest and simplest tonemapping operator, but it causes bright lighting to look blown out, with noticeable clipping in the output colors.
Reinhardt: Performs a variation on rendered pixels' colors by this formula:
color = color / (1 + color). This avoids clipping bright highlights, but the resulting image can look a bit dull.Filmic: This avoids clipping bright highlights, with a resulting image that usually looks more vivid than Reinhardt.
ACES Fitted: Academy Color Encoding System tonemapper. ACES Fitted is slightly more expensive than other options, but it handles bright lighting in a more realistic fashion by desaturating it as it becomes brighter. ACES typically has a more contrasted output compared to Reinhardt and Filmic. ACES is the recommended option when aiming for photorealistic visuals.
ACES: Deprecated (will be removed in Godot 4.0). Behaves like ACES, but doesn't desaturate lighting as it becomes brighter (which is less realistic). It's recommended to use ACES Fitted instead of ACES.
Exposure: Tone mapping exposure which simulates amount of light received over time (default:
1.0). Higher values result in an overall brighter appearance. If the scene appears too dark as a result of a tonemapping operator or whitepoint change, try increasing this value slightly.White: Tone mapping whitepoint, which simulates where in the scale white is located (default:
1.0). For photorealistic lighting, recommended values are between6.0and8.0. Higher values result in less blown out highlights, but make the scene appear slightly darker as a whole.
Automatische Belichtung (HDR)
Diese Features ist nur bei Verwendung des GLES3-Backends verfügbar.
Even though, in most cases, lighting and texturing are heavily artist controlled, Godot supports a simple high dynamic range implementation with the auto exposure mechanism. This is generally used for the sake of realism when combining interior areas with low light and outdoors. Auto exposure simulates the camera (or eye) in an effort to adapt between light and dark locations and their different amounts of light.
The simplest way to use auto exposure is to make sure outdoor lights (or other strong lights) have energy beyond 1.0. This is done by tweaking their Energy multiplier (on the Light itself). To make it consistent, the Sky usually needs to use the energy multiplier too, to match with the directional light. Normally, values between 3.0 and 6.0 are enough to simulate indoor-outdoor conditions.
By combining Auto Exposure with Glow post processing (more on that below), pixels that go over the tonemap White will bleed to the glow buffer, creating the typical bloom effect in photography.

The user-controllable values in the Auto Exposure section come with sensible defaults, but you can still tweak them:
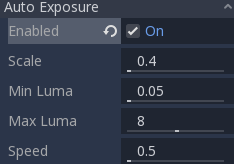
Scale: Value to scale the lighting. Brighter values produce brighter images, smaller ones produce darker ones.
Min Luma: Minimum luminance that auto exposure will aim to adjust for. Luminance is the average of the light in all the pixels of the screen.
Max Luma: Maximale Luminanz (Leuchtdichte), auf die sich die automatische Belichtung einstellen soll.
Speed: Speed at which luminance corrects itself. The higher the value, the faster correction happens.
Mid- und Post-Processing-Effekte
Es wird ein großer Teil der weit verbreiteten Mid- und Post-Processing-Effekte unterstützt.
Bildschirm-Raum-Reflexionen (Screen-Space Reflections=SSR)
Diese Features ist nur bei Verwendung des GLES3-Backends verfügbar.
While Godot supports three sources of reflection data (Sky, ReflectionProbe, and GIProbe), they may not provide enough detail for all situations. Scenarios where Screen Space Reflections make the most sense are when objects are in contact with each other (object over floor, over a table, floating on water, etc).
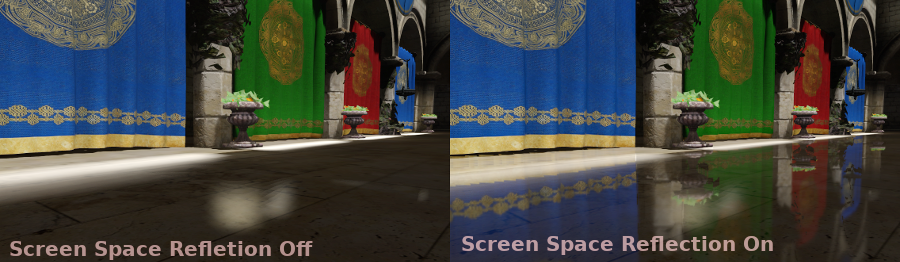
The other advantage (even if only enabled to a minimum), is that it works in real-time (while the other types of reflections are pre-computed). This can be used to make characters, cars, etc. reflect on surrounding surfaces when moving around.
Zur besseren Anpassung der Technik stehen ein paar benutzergesteuerte Parameter zur Verfügung:
Max Steps determines the length of the reflection. The bigger this number, the more costly it is to compute.
Fade In allows adjusting the fade-in curve, which is useful to make the contact area softer.
Ausblenden ermöglicht das Anpassen der Ausblendkurve, sodass die Schrittgrenze sanft ausgeblendet wird.
Depth Tolerance can be used for screen-space-ray hit tolerance to gaps. The bigger the value, the more gaps will be ignored.
Roughness will apply a screen-space blur to approximate roughness in objects with this material characteristic.
Keep in mind that screen-space-reflections only work for reflecting opaque
geometry. Transparent materials won't be reflected, as they don't write to the depth buffer.
This also applies to shaders that use SCREEN_TEXTURE or DEPTH_TEXTURE.
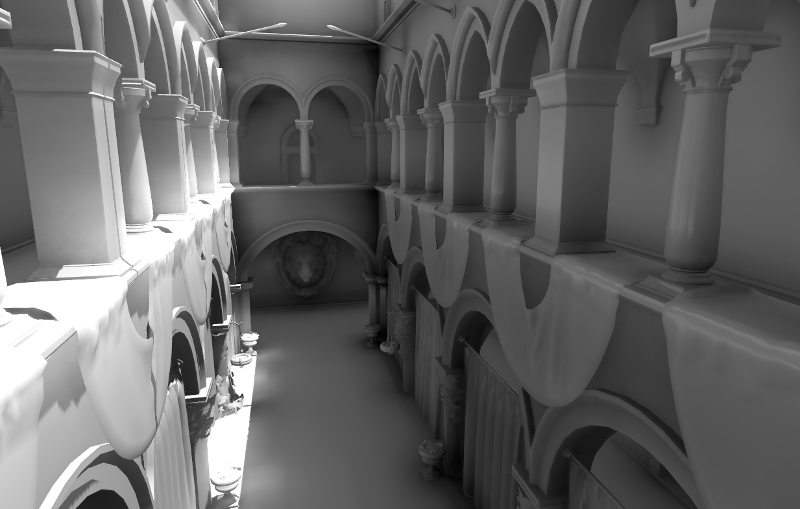
Bildschirm-Raum Berührungsebene (Screen-Space Ambient Occlusion=SSAO)
Diese Features ist nur bei Verwendung des GLES3-Backends verfügbar.
As mentioned in the Ambient section, areas where light from light nodes does not reach (either because it's outside the radius or shadowed) are lit with ambient light. Godot can simulate this using GIProbe, ReflectionProbe, the Sky, or a constant ambient color. The problem, however, is that all the methods proposed previously act more on a larger scale (large regions) than at the smaller geometry level.
Constant ambient color and Sky are the same everywhere, while GI and Reflection probes have more local detail, but not enough to simulate situations where light is not able to fill inside hollow or concave features.
This can be simulated with Screen Space Ambient Occlusion. As you can see in the image below, its purpose is to make sure concave areas are darker, simulating a narrower path for the light to enter:

It is a common mistake to enable this effect, turn on a light, and not be able to appreciate it. This is because SSAO only acts on ambient light, not direct light.
This is why, in the image above, the effect is less noticeable under the direct light (on the left). If you want to force SSAO to work with direct light too, use the Light Affect parameter (even though this is not correct, some artists like how it looks).
SSAO sieht am besten aus, wenn es mit einer echten Quelle indirekten Lichts wie GIProbe kombiniert wird:
Die Optimierung von SSAO ist mit mehreren Parametern möglich:
Radius/Intensity: To control the radius or intensity of the occlusion, these two parameters are available. Radius is in world (Metric) units.
Radius2/Intensity2: A Secondary radius/intensity can be used. Combining a large and a small radius AO generally works well.
Bias: This can be tweaked to solve self occlusion, though the default generally works well enough.
Light Affect: SSAO only affects ambient light, but increasing this slider can make it also affect direct light. Some artists prefer this effect.
Ao Channel Affect: If a value of zero is used, only the material's AO texture will be used for ambient occlusion; SSAO will not be applied. Values greater than 0 multiply the AO texture by the SSAO effect to varying degrees. This does not affect materials without an AO texture.
Quality: Depending on quality, SSAO will take more samples over a sphere for every pixel. High quality only works well on modern GPUs.
Blur: Type of blur kernel used. The 1x1 kernel is a simple blur that preserves local detail better, but is not as efficient (generally works better with the high quality setting above), while 3x3 will soften the image better (with a bit of dithering-like effect), but does not preserve local detail as well.
Edge Sharpness: This can be used to preserve the sharpness of edges (avoids areas without AO on creases).
Tiefenschärfe/Ferne Unschärfe
This effect simulates focal distance on high end cameras. It blurs objects behind a given range. It has an initial Distance with a Transition region (in world units):
The Amount parameter controls the amount of blur. For larger blurs, tweaking the Quality may be needed in order to avoid artifacts.
Tiefenschärfe/Nahe Unschärfe
This effect simulates focal distance on high end cameras. It blurs objects close to the camera (acts in the opposite direction as far blur). It has an initial Distance with a Transition region (in world units):
The Amount parameter controls the amount of blur. For larger blurs, tweaking the Quality may be needed in order to avoid artifacts.
It is common to use both blurs together to focus the viewer's attention on a given object:
Leuchten
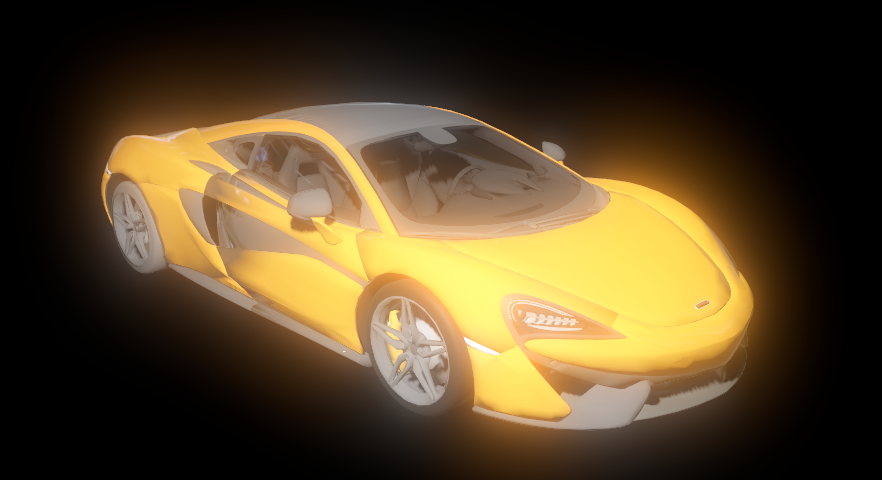
In photography and film, when light amount exceeds the maximum supported by the media (be it analog or digital), it generally bleeds outwards to darker regions of the image. This is simulated in Godot with the Glow effect.
By default, even if the effect is enabled, it will be weak or invisible. One of two conditions need to happen for it to actually show:
The light in a pixel surpasses the HDR Threshold (where 0 is all light surpasses it, and 1.0 is light over the tonemapper White value). Normally, this value is expected to be at 1.0, but it can be lowered to allow more light to bleed. There is also an extra parameter, HDR Scale, that allows scaling (making brighter or darker) the light surpassing the threshold.
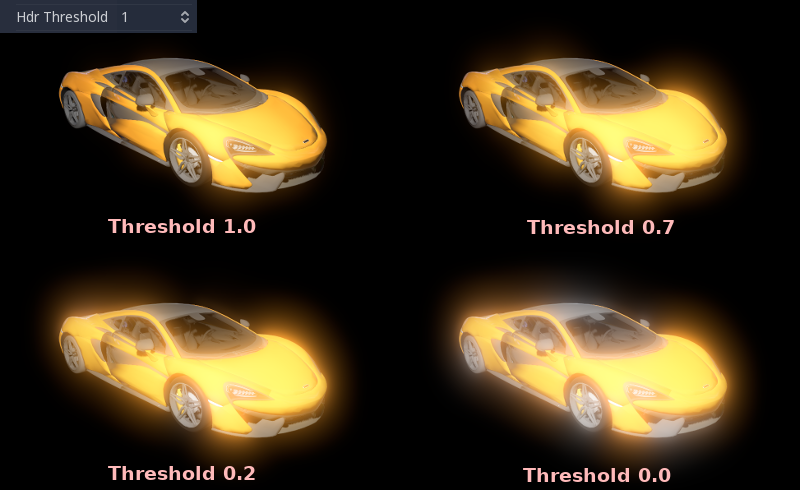
The Bloom effect has a value set greater than 0. As it increases, it sends the whole screen to the glow processor at higher amounts.
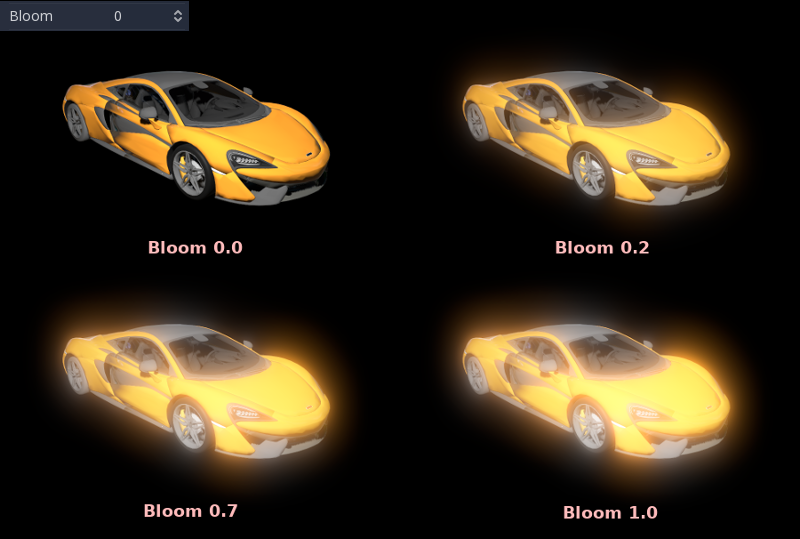
In beiden Fällen beginnt das Licht aus den helleren Bereichen zu leuchten.
Sobald das Leuchten sichtbar ist, kann es mit einigen zusätzlichen Parametern gesteuert werden:
Intensity is an overall scale for the effect, it can be made stronger or weaker (0.0 removes it).
Strength is how strong the gaussian filter kernel is processed. Greater values make the filter saturate and expand outwards. In general, changing this is not needed, as the size can be more efficiently adjusted with the Levels.
Der Mischmodus des Effekts kann ebenfalls geändert werden:
Additive is the strongest one, as it only adds the glow effect over the image with no blending involved. In general, it's too strong to be used, but can look good with low intensity Bloom (produces a dream-like effect).
Screen ensures glow never brightens more than itself and it works great as an all around.
Softlight is the default and weakest one, producing only a subtle color disturbance around the objects. This mode works best on dark scenes.
Replace can be used to blur the whole screen or debug the effect. It only shows the glow effect without the image below.
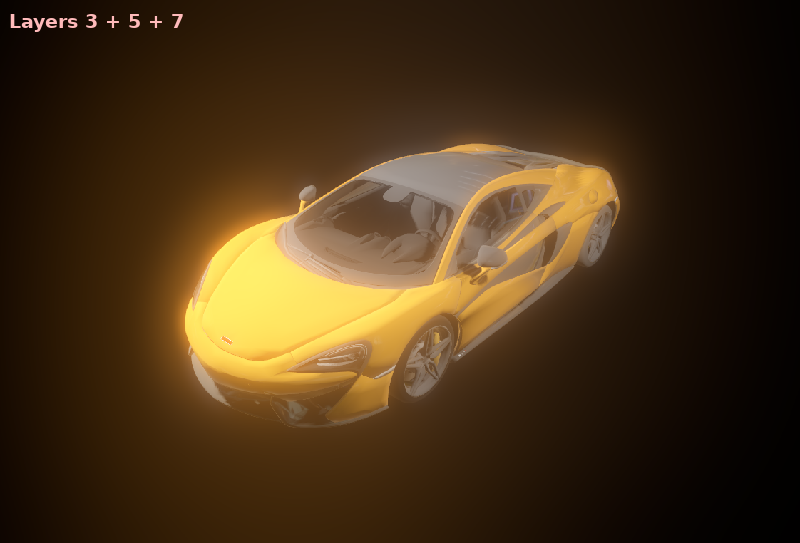
To change the glow effect size and shape, Godot provides Levels. Smaller levels are strong glows that appear around objects, while large levels are hazy glows covering the whole screen:

The real strength of this system, though, is to combine levels to create more interesting glow patterns:
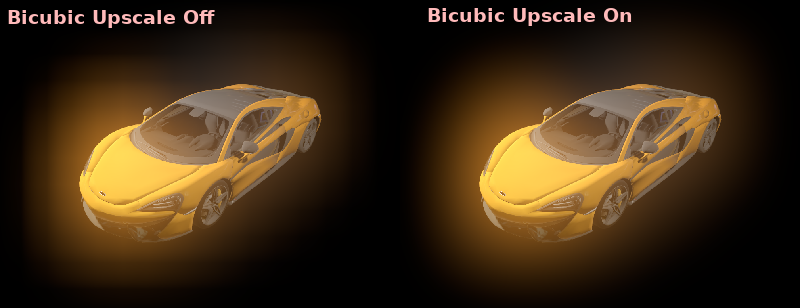
Finally, as the highest layers are created by stretching small blurred images, it is possible that some blockiness may be visible. Enabling Bicubic Upscaling gets rids of it, at a minimal performance cost. Note that this is effective only when using the GLES3 backend.
Anpassungen
Am Ende der Verarbeitung bietet Godot die Möglichkeit, einige Standard-Bildanpassungen vorzunehmen.
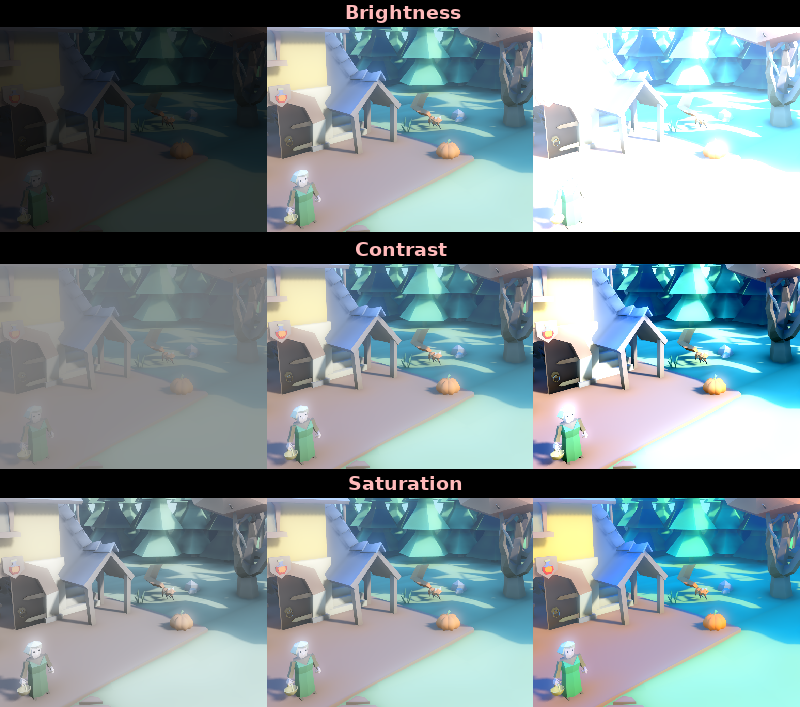
Der erste besteht darin, die typische Helligkeit, den Kontrast und die Sättigung zu ändern:
Die zweite Möglichkeit besteht darin, einen Farbkorrekturgradienten bereitzustellen. Ein normaler Schwarz-Weiß-Farbverlauf wie der folgende erzeugt keinen Effekt:

Wenn Sie jedoch benutzerdefinierte Kanäle erstellen, können Sie jeden Kanal einer anderen Farbe zuordnen: