High-Level Mehrspieler
High-level vs low-level API
Im Folgenden werden die Unterschiede zwischen High- und Low-Level-Netzwerken in Godot sowie einige Grundlagen erläutert. Wenn Sie direkt durchstarten und Ihren ersten Node ein Netzwerk hinzufügen möchten, fahren Sie mit Initializing the network weiter unten fort. Aber lesen Sie den Rest später!
Godot unterstützte immer Standard-Low-Level-Netzwerke über UDP, TCP und einige übergeordnete Protokolle wie SSL und HTTP. Diese Protokolle sind flexibel und können für fast alles verwendet werden. Die manuelle Synchronisierung des Spielstatus kann jedoch eine Menge Arbeit bedeuten. Manchmal kann diese Arbeit nicht vermieden werden oder lohnt sich, beispielsweise wenn Sie mit einer benutzerdefinierten Serverimplementierung im Backend arbeiten. In den meisten Fällen lohnt es sich jedoch, die High-Level-Netzwerk-API von Godot in Betracht zu ziehen, die einen Teil der fein abgestimmten Steuerung von Low-Level-Netzwerken für eine einfachere Benutzbarkeit eintauscht.
Das ist auf die eingebauten Einschränkungen von Low-Level Protokollen zurückzuführen:
TCP stellt sicher, dass Pakete immer zuverlässig und in der richtigen Reihenfolge ankommen, allerdings ist die Latenz durch Fehlerkorrektur in der Regel höher. Es ist auch ein etwas komplexeres Protokoll, da es versteht, was eine "Verbindung" ist, und für Ziele optimiert wird, die häufig nicht für Anwendungen wie Multiplayer-Spiele geeignet sind. Pakete werden gepuffert, um in größeren Stapeln gesendet zu werden, wobei weniger Aufwand pro Paket für eine höhere Latenz getauscht wird. Dies kann für Anwendungen wie HTTP nützlich sein, aber im Allgemeinen nicht für Spiele. Einige davon können konfiguriert und deaktiviert werden (z.B. durch Deaktivieren des "Nagle-Algorithmus" für die TCP-Verbindung).
UDP ist ein einfacheres Protokoll, das nur Pakete sendet (und kein Konzept einer "Verbindung" hat). Keine Fehlerkorrektur macht es ziemlich schnell (geringe Latenz), aber Pakete können auf dem Weg verloren gehen oder in der falschen Reihenfolge empfangen werden. Hinzu kommt, dass die MTU (maximale Paketgröße) für UDP im Allgemeinen niedrig ist (nur einige hundert Bytes). Wenn Sie also größere Pakete übertragen, müssen Sie diese aufteilen, neu organisieren und erneut versuchen, falls etwas fehlschlägt.
Im Allgemeinen kann TCP als zuverlässig, geordnet und langsam und UDP als unzuverlässig, ungeordnet und schnell charakterisiert werden. Wegen dem großen Performance-Unterschied macht es häufig Sinn, die Teile von TCP wiederzuverwenden, die für Spiele gewollt sind (optionale Zuverlässigkeit und Paketordnung) , während die ungewollten Teile (Paketstau/Übertragungs-Kontroll-Features, Nagle-Algorithmus, etc.) weggelassen werden. Aus diesem Grund liefern die meisten Spiele-Engines solche Implementationen direkt mit und Godot ist da keine Ausnahme.
Zusammengefasst kann die Low-Level Netzwerk API für maximale Kontrolle genutzt werden, wobei alles darüber von Grund auf selbst implementiert werden muss, oder man nutzt die High-Level API basierend auf dem Szenenbaum, die den Großteil der Arbeit im Hintergrund leistet und das im Allgemeinen auf optimierte Weise.
Bemerkung
Most of Godot's supported platforms offer all or most of the mentioned high- and low-level networking features. As networking is always largely hardware and operating system dependent, however, some features may change or not be available on some target platforms. Most notably, the HTML5 platform currently offers WebSockets and WebRTC support but lacks some of the higher-level features, as well as raw access to low-level protocols like TCP and UDP.
Bemerkung
Mehr über TCP/IP, UDP und Netzwerke Allgemein finden Sie hier: https://gafferongames.com/post/udp_vs_tcp/
Gaffer On Games hat viele nützliche Artikel über Netzwerke in Spielen (hier), darunter die umfassende Introduction to networking models in games.
Wenn Sie die Low-Level Netzwerkbibliothek Ihrer Wahl anstatt der Godot-eigenen nutzen wollen, finden Sie hier ein Beispiel: https://github.com/PerduGames/gdnet3
Warnung
Das Hinzufügen von Netzwerk-Funktionen zu Ihrem Spiel ist mit einer gewissen Verantwortung verbunden. Es kann Ihre Anwendung angreifbar machen, wenn es falsch gemacht wird, und kann zu Cheats oder Exploits führen. Es kann sogar einem Angreifer ermöglichen, die Computer zu kompromittieren, auf denen Ihre Anwendung ausgeführt wird, und Ihre Server zu verwenden, um Spam zu senden, andere anzugreifen oder die Daten Ihrer Benutzer zu stehlen, wenn diese Ihr Spiel spielen.
Das ist mit Netzwerkanwendungen immer der Fall, ganz unabhängig ob Godot genutzt wird oder nicht. Sie können natürlich experimentieren, aber wenn Sie eine Netzwerkanwendung freigeben, berücksichtigen Sie immer mögliche Sicherheitsbedenken.
Abstraktion auf mittlerer Ebene
Before going into how we would like to synchronize a game across the network, it can be helpful to understand how the base network API for synchronization works.
Godot uses a mid-level object NetworkedMultiplayerPeer. This object is not meant to be created directly, but is designed so that several C++ implementations can provide it.
This object extends from PacketPeer, so it inherits all the useful methods for serializing, sending and receiving data. On top of that, it adds methods to set a peer, transfer mode, etc. It also includes signals that will let you know when peers connect or disconnect.
This class interface can abstract most types of network layers, topologies and libraries. By default, Godot provides an implementation based on ENet (NetworkedMultiplayerEnet), one based on WebRTC (WebRTCMultiplayer), and one based on WebSocket (WebSocketMultiplayerPeer), but this could be used to implement mobile APIs (for ad hoc WiFi, Bluetooth) or custom device/console-specific networking APIs.
For most common cases, using this object directly is discouraged, as Godot provides even higher level networking facilities. Yet it is made available in case a game has specific needs for a lower level API.
Netzwerk initialisieren
The object that controls networking in Godot is the same one that controls everything tree-related: SceneTree.
Um das Netzwerk auf hoher Ebene zu initialisieren, muss dem Szenenbaum ein NetworkedMultiplayerPeer-Objekt bereitgestellt werden.
Um dieses Objekt zu erstellen, muss es zuerst als Server oder Client initialisiert werden.
Initializing as a server, listening on the given port, with a given maximum number of peers:
var peer = NetworkedMultiplayerENet.new()
peer.create_server(SERVER_PORT, MAX_PLAYERS)
get_tree().network_peer = peer
Initialisierung als Client, Verbindung zu einer bestimmten IP und einem bestimmten Port:
var peer = NetworkedMultiplayerENet.new()
peer.create_client(SERVER_IP, SERVER_PORT)
get_tree().network_peer = peer
Den zuvor gesetzten Netzwerk Peer erhalten:
get_tree().get_network_peer()
Prüfen, ob der Baum als Server oder Client initialisiert ist:
get_tree().is_network_server()
Beenden der Netzwerkfunktion:
get_tree().network_peer = null
(Although it may make sense to send a message first to let the other peers know you're going away instead of letting the connection close or timeout, depending on your game.)
Warnung
When exporting to Android, make sure to enable the INTERNET
permission in the Android export preset before exporting the project or
using one-click deploy. Otherwise, network communication of any kind will be
blocked by Android.
Verbindungen verwalten
Some games accept connections at any time, others during the lobby phase. Godot can be requested to no longer accept
connections at any point (see set_refuse_new_network_connections(bool) and related methods on SceneTree). To manage who connects, Godot provides the following signals in SceneTree:
Server und Clients:
network_peer_connected(int id)network_peer_disconnected(int id)
The above signals are called on every peer connected to the server (including on the server) when a new peer connects or disconnects. Clients will connect with a unique ID greater than 1, while network peer ID 1 is always the server. Anything below 1 should be handled as invalid. You can retrieve the ID for the local system via SceneTree.get_network_unique_id(). These IDs will be useful mostly for lobby management and should generally be stored, as they identify connected peers and thus players. You can also use IDs to send messages only to certain peers.
Clients:
connected_to_serverconnection_failedserver_disconnected
Again, all these functions are mainly useful for lobby management or for adding/removing players on the fly. For these tasks, the server clearly has to work as a server and you have to perform tasks manually such as sending a newly connected player information about other already connected players (e.g. their names, stats, etc).
Lobbies can be implemented any way you want, but the most common way is to use a node with the same name across scenes in all peers. Generally, an autoloaded node/singleton is a great fit for this, to always have access to, e.g. "/root/lobby".
RPC
To communicate between peers, the easiest way is to use RPCs (remote procedure calls). This is implemented as a set of functions in Node:
rpc("function_name", <optional_args>)rpc_id(<peer_id>,"function_name", <optional_args>)rpc_unreliable("function_name", <optional_args>)rpc_unreliable_id(<peer_id>, "function_name", <optional_args>)
Das Synchronisieren von Mitgliedsvariablen ist ebenfalls möglich:
rset("variable", value)rset_id(<peer_id>, "variable", value)rset_unreliable("variable", value)rset_unreliable_id(<peer_id>, "variable", value)
Funktionen können auf zwei Arten aufgerufen werden:
Reliable: when the function call arrives, an acknowledgement will be sent back; if the acknowledgement isn't received after a certain amount of time, the function call will be re-transmitted.
Unreliable: the function call is sent only once, without checking to see if it arrived or not, but also without any extra overhead.
In den meisten Fällen ist Zuverlässigkeit erwünscht. Unzuverlässig ist meistens nützlich, wenn Objektpositionen synchronisiert werden (die Synchronisierung muss ständig erfolgen und wenn ein Paket verloren geht ist es nicht so schlimm, da irgendwann ein neues ankommt und es wahrscheinlich veraltet ist, weil sich das Objekt in der Zwischenzeit weiter bewegt hat, selbst wenn es erneut zuverlässig gesendet wurde).
There is also SceneTree.get_rpc_sender_id(), which can be used to check which peer (or peer ID) sent an RPC.
Zurück in die Lobby
Kehren wir noch einmal zum Anfang zurück. Stellen Sie sich vor jeder Spieler, der eine Verbindung zum Server herstellt, wird allen davon erzählen.
# Typical lobby implementation; imagine this being in /root/lobby.

extends Node

# Connect all functions

func _ready():
    get_tree().connect("network_peer_connected", self, "_player_connected")
    get_tree().connect("network_peer_disconnected", self, "_player_disconnected")
    get_tree().connect("connected_to_server", self, "_connected_ok")
    get_tree().connect("connection_failed", self, "_connected_fail")
    get_tree().connect("server_disconnected", self, "_server_disconnected")

# Player info, associate ID to data
var player_info = {}
# Info we send to other players
var my_info = { name = "Johnson Magenta", favorite_color = Color8(255, 0, 255) }

func _player_connected(id):
    # Called on both clients and server when a peer connects. Send my info to it.
    rpc_id(id, "register_player", my_info)

func _player_disconnected(id):
    player_info.erase(id) # Erase player from info.

func _connected_ok():
    pass # Only called on clients, not server. Will go unused; not useful here.

func _server_disconnected():
    pass # Server kicked us; show error and abort.

func _connected_fail():
    pass # Could not even connect to server; abort.

remote func register_player(info):
    # Get the id of the RPC sender.
    var id = get_tree().get_rpc_sender_id()
    # Store the info
    player_info[id] = info

    # Call function to update lobby UI here
You might have already noticed something different, which is the usage of the remote keyword on the register_player function:
remote func register_player(info):
This keyword is one of many that allow a function to be called by a remote procedure call (RPC). There are six of them total:
remoteremotesyncpuppetpuppetsyncmastermastersync
Each of them designate who can call the rpc, and optionally sync if the RPC can be called locally.
Bemerkung
If no rpc keywords are added, Godot will block any attempts to call functions remotely. This makes security work a lot easier (so a client can't call a function to delete a file on another client's system).
The remote keyword can be called by any peer, including the server and all clients.
The puppet keyword means a call can be made from the network master to any network puppet.
The master keyword means a call can be made from any network puppet to the network master.
If sync is included, the call can also be made locally. For example, to allow the network master to change the player's position on all peers:
puppetsync func update_position(new_position):
    position = new_position
Tipp
You can also use SceneTree.get_rpc_sender_id() to have more advanced rules on how an rpc can be called.
These keywords are further explained in Synchronizing the game.
With this, lobby management should be more or less explained. Once you have your game going, you will most likely want to add some extra security to make sure clients don't do anything funny (just validate the info they send from time to time, or before game start). For the sake of simplicity and because each game will share different information, this is not shown here.
Das Spiel starten
Sobald sich genügend Spieler in der Lobby versammelt haben, sollte der Server das Spiel wahrscheinlich starten. Dies ist an sich nichts Besonderes, aber wir werden ein paar nette Tricks erklären, die an dieser Stelle ausgeführt werden können, um Ihr Leben viel einfacher zu machen.
Spielerszene
In den meisten Spielen hat wahrscheinlich jeder Spieler seine eigene Szene. Denken Sie daran, dass dies ein Multiplayer-Spiel ist. In jedem Peer müssen Sie also eine Szene für jeden damit verbundenen Spieler instanziieren. Für ein 4-Spieler-Spiel muss jeder Peer 4-Spieler-Nodes instanziieren.
Wie benennt man solche Nodes? In Godot müssen Nodes einen eindeutigen Namen haben. Es muss für einen Spieler auch relativ einfach zu erkennen sein, welcher Node welche Spieler-ID repräsentiert.
Die Lösung besteht darin, einfach die Wurzel-Nodes der instanziierten Playerszenen als Netzwerk-ID zu benennen. Auf diese Weise sind sie bei jedem Peer gleich und RPC funktioniert hervorragend! Hier ist ein Beispiel:
remote func pre_configure_game():
    var selfPeerID = get_tree().get_network_unique_id()

    # Load world
    var world = load(which_level).instance()
    get_node("/root").add_child(world)

    # Load my player
    var my_player = preload("res://player.tscn").instance()
    my_player.set_name(str(selfPeerID))
    my_player.set_network_master(selfPeerID) # Will be explained later
    get_node("/root/world/players").add_child(my_player)

    # Load other players
    for p in player_info:
        var player = preload("res://player.tscn").instance()
        player.set_name(str(p))
        player.set_network_master(p) # Will be explained later
        get_node("/root/world/players").add_child(player)

    # Tell server (remember, server is always ID=1) that this peer is done pre-configuring.
    # The server can call get_tree().get_rpc_sender_id() to find out who said they were done.
    rpc_id(1, "done_preconfiguring")
Bemerkung
Depending on when you execute pre_configure_game(), you may need to change any calls to add_child()
to be deferred via call_deferred(), as the SceneTree is locked while the scene is being created (e.g. when _ready() is being called).
Spielstart synchronisieren
Spieler einzurichten kann aufgrund von Verzögerungen, unterschiedlicher Hardware oder aus anderen Gründen für jeden Peer unterschiedlich lange dauern. Um sicherzustellen, dass das Spiel tatsächlich startet wenn alle bereit sind, kann es nützlich sein das Spiel anzuhalten, bis alle Spieler bereit sind:
remote func pre_configure_game():
    get_tree().set_pause(true) # Pre-pause
    # The rest is the same as in the code in the previous section (look above)
Wenn der Server von allen Peers das OK erhält, kann er sie anweisen zu starten, wie zum Beispiel:
var players_done = []
remote func done_preconfiguring():
    var who = get_tree().get_rpc_sender_id()
    # Here are some checks you can do, for example
    assert(get_tree().is_network_server())
    assert(who in player_info) # Exists
    assert(not who in players_done) # Was not added yet

    players_done.append(who)

    if players_done.size() == player_info.size():
        rpc("post_configure_game")

remote func post_configure_game():
    # Only the server is allowed to tell a client to unpause
    if 1 == get_tree().get_rpc_sender_id():
        get_tree().set_pause(false)
        # Game starts now!
Das Spiel synchronisieren
In most games, the goal of multiplayer networking is that the game runs synchronized on all the peers playing it. Besides supplying an RPC and remote member variable set implementation, Godot adds the concept of network masters.
Netzwerk-Master
The network master of a node is the peer that has the ultimate authority over it.
When not explicitly set, the network master is inherited from the parent node, which if not changed, is always going to be the server (ID 1). Thus the server has authority over all nodes by default.
The network master can be set
with the function Node.set_network_master(id, recursive) (recursive is true by default and means the network master is recursively set on all child nodes of the node as well).
Checking that a specific node instance on a peer is the network master for this node for all connected peers is done by calling Node.is_network_master(). This will return true when executed on the server and false on all client peers.
If you have paid attention to the previous example, it's possible you noticed that each peer was set to have network master authority for their own player (Node) instead of the server:
[...]
# Load my player
var my_player = preload("res://player.tscn").instance()
my_player.set_name(str(selfPeerID))
my_player.set_network_master(selfPeerID) # The player belongs to this peer; it has the authority.
get_node("/root/world/players").add_child(my_player)

# Load other players
for p in player_info:
    var player = preload("res://player.tscn").instance()
    player.set_name(str(p))
    player.set_network_master(p) # Each other connected peer has authority over their own player.
    get_node("/root/world/players").add_child(player)
[...]
Each time this piece of code is executed on each peer, the peer makes itself master on the node it controls, and all other nodes remain as puppets with the server being their network master.
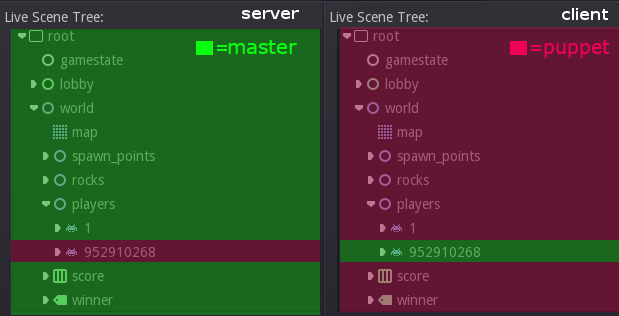
Zur Verdeutlichung hier ein Beispiel, wie dies in der Bomberdemo aussieht:
Master- und Marionettenschlüsselwörter
The real advantage of this model is when used with the master/puppet keywords in GDScript (or their equivalent in C# and Visual Script).
Similarly to the remote keyword, functions can also be tagged with them:
Beispiel für einen Bombencode:
for p in bodies_in_area:
    if p.has_method("exploded"):
        p.rpc("exploded", bomb_owner)
Beispiel für einen Spielercode:
puppet func stun():
    stunned = true

master func exploded(by_who):
    if stunned:
        return # Already stunned

    rpc("stun")

    # Stun this player instance for myself as well; could instead have used
    # the remotesync keyword above (in place of puppet) to achieve this.
    stun()
In the above example, a bomb explodes somewhere (likely managed by whoever is the master of this bomb-node, e.g. the host).
The bomb knows the bodies (player nodes) in the area, so it checks that they contain an exploded method before calling it.
Recall that each peer has a complete set of instances of player nodes, one instance for each peer (including itself and the host). Each peer has set itself as the master of the instance corresponding to itself, and it has set a different peer as the master for each of the other instances.
Now, going back to the call to the exploded method, the bomb on the host has called it remotely on all bodies in the area
that have the method. However, this method is in a player node and has a master keyword.
The master keyword on the exploded method in the player node means two things for how this call is made.
Firstly, from the perspective of the calling peer (the host), the calling peer will only attempt to remotely call the
method on the peer that it has set as the network master of the player node in question.
Secondly, from the perspective of the peer the host is sending the call to, the peer will only accept the call if it
set itself as the network master of the player node with the method being called (which has the master keyword).
This works well as long as all peers agree on who is the master of what.
Das obige Setup bedeutet, dass nur der Peer, dem der betroffene Körper gehört, dafür verantwortlich ist, allen anderen Peers mitzuteilen, dass sein Körper betäubt wurde, nachdem er von der Bombe des Hosts aus der Ferne dazu angewiesen wurde. Der besitzende Peer (immer noch in der exploded Methode) teilt allen anderen Peers mit, dass sein Spieler-Node betäubt wurde. Der Peer ruft dazu die stun Methode auf allen Instanzen dieses Spieler-Nodes (auf den anderen Peers) aus der Ferne auf. Da die stun Methode das Schlüsselwort puppet hat, wird es nur von Peers aufgerufen, die sich nicht als Netzwerkmaster des Nodes festgelegt haben (mit anderen Worten, diese Peers werden aufgrund dieses Nodes als Puppets für diesen Node festgelegt, nicht der Netzwerk-Master davon zu sein).
The result of this call to stun is to make the player look stunned on the screen of all the peers, including the current
network master peer (due to the local call to stun after rpc("stun")).
Der Meister der Bombe (der Wirt) wiederholt die obigen Schritte für jeden der Körper in dem Gebiet, so dass alle Instanzen eines Spielers im Bombengebiet auf den Bildschirmen aller Peers betäubt werden.
Note that you could also send the stun() message only to a specific player by using rpc_id(<id>, "exploded", bomb_owner).
This may not make much sense for an area-of-effect case like the bomb, but might in other cases, like single target damage.
rpc_id(TARGET_PEER_ID, "stun") # Only stun the target peer
Exportieren für dedizierte Server
Sobald Sie ein Multiplayer-Spiel erstellt haben, möchten Sie es möglicherweise exportieren, um es auf einem dedizierten Server ohne verfügbare GPU auszuführen. Weitere Informationen finden Sie unter Exportieren für dedizierte Server.
Bemerkung
Die Codebeispiele auf dieser Seite können nicht auf einem dedizierten Server ausgeführt werden. Sie müssen sie ändern, damit der Server nicht als Spieler betrachtet wird. Sie müssen auch den Spielstartmechanismus ändern, damit der erste Spieler, der beitritt, das Spiel starten kann.
Bemerkung
The bomberman example here is largely for illustrational purposes, and does not
do anything on the host-side to handle the case where a peer uses a custom client
to cheat by for example refusing to stun itself. In the current implementation
such cheating is perfectly possible because each client is the network master of
its own player, and the network master of a player is the one which decides whether
to call the I-was-stunned method (stun) on all of the other peers and itself.