Erweiterungen (Plugins) erstellen
Was sind Erweiterungen
Eine Erweiterung ist eine Möglichkeit dem Editor weitere nützliche Werkzeuge hinzuzufügen. Dies kann nur durch GDScript und Standard Szenen erfolgen, ohne überhaupt den Editor neu starten zu müssen. Im Gegensatz zu Modulen muss kein C++ Programm geschrieben, oder der Editor neu compiliert werden. Dies macht Plugins zwar weniger Leistungsfähig, man kann aber noch immer viel damit anfangen. Solch eine Erweiterung ist ähnlich wie eine Szene die man erzeugen kann, mit der Ausnahme, daß es mittels eines Scripts den Editfunktionalität erweitert.
Um zu zeigen wie diese Erweiterungen aufgebaut sind und funktionieren werden in dieser Anleitung zwei einfache Plugins erstellt. Das erste ist ein benutzerdefiniertes Node, das jeder Szene im Projekt hinzugefügt werden kann und das andere wird ein benutzerdefiniertes Dock, das dem Editor hinzugefügt wird.
Eine Erweiterung erstellen
Bevor es losgeht, erstellen Sie ein neues leeres Projekt wo Sie möchten. Dies wird der Grundstein zum entwickeln und testen des Plugins.
Damit der Editor das neue Plugin erkennt, müssen zwei Dateien erstellt werden: ein plugin.cfg zur Konfiguration und ein Skript mit der Funktionalität. Plugins haben einen Standard Pfad wie addons/plugin_name innerhalb des Projekt Verzeichnisses. Godot stellt einen Dialog zur Verfügung um diese Dateien zu erzeugen und sie an der richtigen Stelle zu speichern.
Im Hauptmenü gehen Sie zu Projekt -> Projekt Einstellungen und dort auf die Registerkarte Erweiterungen, dann drücken Sie Erstellen oben rechts.
Der Dialog wird erscheinen:
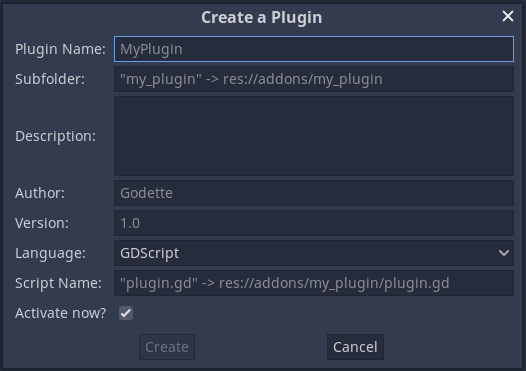
Die Platzhalter in jedem Textfeld beschreiben wie die Erstellung der Dateien und der Konfiguration-Werte des Plugins beeinflusst werden.
To continue with the example, use the following values:
Plugin Name: My Custom Node
Subfolder: my_custom_node
Description: A custom node made to extend the Godot Engine.
Author: Your Name Here
Version: 1.0.0
Language: GDScript
Script Name: custom_node.gd
Activate now: No
Plugin Name: My Custom Node
Subfolder: my_custom_node
Description: A custom node made to extend the Godot Engine.
Author: Your Name Here
Version: 1.0.0
Language: C#
Script Name: CustomNode.cs
Activate now: No
Warnung
Unchecking the Activate now? option in C# is always required because,
like every other C# script, the EditorPlugin script needs to be compiled which
requires building the project. After building the project the plugin can be
enabled in the Plugins tab of Project Settings.
Die Verzeichnisstruktur sollte am Ende so aussehen:
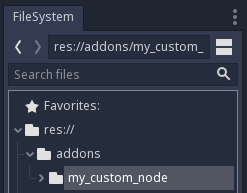
plugin.cfg ist eine einfache INI-Datei mit Metadaten zu Ihrem Plugin. Der Name und die Beschreibung helfen die Funktionsweise zu verstehen. Ihr Name zeigt allen wem wir die Bemühungen zu verdanken haben. Die Versionsnummer hilft anderen zu erkennen, ob sie eine veraltete Version haben. Wenn Sie sich nicht sicher sind, wie Sie die Versionsnummer finden sollen, lesen Sie Semantic Versioning. Die Hauptskriptdatei weist Godot an, was Ihr Plugin im Editor tut, sobald es aktiv ist.
Die Skript Datei
Upon creation of the plugin, the dialog will automatically open the
EditorPlugin script for you. The script has two requirements that you cannot
change: it must be a tool script, or else it will not load properly in the
editor, and it must inherit from EditorPlugin.
Warnung
In addition to the EditorPlugin script, any other GDScript that your plugin uses
must also be a tool. Any GDScript without tool imported into the editor
will act like an empty file!
It's important to deal with initialization and clean-up of resources. A good practice is to use the virtual function _enter_tree() to initialize your plugin and _exit_tree() to clean it up. Thankfully, the dialog generates these callbacks for you. Your script should look something like this:
tool
extends EditorPlugin


func _enter_tree():
    # Initialization of the plugin goes here.
    pass


func _exit_tree():
    # Clean-up of the plugin goes here.
    pass
#if TOOLS
using Godot;
using System;

[Tool]
public class CustomNode : EditorPlugin
{
    public override void _EnterTree()
    {
        // Initialization of the plugin goes here.
    }

    public override void _ExitTree()
    {
        // Clean-up of the plugin goes here.
    }
}
#endif
Dies ist eine gute Vorlage um neue Plugins zu erstellen.
Ein benutzerdefinierter Node
Manchmal möchten Sie ein bestimmtes Verhalten in vielen Nodes, z.B. in einer benutzerdefinierten Szene oder einem Steuerelement, das wiederverwendet werden kann. Die Instanzierung ist in vielen Fällen hilfreich, kann jedoch manchmal umständlich sein, insbesondere wenn Sie sie in vielen Projekten verwenden. Eine gute Lösung hierfür besteht darin, ein Plugin zu erstellen, das einen Node mit einem benutzerdefinierten Verhalten hinzufügt.
Warnung
Nodes added via an EditorPlugin are "CustomType" nodes. While they work with any scripting language, they have fewer features than the Script Class system. If you are writing GDScript or NativeScript, we recommend using Script Classes instead.
To create a new node type, you can use the function
add_custom_type() from the
EditorPlugin class. This function can add new types to the editor
(nodes or resources). However, before you can create the type, you need a script
that will act as the logic for the type. While that script doesn't have to use
the tool keyword, it can be added so the script runs in the editor.
In dieser Anleitung erstellen wir eine einfache Schaltfläche, die beim Klicken eine Nachricht ausgibt. Dafür benötigen wir ein einfaches Skript, das Button oder BaseButton erweitert, je nachdem was Sie bevorzugen:
tool
extends Button


func _enter_tree():
    connect("pressed", self, "clicked")


func clicked():
    print("You clicked me!")
using Godot;
using System;

[Tool]
public class MyButton : Button
{
    public override void _EnterTree()
    {
        Connect("pressed", this, "clicked");
    }

    public void clicked()
    {
        GD.Print("You clicked me!");
    }
}
That's it for our basic button. You can save this as my_button.gd inside the
plugin folder. You'll also need a 16×16 icon to show in the scene tree. If you
don't have one, you can grab the default one from the engine and save it in your
addons/my_custom_node folder as icon.png, or use the default Godot logo
(preload("res://icon.png")). You can also use SVG icons if desired.
Now, we need to add it as a custom type so it shows on the Create New Node
dialog. For that, change the custom_node.gd script to the following:
tool
extends EditorPlugin


func _enter_tree():
    # Initialization of the plugin goes here.
    # Add the new type with a name, a parent type, a script and an icon.
    add_custom_type("MyButton", "Button", preload("my_button.gd"), preload("icon.png"))


func _exit_tree():
    # Clean-up of the plugin goes here.
    # Always remember to remove it from the engine when deactivated.
    remove_custom_type("MyButton")
#if TOOLS
using Godot;
using System;

[Tool]
public class CustomNode : EditorPlugin
{
    public override void _EnterTree()
    {
        // Initialization of the plugin goes here.
        // Add the new type with a name, a parent type, a script and an icon.
        var script = GD.Load<Script>("MyButton.cs");
        var texture = GD.Load<Texture>("icon.png");
        AddCustomType("MyButton", "Button", script, texture);
    }

    public override void _ExitTree()
    {
        // Clean-up of the plugin goes here.
        // Always remember to remove it from the engine when deactivated.
        RemoveCustomType("MyButton");
    }
}
#endif
With that done, the plugin should already be available in the plugin list in the Project Settings, so activate it as explained in Checking the results.
Probieren Sie es dann aus, indem Sie Ihren neuen Node hinzufügen:
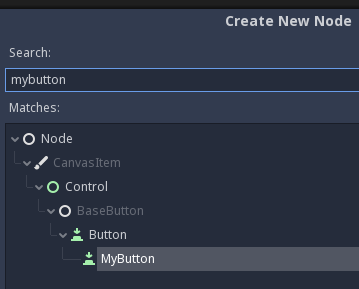
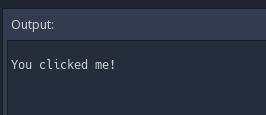
Wenn Sie den Node hinzufügen, können Sie sehen, dass ihm bereits das von Ihnen erstellte Skript angehängt ist. Setzen Sie einen Text auf die Schaltfläche, speichern Sie die Szene und führen Sie sie aus. Wenn Sie auf die Schaltfläche klicken, wird in der Konsole ein Text angezeigt:
Ein benutzerdefiniertes Dock
Manchmal müssen Sie den Editor erweitern und Tools hinzufügen, die immer verfügbar sind. Eine einfache Möglichkeit besteht darin, ein neues Dock mit einem Plugin hinzuzufügen. Docks sind nur Szenen, die auf Control basieren. Sie werden also ähnlich wie normale GUI-Szenen erstellt.
Creating a custom dock is done just like a custom node. Create a new
plugin.cfg file in the addons/my_custom_dock folder, then
add the following content to it:
[plugin]

name="My Custom Dock"
description="A custom dock made so I can learn how to make plugins."
author="Your Name Here"
version="1.0"
script="custom_dock.gd"
[plugin]

name="My Custom Dock"
description="A custom dock made so I can learn how to make plugins."
author="Your Name Here"
version="1.0"
script="CustomDock.cs"
Then create the script custom_dock.gd in the same folder. Fill it with the
template we've seen before to get a
good start.
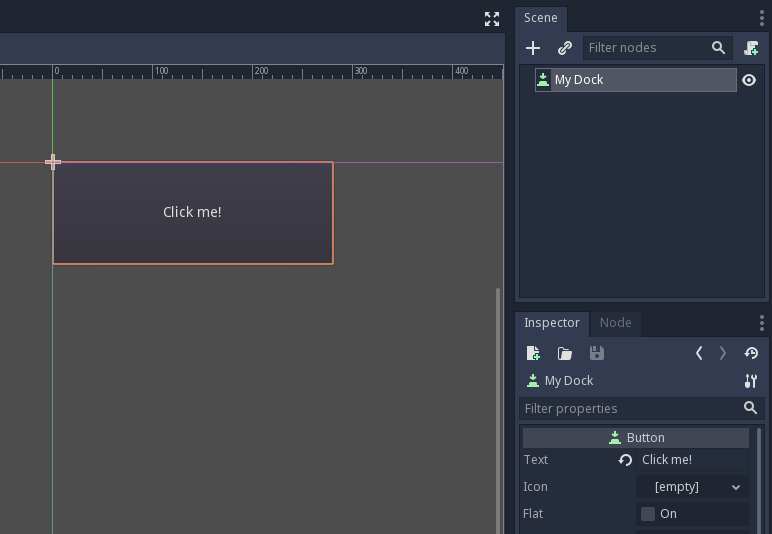
Da wir versuchen ein neues benutzerdefiniertes Dock hinzuzufügen, müssen wir den Inhalt des Docks erstellen. Dies ist nichts weiter als eine Standard-Godot-Szene: Erstellen Sie einfach eine neue Szene im Editor und bearbeiten diese.
For an editor dock, the root node must be a Control or one of its child classes. For this tutorial, you can create a single button. The name of the root node will also be the name that appears on the dock tab, so be sure to give it a short and descriptive name. Also, don't forget to add some text to your button.
Save this scene as my_dock.tscn. Now, we need to grab the scene we created
then add it as a dock in the editor. For this, you can rely on the function
add_control_to_dock() from the
EditorPlugin class.
You need to select a dock position and define the control to add (which is the scene you just created). Don't forget to remove the dock when the plugin is deactivated. The script could look like this:
tool
extends EditorPlugin


# A class member to hold the dock during the plugin life cycle.
var dock


func _enter_tree():
    # Initialization of the plugin goes here.
    # Load the dock scene and instance it.
    dock = preload("res://addons/my_custom_dock/my_dock.tscn").instance()

    # Add the loaded scene to the docks.
    add_control_to_dock(DOCK_SLOT_LEFT_UL, dock)
    # Note that LEFT_UL means the left of the editor, upper-left dock.


func _exit_tree():
    # Clean-up of the plugin goes here.
    # Remove the dock.
    remove_control_from_docks(dock)
    # Erase the control from the memory.
    dock.free()
#if TOOLS
using Godot;
using System;

[Tool]
public class CustomDock : EditorPlugin
{
    Control dock;

    public override void _EnterTree()
    {
        dock = (Control)GD.Load<PackedScene>("addons/my_custom_dock/my_dock.tscn").Instance();
        AddControlToDock(DockSlot.LeftUl, dock);
    }

    public override void _ExitTree()
    {
        // Clean-up of the plugin goes here.
        // Remove the dock.
        RemoveControlFromDocks(dock);
        // Erase the control from the memory.
        dock.Free();
    }
}
#endif
Beachten Sie, dass das Dock zwar zunächst an der angegebenen Position erscheint, der Benutzer aber seine Position frei ändern und das resultierende Layout speichern kann.
Ergebnisse überprüfen
Nun können wir das Resultat unserer Arbeit prüfen. Öffnen Sie die Projekteinstellungen und klicken auf den Plugins tab. Das Plugin sollte nun das einzige in der Liste sein. Falls es nicht angezeigt wird, klicken Sie auf den Update Button in der oberen rechten Ecke.

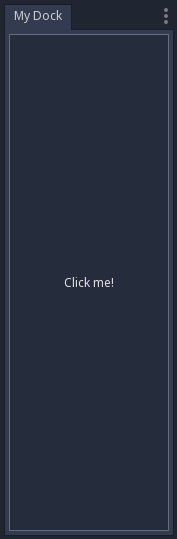
You can see the plugin is inactive on the Status column; click on the status to select Active. The dock should become visible before you even close the settings window. You should now have a custom dock:
Darüber hinausgehen
Nachdem Sie nun gelernt haben, wie Sie grundlegende Plugins erstellen, können Sie den Editor auf verschiedene Arten erweitern. Mit GDScript können dem Editor viele Funktionen hinzugefügt werden. Es ist eine leistungsstarke Möglichkeit, spezialisierte Editoren zu erstellen, ohne sich mit C++ Modulen befassen zu müssen.
Sie können Ihre eigenen Plugins erstellen, um sich selbst zu helfen, und diese in der Bestandsbibliothek <https://godotengine.org/asset-library/> freigeben, damit die Benutzer von Ihrer Arbeit profitieren können.
Registering autoloads/singletons in plugins
It is possible for editor plugins to automatically register autoloads when the plugin is enabled. This also includes unregistering the autoload when the plugin is disabled.
This makes setting up plugins faster for users, as they no longer have to manually add autoloads to their project settings if your editor plugin requires the use of an autoload.
Use the following code to register a singleton from an editor plugin:
tool
extends EditorPlugin

# Replace this value with a PascalCase autoload name, as per the GDScript style guide.
const AUTOLOAD_NAME = "SomeAutoload"


func _enter_tree():
    # The autoload can be a scene or script file.
    add_autoload_singleton(AUTOLOAD_NAME, "res://addons/my_addon/some_autoload.tscn")


func _exit_tree():
    remove_autoload_singleton(AUTOLOAD_NAME)