Benutzerdefinierte Nachbearbeitung
Einführung
Godot bietet viele sofort einsatzbereite Nachbearbeitungseffekte, darunter Bloom, DOF und SSAO. Manchmal möchten Sie Ihren eigenen Effekt schreiben. Hier erfahren Sie, wie Sie dies tun können.
Nachbearbeitungseffekte sind Shader, die auf einen Frame angewendet werden, nachdem Godot ihn gerendert hat. Sie können Ihre Szene zuerst in ein Viewport rendern, dann das Viewport in ein ViewportTexture rendern und auf dem Bildschirm anzeigen.
Der einfachste Weg einen benutzerdefinierten Nachbearbeitungs-Shader zu implementieren besteht darin, die in Godot integrierte Fähigkeit zum Lesen von der Bildschirmtextur zu verwenden. Wenn Sie damit nicht vertraut sind, sollten Sie zuerst die Bildschirmlesen-Shader Anleitung lesen.
Bemerkung
Aktuell unterstützt Godot nicht das Rendern in mehreren Puffern gleichzeitig. Ihr Nachbearbeitungs-Shader hat keinen Zugriff auf Normals oder andere Renderdurchläufe. Sie haben nur Zugriff auf den gerenderten Frame.
Single pass Post-Processing
You will need a Viewport to render your scene to, and a scene to render your
Viewport on the screen. You can use a ViewportContainer to display your Viewport on the entire screen or inside
another Control node.
Bemerkung
Rendering using a Viewport gives you control over
how the scene render, including the framerate, and you can use the
ViewportContainer to render 3D objects in a 2D scene.
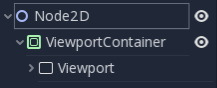
For this demo, we will use a Node2D with a ViewportContainer and finally a
Viewport. Your Scene tab should look like this:
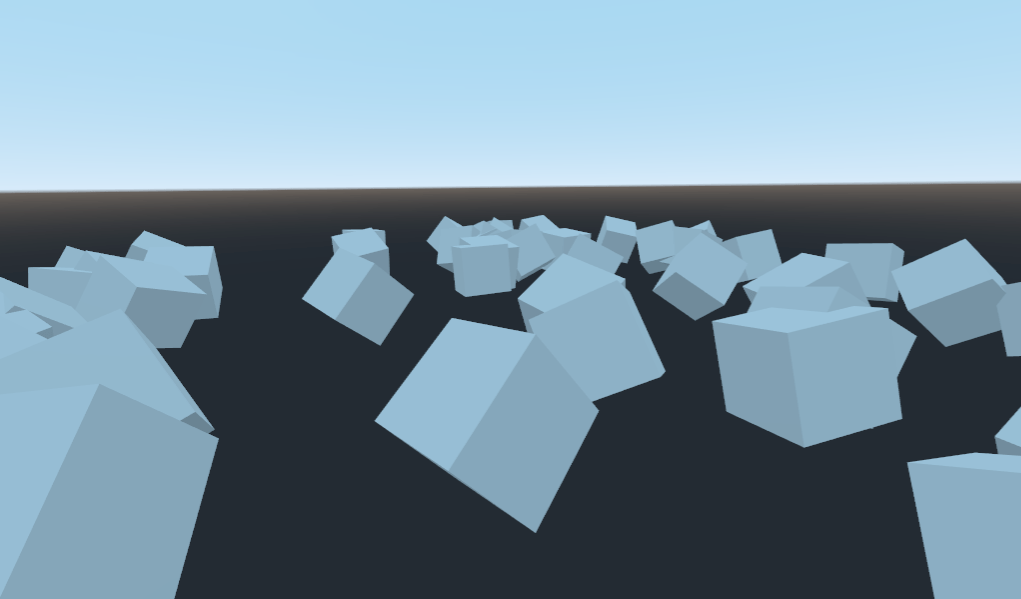
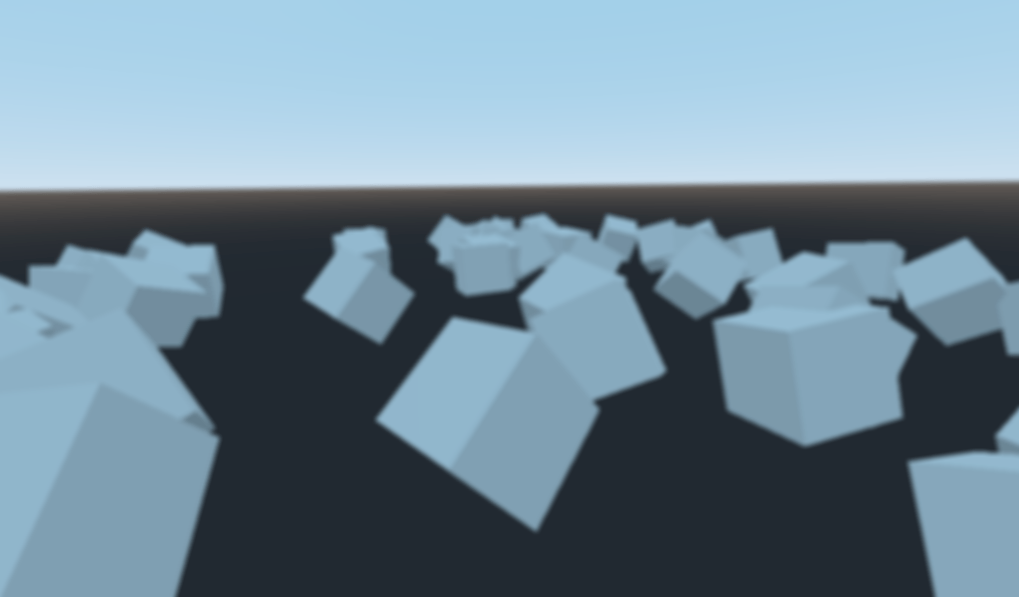
Inside the Viewport, you can have whatever you want. This will contain
your main scene. For this tutorial, we will use a field of random boxes:
Add a new ShaderMaterial to the ViewportContainer, and assign a new
shader resource to it. You can access your rendered Viewport with the built-in TEXTURE uniform.
Bemerkung
You can choose not to use a ViewportContainer, but if you do so, you will
need to create your own uniform in the shader and pass the Viewport texture in
manually, like so:
// Inside the Shader.
uniform sampler2D ViewportTexture;
Und Sie können die Textur wie folgt an den Shader von GDScript übergeben:
# In GDScript.
func _ready():
  $Sprite.material.set_shader_param("ViewportTexture", $Viewport.get_texture())
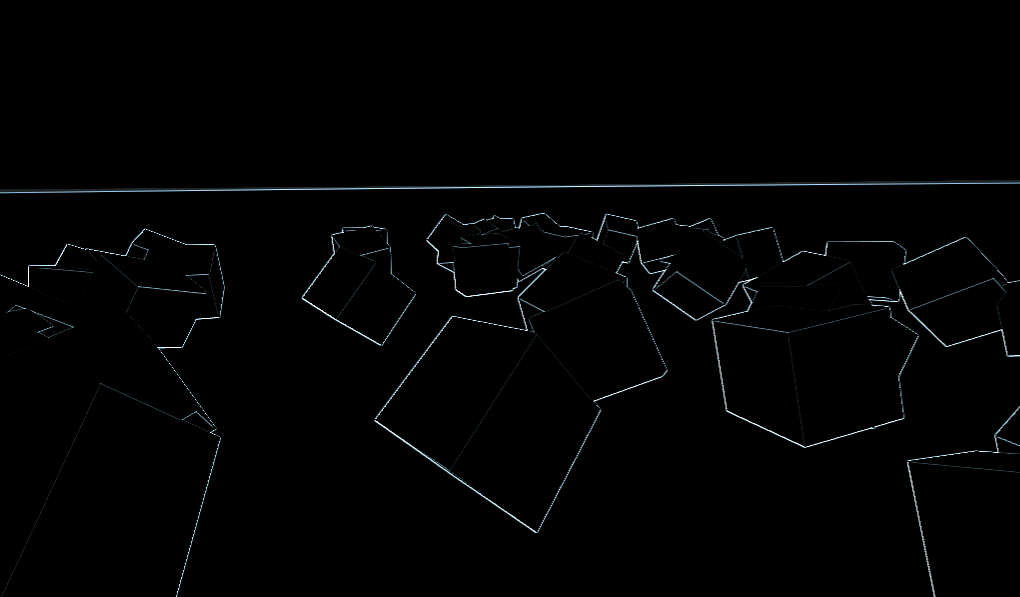
Copy the following code to your shader. The above code is a single pass edge detection filter, a Sobel filter.
shader_type canvas_item;

void fragment() {
    vec3 col = -8.0 * texture(TEXTURE, UV).xyz;
    col += texture(TEXTURE, UV + vec2(0.0, SCREEN_PIXEL_SIZE.y)).xyz;
    col += texture(TEXTURE, UV + vec2(0.0, -SCREEN_PIXEL_SIZE.y)).xyz;
    col += texture(TEXTURE, UV + vec2(SCREEN_PIXEL_SIZE.x, 0.0)).xyz;
    col += texture(TEXTURE, UV + vec2(-SCREEN_PIXEL_SIZE.x, 0.0)).xyz;
    col += texture(TEXTURE, UV + SCREEN_PIXEL_SIZE.xy).xyz;
    col += texture(TEXTURE, UV - SCREEN_PIXEL_SIZE.xy).xyz;
    col += texture(TEXTURE, UV + vec2(-SCREEN_PIXEL_SIZE.x, SCREEN_PIXEL_SIZE.y)).xyz;
    col += texture(TEXTURE, UV + vec2(SCREEN_PIXEL_SIZE.x, -SCREEN_PIXEL_SIZE.y)).xyz;
    COLOR.xyz = col;
}
Bemerkung
The Sobel filter reads pixels in a 9x9 grid around the current pixel and adds them together, using weight. What makes it interesting is that it assigns weights to each pixel; +1 for each of the eight around the center and -8 for the center pixel. The choice of weights is called a "kernel". You can use different kernels to create edge detection filters, outlines, and all sorts of effects.
Multi-pass Post-Processing
Some post-processing effects like blur are resource intensive. If you break them down in multiple passes however, you can make them run a lot faster. In a multipass material, each pass takes the result from the previous pass as an input and processes it.
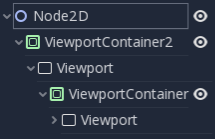
To make a multi-pass post-processing shader, you stack Viewport nodes. In the example above, you
rendered the content of one Viewport object into the root Viewport, through a ViewportContainer
node. You can do the same thing for a multi-pass shader by rendering the content of one Viewport into
another and then rendering the last Viewport into the root Viewport.
Ihre Szenenhierarchie wird in etwa so aussehen:
Godot will render the bottom Viewport node first. So if the order of the passes matters for your
shaders, make sure that you assign the shader you want to apply first to the lowest ViewportContainer in
the tree.
Bemerkung
You can also render your Viewports separately without nesting them like this. You just need to use two Viewports and to render them one after the other.
Apart from the node structure, the steps are the same as with the single-pass post-processing shader.
As an example, you could write a full screen Gaussian blur effect by attaching the following pieces of code to each of the ViewportContainers. The order in which you apply the shaders does not matter:
shader_type canvas_item;

// Blurs the screen in the X-direction.
void fragment() {
    vec3 col = texture(TEXTURE, UV).xyz * 0.16;
    col += texture(TEXTURE, UV + vec2(SCREEN_PIXEL_SIZE.x, 0.0)).xyz * 0.15;
    col += texture(TEXTURE, UV + vec2(-SCREEN_PIXEL_SIZE.x, 0.0)).xyz * 0.15;
    col += texture(TEXTURE, UV + vec2(2.0 * SCREEN_PIXEL_SIZE.x, 0.0)).xyz * 0.12;
    col += texture(TEXTURE, UV + vec2(2.0 * -SCREEN_PIXEL_SIZE.x, 0.0)).xyz * 0.12;
    col += texture(TEXTURE, UV + vec2(3.0 * SCREEN_PIXEL_SIZE.x, 0.0)).xyz * 0.09;
    col += texture(TEXTURE, UV + vec2(3.0 * -SCREEN_PIXEL_SIZE.x, 0.0)).xyz * 0.09;
    col += texture(TEXTURE, UV + vec2(4.0 * SCREEN_PIXEL_SIZE.x, 0.0)).xyz * 0.05;
    col += texture(TEXTURE, UV + vec2(4.0 * -SCREEN_PIXEL_SIZE.x, 0.0)).xyz * 0.05;
    COLOR.xyz = col;
}
shader_type canvas_item;

// Blurs the screen in the Y-direction.
void fragment() {
    vec3 col = texture(TEXTURE, UV).xyz * 0.16;
    col += texture(TEXTURE, UV + vec2(0.0, SCREEN_PIXEL_SIZE.y)).xyz * 0.15;
    col += texture(TEXTURE, UV + vec2(0.0, -SCREEN_PIXEL_SIZE.y)).xyz * 0.15;
    col += texture(TEXTURE, UV + vec2(0.0, 2.0 * SCREEN_PIXEL_SIZE.y)).xyz * 0.12;
    col += texture(TEXTURE, UV + vec2(0.0, 2.0 * -SCREEN_PIXEL_SIZE.y)).xyz * 0.12;
    col += texture(TEXTURE, UV + vec2(0.0, 3.0 * SCREEN_PIXEL_SIZE.y)).xyz * 0.09;
    col += texture(TEXTURE, UV + vec2(0.0, 3.0 * -SCREEN_PIXEL_SIZE.y)).xyz * 0.09;
    col += texture(TEXTURE, UV + vec2(0.0, 4.0 * SCREEN_PIXEL_SIZE.y)).xyz * 0.05;
    col += texture(TEXTURE, UV + vec2(0.0, 4.0 * -SCREEN_PIXEL_SIZE.y)).xyz * 0.05;
    COLOR.xyz = col;
}
Using the above code, you should end up with a full screen blur effect like below.
Für mehr Informationen zur Arbeitsweise von Viewport-Nodes, siehe dazu die Viewports-Anleitung.