Verwendung des AnimationTree
Einführung
With AnimationPlayer, Godot has one of the most flexible animation systems that you can find in any game engine. The ability to animate almost any property in any node or resource, as well as having dedicated transform, bezier, function calling, audio and sub-animation tracks, is pretty much unique.
However, the support for blending those animations via AnimationPlayer is relatively limited, as only a fixed cross-fade transition time can be set.
AnimationTree is a new node introduced in Godot 3.1 to deal with advanced transitions.
It supersedes the ancient AnimationTreePlayer, while adding a huge amount of features and flexibility.
Einen AnimationTree erstellen
Before starting, it must be made clear that an AnimationTree node does not contain its own animations.
Instead, it uses animations contained in an AnimationPlayer node. This way, you can edit your animations (or import them from a 3D scene)
as usual and then use this extra node to control the playback.
The most common way to use AnimationTree is in a 3D scene. When importing your scenes from a 3D exchange format, they will usually come
with animations built-in (either multiple ones or split from a large one on import).
At the end, the imported Godot scene will contain the animations in a AnimationPlayer node.
As you rarely use imported scenes directly in Godot (they are either instantiated or inherited from), you can place the AnimationTree node in your
new scene which contains the imported one. Afterwards, point the AnimationTree node to the AnimationPlayer that was created in the imported scene.
Als Referenz hier noch einmal wie es in der Third Person Shooter Demo gemacht wird:
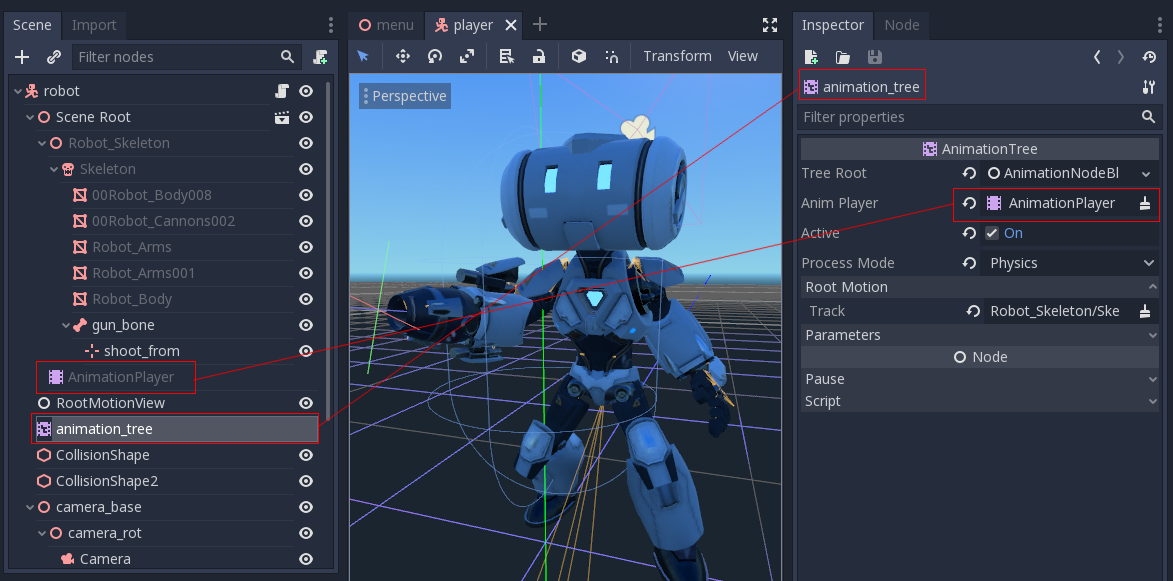
A new scene was created for the player with a KinematicBody as root. Inside this scene, the original .dae (Collada) file was instantiated
and an AnimationTree node was created.
Erstellen eines Baums
Es gibt drei Haupttypen von Nodes, die in ``AnimationTree` verwendet werden können:
Animation-Nodes, die auf eine Animation aus dem verknüpften
AnimationTreeverweisen.Animation-Wurzelnodes, die für Übergänge zwischen Unter-Nodes genutzt werden.
Animation Blend-Knoten, die innerhalb des
AnimationNodeBlendTreeals Single-Graph-Blending über mehrere Eingangsports verwendet werden.
Um einen Wurzel-Node in AnimationTree festzulegen, sind einige Typen verfügbar:
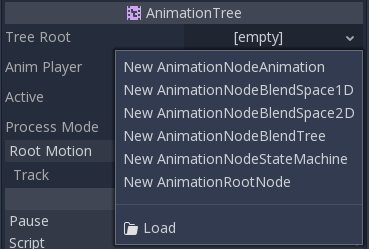
AnimationNodeAnimation``: Wählt eine Animation aus der Liste aus und spielt sie ab. Dies ist der einfachste Wurzel-Node und wird im Allgemeinen nicht direkt als Wurzel verwendet.
AnimationNodeBlendTree: Enthält viele Nodes vom Typ blend, z. B. mix, blend2, blend3, one shot usw. Dies ist einer der am häufigsten verwendeten Nodes.AnimationNodeStateMachine: Enthält mehrere Wurzel-Nodes als untergeordnete Nodes in einem Diagramm. Jeder Node wird als State verwendet und bietet mehrere Funktionen, um zwischen den Zuständen zu wechseln.AnimationNodeBlendSpace2D``: Ermöglicht die Platzierung von Wurzel-Nodes in einem 2D-Überblendungsraum. Steuern Sie die Überblendungsposition in 2D, um zwischen mehreren Animationen zu wechseln (überblenden).
AnimationNodeBlendSpace1D: Vereinfachte Version des oben genannten (1D).
BlendTree (Baum überblenden)
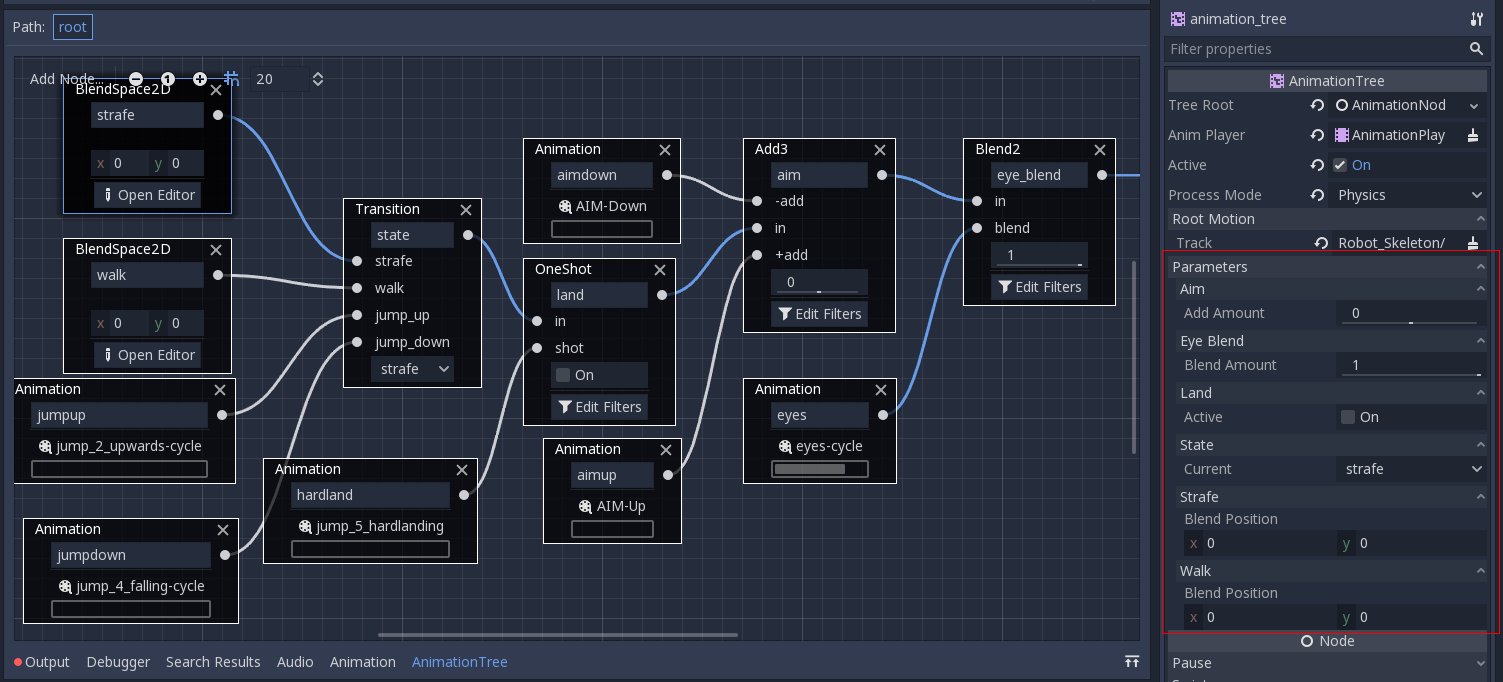
Ein AnimationNodeBlendTree kann sowohl Wurzel- als auch reguläre Nodes enthalten, die zum Überblenden verwendet werden. Nodes werden dem Graphen über ein Menü hinzugefügt:
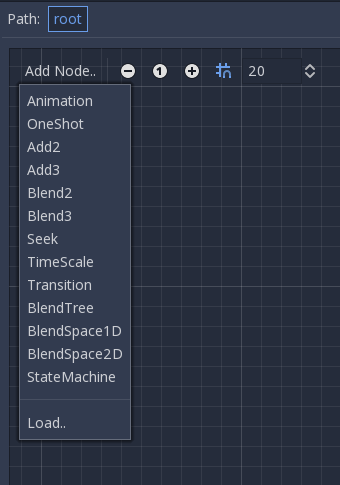
Alle BlendTrees enthalten standardmäßig einen Output-Knoten, an den etwas angeschlossen werden muß, damit die Animationen abgespielt werden können.
Der einfachste Weg diese Funktionalität zu testen besteht darin, einen Animation-Node direkt mit ihm zu verbinden:

Damit wird die Animation einfach abgespielt. Stellen Sie sicher, dass der AnimationTree aktiv ist, damit tatsächlich etwas passiert.
Es folgt eine kurze Beschreibung der verfügbaren Nodes:
Blend2 / Blend3
Diese Nodes blenden zwischen zwei oder drei Eingängen um einen vom Benutzer festgelegten Blendwert um:
Für komplexere Überblendungen wird empfohlen, stattdessen Überblendungsräume zu verwenden.
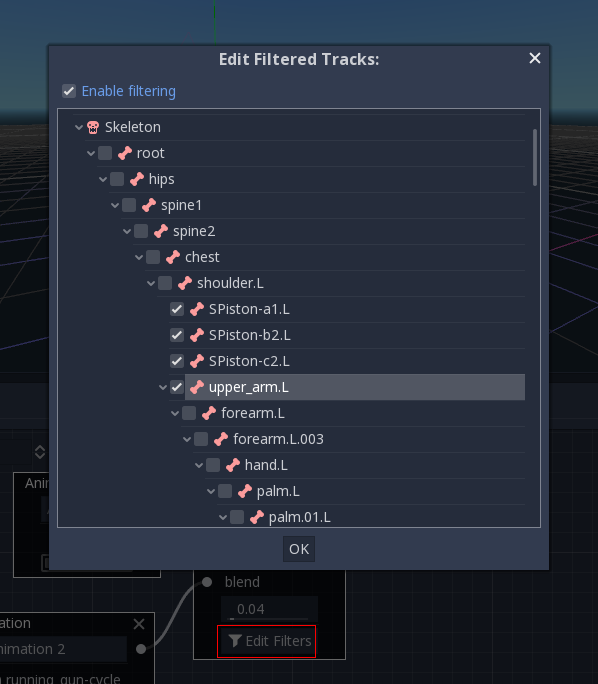
Blending can also use filters, i.e. you can control individually which tracks go through the blend function. This is very useful for layering animations on top of each other.
Einmalig (OneShot)
This node will execute a sub-animation and return once it finishes. Blend times for fading in and out can be customized, as well as filters.
Seek (Suche)
Dieser Node kann verwendet werden, um einen Suchbefehl für beliebige untergeordnete Nodes des Animationsgraphen zu veranlassen. Verwenden Sie diesen Node-Typ, um eine Animation ab dem Start oder einer bestimmten Abspielposition innerhalb des AnimationNodeBlendTree abzuspielen.
After setting the time and changing the animation playback, the seek node automatically goes into sleep mode on the next process frame by setting its seek_position value to -1.0.
# Play child animation from the start.
anim_tree.set("parameters/Seek/seek_position", 0.0)
# Alternative syntax (same result as above).
anim_tree["parameters/Seek/seek_position"] = 0.0

# Play child animation from 12 second timestamp.
anim_tree.set("parameters/Seek/seek_position", 12.0)
# Alternative syntax (same result as above).
anim_tree["parameters/Seek/seek_position"] = 12.0
// Play child animation from the start.
animTree.Set("parameters/Seek/seek_position", 0.0);

// Play child animation from 12 second timestamp.
animTree.Set("parameters/Seek/seek_position", 12.0);
Zeitskalierung
Allows scaling the speed of the animation (or reverse it) in any children nodes. Setting it to 0 will pause the animation.
Übergang
Sehr einfache Zustandsmaschine (wenn Sie nicht mit einem ''StateMachine''-Node fertig werden wollen). Animationen können mit den Ausgängen verbunden und Übergangszeiten angegeben werden.
BlendSpace2D
BlendSpace2D is a node to do advanced blending in two dimensions. Points are added to a two-dimensional space and then a position
can be controlled to determine blending:
The ranges in X and Y can be controlled (and labeled for convenience). By default, points can be placed anywhere (just right-click on the coordinate system or use the add point button) and triangles will be generated automatically using Delaunay.
It is also possible to draw the triangles manually by disabling the auto triangle option, though this is rarely necessary:

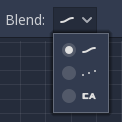
Finally, it is possible to change the blend mode. By default, blending happens by interpolating points inside the closest triangle. When dealing with 2D animations (frame by frame), you may want to switch to Discrete mode. Alternatively, if you want to keep the current play position when switching between discrete animations, there is a Carry mode. This mode can be changed in the Blend menu:
BlendSpace1D
This is similar to 2D blend spaces, but in one dimension (so triangles are not needed).
Zustandsmaschine
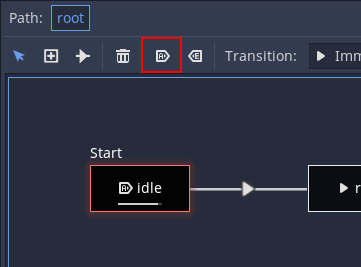
This node acts as a state machine with root nodes as states. Root nodes can be created and connected via lines. States are connected via Transitions, which are connections with special properties. Transitions are uni-directional, but two can be used to connect in both directions.
There are many types of transition:
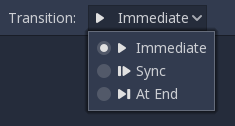
Immediate: Will switch to the next state immediately. The current state will end and blend into the beginning of the new one.
Sync: Will switch to the next state immediately, but will seek the new state to the playback position of the old state.
At End: Will wait for the current state playback to end, then switch to the beginning of the next state animation.
Transitions also have a few properties. Click any transition and it will be displayed in the inspector dock:

Switch Mode ist der Übergangstyp (siehe oben), der nach der Erstellung hier geändert werden kann.
Auto Advance will turn on the transition automatically when this state is reached. This works best with the At End switch mode.
Advance Condition will turn on auto advance when this condition is set. This is a custom text field that can be filled with a variable name. The variable can be modified from code (more on this later).
Xfade Time ist die Zeit zum Überblenden zwischen diesem und dem nächsten Status.
Priority is used together with the
travel()function from code (more on this later). Lower priority transitions are preferred when travelling through the tree.Disabled toggles disabling this transition (when disabled, it will not be used during travel or auto advance).
Wurzelbewegung
When working with 3D animations, a popular technique is for animators to use the root skeleton bone to give motion to the rest of the skeleton. This allows animating characters in a way where steps actually match the floor below. It also allows precise interaction with objects during cinematics.
When playing back the animation in Godot, it is possible to select this bone as the root motion track. Doing so will cancel the bone transformation visually (the animation will stay in place).
Afterwards, the actual motion can be retrieved via the AnimationTree API as a transform:
anim_tree.get_root_motion_transform()
animTree.GetRootMotionTransform();
Dies kann Funktionen wie KinematicBody.move_and_slide zugeführt werden, um die Zeichenbewegung zu steuern.
There is also a tool node, RootMotionView, that can be placed in a scene and will act as a custom floor for your
character and animations (this node is disabled by default during the game).
Steuern aus Programmcode
After building the tree and previewing it, the only question remaining is "How is all this controlled from code?".
Keep in mind that the animation nodes are just resources and, as such, they are shared between all instances using them.
Setting values in the nodes directly will affect all instances of the scene that uses this AnimationTree.
This is generally undesirable, but does have some cool use cases, e.g. you can copy and paste parts of your animation tree,
or reuse nodes with a complex layout (such as a state machine or blend space) in different animation trees.
The actual animation data is contained in the AnimationTree node and is accessed via properties.
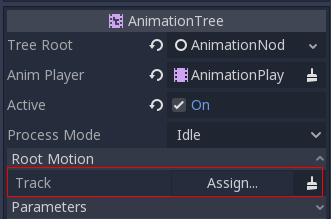
Check the "Parameters" section of the AnimationTree node to see all the parameters that can be modified in real-time:
This is handy because it makes it possible to animate them from an AnimationPlayer, or even the AnimationTree itself,
allowing the realization of very complex animation logic.
To modify these values from code, the property path must be obtained. This is done easily by hovering the mouse over any of the parameters:

So können Sie sie einstellen oder lesen:
anim_tree.set("parameters/eye_blend/blend_amount", 1.0)
# Simpler alternative form:
anim_tree["parameters/eye_blend/blend_amount"] = 1.0
animTree.Set("parameters/eye_blend/blend_amount", 1.0);
Zustandsmaschine fahren
One of the nice features in Godot's StateMachine implementation is the ability to travel. The graph can be instructed to go from the
current state to another one, while visiting all the intermediate ones. This is done via the A* algorithm.
In the absence of any viable set of transitions starting at the current state and finishing at the destination state, the graph teleports
to the destination state.
To use the travel ability, you should first retrieve the AnimationNodeStateMachinePlayback
object from the AnimationTree node (it is exported as a property).
var state_machine = anim_tree["parameters/playback"]
AnimationNodeStateMachinePlayback stateMachine = (AnimationNodeStateMachinePlayback)animTree.Get("parameters/playback");
Einmal abgerufen, kann es verwendet werden, indem Sie eine der vielen gebotenen Funktionen aufrufen:
state_machine.travel("SomeState")
stateMachine.Travel("SomeState");
The state machine must be running before you can travel. Make sure to either call start() or choose a node to Autoplay on Load.