Matrizen und Transformationen
Einführung
Bevor Sie diese Anleitung lesen, empfehlen wir die Vektor-Mathematik Anleitung sorgfältig gelesen und verstanden zu haben, da es hier das Wissen um Vektoren benötigt wird.
In dieser Anleitung geht es um Transformationen und wie wir sie in Godot mithilfe von Matrizen darstellen. Es ist keine ausführliche Anleitung zu Matrizen. Transformationen werden meistens als Translation, Rotation und Skalierung angewendet, daher konzentrieren wir uns darauf, wie diese mit Matrizen dargestellt werden.
Der größte Teil dieses Handbuchs konzentriert sich auf 2D und verwendet Transform2D und Vector2, aber die Funktionsweise in 3D ist sehr ähnlich.
Bemerkung
Wie in der vorherigen Anleitung erwähnt, ist es wichtig sich daran zu erinnern, dass in Godot die Y-Achse in 2D nach unten zeigt. Dies ist das Gegenteil davon, wie die meisten Schulen lineare Algebra unterrichten, wobei die Y-Achse nach oben zeigt.
Bemerkung
Die Konvention ist, dass die X-Achse rot ist, die Y-Achse grün und die Z-Achse blau ist. Diese Anleitung ist farbcodiert, um diesen Konventionen zu entsprechen. Wir werden jedoch auch den Ursprungsvektor mit einer blauen Farbe darstellen.
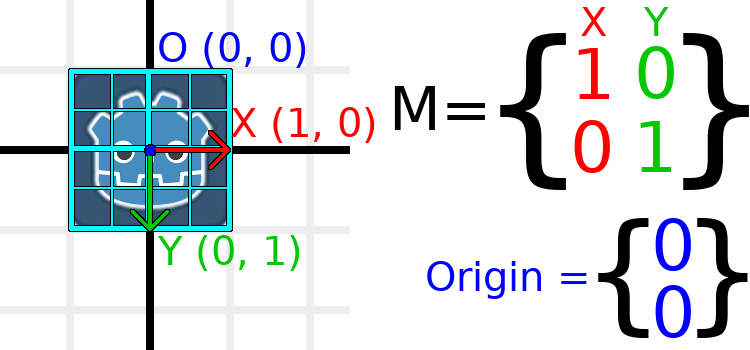
Matrixkomponenten und die Identitätsmatrix
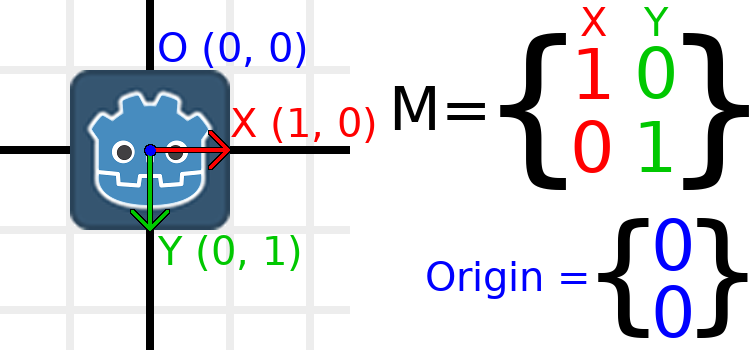
Die Identitätsmatrix repräsentiert eine Transformation ohne Translation, ohne Rotation und ohne Skalierung. Betrachten wir zunächst die Identitätsmatrix und ihre Beziehung zu ihrer visuellen Darstellung.
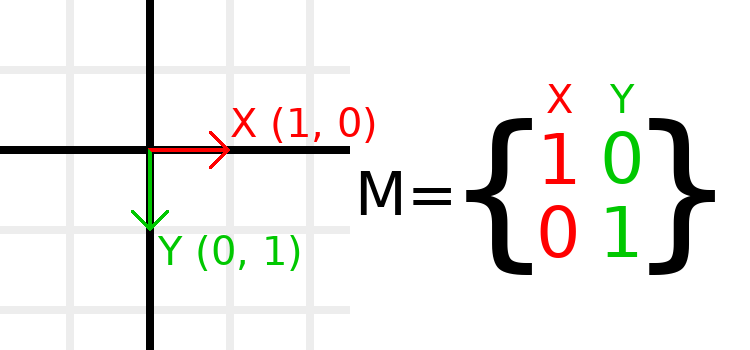
Matrizen haben Zeilen und Spalten, und eine Transformationsmatrix hat spezifische Konventionen wofür jede zuständig ist.
Im obigen Bild sehen wir, dass der rote X-Vektor durch die erste Spalte der Matrix dargestellt wird und der grüne Y-Vektor gleichfalls durch die zweite Spalte dargestellt wird. Durch eine Änderung der Spalten werden diese Vektoren geändert. Wir werden in den nächsten Beispielen sehen, wie sie manipuliert werden können.
Sie sollten sich nicht darum kümmern, Zeilen direkt zu bearbeiten, da wir normalerweise mit Spalten arbeiten. Sie können sich jedoch vorstellen, dass die Zeilen der Matrix zeigen, welche Vektoren dazu beitragen, sich in eine bestimmte Richtung zu bewegen.
When we refer to a value such as t.x.y, that's the Y component of the X column vector. In other words, the bottom-left of the matrix. Similarly, t.x.x is top-left, t.y.x is top-right, and t.y.y is bottom-right, where t is the Transform2D.
Skalieren einer Transformationsmatrix
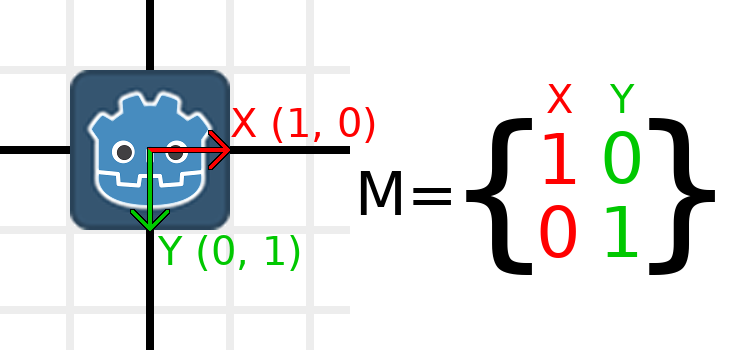
Applying a scale is one of the easiest operations to understand. Let's start by placing the Godot logo underneath our vectors so that we can visually see the effects on an object:
Now, to scale the matrix, all we need to do is multiply each component by the scale we want. Let's scale it up by 2. 1 times 2 becomes 2, and 0 times 2 becomes 0, so we end up with this:
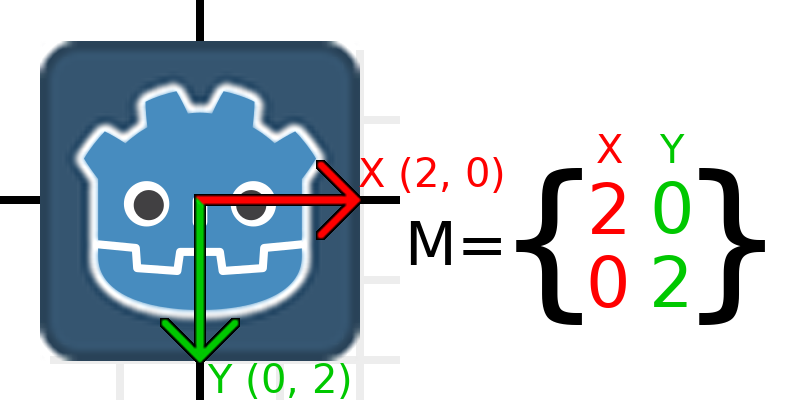
Um dies im Code zu tun, können wir jeden der Vektoren einfach multiplizieren:
var t = Transform2D()
# Scale
t.x *= 2
t.y *= 2
transform = t # Change the node's transform to what we just calculated.
Transform2D t = Transform2D.Identity;
// Scale
t.x *= 2;
t.y *= 2;
Transform = t; // Change the node's transform to what we just calculated.
If we wanted to return it to its original scale, we can multiply each component by 0.5. That's pretty much all there is to scaling a transformation matrix.
To calculate the object's scale from an existing transformation matrix, you can use length() on each of the column vectors.
Bemerkung
In aktuellen Projekten können Sie die Methode scaled() verwenden, um eine Skalierung durchzuführen.
Drehen einer Transformationsmatrix
We'll start the same way as earlier, with the Godot logo underneath the identity matrix:
As an example, let's say we want to rotate our Godot logo clockwise by 90 degrees. Right now the X axis points right and the Y axis points down. If we rotate these in our head, we would logically see that the new X axis should point down and the new Y axis should point left.
You can imagine that you grab both the Godot logo and its vectors, and then spin it around the center. Wherever you finish spinning, the orientation of the vectors determines what the matrix is.
We need to represent "down" and "left" in normal coordinates, so means we'll set X to (0, 1) and Y to (-1, 0). These are also the values of Vector2.DOWN and Vector2.LEFT. When we do this, we get the desired result of rotating the object:
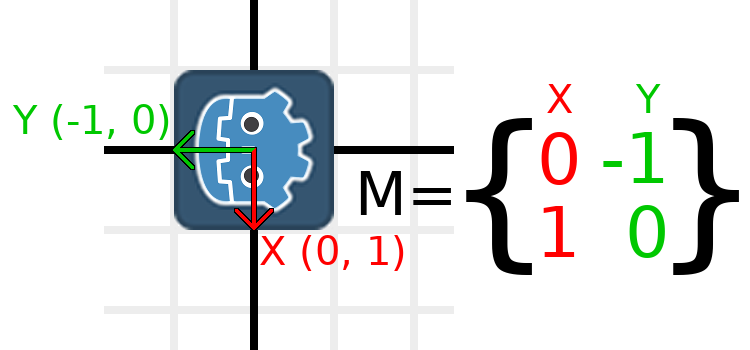
If you have trouble understanding the above, try this exercise: Cut a square of paper, draw X and Y vectors on top of it, place it on graph paper, then rotate it and note the endpoints.
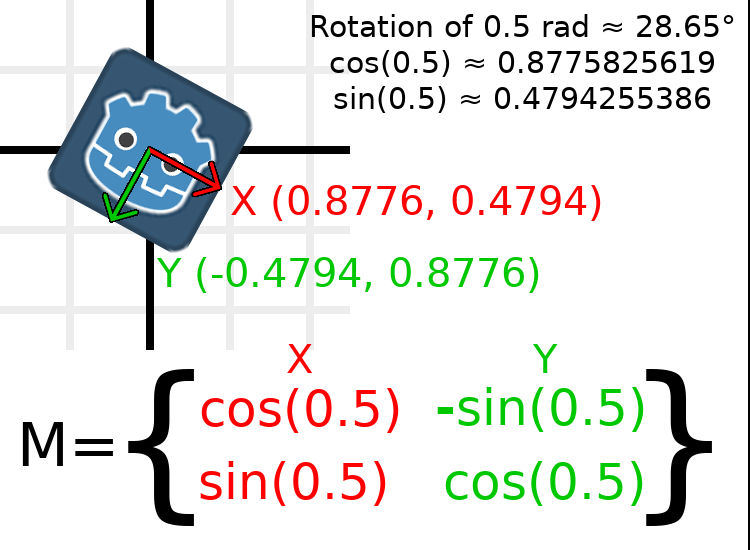
To perform rotation in code, we need to be able to calculate the values programmatically. This image shows the formulas needed to calculate the transformation matrix from a rotation angle. Don't worry if this part seems complicated, I promise it's the hardest thing you need to know.

Bemerkung
Godot represents all rotations with radians, not degrees. A full turn is TAU or PI*2 radians, and a quarter turn of 90 degrees is TAU/4 or PI/2 radians. Working with TAU usually results in more readable code.
Bemerkung
Fun fact: In addition to Y being down in Godot, rotation is represented clockwise. This means that all the math and trig functions behave the same as a Y-is-up CCW system, since these differences "cancel out". You can think of rotations in both systems being "from X to Y".
In order to perform a rotation of 0.5 radians (about 28.65 degrees), we simply plug in a value of 0.5 to the formula above and evaluate to find what the actual values should be:
So würde das im Code gemacht (platzieren Sie das Skript auf einem Node2D):
var rot = 0.5 # The rotation to apply.
var t = Transform2D()
t.x.x = cos(rot)
t.y.y = cos(rot)
t.x.y = sin(rot)
t.y.x = -sin(rot)
transform = t # Change the node's transform to what we just calculated.
float rot = 0.5f; // The rotation to apply.
Transform2D t = Transform2D.Identity;
t.x.x = t.y.y = Mathf.Cos(rot);
t.x.y = t.y.x = Mathf.Sin(rot);
t.y.x *= -1;
Transform = t; // Change the node's transform to what we just calculated.
To calculate the object's rotation from an existing transformation matrix, you can use atan2(t.x.y, t.x.x), where t is the Transform2D.
Bemerkung
In aktuellen Projekten können Sie die rotated() Methode verwenden, um Rotationen durchzuführen.
Basis der Transformationsmatrix
So far we have only been working with the x and y, vectors, which are in charge of representing rotation, scale, and/or shearing (advanced, covered at the end). The X and Y vectors are together called the basis of the transformation matrix. The terms "basis" and "basis vectors" are important to know.
You might have noticed that Transform2D actually has three Vector2 values: x, y, and origin. The origin value is not part of the basis, but it is part of the transform, and we need it to represent position. From now on we'll keep track of the origin vector in all examples. You can think of origin as another column, but it's often better to think of it as completely separate.
Note that in 3D, Godot has a separate Basis structure for holding the three Vector3 values of the basis, since the code can get complex and it makes sense to separate it from Transform (which is composed of one Basis and one extra Vector3 for the origin).
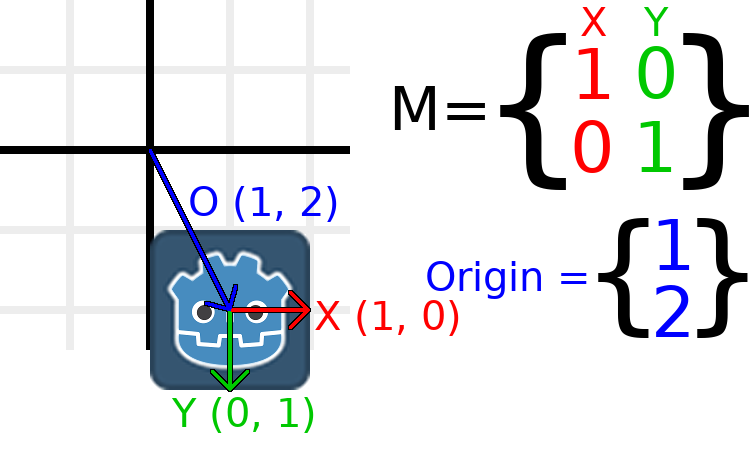
Übersetzen der Transformationsmatrix
Changing the origin vector is called a translating the transformation matrix. Translating is basically a technical term for "moving" the object, but it explicitly does not involve any rotation.
Lassen Sie uns ein Beispiel durcharbeiten, um dies zu verstehen. Wir werden wie beim letzten Mal mit der Identitätstransformation beginnen, außer dass wir diesmal den Ursprungsvektor verfolgen.
Wenn sich das Objekt an eine Position von (1, 2) bewegen soll, müssen wir einfach seinen Ursprung auf (1, 2) setzen:
There is also a translated() method, which performs a different operation to adding or changing origin directly. The translated() method will translate the object relative to its own rotation. For example, an object rotated 90 degrees clockwise will move to the right when translated() with Vector2.UP.
Bemerkung
Godot's 2D uses coordinates based on pixels, so in actual projects you will want to translate by hundreds of units.
Fügen wir alles zusammen
Wir werden alles, was wir bisher erwähnt haben, auf eine Transformation anwenden. Erstellen Sie anschließend ein einfaches Projekt mit einem Sprite-Node und verwenden Sie das Godot-Logo für die Texturressource.
Let's set the translation to (350, 150), rotate by -0.5 rad, and scale by 3. I've posted a screenshot, and the code to reproduce it, but I encourage you to try and reproduce the screenshot without looking at the code!
var t = Transform2D()
# Translation
t.origin = Vector2(350, 150)
# Rotation
var rot = -0.5 # The rotation to apply.
t.x.x = cos(rot)
t.y.y = cos(rot)
t.x.y = sin(rot)
t.y.x = -sin(rot)
# Scale
t.x *= 3
t.y *= 3
transform = t # Change the node's transform to what we just calculated.
Transform2D t = Transform2D.Identity;
// Translation
t.origin = new Vector2(350, 150);
// Rotation
float rot = -0.5f; // The rotation to apply.
t.x.x = t.y.y = Mathf.Cos(rot);
t.x.y = t.y.x = Mathf.Sin(rot);
t.y.x *= -1;
// Scale
t.x *= 3;
t.y *= 3;
Transform = t; // Change the node's transform to what we just calculated.
Abschneiden der Transformationsmatrix (fortgeschritten)
Bemerkung
Wenn Sie nur nach der Verwendung von Transformationsmatrizen suchen, können Sie diesen Abschnitt der Anleitung überspringen. In diesem Abschnitt wird ein ungewöhnlich verwendeter Aspekt von Transformationsmatrizen untersucht, um ein Verständnis für sie aufzubauen.
You may have noticed that a transform has more degrees of freedom than the combination of the above actions. The basis of a 2D transformation matrix has four total numbers in two Vector2 values, while a rotation value and a Vector2 for scale only has 3 numbers. The high-level concept for the missing degree of freedom is called shearing.
Normalerweise sind die Basisvektoren immer senkrecht zueinander, in einigen Situationen kann das Beschneiden jedoch hilfreich sein. Wenn Sie das Beschneiden verstehen, wird auch verständlicher wie Transformationen funktionieren.
Um Ihnen visuell zu zeigen, wie es aussehen wird, überlagern wir das Godot-Logo mit einem Raster:
Each point on this grid is obtained by adding the basis vectors together. The bottom-right corner is X + Y, while the top-right corner is X - Y. If we change the basis vectors, the entire grid moves with it, as the grid is composed of the basis vectors. All lines on the grid that are currently parallel will remain parallel no matter what changes we make to the basis vectors.
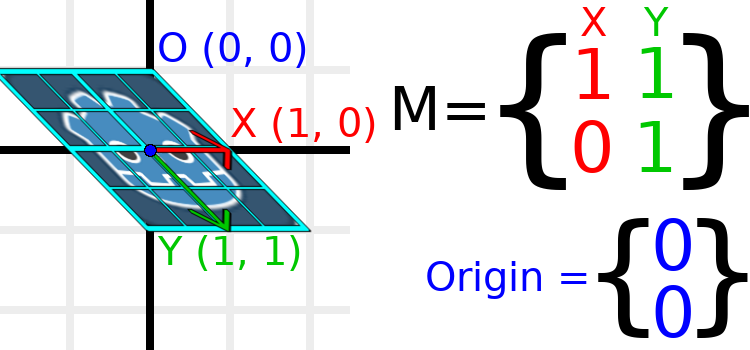
Als Beispiel setzen wir Y auf (1, 1):
var t = Transform2D()
# Shear by setting Y to (1, 1)
t.y = Vector2.ONE
transform = t # Change the node's transform to what we just calculated.
Transform2D t = Transform2D.Identity;
// Shear by setting Y to (1, 1)
t.y = Vector2.One;
Transform = t; // Change the node's transform to what we just calculated.
Bemerkung
You can't set the raw values of a Transform2D in the editor, so you must use code if you want to shear the object.
Due to the vectors no longer being perpendicular, the object has been sheared. The bottom-center of the grid, which is (0, 1) relative to itself, is now located at a world position of (1, 1).
The intra-object coordinates are called UV coordinates in textures, so let's borrow that terminology for here. To find the world position from a relative position, the formula is U * X + V * Y, where U and V are numbers and X and Y are the basis vectors.
The bottom-right corner of the grid, which is always at the UV position of (1, 1), is at the world position of (2, 1), which is calculated from X*1 + Y*1, which is (1, 0) + (1, 1), or (1 + 1, 0 + 1), or (2, 1). This matches up with our observation of where the bottom-right corner of the image is.
Similarly, the top-right corner of the grid, which is always at the UV position of (1, -1), is at the world position of (0, -1), which is calculated from X*1 + Y*-1, which is (1, 0) - (1, 1), or (1 - 1, 0 - 1), or (0, -1). This matches up with our observation of where the top-right corner of the image is.
Hopefully you now fully understand the how a transformation matrix affects the object, and the relationship between the basis vectors and how the object's "UV" or "intra-coordinates" have their world position changed.
Bemerkung
In Godot, all transform math is done relative to the parent node. When we refer to "world position", that would be relative to the node's parent instead, if the node had a parent.
If you would like additional explanation, you should check out 3Blue1Brown's excellent video about linear transformations: https://www.youtube.com/watch?v=kYB8IZa5AuE
Praktische Anwendungen von Transformationen
In actual projects, you will usually be working with transforms inside transforms by having multiple Node2D or Spatial nodes parented to each other.
However, sometimes it's very useful to manually calculate the values we need. We will go over how you could use Transform2D or Transform to manually calculate transforms of nodes.
Positionen zwischen Transformationen konvertieren
There are many cases where you'd want to convert a position in and out of a transform. For example, if you have a position relative to the player and would like to find the world (parent-relative) position, or if you have a world position and want to know where it is relative to the player.
We can find what a vector relative to the player would be defined in world space as using the "xform" method:
# World space vector 100 units below the player.
print(transform.xform(Vector2(0, 100)))
// World space vector 100 units below the player.
GD.Print(Transform.Xform(new Vector2(0, 100)));
And we can use the "xform_inv" method to find a what world space position would be if it was instead defined relative to the player:
# Where is (0, 100) relative to the player?
print(transform.xform_inv(Vector2(0, 100)))
// Where is (0, 100) relative to the player?
GD.Print(Transform.XformInv(new Vector2(0, 100)));
Bemerkung
If you know in advance that the transform is positioned at (0, 0), you can use the "basis_xform" or "basis_xform_inv" methods instead, which skip dealing with translation.
Verschieben eines Objekts relativ zu sich selbst
A common operation, especially in 3D games, is to move an object relative to itself. For example, in first-person shooter games, you would want the character to move forward (-Z axis) when you press W.
Since the basis vectors are the orientation relative to the parent, and the origin vector is the position relative to the parent, we can simply add multiples of the basis vectors to move an object relative to itself.
Dieser Code verschiebt ein Objekt um 100 Einheiten nach rechts:
transform.origin += transform.x * 100
Transform2D t = Transform;
t.origin += t.x * 100;
Transform = t;
Um sich in 3D zu bewegen, müssten Sie "x" durch "basis.x" ersetzen.
Bemerkung
In actual projects, you can use translate_object_local in 3D or move_local_x and move_local_y in 2D to do this.
Anwenden von Transformationen auf Transformationen
Eines der wichtigsten Dinge, die Sie über Transformationen wissen sollten ist, wie Sie mehrere davon zusammen verwenden können. Die Transformation eines übergeordneten Nodes wirkt sich auf alle untergeordneten Nodes aus. Lassen Sie uns ein Beispiel analysieren.
In this image, the child node has a "2" after the component names to distinguish them from the parent node. It might look a bit overwhelming with so many numbers, but remember that each number is displayed twice (next to the arrows and also in the matrices), and that almost half of the numbers are zero.
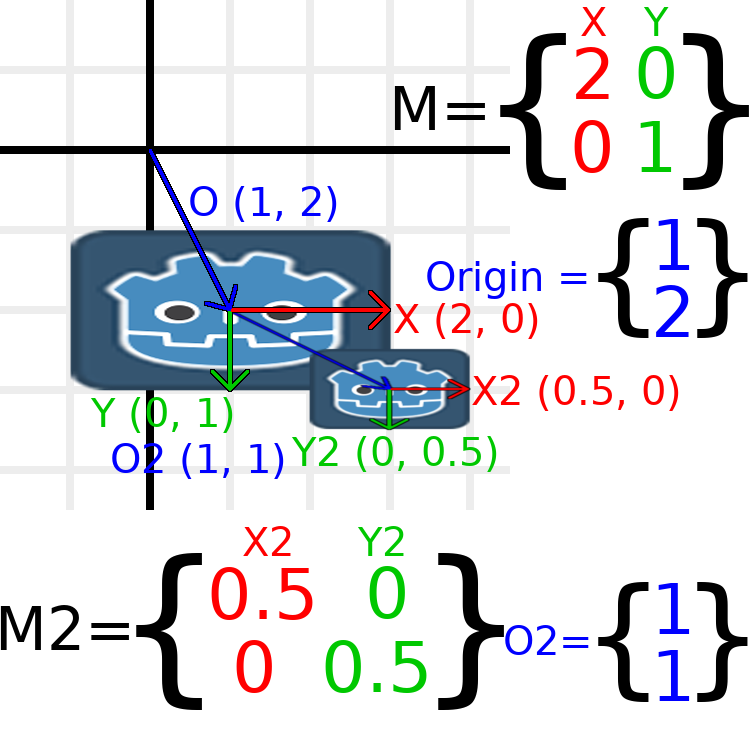
The only transformations going on here are that the parent node has been given a scale of (2, 1), the child has been given a scale of (0.5, 0.5), and both nodes have been given positions.
All child transformations are affected by the parent transformations. The child has a scale of (0.5, 0.5), so you would expect it to be a 1:1 ratio square, and it is, but only relative to the parent. The child's X vector ends up being (1, 0) in world space, because it is scaled by the parent's basis vectors. Similarly, the child node's origin vector is set to (1, 1), but this actually moves it (2, 1) in world space, due to the parent node's basis vectors.
To calculate a child transform's world space transform manually, this is the code we would use:
# Set up transforms just like in the image, except make positions be 100 times bigger.
var parent = Transform2D(Vector2(2, 0), Vector2(0, 1), Vector2(100, 200))
var child = Transform2D(Vector2(0.5, 0), Vector2(0, 0.5), Vector2(100, 100))

# Calculate the child's world space transform
# origin = (2, 0) * 100 + (0, 1) * 100 + (100, 200)
var origin = parent.x * child.origin.x + parent.y * child.origin.y + parent.origin
# basis_x = (2, 0) * 0.5 + (0, 1) * 0
var basis_x = parent.x * child.x.x + parent.y * child.x.y
# basis_y = (2, 0) * 0 + (0, 1) * 0.5
var basis_y = parent.x * child.y.x + parent.y * child.y.y

# Change the node's transform to what we just calculated.
transform = Transform2D(basis_x, basis_y, origin)
// Set up transforms just like in the image, except make positions be 100 times bigger.
Transform2D parent = new Transform2D(2, 0, 0, 1, 100, 200);
Transform2D child = new Transform2D(0.5f, 0, 0, 0.5f, 100, 100);

// Calculate the child's world space transform
// origin = (2, 0) * 100 + (0, 1) * 100 + (100, 200)
Vector2 origin = parent.x * child.origin.x + parent.y * child.origin.y + parent.origin;
// basisX = (2, 0) * 0.5 + (0, 1) * 0 = (0.5, 0)
Vector2 basisX = parent.x * child.x.x + parent.y * child.x.y;
// basisY = (2, 0) * 0 + (0, 1) * 0.5 = (0.5, 0)
Vector2 basisY = parent.x * child.y.x + parent.y * child.y.y;

// Change the node's transform to what we just calculated.
Transform = new Transform2D(basisX, basisY, origin);
In actual projects, we can find the world transform of the child by applying one transform onto another using the * operator:
# Set up transforms just like in the image, except make positions be 100 times bigger.
var parent = Transform2D(Vector2(2, 0), Vector2(0, 1), Vector2(100, 200))
var child = Transform2D(Vector2(0.5, 0), Vector2(0, 0.5), Vector2(100, 100))

# Change the node's transform to what would be the child's world transform.
transform = parent * child
// Set up transforms just like in the image, except make positions be 100 times bigger.
Transform2D parent = new Transform2D(2, 0, 0, 1, 100, 200);
Transform2D child = new Transform2D(0.5f, 0, 0, 0.5f, 100, 100);

// Change the node's transform to what would be the child's world transform.
Transform = parent * child;
Bemerkung
Beim Multiplizieren von Matrizen kommt es auf die Reihenfolge an! Verwechsle sie nicht.
Und schließlich wird die Anwendung der Identitätsumwandlung niemals etwas bewirken.
If you would like additional explanation, you should check out 3Blue1Brown's excellent video about matrix composition: https://www.youtube.com/watch?v=XkY2DOUCWMU
Invertieren einer Transformationsmatrix
Die Funktion "affine_inverse" gibt eine Transformation zurück, die die vorherige Transformation "rückgängig macht". Dies kann in einigen Situationen nützlich sein, einige Beispiele erläutern dies auf einfachere Weise.
Das Multiplizieren einer inversen Transformation mit der normalen Transformation macht alle Transformationen rückgängig:
var ti = transform.affine_inverse()
var t = ti * transform
# The transform is the identity transform.
Transform2D ti = Transform.AffineInverse();
Transform2D t = ti * Transform;
// The transform is the identity transform.
Das Transformieren einer Position durch eine Transformation und ihre Umkehrung führt zu derselben Position (dasselbe für "xform_inv"):
var ti = transform.affine_inverse()
position = transform.xform(position)
position = ti.xform(position)
# The position is the same as before.
Transform2D ti = Transform.AffineInverse();
Position = Transform.Xform(Position);
Position = ti.Xform(Position);
// The position is the same as before.
Wie funktioniert das alles in 3D?
Eines der großartigen Dinge an Transformationsmatrizen ist, dass sie zwischen 2D- und 3D-Transformationen sehr ähnlich funktionieren. Alle Codes und Formeln, die oben für 2D verwendet wurden, funktionieren in 3D gleich, mit 3 Ausnahmen: die Hinzufügung einer dritten Achse, dass jede Achse vom Typ Vector3 ist, und auch, dass Godot die Basis getrennt von der Transform speichert, da die Mathematik komplex werden kann und es sinnvoll ist, sie zu trennen.
Alle Konzepte für die Funktionsweise von Translation (Verschiebung), Rotation (Drehung), Skalierung (Größenänderung) und Scherung (Beschneidung) in 3D sind im Vergleich zu 2D gleich. Zum Skalieren nehmen wir jede Komponente und multiplizieren sie; zum Drehen ändern wir, wohin jeder Basisvektor zeigt; zum Verschieben verändern wir den Ursprung; und zum Scheren ändern wir die Basisvektoren so, dass sie nicht senkrecht sind.

If you would like, it's a good idea to play around with transforms to get an understanding of how they work. Godot allows you to edit 3D transform matrices directly from the inspector. You can download this project which has colored lines and cubes to help visualize the Basis vectors and the origin in both 2D and 3D: https://github.com/godotengine/godot-demo-projects/tree/master/misc/matrix_transform
Bemerkung
Spatial's "Matrix" section in Godot 3.2's inspector displays the matrix as transposed, with the columns horizontal and the rows vertical. This may be changed to be less confusing in a future release of Godot.
Bemerkung
You cannot edit Node2D's transform matrix directly in Godot 3.2's inspector. This may be changed in a future release of Godot.
If you would like additional explanation, you should check out 3Blue1Brown's excellent video about 3D linear transformations: https://www.youtube.com/watch?v=rHLEWRxRGiM
Darstellung der Rotation in 3D (fortgeschritten)
Der größte Unterschied zwischen 2D- und 3D-Transformationsmatrizen besteht darin, wie Sie die Rotation selbst ohne die Basisvektoren darstellen.
Mit 2D haben wir eine einfache Möglichkeit (atan2), zwischen einer Transformationsmatrix und einem Winkel zu wechseln. In 3D können wir die Rotation nicht einfach als eine Zahl darstellen. Es gibt etwas namens Eulerwinkel, das Rotationen als eine Menge von 3 Zahlen darstellen kann. Diese sind jedoch begrenzt und nicht sehr nützlich, außer in trivialen Fällen.
In 3D werden normalerweise keine Winkel verwendet, sondern entweder eine Transformationsbasis (die so ziemlich überall in Godot verwendet wird) oder Quaternionen (erweiterter reeller Zahlenbereich). Godot kann Quaternionen mit der Struktur Quat darstellen. Sie sollten dabei am besten völlig ignorieren, wie dies unter der Haube funktioniert, denn sie sind sehr kompliziert und nicht intuitiv.
Wenn Sie jedoch wirklich wissen müssen, wie es funktioniert, finden Sie hier einige großartige Ressourcen, die Sie durchgehen können:
https://www.youtube.com/watch?v=mvmuCPvRoWQ