Attention: Here be dragons
This is the latest
(unstable) version of this documentation, which may document features
not available in or compatible with released stable versions of Godot.
Checking the stable version of the documentation...
Code im Editor ausführen
Was ist @tool?
@tool ist eine leistungsstarke Codezeile, die im Editor ausgeführt wird, wenn man sie oben im Skript hinzufügt. Sie können auch entscheiden, welche Teile des Skripts im Editor ausgeführt werden, welche im Spiel und welche in beiden.
Sie können es für viele Dinge verwenden, aber es ist vor allem im Level-Design nützlich, um Dinge visuell darzustellen, die selbst schwer vorherzusagen sind. Hier sind einige Anwendungsfälle:
Wenn Sie eine Kanone haben, die Kanonenkugeln abschießt, die von der Physik (Schwerkraft) beeinflusst werden, können Sie die Flugbahn der Kanonenkugel im Editor zeichnen, was das Leveldesign sehr erleichtert.
Wenn Sie Sprungfelder mit unterschiedlichen Sprunghöhen haben, können Sie die maximale Sprunghöhe einzeichnen, die ein Spieler erreichen würde, wenn er auf ein Sprungfeld springt, was die Levelgestaltung ebenfalls erleichtert.
Wenn Ihr Spieler kein Sprite verwendet, sondern durch Code gezeichnet wird, können Sie diesen Zeichencode im Editor ausführen lassen, um Ihren Spieler anzuzeigen.
Gefahr
@tool-Skripte laufen innerhalb des Editors und erlauben den Zugriff auf den Szenenbaum der aktuell bearbeiteten Szene. Dies ist eine mächtige Funktion, die aber auch ihre Tücken hat, da der Editor keinen Schutz gegen möglichen Missbrauch von @tool-Skripten bietet. Seien Sie äußerst vorsichtig, wenn Sie den Szenenbaum manipulieren, besonders über Node.queue_free, da es zu Abstürzen führen kann, wenn Sie einen Node freigeben, während der Editor eine Logik ausführt, die ihn betrifft.
Wie man @tool verwendet
Um ein Skript in ein Tool zu verwandeln, fügen Sie das Schlüsselwort @tool am Anfang Ihres Codes ein.
Um zu prüfen, ob Sie sich gerade im Editor befinden, verwenden Sie: Engine.is_editor_hint().
Wenn Sie beispielsweise Code nur im Editor ausführen möchten, verwenden Sie:
if Engine.is_editor_hint():
    # Code to execute when in editor.
if (Engine.IsEditorHint())
{
    // Code to execute when in editor.
}
Wenn Sie dagegen Code nur im Spiel ausführen möchten, negieren Sie einfach dieselbe Anweisung:
if not Engine.is_editor_hint():
    # Code to execute when in game.
if (!Engine.IsEditorHint())
{
    // Code to execute when in game.
}
Codeteile, auf die keine der beiden oben genannten Bedingungen zutreffen, werden sowohl im Editor als auch im Spiel ausgeführt.
Hier sieht man wie eine _process() Funktion aussehen könnte:
func _process(delta):
    if Engine.is_editor_hint():
        # Code to execute in editor.

    if not Engine.is_editor_hint():
        # Code to execute in game.

    # Code to execute both in editor and in game.
public override void _Process(double delta)
{
    if (Engine.IsEditorHint())
    {
        // Code to execute in editor.
    }

    if (!Engine.IsEditorHint())
    {
        // Code to execute in game.
    }

    // Code to execute both in editor and in game.
}
Wichtige Informationen
The general rule is that any other GDScript that your tool script uses must
*also* be a tool. The editor is not able to construct instances from GDScript
files without @tool, which means you cannot call methods or reference member
variables from them otherwise. However, since static methods, constants and
enums can be used without creating an instance, it is possible to call them or
reference them from a @tool script onto other non-tool scripts. One exception to
this are static variables.
If you try to read a static variable's value in a script that does not have
@tool, it will always return null but won't print a warning or error
when doing so. This restriction does not apply to static methods, which can be
called regardless of whether the target script is in tool mode.
Extending a @tool script does not automatically make the extending script
a @tool. Omitting @tool from the extending script will disable tool
behavior from the super class. Therefore, the extending script should also
specify the @tool annotation.
Modifications in the editor are permanent, with no undo/redo possible. For example, in the next section when we remove the script, the node will keep its rotation. Be careful to avoid making unwanted modifications. Consider setting up version control to avoid losing work in case you make a mistake.
Debugging
While the debugger and breakpoints cannot be used directly with tool scripts, it is possible to launch a new instance of the editor and debug from there. To do this, navigate to Debug > Customize Run Instances... and specify --editor in Main Run Args.
See Übersicht der Debugging-Tools for more information.
Additionally, you can use print statements to display the contents of variables instead.
Probieren Sie @tool aus
Fügen Sie einen Sprite2D-Node zu Ihrer Szene hinzu und setzen Sie die Textur auf das Godot Icon. Fügen Sie ein Skript hinzu, öffnen Sie es und ändern Sie es wie folgt:
@tool
extends Sprite2D

func _process(delta):
    rotation += PI * delta
using Godot;

[Tool]
public partial class MySprite : Sprite2D
{
    public override void _Process(double delta)
    {
        Rotation += Mathf.Pi * (float)delta;
    }
}
Speichern Sie das Skript und kehren Sie zum Editor zurück. Sie sollten jetzt sehen, wie Ihr Objekt rotiert. Wenn Sie das Spiel ausführen, rotiert es ebenfalls.
Warnung
You may need to restart the editor. This is a known bug found in all Godot 4 versions: GH-66381.
Bemerkung
Wenn Sie die Änderungen nicht sehen, laden Sie die Szene neu (schließen Sie sie und öffnen sie erneut).
Wählen wir nun aus, welcher Code wann ausgeführt wird. Ändern Sie Ihre _process()-Funktion so ab:
func _process(delta):
    if Engine.is_editor_hint():
        rotation += PI * delta
    else:
        rotation -= PI * delta
public override void _Process(double delta)
{
    if (Engine.IsEditorHint())
    {
        Rotation += Mathf.Pi * (float)delta;
    }
    else
    {
        Rotation -= Mathf.Pi * (float)delta;
    }
}
Speichern Sie das Skript. Jetzt dreht sich das Objekt im Editor im Uhrzeigersinn, aber wenn Sie das Spiel ausführen, dreht es sich gegen den Uhrzeigersinn.
Variablen bearbeiten
Fügen Sie dem Skript eine variable Geschwindigkeit hinzu und exportieren Sie sie. Um die Geschwindigkeit zu aktualisieren und auch den Drehwinkel zurückzusetzen, fügen Sie einen Setter set(new_speed) hinzu, der mit der Eingabe vom Inspektor ausgeführt wird. Modifizieren Sie _process(), um die Rotationsgeschwindigkeit einzubeziehen.
@tool
extends Sprite2D


@export var speed = 1:
    # Update speed and reset the rotation.
    set(new_speed):
        speed = new_speed
        rotation = 0


func _process(delta):
    rotation += PI * delta * speed
using Godot;

[Tool]
public partial class MySprite : Sprite2D
{
    private float _speed = 1;

    [Export]
    public float Speed
    {
        get => _speed;
        set
        {
            // Update speed and reset the rotation.
            _speed = value;
            Rotation = 0;
        }
    }

    public override void _Process(double delta)
    {
        Rotation += Mathf.Pi * (float)delta * _speed;
    }
}
Bemerkung
Code from other nodes doesn't run in the editor. Your access to other nodes is limited. You can access the tree and nodes, and their default properties, but you can't access user variables. If you want to do so, other nodes have to run in the editor too.
Getting notified when arrays or dictionaries change
You can use an Array or Dictionary as an @export variable. In a @tool
script, you can react to any changes to that collection by using a setter.
Normally, at runtime, such a setter is only called when you assign to the
variable, but when you modify an Array or Dictionary in the inspector, the
setter will also be called.
@tool
class_name MyTool
extends Node

@export var my_array = []:
    set(new_array):
        my_array = new_array
        print("My array just changed!")

@export var my_dictionary = {}:
    set(new_dictionary):
        my_dictionary = new_dictionary
        print("My dictionary just changed!")
using Godot;

[Tool]
public partial class MyTool : Node
{
    private Array _myArray = new();
    private Dictionary _myDictionary = new();

    [Export]
    public Array MyArray
    {
        get => _myArray;
        set
        {
            _myArray = value;
            GD.Print("My array just changed!");
        }
    }

    [Export]
    public Dictionary MyDictionary
    {
        get => _myDictionary;
        set
        {
            _myDictionary = value;
            GD.Print("My dictionary just changed!");
        }
    }
}
Benachrichtigung bei Ressourcenänderungen
Sometimes you want your tool to use a resource. However, when you change a
property of that resource in the editor, the set() method of your tool will
not be called.
@tool
class_name MyTool
extends Node

@export var resource: MyResource:
    set(new_resource):
        resource = new_resource
        _on_resource_set()

# This will only be called when you create, delete, or paste a resource.
# You will not get an update when tweaking properties of it.
func _on_resource_set():
    print("My resource was set!")
using Godot;

[Tool]
public partial class MyTool : Node
{
    private MyResource _resource;

    [Export]
    public MyResource Resource
    {
        get => _resource;
        set
        {
            _resource = value;
            OnResourceSet();
        }
    }

    // This will only be called when you create, delete, or paste a resource.
    // You will not get an update when tweaking properties of it.
    private void OnResourceSet()
    {
        GD.Print("My resource was set!");
    }
}
Um dieses Problem zu umgehen, müssen Sie zunächst Ihre Ressource zu einem Tool machen und sie dazu bringen, das Signal changed auszusenden, wenn eine Property gesetzt wird:
# Make Your Resource a tool.
@tool
class_name MyResource
extends Resource

@export var property = 1:
    set(new_setting):
        property = new_setting
        # Emit a signal when the property is changed.
        changed.emit()
using Godot;

[Tool]
public partial class MyResource : Resource
{
    private float _property = 1;

    [Export]
    public float Property
    {
        get => _property;
        set
        {
            _property = value;
            // Emit a signal when the property is changed.
            EmitChanged();
        }
    }
}
Sie würden dann das Signal verbinden, wenn eine neue Ressource gesetzt wird:
@tool
class_name MyTool
extends Node

@export var resource: MyResource:
    set(new_resource):
        resource = new_resource
        # Connect the changed signal as soon as a new resource is being added.
        if resource != null:
            resource.changed.connect(_on_resource_changed)

func _on_resource_changed():
    print("My resource just changed!")
using Godot;

[Tool]
public partial class MyTool : Node
{
    private MyResource _resource;

    [Export]
    public MyResource Resource
    {
        get => _resource;
        set
        {
            _resource = value;
            // Connect the changed signal as soon as a new resource is being added.
            if (_resource != null)
            {
                _resource.Changed += OnResourceChanged;
            }
        }
    }

    private void OnResourceChanged()
    {
        GD.Print("My resource just changed!");
    }
}
Denken Sie schließlich daran, das Signal zu unterbrechen, da die alte Ressource verwendet und an anderer Stelle geändert wird, was zu unnötigen Aktualisierungen führen würde.
@export var resource: MyResource:
    set(new_resource):
        # Disconnect the signal if the previous resource was not null.
        if resource != null:
            resource.changed.disconnect(_on_resource_changed)
        resource = new_resource
        if resource != null:
            resource.changed.connect(_on_resource_changed)
[Export]
public MyResource Resource
{
    get => _resource;
    set
    {
        // Disconnect the signal if the previous resource was not null.
        if (_resource != null)
        {
            _resource.Changed -= OnResourceChanged;
        }
        _resource = value;
        if (_resource != null)
        {
            _resource.Changed += OnResourceChanged;
        }
    }
}
Meldung von Warnungen bei der Node-Konfiguration
Godot verwendet ein Node-Konfigurations-Warnsystem, um Benutzer vor falsch konfigurierten Nodes zu warnen. Wenn ein Node nicht korrekt konfiguriert ist, erscheint ein gelbes Warnzeichen neben dem Namen des Nodes im Scene-Dock. Wenn Sie mit dem Mauszeiger über das Symbol fahren oder darauf klicken, wird eine Warnmeldung eingeblendet. Sie können diese Funktion in Ihren Skripten verwenden, um Ihnen und Ihrem Team zu helfen, Fehler beim Einrichten von Szenen zu vermeiden.
Wenn Sie Node-Konfigurations-Warnungen verwenden, müssen Sie update_configuration_warnings aufrufen, wenn sich ein Wert ändert, der die Warnung beeinflussen oder entfernen soll. Standardmäßig wird die Warnung nur beim Schließen und erneuten Öffnen der Szene aktualisiert.
# Use setters to update the configuration warning automatically.
@export var title = "":
    set(p_title):
        if p_title != title:
            title = p_title
            update_configuration_warnings()

@export var description = "":
    set(p_description):
        if p_description != description:
            description = p_description
            update_configuration_warnings()


func _get_configuration_warnings():
    var warnings = []

    if title == "":
        warnings.append("Please set `title` to a non-empty value.")

    if description.length() >= 100:
        warnings.append("`description` should be less than 100 characters long.")

    # Returning an empty array means "no warning".
    return warnings
Ausführen von Einmal-Skripten mit EditorScript
Manchmal müssen Sie einen Code nur einmal ausführen, um eine bestimmte Aufgabe zu automatisieren, die im Editor nicht sofort verfügbar ist. Einige Beispiele könnten sein:
Verwenden Sie den Editor als Spielwiese für GDScript- oder C#-Skripte, ohne ein Projekt ausführen zu müssen. Die
print()Ausgabe wird im Ausgabefenster des Editors angezeigt.Skalieren Sie alle Lichtquellen-Nodes in der aktuell bearbeiteten Szene, da Sie bemerkt haben, dass Ihr Level am Ende zu dunkel oder zu hell aussieht, nachdem Sie die Lichter an den gewünschten Stellen platziert haben.
Ersetzen Sie Nodes, die durch Kopieren eingefügt wurden, durch Szeneninstanzen, damit sie später leichter geändert werden können.
Dies ist in Godot durch die Erweiterung EditorScript in einem Skript möglich. Dies ermöglicht es, einzelne Skripte im Editor auszuführen, ohne ein Editor-Plugin erstellen zu müssen.
Um ein EditorScript zu erstellen, klicken Sie mit der rechten Maustaste auf einen Ordner oder einen leeren Bereich im Dateisystem-Dock und wählen Sie Neu > Skript.... Klicken Sie im Dialogfenster für die Skripterstellung auf das Baumsymbol, um ein Objekt auszuwählen, das Sie erweitern möchten (oder geben Sie EditorScript direkt in das Feld auf der linken Seite ein, wobei die Groß- und Kleinschreibung beachtet werden muss):
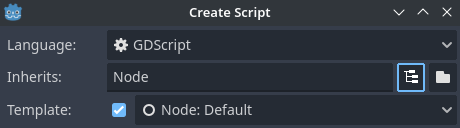
Erstellen eines Editor-Skripts im Dialogfeld "Skript-Editor erstellen
Dadurch wird automatisch eine Skriptvorlage ausgewählt, die für EditorScripts geeignet ist und bereits eine _run() Methode enthält:
@tool
extends EditorScript

# Called when the script is executed (using File -> Run in Script Editor).
func _run():
    pass
using Godot;

[Tool]
public partial class MyEditorScript : EditorScript
{
    // Called when the script is executed (right-click on Script -> Run in FileSystem dock).
    public override void _Run()
    {
        // ...
    }
}
This _run() method is executed when you use any of the 4 approaches that can be
used to run an EditorScript:
Use at the top of the script editor with the EditorScript being the current tab.
Press the keyboard shortcut Ctrl + Shift + X while the EditorScript is the current tab. This keyboard shortcut is only effective when focused on the script editor.
Right-click the script in the FileSystem dock and choose .
Add a
class_name <name>at the top of the script, bring up the command palette by pressing Ctrl + Shift + P, and enter the class name to run it. The entry will be named according to the class name, with automatic capitalization applied.
Scripts that extend EditorScript must be @tool scripts to function.
Bemerkung
EditorScripts can only be run from the Godot script editor. If you are using an external editor, use one of the last two approaches to run the script.
Bemerkung
C# EditorScripts cannot be run from the script editor as it only supports GDScript. Please refer to the above alternative approaches to run custom C# EditorScripts.
Keep in mind C# tool scripts will only appear in the command palette when denoted by the GlobalClass attribute.
Gefahr
EditorScripts haben keine Rückgängig-/Wiederherstellen-Funktion, also sichern Sie Ihre Szene, bevor Sie ein Skript ausführen, wenn das Skript Daten verändern soll.
To access nodes in the currently edited scene, use the EditorInterface.get_edited_scene_root() method which returns the root Node of the currently edited scene. Here's an example that recursively gets all nodes in the currently edited scene and doubles the range of all OmniLight3D nodes:
@tool
# Thanks to the class name, we can run this script by bringing up
# the command palette and searching "Scale Omni Lights".
class_name ScaleOmniLights
extends EditorScript

func _run():
    for node in EditorInterface.get_edited_scene_root().find_children("", "OmniLight3D"):
        # Don't operate on instanced subscene children, as changes are lost
        # when reloading the scene.
        # See the "Instancing scenes" section below for a description of `owner`.
        var is_instanced_subscene_child = node != get_scene() and node.owner != get_scene()
        if not is_instanced_subscene_child:
            node.omni_range *= 2.0
            EditorInterface.mark_scene_as_unsaved()
using Godot;

[GlobalClass, Tool]
// Thanks to the GlobalClass attribute, we can run this script by bringing up
// the command palette and searching "Scale Omni Lights".
public partial class ScaleOmniLights : EditorScript
{
    public override void _Run()
    {
        var sceneNode = EditorInterface.Singleton.GetEditedSceneRoot();

        foreach (OmniLight3D node in sceneNode.FindChildren("", "OmniLight3D"))
        {
            // Don't operate on instanced subscene children, as changes are lost
            // when reloading the scene.
            // See the "Instancing scenes" section below for a description of `owner`.
            var isInstancedSubsceneChild = node != sceneNode && node.Owner != sceneNode;
            if (!isInstancedSubsceneChild)
            {
                node.OmniRange *= 2.0f;
                EditorInterface.Singleton.MarkSceneAsUnsaved();
            }
        }
    }
}
In the above example, we also call EditorScript.mark_scene_as_unsaved() after any modification that affects the scene's state. This allows the editor to display the scene as "unsaved" (i.e. with an asterisk next to the name). This way, you also get a confirmation when trying to close the scene with unsaved changes.
Tipp
You can change the currently edited scene at the top of the editor even while the Script view is open. This will affect the return value of EditorInterface.get_edited_scene_root, so make sure you've selected the scene you intend to iterate upon before running the script.
Instanziierung von Szenen
Sie können gepackte Szenen ganz normal instanziieren und sie zu der gerade im Editor geöffneten Szene hinzufügen. Standardmäßig sind Nodes oder Szenen, die mit Node.add_child(node) hinzugefügt werden, nicht im Szenenbaum-Dock sichtbar und werden nicht auf der Festplatte gespeichert. Wenn Sie möchten, dass der Node oder die Szene im Szenenbaum sichtbar ist und beim Speichern der Szene auf der Festplatte gespeichert wird, müssen Sie die Property owner des Child-Nodes auf den aktuell bearbeiteten Szenen-Root setzen.
Wenn Sie @tool verwenden:
func _ready():
    var node = Node3D.new()
    add_child(node) # Parent could be any node in the scene

    # The line below is required to make the node visible in the Scene tree dock
    # and persist changes made by the tool script to the saved scene file.
    node.owner = get_tree().edited_scene_root
public override void _Ready()
{
    var node = new Node3D();
    AddChild(node); // Parent could be any node in the scene

    // The line below is required to make the node visible in the Scene tree dock
    // and persist changes made by the tool script to the saved scene file.
    node.Owner = GetTree().EditedSceneRoot;
}
If you are using EditorScript:
func _run():
    # `parent` could be any node in the scene.
    var parent = get_scene().get_node("Parent")
    var node = Node3D.new()
    parent.add_child(node)

    # The line below is required to make the node visible in the Scene tree dock
    # and persist changes made by the tool script to the saved scene file.
    node.owner = get_scene()
public override void _Run()
{
    // `parent` could be any node in the scene.
    var parent = GetScene().GetNode("Parent");
    var node = new Node3D();
    parent.AddChild(node);

    // The line below is required to make the node visible in the Scene tree dock
    // and persist changes made by the tool script to the saved scene file.
    node.Owner = GetScene();
}
Bemerkung
Changes made by tool scripts and EditorScript (such as adding nodes or modifying properties)
do not automatically mark the scene as unsaved. To show the asterisk (*)
and prevent accidental data loss, call
EditorInterface.mark_scene_as_unsaved()
after modifications, or use EditorUndoRedoManager for undo support.
Warnung
Die falsche Verwendung von @tool kann zu vielen Fehlern führen. Es ist ratsam, zuerst den Code so zu schreiben, wie Sie ihn haben wollen, und erst dann das @tool-Schlüsselwort am Anfang hinzuzufügen. Stellen Sie außerdem sicher, dass Sie Code, der im Editor läuft, von Code, der im Spiel läuft, trennen. Auf diese Weise können Sie Bugs leichter finden.