Attention: Here be dragons
This is the latest
(unstable) version of this documentation, which may document features
not available in or compatible with released stable versions of Godot.
Checking the stable version of the documentation...
Verwendung des AnimationTree
Einführung
With AnimationPlayer, Godot has one of the most flexible animation systems that you can find in any game engine. It is pretty much unique in its ability to animate almost any property in any node or resource, and its dedicated transform, bezier, function calling, audio, and sub-animation tracks.
However, the support for blending those animations via AnimationPlayer is limited, as you can only set a fixed cross-fade transition time.
AnimationTree is a node designed to deal with advanced transitions.
AnimationTree and AnimationPlayer
Before starting, know that an AnimationTree node does not contain its own animations.
Instead, it uses animations contained in an AnimationPlayer node. You create, edit, or import your animations in an AnimationPlayer
and then use an AnimationTree to control the playback.
AnimationPlayer and AnimationTree can be used in both 2D and 3D scenes. When importing 3D scenes and their animations, you can use
name suffixes
to simplify the process and import with the correct properties. At the end, the imported Godot scene will contain the animations in an AnimationPlayer node.
Since you rarely use imported scenes directly in Godot (they are either instantiated or inherited from), you can place the AnimationTree node in your
new scene which contains the imported one. Afterwards, point the AnimationTree node to the AnimationPlayer that was created in the imported scene.
This is how it's done in the Third Person Shooter demo, for reference:

Eine neue Szene wurde für den Spieler mit einem CharacterBody3D als Root erstellt. Innerhalb dieser Szene wurde die ursprüngliche .dae (Collada) Datei instanziiert und ein AnimationTree-Node erstellt.
Erstellen eines Baums
To use an AnimationTree, you have to set a root node. An animation root node is a class that contains and evaluates sub-nodes and outputs an animation.
There are 3 types of sub-nodes:
Animation-Nodes, die auf eine Animation aus dem verknüpften
AnimationPlayerverweisen.Animation Root nodes, which are used to blend sub-nodes and can be nested.
Animation Blend nodes, which are used in an
AnimationNodeBlendTree, a 2D graph of nodes. Blend nodes take multiple input ports and give one output port.
A few types of root nodes are available:

AnimationNodeAnimation: Selects an animation from the list and plays it. This is the simplest root node, and generally not used as a root.AnimationNodeBlendTree: Contains multiple nodes as children in a graph. Many blend nodes are available, such as mix, blend2, blend3, one shot, etc.AnimationNodeBlendSpace1D: Allows linear blending between two animation nodes. Control the blend position in a 1D blend space to mix between animations.AnimationNodeBlendSpace2D: Allows linear blending between three animation nodes. Control the blend position in a 2D blend space to mix between animations.AnimationNodeStateMachine: Contains multiple nodes as children in a graph. Each node is used as a state, with multiple functions used to alternate between states.
Blending-Baum
When you make an AnimationNodeBlendTree, you get an empty 2d graph in the bottom panel, under the AnimationTree tab. It contains only an Output
node by default.

In order for animations to play, a node has to be connected to the output. You can add nodes from the Add Node.. menu or by right clicking an empty space:

The simplest connection to make is to connect an Animation node to the output directly, which will just play back the animation.

Following is a description of the other available nodes:
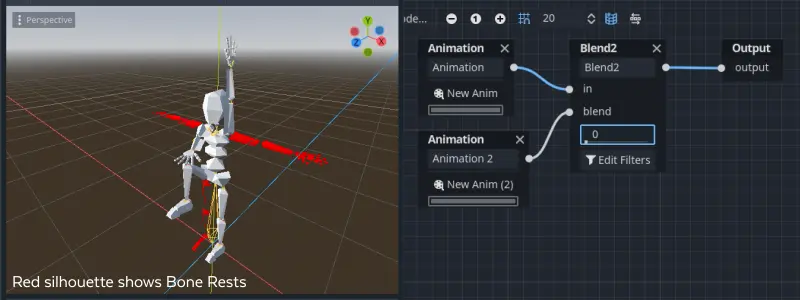
Blend2 / Blend3
Diese Nodes überblenden zwischen zwei oder drei Eingängen um einen vom Benutzer festgelegten Blending-Wert:

Blending can use filters to control individually which tracks get blended and which do not. This can be useful for layering animations on top of each other.

For more complex blending, it is recommended to use blend spaces instead.
OneShot
This node will execute an animation once and return when it finishes. You can customize blend times for fading in and out, as well as filters.

# Play child animation connected to "shot" port.
animation_tree.set("parameters/OneShot/request", AnimationNodeOneShot.ONE_SHOT_REQUEST_FIRE)
# Alternative syntax (same result).
animation_tree["parameters/OneShot/request"] = AnimationNodeOneShot.ONE_SHOT_REQUEST_FIRE

# Abort child animation connected to "shot" port.
animation_tree.set("parameters/OneShot/request", AnimationNodeOneShot.ONE_SHOT_REQUEST_ABORT)
# Alternative syntax (same result).
animation_tree["parameters/OneShot/request"] = AnimationNodeOneShot.ONE_SHOT_REQUEST_ABORT

# Get current state (read-only).
animation_tree.get("parameters/OneShot/active"))
# Alternative syntax (same result).
animation_tree["parameters/OneShot/active"]
// Play child animation connected to "shot" port.
animationTree.Set("parameters/OneShot/request", (int)AnimationNodeOneShot.OneShotRequest.Fire);

// Abort child animation connected to "shot" port.
animationTree.Set("parameters/OneShot/request", (int)AnimationNodeOneShot.OneShotRequest.Abort);

// Get current state (read-only).
animationTree.Get("parameters/OneShot/active");
TimeSeek
This node allows you to seek to a time in the animation connected to its in input. Use this node to play an Animation starting from a certain playback position.
Note that the seek request value is measured in seconds, so if you would like to play an animation from the beginning, set the value to 0.0, or if you would like
to play an animation from 3 seconds in, set the value to 3.0.

# Play child animation from the start.
animation_tree.set("parameters/TimeSeek/seek_request", 0.0)
# Alternative syntax (same result).
animation_tree["parameters/TimeSeek/seek_request"] = 0.0

# Play child animation from 12 second timestamp.
animation_tree.set("parameters/TimeSeek/seek_request", 12.0)
# Alternative syntax (same result).
animation_tree["parameters/TimeSeek/seek_request"] = 12.0
// Play child animation from the start.
animationTree.Set("parameters/TimeSeek/seek_request", 0.0);

// Play child animation from 12 second timestamp.
animationTree.Set("parameters/TimeSeek/seek_request", 12.0);
TimeScale
This node allows you to scale the speed of the animation connected to its in input. The speed of the animation will be multiplied by the number in the scale parameter. Setting the scale to 0 will pause the animation. Setting the scale to a negative number will play the animation backwards.

Übergang
This node is a simplified version of a StateMachine. You connect animations to the inputs, and the current state index determines which animation to play. You may specify a crossfade transition time. In the Inspector, you may change the number of input ports, rearrange inputs, or delete inputs.

# Play child animation connected to "state_2" port.
animation_tree.set("parameters/Transition/transition_request", "state_2")
# Alternative syntax (same result).
animation_tree["parameters/Transition/transition_request"] = "state_2"

# Get current state name (read-only).
animation_tree.get("parameters/Transition/current_state")
# Alternative syntax (same result).
animation_tree["parameters/Transition/current_state"]

# Get current state index (read-only).
animation_tree.get("parameters/Transition/current_index"))
# Alternative syntax (same result).
animation_tree["parameters/Transition/current_index"]
// Play child animation connected to "state_2" port.
animationTree.Set("parameters/Transition/transition_request", "state_2");

// Get current state name (read-only).
animationTree.Get("parameters/Transition/current_state");

// Get current state index (read-only).
animationTree.Get("parameters/Transition/current_index");
StateMachine
When you make an AnimationNodeStateMachine, you get an empty 2d graph in the bottom panel, under the AnimationTree tab. It contains a Start and End
state by default.

To add states, right click or use the create new nodes button, whose icon is a plus in a box. You can add animations, blendspaces, blendtrees, or even another StateMachine. To edit one of these more complex sub-nodes, click on the pencil icon on the right of the state. To return to the original StateMachine, click Root on the top left of the panel.
Before the StateMachine can do anything useful, the states must be connected with transitions. To add a transition, click the connect nodes button, which is a line with a right-facing arrow, and drag between two states. You can create 2 transitions between states, one going in each direction.

There are 3 types of transitions:

Immediate: Will switch to the next state immediately.
Sync: Wechselt sofort zum nächsten Zustand, sucht aber den neuen Zustand an der Abspielposition des alten Zustands.
Am Ende: Wartet auf das Ende der Wiedergabe des aktuellen Zustands und schaltet dann auf den Beginn der Animation des nächsten Zustands um.
Transitions also have a few properties. Click a transition and it will be displayed in the inspector:

Crossfade Time ist die Zeit zum Cross-Fade zwischen diesem und dem nächsten Status.
Xfade Curve is a cross-fade following a curve rather than a linear blend.
Reset determines whether the state you are switching into plays from the beginning (true) or not (false).
Priorität wird zusammen mit der Funktion
travel()aus dem Code verwendet (mehr dazu später). Übergänge mit niedrigerer Priorität werden beim Traveling des Baums bevorzugt.Switch Mode is the transition type (see above). It can be changed after creation here.
Advance Mode determines the advance mode. If
Disabled, the transition will not be used. IfEnabled, the transition will only be used duringtravel(). IfAuto, the transition will be used if the advance condition and expression are true, or if there are no advance conditions/expressions.
Advance Condition and Advance Expression
The last 2 properties in a StateMachine transition are Advance Condition and Advance Expression. When the Advance Mode is set to Auto, these
determine if the transition will advance or not.
Advance Condition is a true/false check. You may put a custom variable name in the text field, and when the StateMachine reaches this transition, it will check if your variable is true. If so, the transition continues. Note that the advance condition only checks if a variable is true, and it cannot check for falseness.
This gives the Advance Condition a very limited capability. If you wanted to make a transition back and forth based on one property, you would need to make 2 variables that have opposite values, and check if either of them are true. This is why, in Godot 4, the Advance Expression was added.
The Advance Expression works similar to the Advance Condition, but instead of checking if one variable is true, it evaluates any expression. An expression
is anything you could put in an if statement. These are all examples of expressions that would work in the Advance Expression:
is_walkingis_walking == true(behaves the same as the one above)is_walking && !is_idlevelocity > 0player.is_on_floor()
Warnung
The expression is case-sensitive. If you reference engine properties,
such as velocity on a CharacterBody3D node, you should use
snake_case naming conventions. If you reference script properties,
you should match the style used in the script, which is typically
snake_case in GDScript and PascalCase in C#.
Here is an example of an improperly-set-up StateMachine transition using Advance Condition:


This is not working because there is a ! variable in the Advance Condition, which cannot be checked.
Here is the same example, set up properly, using two opposite variables:


Here is the same example, but using Advance Expression rather than Advance Condition, which eliminates the need for two variables:


In order to use Advance Expressions, the Advance Expression Base Node has to be set from the Inspector of the AnimationTree node. By default, it is set to the AnimationTree node itself, but it needs to point to whatever node contains the script with your animation variables.
Siehe auch
The Advance Expression is evaluated using Godot's Expression class. See Auswertung von Ausdrücken for more information on writing expressions.
StateMachine travel
One of the nice features in Godot's StateMachine implementation is the ability to travel. You can instruct the graph to go from the
current state to another one, while visiting all the intermediate ones. This is done via the A* algorithm.
If there is no path of transitions starting at the current state and finishing at the destination state, the graph teleports to the destination state.
To use the travel ability, you should first retrieve the AnimationNodeStateMachinePlayback
object from the AnimationTree node (it is exported as a property), and then call one of its many functions:
var state_machine = animation_tree["parameters/playback"]
state_machine.travel("SomeState")
AnimationNodeStateMachinePlayback stateMachine = (AnimationNodeStateMachinePlayback)animationTree.Get("parameters/playback");
stateMachine.Travel("SomeState");
The StateMachine must be running before you can travel. Make sure to either call start() or connect a node to Start.
BlendSpace2D and BlendSpace1D
BlendSpace2D is a node to do advanced blending in two dimensions. Points representing animations are added to a 2D space and then a position between them
is controlled to determine the blending:

You may place these points anywhere on the graph by right clicking or using the add point button, whose icon is a pen and point. Wherever you place the points, the triangle between them will be generated automatically using Delaunay. You may also control and label the ranges in X and Y.

Finally, you may also change the blend mode. By default, blending happens by interpolating points inside the closest triangle. When dealing with 2D animations (frame by frame), you may want to switch to Discrete mode. Alternatively, if you want to keep the current play position when switching between discrete animations, there is a Carry mode. This mode can be changed in the Blend menu:

BlendSpace1D works just like BlendSpace2D, but in one dimension (a line). Triangles are not used.

Sync mode
Both BlendSpace1D and BlendSpace2D have a Sync Mode property that controls how animations advance when they are blended.
This replaces the older boolean sync property and offers more precise control.

There are four modes available:
None (default): Inactive animations are frozen and do not advance. Only the currently active (highest-weight) animation moves forward.
Independent: Inactive animations advance with a weight of
0. This matches the behavior of the oldsync = truesetting.Cyclic Mutable: All animations are time-scaled so their phases stay aligned. The shared cycle length is computed dynamically from the active blend weights, which means a single unblended animation plays at its normal speed. This is useful when all your animations have the same logical cycle (e.g. locomotion loops) but may differ slightly in length.
Cyclic Constant: All animations are time-scaled to complete one full cycle in exactly Cyclic Length seconds, regardless of their individual lengths. Set the
cyclic_lengthproperty to your desired cycle duration (must be greater than0).
Warnung
Cyclic sync modes require that all blend points use AnimationNodeAnimation with a finite, immutable length. If any blend point uses a different node type, a warning will be shown and cyclic sync will not take effect:

Bemerkung
When using either cyclic mode with animations of different lengths, applying an AnimationNodeTimeSeek to the output will break synchronization. In that case, use AnimationNodeAnimation.use_custom_timeline to normalize animation lengths before syncing.
Für besseres Blending
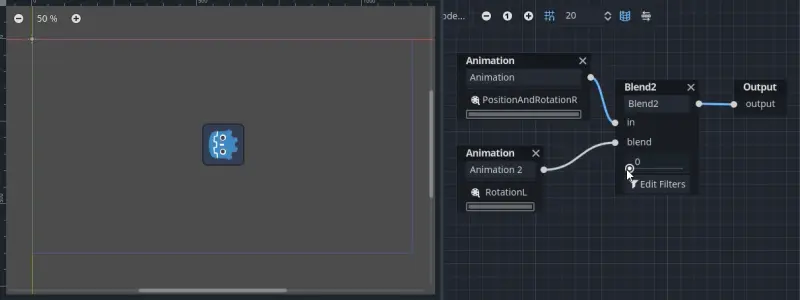
For the blending results to be deterministic (reproducible and always consistent), the blended property values must have a specific initial value. For example, in the case of two animations to be blended, if one animation has a property track and the other does not, the blended animation is calculated as if the latter animation had a property track with the initial value.
Bei der Verwendung von Positions/Rotations/Skalierungs-3D-Tracks für Skeleton3D-Knochen ist der Anfangswert Knochen-Standardpose. Für andere Propertys ist der Anfangswert 0 und wenn der Track in der RESET-Animation vorhanden ist, wird stattdessen der Wert seines ersten Keyframes verwendet.
Der folgende AnimationPlayer hat z.B. zwei Animationen, aber in einer von ihnen fehlt ein Property-Track für Position.
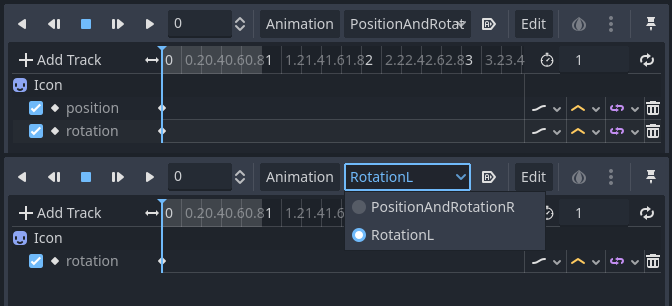
Das bedeutet, dass die Animation ohne diese Positionen als Vector2(0, 0) behandelt wird.
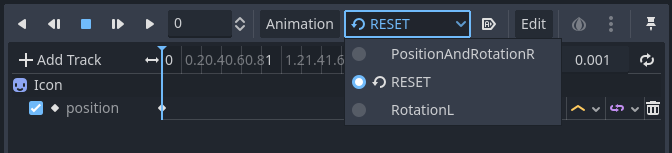
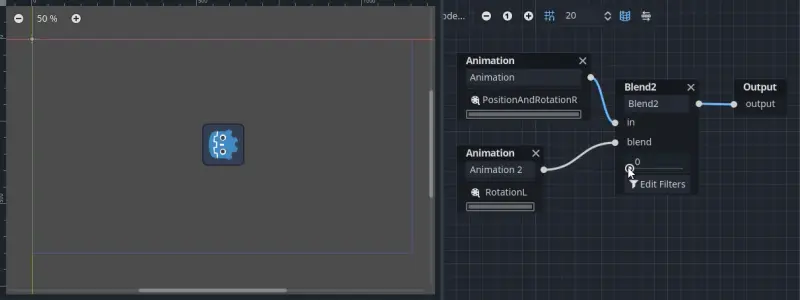
Dieses Problem kann gelöst werden, indem ein Property-Track für Position als Anfangswert der RESET-Animation hinzugefügt wird.
Bemerkung
Beachten Sie, dass die RESET-Animation existiert, um die Standard-Pose beim Laden des Objekts zu definieren. Es wird angenommen, dass diese nur einen Frame lang ist und nicht dazu gedacht ist, auf der Zeitachse abgespielt zu werden.
Also keep in mind that the Rotation 3D tracks and the Property tracks for 2D rotation with Interpolation Type set to Linear Angle or Cubic Angle will prevent rotations greater than 180 degrees from the initial value as blended animation.
Dies kann für Skeleton3Ds nützlich sein, um zu verhindern, dass die Knochen beim Blending von Animationen in den Körper eindringen. Daher sollten die Skeleton3D-Werte für Knochen-Standardpose so nah wie möglich am Mittelpunkt des beweglichen Bereichs liegen. Das bedeutet, dass es bei humanoiden Modellen besser ist, sie in einer T-Position zu importieren.
Sie können sehen, dass der kürzeste Rotationspfad von Knochen-Standardposen gegenüber dem kürzesten Rotationspfad zwischen Animationen bevorzugt wird.
Wenn Sie Skeleton3D selbst um mehr als 180 Grad rotieren müssen, indem Sie Animationen für die Bewegung überblenden, können Sie Root-Bewegung verwenden.
Root-Bewegung
Bei der Arbeit mit 3D-Animationen ist es eine beliebte Technik, den Root-Skelettknochen zu verwenden, um dem Rest des Skeletts Bewegung zu verleihen. Auf diese Weise können Charaktere so animiert werden, dass die Schritte tatsächlich dem Boden darunter entsprechen. Außerdem ermöglicht es eine präzise Interaktion mit Objekten während der Zwischensequenzen.
Bei der Wiedergabe der Animation in Godot ist es möglich, diesen Knochen als Root-Bewegungstrack auszuwählen. Dadurch wird die Knochen-Transformation visuell aufgehoben (die Animation bleibt an ihrem Platz).

Anschließend kann die eigentliche Bewegung über die AnimationTree-API als Transformation abgerufen werden:
# Get the motion delta.
animation_tree.get_root_motion_position()
animation_tree.get_root_motion_rotation()
animation_tree.get_root_motion_scale()

# Get the actual blended value of the animation.
animation_tree.get_root_motion_position_accumulator()
animation_tree.get_root_motion_rotation_accumulator()
animation_tree.get_root_motion_scale_accumulator()
// Get the motion delta.
animationTree.GetRootMotionPosition();
animationTree.GetRootMotionRotation();
animationTree.GetRootMotionScale();

// Get the actual blended value of the animation.
animationTree.GetRootMotionPositionAccumulator();
animationTree.GetRootMotionRotationAccumulator();
animationTree.GetRootMotionScaleAccumulator();
Dies kann an Funktionen wie CharacterBody3D.move_and_slide weitergegeben werden, um die Bewegung des Charakters zu steuern.
There is also a tool node, RootMotionView, you can place a scene that will act as a custom floor for your
character and animations (this node is disabled by default during the game).
Steuern aus dem Code heraus
Nachdem der Baum erstellt und in der Vorschau angezeigt wurde, bleibt nur noch die Frage: "Wie wird das alles vom Code aus gesteuert?".
Keep in mind that the animation nodes are just resources, so they are shared between all instances using them.
Setting values in the nodes directly will affect all instances of the scene that uses this AnimationTree.
This is generally undesirable, but does have some cool use cases, e.g. you can copy and paste parts of your animation tree,
or reuse nodes with a complex layout (such as a StateMachine or blend space) in different animation trees.
Die eigentlichen Animationsdaten sind im AnimationTree-Node enthalten und werden über Propertys angesprochen. Im Abschnitt "Parameter" des Nodes AnimationTree finden Sie alle Parameter, die in Echtzeit geändert werden können:

This is handy because it makes it possible to animate them from an AnimationPlayer, or even the AnimationTree itself,
allowing very complex animation logic.
To modify these values from code, you must obtain the property path. You can find them by hovering your mouse over any of the parameters:

Then you can set or read them:
animation_tree.set("parameters/eye_blend/blend_amount", 1.0)
# Alternate syntax (same result)
animation_tree["parameters/eye_blend/blend_amount"] = 1.0
animationTree.Set("parameters/eye_blend/blend_amount", 1.0);
Bemerkung
Advance Expressions from a StateMachine will not be found under the parameters. This is because they are held in another script rather than the AnimationTree itself. Advance Conditions will be found under parameters.