Scripting
Introduction
Before Godot 3.0, the only choice for scripting a game was to use GDScript. Nowadays, Godot has four (yes, four!) official languages and the ability to add extra scripting languages dynamically!
This is great, mostly due to the large amount of flexibility provided, but it also makes our work supporting languages more difficult.
The "main" languages in Godot, though, are GDScript and VisualScript. The main reason to choose them is their level of integration with Godot, as this makes the experience smoother; both have slick editor integration, while C# and C++ need to be edited in a separate IDE. If you are a big fan of statically typed languages, go with C# and C++ instead.
GDScript
GDScript is, as mentioned above, the main language used in Godot. Using it has some positive points compared to other languages due to its high integration with Godot:
It's simple, elegant, and designed to be familiar for users of other languages such as Lua, Python, Squirrel, etc.
Loads and compiles blazingly fast.
The editor integration is a pleasure to work with, with code completion for nodes, signals, and many other items pertaining to the scene being edited.
Has vector types built-in (such as Vectors, transforms, etc.), making it efficient for heavy use of linear algebra.
Supports multiple threads as efficiently as statically typed languages - one of the limitations that made us avoid VMs such as Lua, Squirrel, etc.
Uses no garbage collector, so it trades a small bit of automation (most objects are reference counted anyway), by determinism.
Its dynamic nature makes it easy to optimize sections of code in C++ (via GDNative) if more performance is required, all without recompiling the engine.
If you're undecided and have experience with programming, especially dynamically typed languages, go for GDScript!
VisualScript
Beginning with 3.0, Godot offers Visual Scripting. This is a typical implementation of a "blocks and connections" language, but adapted to how Godot works.
Visual scripting is a great tool for non-programmers, or even for experienced developers who want to make parts of the code more accessible to others, like game designers or artists.
It can also be used by programmers to build state machines or custom visual node workflows - for example, a dialogue system.
.NET / C#
As Microsoft's C# is a favorite amongst game developers, we have added official support for it. C# is a mature language with tons of code written for it, and support was added thanks to a generous donation from Microsoft.
It has an excellent tradeoff between performance and ease of use, although one must be aware of its garbage collector.
Since Godot uses the Mono .NET runtime, in theory any third-party .NET library or framework can be used for scripting in Godot, as well as any Common Language Infrastructure-compliant programming language, such as F#, Boo or ClojureCLR. In practice however, C# is the only officially supported .NET option.
GDNative / C++
Finally, one of our brightest additions for the 3.0 release: GDNative allows scripting in C++ without needing to recompile (or even restart) Godot.
Any C++ version can be used, and mixing compiler brands and versions for the generated shared libraries works perfectly, thanks to our use of an internal C API Bridge.
This language is the best choice for performance and does not need to be used throughout an entire game, as other parts can be written in GDScript or Visual Script. However, the API is clear and easy to use as it resembles, mostly, Godot's actual C++ API.
More languages can be made available through the GDNative interface, but keep in mind we don't have official support for them.
Scripting a scene
For the rest of this tutorial we'll set up a GUI scene consisting of a button and a label, where pressing the button will update the label. This will demonstrate:
Writing a script and attaching it to a node.
Hooking up UI elements via signals.
Writing a script that can access other nodes in the scene.
Before continuing, make sure to skim and bookmark the GDScript reference. It's a language designed to be simple, and the reference is structured into sections to make it easier to get an overview of the concepts.
Scene setup
If you still have the "instancing" project open from the previous tutorial, then close that out (Project -> Quit to Project List) and create a New Project.
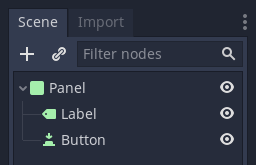
Use the "Add Child Node" dialogue accessed from the Scene tab (or by pressing Ctrl + A) to create a hierarchy with the following nodes:
Panel
Label
Button
The scene tree should look like this:
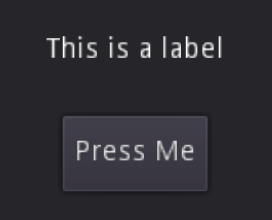
Use the 2D editor to position and resize the Button and Label so that they look like the image below. You can set the text from the Inspector tab.
Finally, save the scene with a name such as sayhello.tscn.
Adding a script
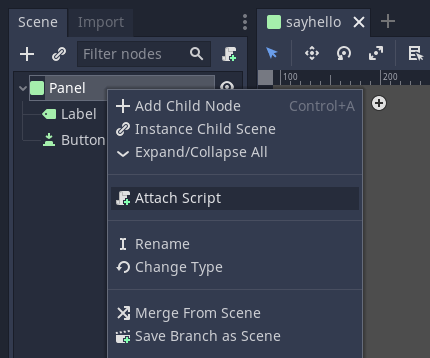
Right click on the Panel node, then select "Attach Script" from the context menu:
The script creation dialog will pop up. This dialog allows you to set the script's language, class name, and other relevant options.
In GDScript, the file itself represents the class, so the class name field is not editable.
The node we're attaching the script to is a panel, so the Inherits field will automatically be filled in with "Panel". This is what we want, as the script's goal is to extend the functionality of our panel node.
Finally, enter a path name for the script and select Create:

The script will then be created and added to the node. You can see this as an "Open script" icon next to the node in the Scene tab, as well as in the script property under Inspector:
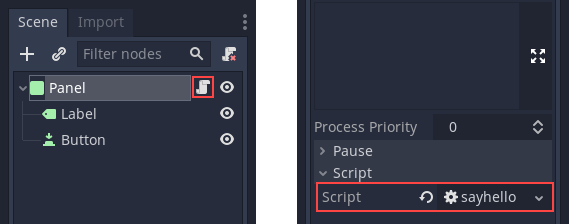
To edit the script, select either of these buttons, both of which are highlighted in the above image. This will bring you to the script editor, where a default template will be included:
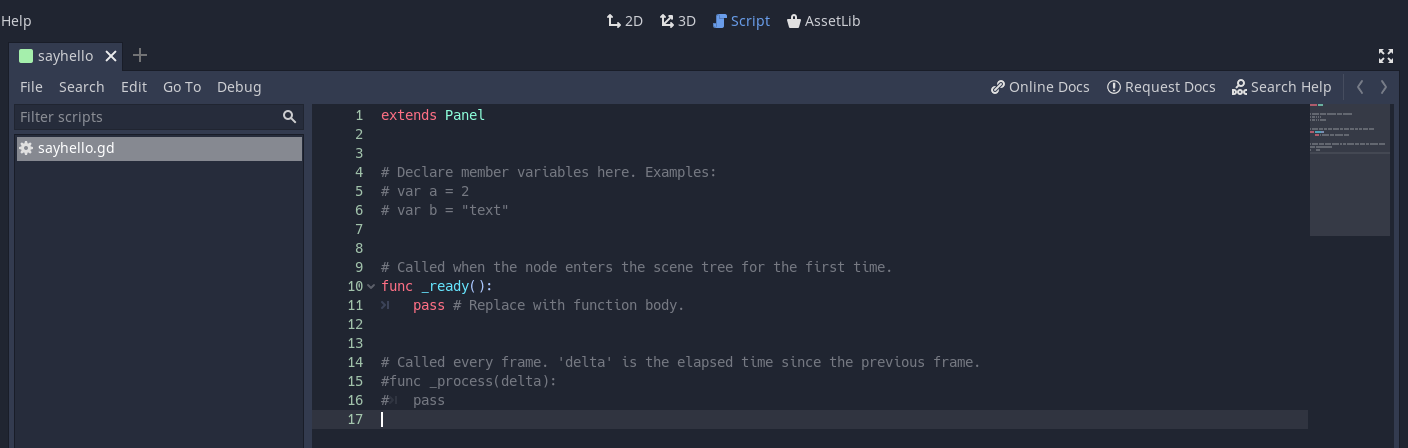
There's not much there. The _ready() function is called when the
node, and all its children, enters the active scene. Note: _ready() is not
the constructor; the constructor is instead _init().
The role of the script
A script adds behavior to a node. It is used to control how the node functions as well as how it interacts with other nodes: children, parent, siblings, and so on. The local scope of the script is the node. In other words, the script inherits the functions provided by that node.

Handling a signal
Signals are "emitted" when some specific kind of action happens, and they can be connected to any function of any script instance. Signals are used mostly in GUI nodes, although other nodes have them too, and you can even define custom signals in your own scripts.
In this step, we'll connect the "pressed" signal to a custom function. Forming connections is the first part and defining the custom function is the second part. For the first part, Godot provides two ways to create connections: through a visual interface the editor provides or through code.
While we will use the code method for the remainder of this tutorial series, let's cover how the editor interface works for future reference.
Select the Button node in the scene tree and then select the "Node" tab. Next, make sure that you have "Signals" selected.
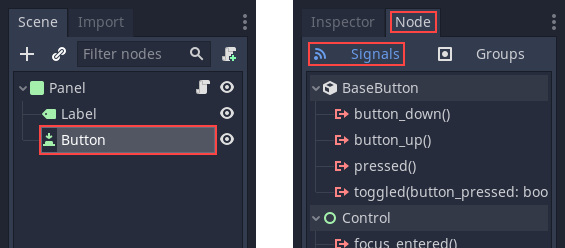
If you then select "pressed()" under "BaseButton" and click the "Connect..." button in the bottom right, you'll open up the connection creation dialogue.

The top of the dialogue displays a list of your scene's nodes with the emitting node's name highlighted in blue. Select the "Panel" node here.
The bottom of the dialogue shows the name of the method that will be created.
By default, the method name will contain the emitting node's name ("Button" in
this case), resulting in _on_[EmitterNode]_[signal_name].
And that concludes the guide on how to use the visual interface. However, this is a scripting tutorial, so for the sake of learning, let's dive into the manual process!
To accomplish this, we will introduce a function that is probably the most used by Godot programmers: Node.get_node(). This function uses paths to fetch nodes anywhere in the scene, relative to the node that owns the script.
For the sake of convenience, delete everything underneath extends Panel.
You will fill out the rest of the script manually.
Because the Button and Label are siblings under the Panel
where the script is attached, you can fetch the Button by typing
the following underneath the _ready() function:
func _ready():
    get_node("Button")
public override void _Ready()
{
    GetNode("Button");
}
Next, write a function which will be called when the button is pressed:
func _on_Button_pressed():
    get_node("Label").text = "HELLO!"
public void _OnButtonPressed()
{
    GetNode<Label>("Label").Text = "HELLO!";
}
Finally, connect the button's "pressed" signal to _on_Button_pressed() by
using Object.connect().
func _ready():
    get_node("Button").connect("pressed", self, "_on_Button_pressed")
public override void _Ready()
{
    GetNode("Button").Connect("pressed", this, nameof(_OnButtonPressed));
}
The final script should look like this:
extends Panel

func _ready():
    get_node("Button").connect("pressed", self, "_on_Button_pressed")

func _on_Button_pressed():
    get_node("Label").text = "HELLO!"
using Godot;

// IMPORTANT: the name of the class MUST match the filename exactly.
// this is case sensitive!
public class sayhello : Panel
{
    public override void _Ready()
    {
        GetNode("Button").Connect("pressed", this, nameof(_OnButtonPressed));
    }

    public void _OnButtonPressed()
    {
        GetNode<Label>("Label").Text = "HELLO!";
    }
}
Run the scene and press the button. You should get the following result:
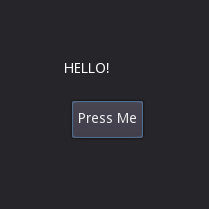
Why, hello there! Congratulations on scripting your first scene.
Note
A common misunderstanding regarding this tutorial is how get_node(path)
works. For a given node, get_node(path) searches its immediate children.
In the above code, this means that Button must be a child of Panel. If
Button were instead a child of Label, the code to obtain it would be:
# Not for this case,
# but just in case.
get_node("Label/Button")
// Not for this case,
// but just in case.
GetNode("Label/Button")
Also, remember that nodes are referenced by name, not by type.
Note
The 'advanced' panel of the connect dialogue is for binding specific values to the connected function's parameters. You can add and remove values of different types.
The code approach also enables this with a 4th Array parameter that
is empty by default. Feel free to read up on the Object.connect
method for more information.