Control the game's UI with code
Intro
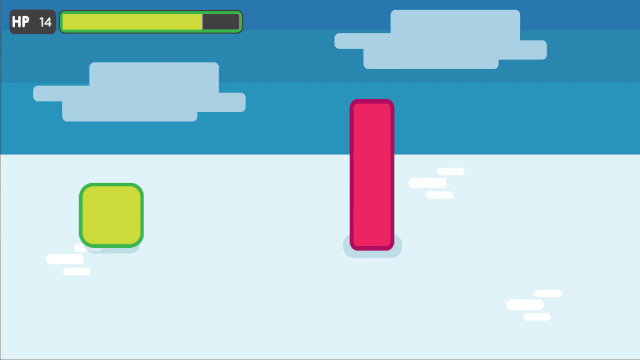
In this tutorial, you will connect a character to a life bar and animate the health loss.
Here's what you'll create: the bar and the counter animate when the character takes a hit. They fade when it dies.
You will learn:
How to connect a character to a GUI with signals
How to control a GUI with GDscript
How to animate a life bar with the Tween node
If you want to learn how to set up the interface instead, check out the step-by-step UI tutorials:
When you code a game, you want to build the core gameplay first: the main mechanics, player input, win and loss conditions. The UI comes a bit later. You want to keep all the elements that make up your project separate if possible. Each character should be in its own scene, with its own scripts, and so should the UI elements. This prevents bugs, keeps your project manageable, and allows different team members to work on different parts of the game.
Once the core gameplay and the UI are ready, you'll need to connect them somehow. In our example, we have the Enemy who attacks the Player at constant time intervals. We want the life bar to update when the Player takes damage.
To do this, we will use signals.
Note
Signals are Godot's version of the Observer pattern. They allow us to send out some message. Other nodes can connect to the object that emits the signal and receive the information. It's a powerful tool we use a lot for User Interface and achievement systems. You don't want to use them everywhere, though. Connecting two nodes adds some coupling between them. When there's a lot of connections, they become hard to manage. For more information, check out the signals video tutorial on GDquest.
Download and explore the start project
Download the Godot project: ui_code_life_bar.zip. It contains all the assets and scripts you
need to get started. Extract the .zip archive to get two folders: start and end.
Load the start project in Godot. In the FileSystem dock,
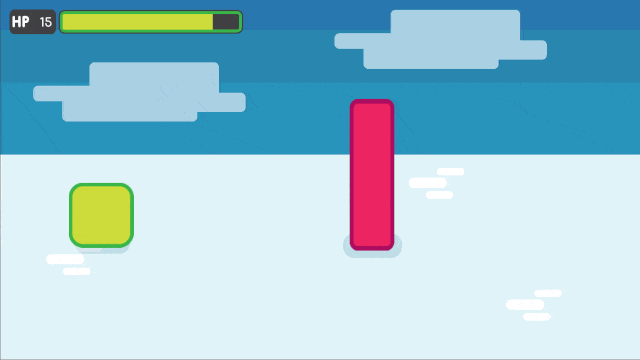
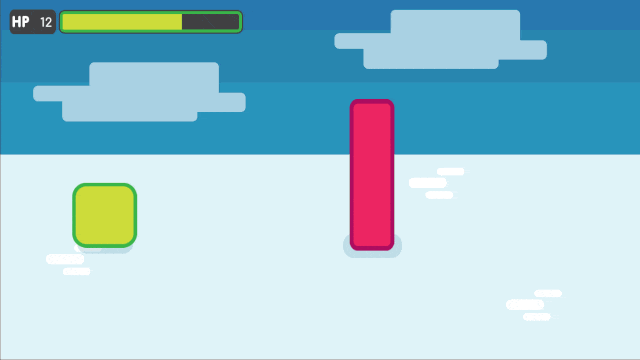
double click on LevelMockup.tscn to open it. It's an RPG game's mockup
where 2 characters face each other. The pink enemy attacks and damages
the green square at regular time intervals, until its death. Feel free
to try out the game: the basic combat mechanics already work. But as the
character isn't connected to the life bar, the GUI doesn't do
anything.
Note
This is typical of how you'd code a game: you implement the core gameplay first, handle the player's death, and only then you'll add the interface. That's because the UI listens to what's happening in the game. So it can't work if other systems aren't in place yet. If you design the UI before you prototype and test the gameplay, chances are it won't work well and you'll have to re-create it from scratch.
The scene contains a background sprite, a GUI, and two characters.
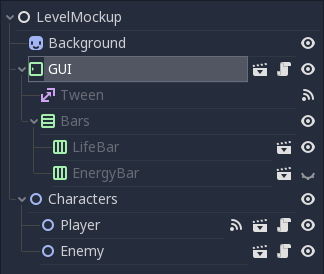
The scene tree, with the GUI scene set to display its children
The GUI scene encapsulates all of the game's Graphical User Interface. It comes with a barebones script where we get the path to nodes that exist inside the scene:
onready var number_label = $Bars/LifeBar/Count/Background/Number
onready var bar = $Bars/LifeBar/TextureProgress
onready var tween = $Tween
public class Gui : MarginContainer
{
    private Tween _tween;
    private Label _numberLabel;
    private TextureProgress _bar;

    public override void _Ready()
    {
        // C# doesn't have an onready feature, this works just the same.
        _bar = (TextureProgress) GetNode("Bars/LifeBar/TextureProgress");
        _tween = (Tween) GetNode("Tween");
        _numberLabel = (Label) GetNode("Bars/LifeBar/Count/Background/Number");
    }
}
number_labeldisplays a life count as a number. It's aLabelnodebaris the life bar itself. It's aTextureProgressnodetweenis a component-style node that can animate and control any value or method from any other node
Note
The project uses a simple organization that works for game jams and tiny games.
At the root of the project, in the res:// folder, you will find the LevelMockup. That's the main game scene and the one we will work with. All the components that make up the game are in the scenes/ folder. The assets/ folder contains the game sprites and the font for the HP counter. In the scripts/ folder you will find the enemy, the player, and the GUI controller scripts.
Click the edit scene icon to the right of the node in the scene tree to open the scene in the editor. You'll see the LifeBar and EnergyBar are sub-scenes themselves.
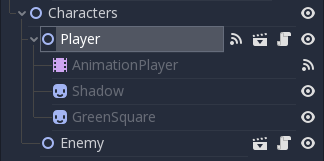
The scene tree, with the Player scene set to display its children
Set up the Lifebar with the Player's max_health
We have to tell the GUI somehow what the player's current health is, to
update the lifebar's texture, and to display the remaining health in the
HP counter in the top left corner of the screen. To do this we send the
player's health to the GUI every time they take damage. The GUI will then
update the Lifebar and Number nodes with this value.
We could stop here to display the number, but we need to initialize the
bar's max_value for it to update in the right proportions. The first
step is thus to tell the GUI what the green character's
max_health is.
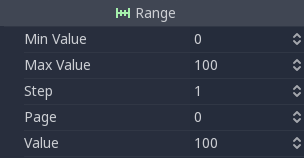
Tip
The bar, a TextureProgress, has a max_value of 100 by default. If you don't need to display the character's health with a number, you don't need to change its max_value property. You send a percentage from the Player to the GUI instead: health / max_health * 100.
Click the script icon to the right of the GUI in the Scene dock to
open its script. In the _ready function, we're going to store the
Player's max_health in a new variable and use it to set the
bar's max_value:
func _ready():
    var player_max_health = $"../Characters/Player".max_health
    bar.max_value = player_max_health
public override void _Ready()
{
    // Add this below _bar, _tween, and _numberLabel.
    var player = (Player) GetNode("../Characters/Player");
    _bar.MaxValue = player.MaxHealth;
}
Let's break it down. $"../Characters/Player" is a shorthand that
goes one node up in the scene tree, and retrieves the
Characters/Player node from there. It gives us access to the node.
The second part of the statement, .max_health, accesses the
max_health on the Player node.
The second line assigns this value to bar.max_value. You could
combine the two lines into one, but we'll need to use
player_max_health again later in the tutorial.
Player.gd sets the health to max_health at the start of the
game, so we could work with this. Why do we still use max_health?
There are two reasons:
We don't have the guarantee that health will always equal
max_health: a future version of the game may load a level where
the player already lost some health.
Note
When you open a scene in the game, Godot creates nodes one by one, following the order in your Scene dock, from top to bottom. GUI and Player are not part of the same node branch. To make sure they both exist when we access each other, we have to use the _ready function. Godot calls _ready right after it loaded all nodes, before the game starts. It's the perfect function to set everything up and prepare the game session. Learn more about _ready: Scripting (continued)
Update health with a signal when the player takes a hit
Our GUI is ready to receive the health value updates from the
Player. To achieve this we're going to use signals.
Note
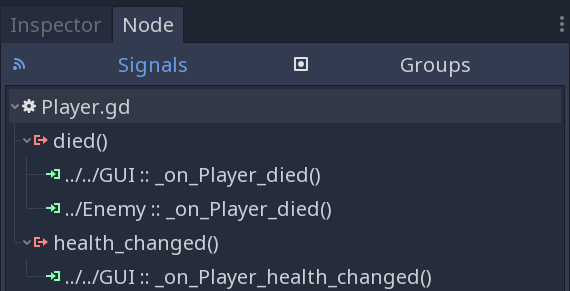
There are many useful built-in signals like enter_tree and exit_tree, that all nodes emit when they are respectively created and destroyed. You can also create your own using the signal keyword. On the Player node, you'll find two signals we created for you: died and health_changed.
Why don't we directly get the Player node in the _process
function and look at the health value? Accessing nodes this way creates
tight coupling between them. If you did it sparingly it may work. As
your game grows bigger, you may have many more connections. If you get
nodes this way it gets complex quickly. Not only that: you
need to listen to the state change constantly in the _process
function. This check happens 60 times a second and you'll likely break
the game because of the order in which the code runs.
On a given frame you may look at another node's property before it was updated: you get a value from the last frame. This leads to obscure bugs that are hard to fix. On the other hand, a signal is emitted right after a change happened. It guarantees you're getting a fresh piece of information. And you will update the state of your connected node right after the change happened.
Note
The Observer pattern, that signals derive from, still adds a bit of coupling between node branches. But it's generally lighter and more secure than accessing nodes directly to communicate between two separate classes. It can be okay for a parent node to get values from its children. But you'll want to favor signals if you're working with two separate branches. Read Game Programming Patterns for more information on the Observer pattern. The full book is available online for free.
With this in mind, let's connect the GUI to the Player. Click on
the Player node in the scene dock to select it. Head down to the
Inspector and click on the Node tab. This is the place to connect nodes
to listen to the one you selected.
The first section lists custom signals defined in Player.gd:
diedis emitted when the character died. We will use it in a moment to hide the UI.health_changedis emitted when the character got hit.
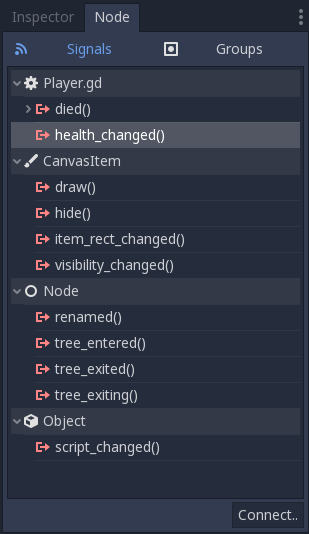
We're connecting to the health_changed signal
Select health_changed and click on the Connect button in the bottom
right corner to open the Connect Signal window. On the left side you can
pick the node that will listen to this signal. Select the GUI node.
The right side of the screen lets you pack optional values with the
signal. We already took care of it in Player.gd. In general I
recommend not to add too many arguments using this window as they're
less convenient than doing it from the code.
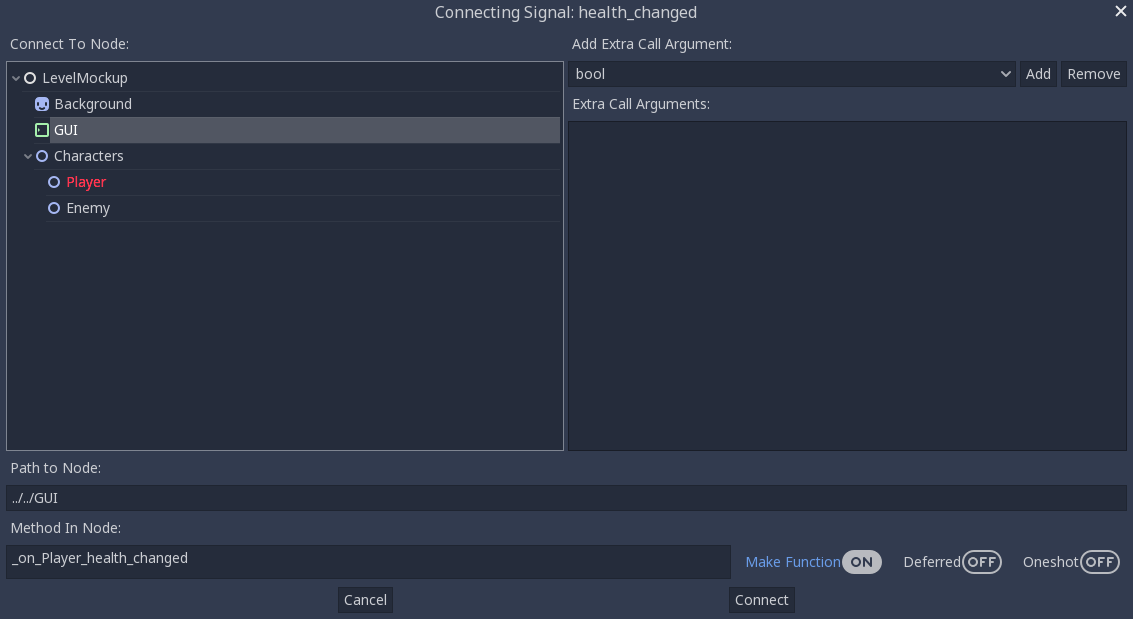
The Connect Signal window with the GUI node selected
Tip
You can optionally connect nodes from the code. However doing it from the editor has two advantages:
Godot can write new callback functions for you in the connected script
An emitter icon appears next to the node that emits the signal in the Scene dock
At the bottom of the window you will find the path to the node you
selected. We're interested in the second row called "Method in Node".
This is the method on the GUI node that gets called when the signal
is emitted. This method receives the values sent with the signal and
lets you process them. If you look to the right, there is a "Make
Function" radio button that is on by default. Click the connect button
at the bottom of the window. Godot creates the method inside the GUI
node. The script editor opens with the cursor inside a new
_on_Player_health_changed function.
Note
When you connect nodes from the editor, Godot generates a
method name with the following pattern: _on_EmitterName_signal_name.
If you wrote the method already, the "Make Function" option will keep
it. You may replace the name with anything you'd like.

Godot writes the callback method for you and takes you to it
Inside the parentheses after the function name, add a player_health
argument. When the player emits the health_changed signal, it will send
its current health alongside it. Your code should look like:
func _on_Player_health_changed(player_health):
    pass
public void OnPlayerHealthChanged(int playerHealth)
{
}
Note
The engine does not convert PascalCase to snake_case, for C# examples we'll be using PascalCase for method names & camelCase for method parameters, which follows the official C# naming conventions.

In Player.gd, when the Player emits the health_changed signal, it also sends its health value
Inside _on_Player_health_changed, let's call a second function called
update_health and pass it the player_health variable.
Note
We could directly update the health value on LifeBar and Number. There are two reasons to use this method instead:
The name makes it clear for our future selves and teammates that when the player took damage, we update the health count on the GUI
We will reuse this method a bit later
Create a new update_health method below _on_Player_health_changed.
It takes a new_value as its only argument:
func update_health(new_value):
    pass
public void UpdateHealth(int health)
{
}
This method needs to:
set the
Numbernode'stexttonew_valueconverted to a stringset the
TextureProgress'svaluetonew_value
func update_health(new_value):
    number_label.text = str(new_value)
    bar.value = new_value
public void UpdateHealth(int health)
{
    _numberLabel.Text = health.ToString();
    _bar.Value = health;
}
Tip
str is a built-in function that converts about any value to
text. Number's text property requires a string, so we can't
assign it to new_value directly
Also call update_health at the end of the _ready function to
initialize the Number node's text with the right value at the
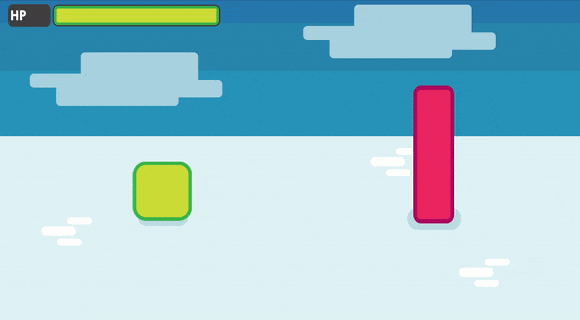
start of the game. Press F5 to test the game: the life bar updates with
every attack!
Both the Number node and the TextureProgress update when the Player takes a hit
Animate the loss of life with the Tween node
Our interface is functional, but it could use some animation. That's a
good opportunity to introduce the Tween node, an essential tool to
animate properties. Tween animates anything you'd like from a start
to an end state over a certain duration. For example, it can animate the
health on the TextureProgress from its current level to the
Player's new health when the character takes damage.
The GUI scene already contains a Tween child node stored in the
tween variable. Let's now use it. We have to make some changes to
update_health.
We will use the Tween node's interpolate_property method. It
takes seven arguments:
A reference to the node who owns the property to animate
The property's identifier as a string
The starting value
The end value
The animation's duration in seconds
The type of the transition
The easing to use in combination with the equation.
The last two arguments combined correspond to an easing equation. This controls how the value evolves from the start to the end point.
Click the script icon next to the GUI node to open it again. The
Number node needs text to update itself, and the Bar needs a
float or an integer. We can use interpolate_property to animate a
number, but not to animate text directly. We're going to use it to
animate a new GUI variable named animated_health.
At the top of the script, define a new variable, name it
animated_health, and set its value to 0. Navigate back to the update_health method and
clear its content. Let's animate the animated_health value. Call the
Tween node's interpolate_property method:
func update_health(new_value):
    tween.interpolate_property(self, "animated_health", animated_health, new_value, 0.6)
// Add this to the top of your class.
private float _animatedHealth = 0;

public void UpdateHealth(int health)
{
    _tween.InterpolateProperty(this, "_animatedHealth", _animatedHealth, health, 0.6f, Tween.TransitionType.Linear,
        Tween.EaseType.In);
}
Let's break down the call:
tween.interpolate_property(self, "animated_health", ...
We target animated_health on self, that is to say the GUI
node. Tween's interpolate_property takes the property's name as a
string. That's why we write it as "animated_health".
... _health", animated_health, new_value, 0.6 ...
The starting point is the current value the bar's at. We still have to
code this part, but it's going to be animated_health. The end point
of the animation is the Player's health after the
health_changed: that's new_value. And 0.6 is the animation's
duration in seconds.
The animation will not play until we activated the Tween node with
tween.start(). We only have to do this once if the node is not
active. Add this code after the last line:
if not tween.is_active():
    tween.start()
if (!_tween.IsActive())
{
    _tween.Start();
}
Note
Although we could animate the health property on the Player, we shouldn't. Characters should lose life instantly when they get hit. It makes it a lot easier to manage their state, like to know when one died. You always want to store animations in a separate data container or node. The tween node is perfect for code-controlled animations. For hand-made animations, check out AnimationPlayer.
Assign the animated_health to the LifeBar
Now the animated_health variable animates but we don't update the
actual Bar and Number nodes anymore. Let's fix this.
So far, the update_health method looks like this:
func update_health(new_value):
    tween.interpolate_property(self, "animated_health", animated_health, new_value, 0.6)
    if not tween.is_active():
        tween.start()
public void UpdateHealth(int health)
{
    _tween.InterpolateProperty(this, "_animatedHealth", _animatedHealth, health, 0.6f, Tween.TransitionType.Linear,
        Tween.EaseType.In);

    if(!_tween.IsActive())
    {
        _tween.Start();
    }
}
In this specific case, because number_label takes text, we need to
use the _process method to animate it. Let's now update the
Number and TextureProgress nodes like before, inside of
_process:
func _process(delta):
    number_label.text = str(animated_health)
    bar.value = animated_health
public override void _Process(float delta)
{
    _numberLabel.Text = _animatedHealth.ToString();
    _bar.Value = _animatedHealth;
}
Note
number_label and bar are variables that store references to the Number and TextureProgress nodes.
Play the game to see the bar animate smoothly. But the text displays decimal number and looks like a mess. And considering the style of the game, it'd be nice for the life bar to animate in a choppier fashion.
The animation is smooth, but the number is broken
We can fix both problems by rounding out animated_health. Use a
local variable named round_value to store the rounded
animated_health. Then assign it to number_label.text and
bar.value:
func _process(delta):
    var round_value = round(animated_health)
    number_label.text = str(round_value)
    bar.value = round_value
public override void _Process(float delta)
{
    var roundValue = Mathf.Round(_animatedHealth);
    _numberLabel.Text = roundValue.ToString();
    _bar.Value = roundValue;
}
Try the game again to see a nice blocky animation.
By rounding out animated_health, we kill two birds with one stone
Tip
Every time the player takes a hit, the GUI calls
_on_Player_health_changed, which in turn calls update_health. This
updates the animation and the number_label and bar follow in
_process. The animated life bar that shows the health going down gradually
is a trick. It makes the GUI feel alive. If the Player takes 3 damage,
it happens in an instant.
Fade the bar when the Player dies
When the green character dies, it plays a death animation and fades out.
At this point, we shouldn't show the interface anymore. Let's fade the
bar as well when the character died. We will reuse the same Tween
node as it manages multiple animations in parallel for us.
First, the GUI needs to connect to the Player's died signal
to know when it died. Press F1 to jump back to the 2D
Workspace. Select the Player node in the Scene dock and click on the
Node tab next to the Inspector.
Find the died signal, select it, and click the Connect button.
The signal should already have the Enemy connected to it
In the Connecting Signal window, connect to the GUI node again. The
Path to Node should be ../../GUI and the Method in Node should show
_on_Player_died. Leave the Make Function option on and click Connect
at the bottom of the window. This will take you to the GUI.gd file
in the Script Workspace.

You should get these values in the Connecting Signal window
Note
You should see a pattern by now: every time the GUI needs a new piece of information, we emit a new signal. Use them wisely: the more connections you add, the harder they are to track.
To animate a fade on a UI element, we have to use its modulate
property. modulate is a Color that multiplies the colors of our
textures.
Note
modulate comes from the CanvasItem class, All 2D and UI nodes inherit from it. It lets you toggle the visibility of the node, assign a shader to it, and modify it using a color with modulate.
modulate takes a Color value with 4 channels: red, green, blue
and alpha. If we darken any of the first three channels it darkens the
interface. If we lower the alpha channel, our interface fades out.
We're going to tween between two color values: from a white with an
alpha of 1, that is to say at full opacity, to a pure white with an
alpha value of 0, completely transparent. Let's add two variables at
the top of the _on_Player_died method and name them start_color
and end_color. Use the Color() constructor to build two
Color values.
func _on_Player_died():
    var start_color = Color(1.0, 1.0, 1.0, 1.0)
    var end_color = Color(1.0, 1.0, 1.0, 0.0)
public void OnPlayerDied()
{
    var startColor = new Color(1.0f, 1.0f, 1.0f);
    var endColor = new Color(1.0f, 1.0f, 1.0f, 0.0f);
}
Color(1.0, 1.0, 1.0) corresponds to white. The fourth argument,
respectively 1.0 and 0.0 in start_color and end_color,
is the alpha channel.
We then have to call the interpolate_property method of the
Tween node again:
tween.interpolate_property(self, "modulate", start_color, end_color, 1.0)
_tween.InterpolateProperty(this, "modulate", startColor, endColor, 1.0f, Tween.TransitionType.Linear,
  Tween.EaseType.In);
This time, we change the modulate property and have it animate from
start_color to the end_color. The duration is of one second,
with a linear transition. Here's the complete _on_Player_died
method:
func _on_Player_died():
    var start_color = Color(1.0, 1.0, 1.0, 1.0)
    var end_color = Color(1.0, 1.0, 1.0, 0.0)
    tween.interpolate_property(self, "modulate", start_color, end_color, 1.0)
public void OnPlayerDied()
{
    var startColor = new Color(1.0f, 1.0f, 1.0f);
    var endColor = new Color(1.0f, 1.0f, 1.0f, 0.0f);

    _tween.InterpolateProperty(this, "modulate", startColor, endColor, 1.0f, Tween.TransitionType.Linear,
        Tween.EaseType.In);
}
And that is it. You may now play the game to see the final result!
The final result. Congratulations for getting there!
Note
Using the exact same techniques, you can change the color of the bar when the Player gets poisoned, turn the bar red when its health drops low, shake the UI when they take a critical hit... the principle is the same: emit a signal to forward the information from the Player to the GUI and let the GUI process it.